background image

Using the position selector

One way to assure a more natural sound is to

accurately position the stereo image, putting

you right in the center of the sound field. The

position selector function lets you automati-

cally adjust the speaker output levels and in-

serts a delay time to match the number and

position of occupied seats.

1 Touch A.MENU and AUDIO and then

touch POSITION.

2 Touch

c

/

d

/

a

/

b

to select a listening po-

sition.

Touch one of these,

c

/

d

/

a

/

b

, to select a lis-

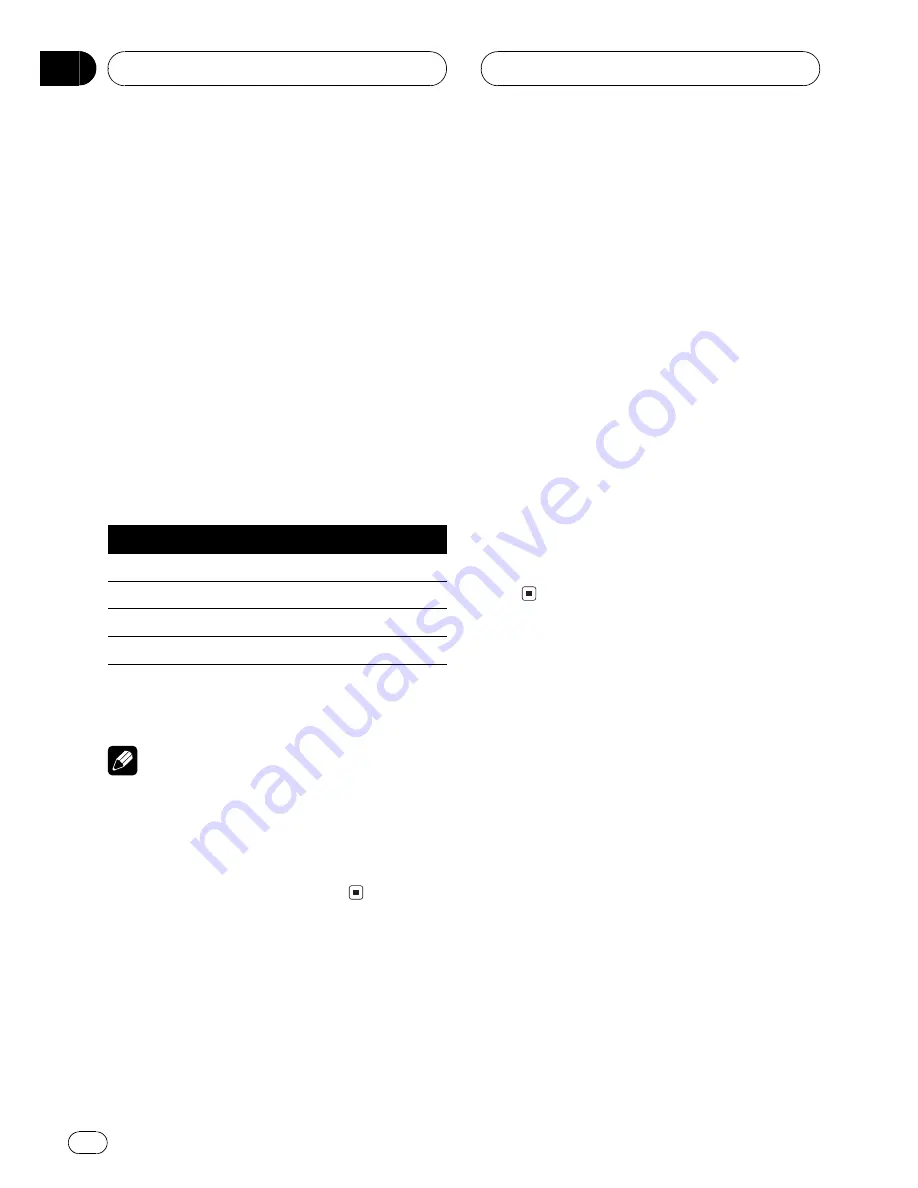
tening position as listed in the table.

Key

Display

Position

c

FL

Front seat left

d

FR

Front seat right

a

FRONT

Front seats

b

ALL

All seats

#

To cancel the selected listening position,

touch the same key again.

Note

When you make adjustments for listening posi-
tion, the speakers are automatically set for appro-
priate output levels. You can tailor them if you
want as discussed under the heading of

Adjust-

ing the speaker output levels using a test tone

or

Adjusting the speaker output levels

.

Using balance adjustment

You can select a fader/balance setting that

provides an ideal listening environment in all

occupied seats.

1 Touch A.MENU and AUDIO and then

touch FADER/BALANCE.

2 Touch

a

or

b

to adjust front/rear

speaker balance.

Each time you touch

a

or

b

it moves the

front/rear speaker balance towards the front or

the rear.

FAD F:25

FAD R:25

is displayed as the front/

rear speaker balance moves from front to rear.

#

FAD FR: 0

is the proper setting when only two

speakers are used.

3 Touch

c

or

d

to adjust left/right speak-

er balance.

Each time you touch

c

or

d

it moves the left/

right speaker balance towards the left or the

right.

BAL L:25

BAL R:25

is displayed as the left/

right speaker balance moves from left to

right.

Adjusting source levels

SLA (source level adjustment) lets you adjust

the volume level of each source to prevent ra-

dical changes in volume when switching be-

tween sources.

!

Settings are based on the FM tuner volume

level, which remains unchanged.

1 Compare the FM tuner volume level

with the level of the source you wish to ad-

just.

2 Touch A.MENU and AUDIO and then

touch SLA.

3 Touch

a

or

b

to adjust the source vo-

lume.

Each time you touch

a

or

b

it increases or de-

creases the source volume.

Audio Adjustments

En

70

Section

14

Содержание AVH-P7650DVD

Страница 1: ...Operation Manual 7 inch Wide Fully Motorized LCD Color Display with 5 Channel High Power DVD VCD CD Receiver AVH P7650DVD English ...

Страница 2: ...eration 19 Opening and closing the LCD panel 20 Changing the wide screen mode 21 Adjusting the picture adjustment 22 Protecting your unit from theft 23 Tuner Listening to the radio 25 Introduction of advanced tuner operation 26 Storing and recalling broadcast frequencies 26 Tuning in strong signals 26 Storing the strongest broadcast frequencies 27 Playing DVD audio discs Listening to a DVD audio 2...

Страница 3: ...n a random order 47 Scanning tracks of a CD 47 Pausing CD playback 48 Entering disc titles 48 Using CD TEXT functions 49 Playing MP3 Listening to MP3 50 Stopping playback 51 Introduction of advanced MP3 operation 51 Repeating play 52 Playing tracks in a random order 52 Scanning folders and tracks 52 Pausing MP3 playback 52 Displaying text information on MP3 discs 53 Scrolling text information in t...

Страница 4: ...ngle icon display 80 Setting the aspect ratio 80 Setting the parental lock 80 To play back bonus groups 81 Setting remote control code type 81 Initial Settings Adjusting initial settings 83 Setting the FM tuning step 83 Setting the AM tuning step 83 Switching the warning tone 84 Switching the auxiliary setting 84 Correcting distorted sound 84 Switching the sound muting attenuation 84 Switching the...

Страница 5: ...vered by warranty 8 Please remember to wear your seat belt at all times while operating your vehicle If you are ever in an accident your injuries can be considerably more severe if your seat belt is not properly buckled To ensure safe driving WARNING LIGHT GREEN LEAD AT POWER CON NECTOR IS DESIGNED TO DETECT PARKED STATUS AND MUST BE CON NECTED TO THE POWER SUPPLY SIDE OF THE PARKING BRAKE SWITCH ...

Страница 6: ...ch the DVD or TV while driving To avoid battery exhaustion Be sure to run the vehicle engine while using this unit Using this unit without running the engine can result in battery drainage WARNING Do not use with vehicles that do not feature an ACC position Precautions En 6 Section 01 ...

Страница 7: ...andy as a reference for op erating procedures and precautions Always keep the volume low enough so that you can hear sounds from outside the vehicle Protect this unit from moisture If the battery is disconnected or discharged the preset memory will be erased and must be reprogrammed If this unit does not operate properly contact your dealer or nearest authorized Pioneer Ser vice Station Playable d...

Страница 8: ...video mode and DVD RW video mode Video CDs featuring PBC compatibility It is possible to play back Video CDs featuring PBC playback control CD playback Music CD CD R CD RW playback is possible MP3 file playback You can play back MP3 files recorded on CD ROM CD R CD RW ISO9660 Level 1 Level 2 standard recordings Supply of this product only conveys a li cense for private non commercial use and does ...

Страница 9: ...ration and is intended for home and other limited viewing uses only unless otherwise authorized by Macrovision Corporation Reverse engineering or disassembly is prohibited To protect the LCD screen Do not allow direct sunlight to fall on the display when this unit is not being used Extended exposure to direct sunlight can result in LCD screen malfunction due to the resulting high temperatures When...

Страница 10: ...sys tems 2 Indicates the number of subtitle lan guages 3 Indicates the number of viewing an gles 16 9 LB Indicates the picture size aspect ratio screen width to height ratio type 3 4 ALL Indicates the number of the region where playback is possible When an operation is prohibited When you are watching a DVD and attempt to perform an operation it may not be performed because of the programming on t...

Страница 11: ...an and install a new battery When disposing of used batteries please comply with governmental regulations or en vironmental public institutions rules that apply in your country area Using the remote control Point the remote control in the direction of the front panel to operate The remote control may not function prop erly in direct sunlight Important Do not store the remote control in high tem pe...

Страница 12: ...Press to display the clock for eight seconds when the LCD panel is closed 5 OPEN CLOSE button Press to open or close the LCD panel 6 ENTERTAINMENT button Press to switch between the background displays 7 WIDE button Press to select a desired mode for enlarging a 4 3 picture to a 16 9 one 8 MENU button Press and hold to display the picture adjust ment menu 9 RESET button Press to return to the fact...

Страница 13: ...LCD panel angle g ATT button Press to quickly lower the volume level by about 90 Press once more to return to the original volume level h BACK button Press to return to the previous display i REAR ON button Press to switch between the video sources such as DVD or AV on rear display j Disc loading slot Insert a disc to play k SOURCE button This unit is turned on by selecting a source Press to cycle...

Страница 14: ...ontrols Also used for controlling functions 6 Remote control operation mode switch Switch the operation mode between AVH DVD and TV modes Normally set to AVH AVH For common operation of this unit DVD Only for DVD player operation TV Only for TV tuner operation For details refer to Using the remote control operation mode switch on the next page 7 BACK button Press to return to the previous display ...

Страница 15: ... to change the audio language during DVD playback n RETURN button Press to display the PBC playback control menu during PBC playback o MENU button Press to display the DVD menu during DVD playback p TOP MENU TOP M button Press to return to the top menu during DVD playback Using the remote control operation mode switch There are three remote control operation modes on the remote control AVH mode op...

Страница 16: ...tch the TV picture on the rear display inde pendently To operate the TV on the rear dis play independently switch the mode to TV In this case the joystick operation is changed for TV For details concerning operation refer to the TV tuner s operation manuals When you want to operate the follow ing functions only on the rear display switch the mode to TV When performing manual or seek tuning by movi...

Страница 17: ...input DVD built in DVD player S DVD DVD player multi DVD player M CD multi CD player EXT1 external unit 1 EXT2 ex ternal unit 2 AUX AUX Notes In the following cases the sound source will not change When there is no unit corresponding to the selected source connected to this unit When there is no disc in the unit When there is no disc in the DVD player When there is no magazine in the multi CD play...

Страница 18: ...s not displayed you can display it by touching the screen When using the button press SOURCE and hold until the unit turns off Using the rear display You can watch the video sources such as DVD or AV on rear display independently of front display To watch a DVD Video CD on the rear dis play only switch the operation mode on the remote control to DVD And you can oper ate the DVD Video CD playback o...

Страница 19: ... is not set to VIDEO refer to page 86 Touch panel key basic operation Activating the touch panel keys 1 1 Touch panel keys Touch to do various operations 1 Touch the screen to activate the touch panel keys corresponding to each source The touch panel keys appear on the display To go to the next group of touch panel keys touch d 2 Touch ESC to hide the touch panel keys You can also hide the touch p...

Страница 20: ...the menu by using the joystick You can also perform most of the menu items by using the joystick Switch the remote control operation mode to AVH to operate the menu by using the joystick on the remote control Refer to page 15 1 Click the joystick during display of each source to display MENU MENU appears on the display 2 Move the joystick up or down and then click it to display the function names ...

Страница 21: ...nel angle be sure to press ANGLE Forcibly adjusting the LCD panel by hand may damage it Press ANGLE to adjust the LCD panel to an easily viewable angle The LCD panel angle continues changing as long as you press ANGLE and hold The adjusted LCD panel angle will be memor ized and automatically returned to the next time the LCD panel is opened Turning the LCD panel horizontal When the LCD panel is up...

Страница 22: ...ure is always FULL Adjusting the picture adjustment You can adjust BRIGHT brightness CONTRAST contrast COLOR color and HUE hue for each source and rear view cam era The adjustments of BRIGHT and CONTRAST are stored separately for light ambient daytime and dark ambient night time A sun or moon is displayed to the left of BRIGHT and CONTRAST respec tively as the ambient light sensor deter mines brig...

Страница 23: ...Adjust the brightness for dark ambient light nighttime 3 Touch c or d to adjust the brightness Each time you touch c or d it moves red to wards the left or the right The level indicates the brightness of the screen being adjusted The farther red moves to the right the brighter the screen 4 Touch ESC to hide the touch panel keys Note The icons indicating the current ambient bright ness used for adj...

Страница 24: ...ght side of the front panel and slowly pull it outward Take care not to grip it too tightly or to drop the front panel and protect it from contact with water or other fluids to prevent perma nent damage Attaching the front panel Replace the front panel by holding it upright to the unit and clipping it securely into the mounting hooks Basic Operations En 24 Section 04 ...

Страница 25: ...UNER to select the tuner When the source icon is not displayed you can display it by touching the screen 2 Touch the screen to display the touch panel keys 3 Touch BAND to select a band Touch BAND repeatedly until the desired band is displayed FM1 FM2 FM3 for FM or AM 4 To perform manual tuning briefly touch c or d The frequencies move up or down step by step You can also perform manual tuning by ...

Страница 26: ...e preset number stops flashing The number you have touched will flash in the preset number indicator and then remain lit The selected radio station frequency has been stored in memory The next time you touch the same preset tun ing key the radio station frequency is recalled from memory When the touch panel keys are not displayed you can display them by touching the screen When P 1 P 6 are not dis...

Страница 27: ... six strongest broadcast fre quencies under preset tuning keys P 1 P 6 and once stored there you can tune in to those frequencies with the touch of a key 1 Touch A MENU and FUNCTION and then touch BSM 2 Touch a to turn BSM on BSM begins to flash While BSM is flashing the six strongest broadcast frequencies will be stored under preset tuning keys P 1 P 6 in order of their signal strength When finis...

Страница 28: ...he unit Refer to page 18 With some discs a menu may be displayed Refer to Operating the DVD menu on the next page 2 Touch the screen to display the touch panel keys 3 To skip back or forward to another track touch o or p Touching p skips to the start of the next track Touching o once skips to the start of the current track Touching it again will skip to the previous track Track numbers are display...

Страница 29: ...peration mode to DVD the joystick on the remote control can also operate the DVD menu Refer to page 15 You cannot operate the DVD menu from the joystick on the head unit The way to display the menu differs depending on the disc Skipping back or forward to another group To skip back or forward to another group touch a or b Touching a skips to the start of the next group Touching b skips to the star...

Страница 30: ...C disc repeat GROUP group repeat and TRACK track repeat 1 Touch A MENU and FUNCTION and then touch REPEAT 2 Touch any of the following touch panel keys to select the repeat range DISC Play through the current disc GROUP Repeat just the current group TRACK Repeat just the current track Note If you perform track search or fast forward re verse the repeat play range changes to DISC Playing tracks in ...

Страница 31: ...oes to the next still picture Touching PAGE returns to the previous still picture You can also go to the next still picture by touching r during playback To return to the initial still picture touch HOME If you switch the remote control operation mode to DVD the joystick on the remote control can also browse still pictures Refer to page 15 You cannot browse still pictures from the joy stick on the...

Страница 32: ...nput the desired num ber To select 3 touch 3 To select 10 touch 1 and 0 in that order To select 23 touch 2 and 3 in that order To cancel the inputted numbers touch C You can also input the desired number by using the joystick and 0 9 3 While the inputted number is dis played touch ENTER This starts playback from the selected group or track Notes You can also perform the same operations using SEARC...

Страница 33: ...playback Multi subtitle With DVDs featuring multi subtitle recordings you can switch between subtitle languages during playback Touch SUB T during playback Each time you touch SUB T it switches be tween subtitle languages Notes The number in the 2 mark on a DVD s pack age indicates the number of recorded subtitle languages With some DVDs switching between subtitle languages may only be possible us...

Страница 34: ...range refers to the difference be tween the largest and softest sounds The dy namic range control compresses this difference so that you can clearly hear sounds even at low volume levels The dynamic range control is effective only on Dolby Digital sounds The dynamic range control may produce lit tle effect on certain discs 1 Touch A MENU and FUNCTION and then touch NEXT 2 Touch D R C 3 Touch a to ...

Страница 35: ...unit you cannot se lect DVD DVD player Insert a disc in the unit Refer to page 18 With some discs a menu may be displayed Refer to Operating the DVD menu on the next page 2 Touch the screen to display the touch panel keys 3 To skip back or forward to another chapter touch o or p Touching p skips to the start of the next chapter Touching o once skips to the start of the current chapter Touching it ...

Страница 36: ...ouching the screen 2 Touch a b c or d to select the desired menu item 3 Touch ENTER Playback starts from the selected menu item If you switch the remote control operation mode to DVD the joystick on the remote control can also operate the DVD menu Refer to page 15 You cannot operate the DVD menu from the joystick on the head unit The way to display the menu differs depending on the disc Skipping b...

Страница 37: ... repeat 1 Touch A MENU and FUNCTION and then touch REPEAT 2 Touch any of the following touch panel keys to select the repeat range DISC Play through the current disc TITLE Repeat just the current title CHAPTER Repeat just the current chapter Note If you perform chapter search or fast forward re verse the repeat play range changes to DISC Pausing DVD video playback Pause lets you temporarily stop d...

Страница 38: ... for a desired scene starting playback from a specified time You can use the search function to search for a desired scene by specifying a title or chapter and the time search function to specify the time on a disc at which play starts Chapter search and time search are not possible when disc playback has been stopped 1 Touch SEARCH and then touch TITLE title CHAPTER chapter or TIME time 2 Touch 0...

Страница 39: ...ith some DVDs switching between lan guages audio systems may only be possible using a menu display You can also switch between languages audio systems using DVD SETUP MENU For de tails refer to Setting the audio language on page 79 Display indications such as Dolby D and 5 1ch indicate the audio system recorded on the DVD Depending on the setting playback may not be with the same audio system as t...

Страница 40: ...ngle scenes The number in the 3 mark indicates the number of angles from which scenes were shot Touching ANGLE during fast forward fast re verse pause or slow motion playback returns you to normal playback Using the dynamic range control The dynamic range refers to the difference be tween the largest and softest sounds The dy namic range control compresses this difference so that you can clearly h...

Страница 41: ...nu item Playback starts from the selected menu item When the menu is two or more pages long touch o or p to switch between displays You can play a disc without using a menu without PBC playback Refer to Specifying track on page 45 To return to PBC playback stop play back and touch f You can display the menu by pressing RETURN during PBC playback For details refer to the instructions provided with ...

Страница 42: ...ate a menu Switch the remote control operation mode to DVD and then press 0 10 to select the desired menu item Playback starts from the selected menu item When the menu is two or more pages long touch o or p to switch between displays You can play a disc without using a menu without PBC playback Refer to Specifying track on page 45 To return to PBC playback stop play back and touch f You can displ...

Страница 43: ... play ranges for the Video CD playback TRACK track repeat and DISC disc repeat During PBC playback of Video CDs this function cannot be operated 1 Touch A MENU and FUNCTION and then touch REPEAT 2 Touch either of the following touch panel keys to select the repeat range DISC Repeat the current disc TRACK Repeat just the current track Note If you perform track search or fast forward re verse the re...

Страница 44: ...motion playback is not possible With some discs images may be unclear dur ing slow motion playback Reverse slow motion playback is not possi ble Searching for a desired scene starting playback from a specified time You can use the search function to search for a desired scene by specifying a track and the time search function to specify the time on a disc at which play starts During PBC playback o...

Страница 45: ...is stopped Track number is displayed for eight seconds and playback starts from the selected track To select 3 press 3 To select 10 press 10 and 0 in that order To select 23 press 10 10 and 3 in that order Note With some discs the icon may be displayed and operation may not be possible Selecting audio output You can switch between stereo and monaural audio output Press AUDIO during playback Press ...

Страница 46: ...ing p skips to the start of the next track Touching o once skips to the start of the current track Touching it again will skip to the previous track Track numbers are displayed for eight sec onds You can also skip back or forward to another track by moving the joystick left or right 4 Touch d to display m and n Touch d until m and n appear in the dis play 5 To perform fast forward or reverse keep ...

Страница 47: ...playback display Repeating play Repeat play lets you hear the same track over again 1 Touch A MENU and FUNCTION and then touch REPEAT 2 Touch either of the following touch panel keys to select the repeat range DISC Repeat the current disc TRACK Repeat just the current track Notes If you perform track search or fast forward re verse repeat play is automatically cancelled When playing discs with MP3...

Страница 48: ... cannot switch to TITLE EDIT The disc title will have already been recorded on a CD TEXT disc If no title has been entered for the currently playing disc NO TITLE is displayed 1 Play the CD that you want to enter a title for 2 Touch A MENU and FUNCTION and then touch NEXT 3 Touch TITLE EDIT 4 Touch ABC to select the desired charac ter type Touch ABC repeatedly to switch between the following chara...

Страница 49: ...ch DISP Touch DISP repeatedly to switch between the following settings DiscTitle disc title DiscArtist disc artist name TrackTitle track title TrackArtist track artist name If specific information has not been recorded on a CD TEXT disc NO XXXX will be displayed e g NO ARTIST Scrolling titles in the display This unit can display the first 20 letters only of DiscTitle DiscArtist TrackTitle and Trac...

Страница 50: ... or forward to another track touch o or p Touching p skips to the start of the next track Touching o once skips to the start of the current track Touching it again will skip to the previous track Track numbers are displayed for eight sec onds You can also skip back or forward to another track by moving the joystick left or right 4 Touch d to display a b m and n Touch d until a b m and n appear in ...

Страница 51: ...f you do not use the touch panel keys within 30 seconds they will be hidden auto matically Stopping playback Touch g When you stop MP3 playback by touching g that location on the disc is memorized enabling playback from that point when you play the disc again To play back the disc again touch f Introduction of advanced MP3 operation 1 1 Function display Shows the function names Touch A MENU and th...

Страница 52: ...Repeating play on this page 2 Touch A MENU and FUNCTION and then touch RANDOM 3 Touch a to turn random play on Tracks will play in a random order within the previously selected FOLDER or DISC ranges To turn random play off touch b Scanning folders and tracks While you are using FOLDER the beginning of each track in the selected folder plays for about 10 seconds When you are using DISC the beginnin...

Страница 53: ...0 letters only of FolderName FileName TrackTitle ArtistName AlbumTitle and Comment When the recorded information is longer than 20 letters you can scroll the text to the left so that the rest of the text information can be seen Keep touching DISP until the text infor mation begins to scroll to the left The rest of the text information will appear in the display Selecting tracks from the file name ...

Страница 54: ...ay 07 12 When 01 06 and 07 12 are not displayed you can display them by touching DISP You can also sequentially select a disc by using a b 4 To skip back or forward to another track touch c or d Touching d skips to the start of the next track Touching c once skips to the start of the cur rent track Touching again will skip to the pre vious track You can also skip back or forward to another track b...

Страница 55: ... disc repeat 1 Touch A MENU and FUNCTION and then touch REPEAT 2 Touch j to select the repeat range Touch j repeatedly until the desired repeat range appears in the display MULTI CD REPEAT Repeat all discs in the multi CD player TRACK REPEAT Repeat just the current track DISC REPEAT Repeat the current disc You can also select the repeat range by mov ing the joystick left or right Notes If you sele...

Страница 56: ...use off touch b Using ITS playlists ITS instant track selection lets you make a playlist of favorite tracks from those in the multi CD player magazine After you have added your favorite tracks to the playlist you can turn on ITS play and play just those selec tions Creating a playlist with ITS programming You can use ITS to enter and play back up to 99 tracks per disc up to 100 discs with the disc...

Страница 57: ...n ITS play on Refer to Playback from your ITS playlist on this page 2 Touch A MENU and FUNCTION and then touch NEXT 3 Touch ITS MEMORY 4 Touch c or d to select the desired track 5 Touch b to erase the track from your ITS playlist The currently playing selection is erased from your ITS playlist and playback of the next track from your ITS playlist begins If there are no tracks from your playlist in...

Страница 58: ...case You can select to input numbers and symbols by touching 012 You can also switch character types by click ing the joystick 5 Touch a or b to select a letter of the al phabet Each time you touch a it will display a letter of the alphabet in A B C X Y Z numbers and symbols in 1 2 3 order Each time you touch b it will display a letter in the reverse order such as Z Y X C B A 6 Touch d to move the...

Страница 59: ...s in the display This unit can display the first 20 letters only of DiscTitle DiscArtist TrackTitle and TrackArtist When the recorded information is longer than 20 letters you can scroll the text to the left so that the rest of the title can be seen Keep touching DISP until the title be gins to scroll to the left The rest of the title will appear in the display Selecting tracks from the track titl...

Страница 60: ...BE NO COMPRESSION is displayed when you attempt to select it 2 Touch ab to select your favorite set ting Touch ab repeatedly to switch between the following settings OFF COMP1 COMP2 OFF DBE1 DBE2 You can also select the desired setting by mov ing the joystick up or down Multi CD Player En 60 Section 11 ...

Страница 61: ... display it by touching the screen 2 Touch the screen to display the touch panel keys 3 Touch BAND to select a band Touch BAND repeatedly until the desired band is displayed TV1 or TV2 4 To perform manual tuning briefly touch c or d The channels move up or down step by step You can also perform manual tuning by mov ing the joystick left or right 5 To perform seek tuning keep touching c or d for ab...

Страница 62: ...er you have touched will flash in the preset number indicator and then remain lit The selected station has been stored in mem ory The next time you touch the same preset tun ing key the station is recalled from memory To switch between P 1 P 6 and P 7 P12 touch PREV or NEXT When the touch panel keys are not displayed you can display them by touching the screen When P 1 P 6 and P 7 P12 are not dis ...

Страница 63: ...tuner e g GEX P6450TVP featuring the country setting 1 Touch A MENU and FUNCTION and then touch COUNTRY 2 Touch c or d to select the country group Touch c or d until the desired country group appears in the display COUNTRY 1 CCIR channel COUNTRY 2 IN channel COUNTRY 3 CHN channel COUNTRY 4 U K channel COUNTRY 5 OIRT channel COUNTRY 6 AUSTRALIA channel TV tuner En 63 Section 12 TV tuner ...

Страница 64: ... Play time indicator Shows the elapsed playing time of the cur rent chapter track 6 Disc list display Shows the list of the disc type or the disc title when using a multi DVD player 7 Repeat indicator Shows the selected repeat range 1 Touch the source icon and then touch S DVD to select the DVD player When the source icon is not displayed you can display it by touching the screen 2 Touch the scree...

Страница 65: ... AVH Refer to page 15 You can also select a disc by pressing BACK or ENTERTAINMENT on the remote control when the remote control operation mode is switched to DVD Introduction of advanced DVD player operation 1 1 Function display Shows the function names Touch A MENU and then touch FUNCTION to display the function names The function names are displayed and oper able ones are highlighted When A MEN...

Страница 66: ...dom order To turn random play off touch b Scanning tracks of a CD You can operate this function only during CD playback 1 Touch A MENU and FUNCTION and then touch SCAN 2 Touch a to turn scan play on The first 10 seconds of each track is played 3 When you find the desired track touch b to turn scan play off Using ITS playlists You can operate these functions only when a multi DVD player is connecte...

Страница 67: ...you can dis play it by touching the screen You can also display MENU by clicking the joystick When playing discs recorded with more than 96 kHz sampling frequency you cannot use audio functions Also equalizer curve setting POSITION AUTO EQ and AUTO TA will be can celled When playing discs recorded with more than 96 kHz sampling frequency audio is outputted from front speaker only When selecting th...

Страница 68: ... 3 CUSTOM4 Custom 4 CUSTOM1 CUSTOM2 CUSTOM3 and CUSTOM4 are adjusted equalizer curves When FLAT is selected no supplement or correction is made to the sound This is useful to check the effect of the equalizer curves by switching alternatively between FLAT and a set equalizer curve Press EQ to select the equalizer Press EQ repeatedly to switch between the fol lowing equalizers SUPER BASS S BASS POW...

Страница 69: ...ed frequency ap pears in the display 40 50 63 80 100 125 160 200 250 315 400 500 630 800 1k 1 25k 1 6k 2k 2 5k 3 15k 4k 5k 6 3k 8k 10k 12 5k Hz You can select a center frequency from among 20 frequencies for each band You can change the center frequency in 1 3 octave steps but you cannot select frequencies that have inter vals shorter than 1 octave among the center fre quencies of the three bands ...

Страница 70: ... balance setting that provides an ideal listening environment in all occupied seats 1 Touch A MENU and AUDIO and then touch FADER BALANCE 2 Touch a or b to adjust front rear speaker balance Each time you touch a or b it moves the front rear speaker balance towards the front or the rear FAD F 25 FAD R 25 is displayed as the front rear speaker balance moves from front to rear FAD FR 0 is the proper ...

Страница 71: ... function Dolby Pro Logic II supports up to 48kHz sampling rate stereo source and has no ef fect on other types of source 1 Touch A MENU and AUDIO and then touch Dolby PL II 2 Touch any of the following touch panel keys to select the desired mode MOVIE The Movie mode suitable for movie playback MUSIC The Music mode suitable for music playback MATRIX The Matrix mode for when FM radio reception is w...

Страница 72: ...to SMALL or OFF It is imperative that non installed speakers be set to OFF Set the front or rear speaker to LARGE if the speaker is capable of reproducing bass content or if no subwoofer is installed 1 Touch A MENU and AUDIO and then touch Sound Setting 2 Touch SP SET 3 Touch the speaker to be adjusted 4 Touch a or b to select the correct size for the selected speaker Each time you touch a or b it...

Страница 73: ...nd then touch Sound Setting 2 Touch SP LEVEL 3 Touch the speaker to be adjusted You cannot select speakers whose size is set at OFF 4 Touch a or b to adjust the speaker out put level Each time you touch a or b it increases or de creases the speaker output level 10 10 is displayed as the level is increased or de creased Note To adjust the speaker output levels in this mode is the same as making the...

Страница 74: ...alignment created by auto TA and EQ Refer to Auto TA and EQ auto time alignment and auto equalizing on the next page CUSTOM Adjusted time alignment that you can create for yourself OFF Turn the time alignment off ADJUSTMENT Adjust the time alignment as desired You cannot select AUTO TA if auto TA and EQ has not been carried out You cannot select ADJUSTMENT when neither FL nor FR is selected in POS...

Страница 75: ...g switched off Also cut power to car phones or portable telephones in the car or remove them from the car be fore carrying out auto TA and EQ Sounds other than the measurement tone sur rounding sounds engine sound tele phones ringing etc may prevent correct measurement of the car interior acoustic characteristics Be sure to carry out auto TA and EQ using the supplied microphone Using another micro...

Страница 76: ...t passenger seat to carry out auto TA and EQ 3 Turn the ignition switch to ON or ACC If the car s air conditioner or heater is turned on turn it off Noise from the fan in the air conditioner or heater may prevent correct auto TA and EQ Press SOURCE to turn the source on if this unit is turned off 4 Select the position for the seat on which the microphone is placed Refer to Using the position selec...

Страница 77: ...to Under standing auto TA and EQ error messages on page 93 11 Touch ESC to cancel the auto TA and EQ mode 12 Store the microphone carefully in the glove compartment Store the microphone carefully in the glove compartment or any other safe place If the microphone is subjected to direct sunlight for an extended period high temperatures may cause distortion color change or mal function Audio Adjustme...

Страница 78: ...uch ESC Note If you do not operate the DVD setup function within about 30 seconds the display is automati cally returned to the playback display Setting the subtitle language You can set a desired subtitle language If the selected subtitle language is recorded on the DVD subtitles are displayed in that language 1 Touch SETUP and LANGUAGE and then touch SUB TITLE LANGUAGE A subtitle language menu i...

Страница 79: ...can also switch the audio language by touching AUDIO during playback Refer to Changing audio language during playback Multi audio on page 39 Even if you use AUDIO to switch the audio language this does not affect the settings here Setting the menu language You can set the preferred language for dis plays of menus recorded on a disc 1 Touch SETUP and LANGUAGE and then touch MENU LANGUAGE A menu lan...

Страница 80: ... letterbox with black bands at the top and bottom of the screen PANSCAN The picture is cut short at the right and left of the screen Notes When playing discs that do not specify PANSCAN playback is with LETTER BOX even if you select PANSCAN setting Confirm whether the disc package bears the 16 9 LB mark See page 10 Some discs do not enable changing of the TV aspect For details refer to the disc s ...

Страница 81: ...ge 4 Touch c or d to select the desired level The new parental lock level is set If you forget your code number Refer to Changing the level on this page and touch C 10 times The registered code number is canceled letting you register a new one To play back bonus groups Some DVD audio discs have an extra bonus group that requires a four digit password to access See the disc packaging for details an...

Страница 82: ...to take the following procedure If you select A B mode take the following procedure and change the code type to the appropriate type 2 Press 7 and 0 on the remote control si multaneously to change the code type Initially the code type is set to A Each time you press 7 and 0 simultaneously on the re mote control the code type switches between A and B Setting up the DVD player En 82 Section 15 ...

Страница 83: ...turn to the display of each source touch ESC Setting the FM tuning step The FM tuning step employed by seek tuning can be switched between 100 kHz the preset step and 50 kHz 1 Touch A MENU and INITIAL and then touch FM STEP 2 Touch either of the following touch panel keys to select the FM tuning step 50k 50 kHz 100k 100 kHz Note If seek tuning is performed in 50 kHz steps sta tions may be tuned in...

Страница 84: ...HIGH High quality sound LOW Minimize distortion sound Switching the sound muting attenuation Sound from this system is muted or attenu ated automatically when the signal from the equipment with mute function is received The sound is turned off MUTE is displayed and no audio adjustments are possible The sound is attenuated ATT is displayed and no audio adjustments except volume control are possible...

Страница 85: ... are turned on You can turn dimmer on or off 1 Touch A MENU and INITIAL and then touch NEXT 2 Touch SUB DISPLAY DIMMER 3 Touch a to turn dimmer on To turn dimmer off touch b Resetting the audio functions You can reset all audio functions except vo lume 1 Touch A MENU and INITIAL and then touch NEXT 2 Touch AUDIO RESET 3 Touch RESET 4 Touch RESET again to reset audio func tions To cancel resetting ...

Страница 86: ... video input setting OFF No video component is connected VIDEO External video component M DVD DVD player connected with RCA cable When a DVD player is connected with an AV BUS cable do not select M DVD otherwise no picture will be displayed even if you select S DVD Setting for rear view camera CAUTION Pioneer recommends the use of a camera which outputs mirror reversed images other wise screen ima...

Страница 87: ...ch time you touch a it increases the se lected hour or minute Each time you touch b it decreases the selected hour or minute Notes You can match the clock to a time signal by touching JUST If the minute is 00 29 the minutes are rounded down e g 10 18 becomes 10 00 If the minute is 30 59 the minutes are rounded up e g 10 36 becomes 11 00 You can display the clock for eight seconds by pressing FLIP ...

Страница 88: ...ependently of front dis play Using the AUX source An IP BUS RCA Interconnector such as the CD RB20 CD RB10 sold separately lets you connect this unit to auxiliary equipment fea turing RCA output For more details refer to the IP BUS RCA Interconnector owner s man ual Selecting AUX as the source Touch the source icon and then touch AUX to select AUX as the source When the source icon is not displaye...

Страница 89: ...PICTURE1 picture 1 PICTURE2 picture 2 SPEANA spectrum analyzer LEVEL METER1 level meter 1 LEVEL METER2 level meter 2 MOVIE1 movie 1 MOVIE2 movie 2 CLOCK entertainment clock DVD DVD player AV video input Notes In the following cases the background display will not change When there is no disc in the unit When the AV video input is not set to VIDEO refer to page 86 If vehicle s parking brake is not ...

Страница 90: ... 94 The loaded disc is a type this unit cannot play Check what type the disc is Non compatible video system disc is loaded Change to a disc compatible to your video system No sounds are heard The volume level will not rise Cables are not connected correctly Connect the cables correctly The unit is performing still slow mo tion or frame by frame playback There is no sound during still slow motion o...

Страница 91: ...back Symptom Cause Action See Playback is not possible The loaded disc has a different re gion number from this unit Replace the disc with one featuring the same region number as this unit Page 8 Page 101 A parental lock message is dis played and playback is not pos sible Parental lock is on Turn parental lock off or change the level Page 80 Parental lock cannot be can celed The code number is inc...

Страница 92: ...PBC playback control menu display cannot be called up The Video CD playing does not fea ture PBC This operation is not possible with Video CDs not featuring PBC PBC is turned off Turn PBC on Page 41 Page 45 Repeat play and track time search are not possible PBC is turned on Turn PBC off Page 41 Page 45 Error messages When you contact your dealer or your nearest Pioneer Service Center be sure to re...

Страница 93: ...rophone securely into the jack Error check front SP Error check FL SP Error check FR SP Error check center SP Error check RL SP Error check RR SP Error check subwoofer The microphone cannot pick up the measuring tone of a speaker Confirm that the speakers are connected correctly Correct the input level setting of the power amp connected to the speakers Set the microphone correctly Error check nois...

Страница 94: ... use certain functions It may not be possible to play back some DVD video discs When DVD R DVD RW discs are used playback is possible only for discs which have been finalized When DVD R DVD RW discs are used playback is possible only for discs which have been recorded with the Video format video mode It is not possible to play back DVD RW discs which have been recorded with the Video Recording for...

Страница 95: ...ayed When playing discs with MP3 files and audio data CD DA such as CD EXTRA and MIXED MODE CDs both types can be played only by switching mode between MP3 and CD DA The folder selection sequence for playback and other operations becomes the writing sequence used by the writing software For this reason the expected sequence at the time of playback may not coincide with the actual playback sequence...

Страница 96: ...UTION If liquid or foreign matter should get inside this unit turn off the power immediately and consult your dealer or the nearest authorized PIONEER Service Station Do not use the unit in this condition because doing so may result in a fire electric shock or other failure If you notice smoke a strange noise or smell or any other abnormal signs from the display turn off the power immediately and ...

Страница 97: ...fe span of the small fluorescent tube used in side the display may be shortened Small black dots or white dots bright dots may appear on the LCD screen These are due to the characteristics of the LCD screen and do not indicate a problem with the display At low temperatures the LCD screen may be dark for a while after the power is turned on The LCD screen will be difficult to see if it is exposed t...

Страница 98: ...annada kn 1114 Sesotho st 1920 Azerbaijani az 0126 Kashmiri ks 1119 Sundanese su 1921 Bashkir ba 0201 Kurdish ku 1121 Swahili sw 1923 Byelorussian be 0205 Kirghiz ky 1125 Tamil ta 2001 Bulgarian bg 0207 Latin la 1201 Telugu te 2005 Bihari bh 0208 Lingala ln 1214 Tajik tg 2007 Bislama bi 0209 Laothian lo 1215 Thai th 2008 Bengali bn 0214 Lithuanian lt 1220 Tigrinya ti 2009 Tibetan bo 0215 Latvian l...

Страница 99: ...nt chan nels 1 center channel and 2 rear channels A music mode is also available for 2 channel sources in addition to the movie mode DTS This stands for Digital Theater Systems DTS is a surround system delivering multi channel audio from up to 6 independent channels Dynamic range control Dolby Digital has a function for compressing the difference between the loudest and softest sounds Dynamic rang...

Страница 100: ...ne camera at a time are transmitted to your TV Some DVDs feature scenes shot from multiple angles let ting you choose your viewing angle as desired Multi audio Multilingual dialog Some DVDs feature dialog recorded in multi ple languages Dialog in up to 8 languages can be recorded on a single disc letting you choose as desired Multi session Multi session is a recording method that al lows additiona...

Страница 101: ...on the bottom of the unit Slideshow A feature of some DVD discs in which still pic tures recorded on the disc cycle automatically while the audio is played back Title DVD video discs have high data capacity en abling recording of multiple movies on a sin gle disc If for example one disc contains three separate movies they are divided into title 1 title 2 and title 3 This lets you enjoy the conveni...

Страница 102: ...er frequency 63 80 100 125 160 200 Hz Level 10dB 1 dB step Speaker setting Time alignment 0 500 cm 2 5 cm step Level 10dB Equalizer Band 3 band Frequency 40 50 63 80 100 125 160 200 250 315 400 500 630 800 1k 1 25k 1 6k 2k 2 5k 3 15k 4k 5k 6 3k 8k 10k 12 5k Hz Gain 12dB 2 dB step Q Factor 1 2 3 6 Crossover frequency 63 80 100 125 160 200 Hz DVD Player System DVD audio DVD video Video CD CD dtsCD M...

Страница 103: ...5 dB at 65 dBf 1 kHz AM tuner Frequency range 531 1 602 kHz 9 kHz 530 1 640 kHz 10 kHz Usable sensitivity 18 µV S N 20 dB Signal to noise ratio 65 dB IEC A network Infrared remote control Wavelength 945 nm Output typ 10 mw sr per Infrared LED Note Specifications and the design are subject to pos sible modifications without notice due to im provements Additional Information En 103 Appendix Addition...

Страница 104: ... Pro Logic II 99 DTS 8 99 Dynamic range control 99 G Group 99 H Hue 22 L Language code chart 98 Linear PCM LPCM 100 M Menu language 79 MPEG 100 Multi angle 33 40 100 Multi audio 33 39 100 Multi subtitle 33 39 100 P Packed PCM 100 Parental lock 80 100 PBC playback control 41 Playback control PBC 101 R Region number 8 101 S Slideshow 101 Subtitle language 33 39 78 T Title 101 TV aspect 80 V Video CD...

Страница 105: ...RONICS AUSTRALIA PTY LTD 178 184 Boundary Road Braeside Victoria 3195 Australia TEL 03 9586 6300 PIONEER ELECTRONICS OF CANADA INC 300 Allstate Parkway Markham Ontario L3R OP2 Canada TEL 1 877 283 5901 PIONEER ELECTRONICS DE MEXICO S A de C V Blvd Manuel Avila Camacho 138 10 piso Col Lomas de Chapultepec Mexico D F 11000 TEL 55 9178 4270 HÒ ý Plø lø ð q ï µ44_13 ûq 02 2521 3588 HÒûP Plø w Î LFm à ...

Отзывы: