background image

Connecting Up

02

14

En

Using other types of video
output

This player has standard (composite),
S-Video and component video outputs (the
DV-655A (Taiwan model) has a D video
connector for component video). The main
difference between them is the quality of the
picture.
S-Video delivers a better picture than
standard composite video, while component
video gives better picture quality still. The
variety of outputs also gives you the flexibility
of connecting your particular equipment
using the best connection type available.

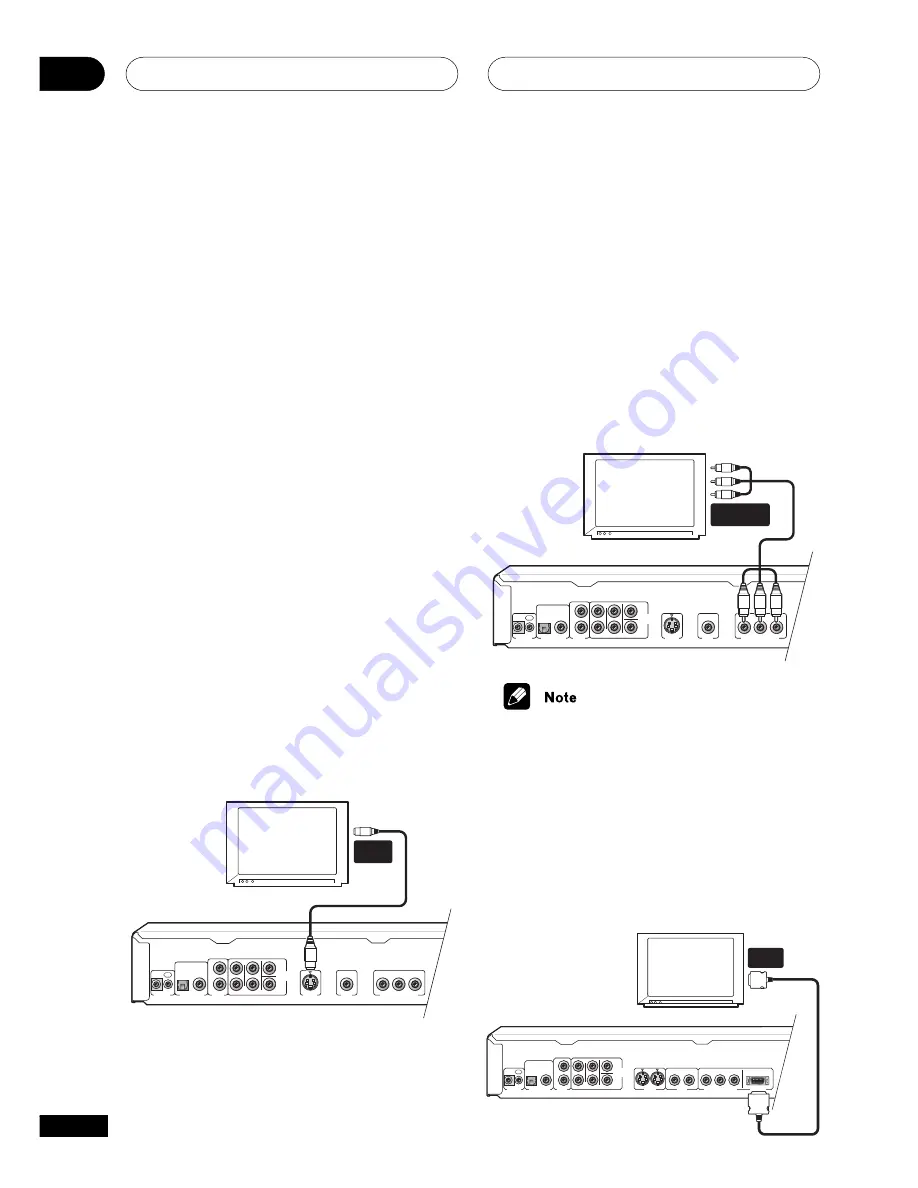
Connecting using an S-Video
output

You can use the S-Video output instead of the

VIDEO OUT

 jack to connect this player to

your TV (or other equipment).

1

Use an S-Video cable (not supplied)

to connect the S-VIDEO OUTPUT to an
S-Video input on your TV, monitor or
AV receiver.

Line up the small triangle above the jack with
the same mark on the plug before plugging
in.

DIGITAL AUDIO

OUT

AUDIO

OUT

(2ch)

CONTROL

OPTICAL

COAXIAL

IN

OUT

L

R

L

R

AUDIO OUT

(5.1ch)

CENTER

SUB

WOOFER

SURROUND

FRONT

S-VIDEO

OUT

VIDEO

OUT

COMPONENT  VIDEO OUT

P

B

P

R

Y

TV

S-VIDEO

INPUT

DV-656A

• DV-655A only: If you connect both

S-video jacks, but one of the connected
components is not S1/S2 compatible,
the automatic aspect ratio switching will
not work with either connected
component.

Connecting using the component
video output

You can use the component video output
instead of the standard video out jack to
connect this player to your TV (or other
equipment).

1

Use a component video cable (not

supplied) to connect the COMPONENT
VIDEO OUT jacks to a component video
input on your TV, monitor or AV receiver.

DIGITAL AUDIO

OUT

AUDIO

OUT

(2ch)

CONTROL

OPTICAL

COAXIAL

IN

OUT

L

R

L

R

AUDIO OUT

(5.1ch)

CENTER

SUB

WOOFER

SURROUND

FRONT

S-VIDEO

OUT

VIDEO

OUT

COMPONENT  VIDEO OUT

P

B

P

R

Y

TV

COMPONENT

VIDEO IN

DV-656A

• DV-655A: Only NTSC video is output

when set to progressive scan.

DV-655A Taiwan model only:
Connecting using the D1/D2 video
output

If your TV is equipped with a D type video
input, you can use a D video cord to connect
this player to your TV.

DIGITAL AUDIO

OUT

AUDIO

OUT

(2ch)

CONTROL

OPTICAL

COAXIAL

IN

OUT

L

R

L

R

AUDIO OUT

(5.1ch)

CENTER

SUB

WOOFER

SURROUND

FRONT

S-VIDEO

OUT

VIDEO

OUT

COMPONENT  VIDEO OUT

P

B

P

R

Y

DV-655A Taiwan model

1

1

2

2

D1/D2

VIDEO OUT

TV

D1 VIDEO

INPUT

Содержание 655A

Страница 1: ...DVD Player DV 656A DV 655A Operating Instructions DV 655A only ...

Страница 2: ...n a built in installation such as a bookcase or rack unless proper ventilation is provided or the manufacturer s instructions have been adhered to POWER SOURCES This product should be operated only from the type of power source indicated on the marking label If you are not sure of the type of power supply to your home consult your product dealer or local power company LOCATION The appliance should...

Страница 3: ...vicing to qualified service personnel For U S model IMPORTANT NOTICE The serial number for this equipment is located on the rear panel Please write this serial number on your enclosed warranty card and keep it in a secure area This is for your security H006A_En DAMAGE REQUIRING SERVICE Unplug this product from the wall outlet and refer servicing to qualified service personnel under the following c...

Страница 4: ...nterference with electric appliances such as radios and televisions use shielded cables and connec tors for connections H012_En Information to User Alteration or modifications carried out without appropriate authorization may invalidate the user s right to operate the equipment H011_En For Canadian model CAUTION TO PREVENT ELECTRIC SHOCK DO NOT USE THIS POLARIZED PLUG WITH AN EXTENSION CORD RECEPT...

Страница 5: ...net are provided for ventilation and to ensure reliable operation of the product and to protect it from overheating to prevent fire hazard the openings should never be blocked and covered with items such as newspapers table cloths curtains etc Also do not put the apparatus on the thick carpet bed sofa or fabric having a thick pile H040_En WARNING BEFORE PLUGGING IN THE UNIT FOR THE FIRST TIME READ...

Страница 6: ... 04 Getting Started Switching on 23 Let s Get Started 23 Using the on screen displays 25 Setting up with the Setup Navigator 25 Playing discs 28 Basic playback controls 28 Front panel controls 29 DVD disc menus 29 Video CD Super VCD PBC menus 30 05 Playing Discs Introduction 33 Using the Disc Navigator to browse the contents of a disc 33 Scanning discs 34 Playing in slow motion 35 Frame advance fr...

Страница 7: ...word 58 Changing your password 58 Setting changing the Parental Lock level 59 Setting changing the CountryCode 59 Bonus Group 60 Auto Disc Menu 60 Group Playback 61 DVD Playback Mode 61 SACD Playback DV 655A only 61 CD Playback 62 Speakers 62 Audio Output Mode 62 Speaker Installation 62 Channel Level 63 09 Additional Information Taking care of your player and discs 65 Handling discs 65 Storing dis...

Страница 8: ...progressive scan When connected to a progressive scan compatible TV or monitor using the compo nent video outputs you can enjoy extremely stable flicker free images with the same frame refresh rate as the original movie see page 50 Super Fine Focus digital filter This improves the quality of the video output by reducing video noise and increasing the horizonatal resolution to 540 lines see page 49...

Страница 9: ...the remote and the remote sensor on the unit The remote has a range of about 23 ft 7 meters Remote operation may become unreli able if strong sunlight or fluorescent light is shining on the unit s remote sensor Remote controllers for different devices can interfere with each other Avoid using remotes for other equipment located close to this unit Replace the batteries when you notice a fall off in...

Страница 10: ...ility This unit will play CD R and CD RW discs recorded in CD Audio Video CD or MP3 audio formatting However any other content may cause the disc not to play or create noise distortion in the output This unit cannot record CD R or CD RW discs Un finalized CD R RW discs recorded in CD Audio can be played but not all Table of Contents playing time etc will be displayed DVD R RW Compatibility This un...

Страница 11: ... with the software publisher for more detailed information DVD R RW and CD R RW software disc boxes also have additional compatibility information Titles chapters Groups and tracks DVD Video discs are generally divided into one or more titles Titles may be further subdivided into chapters Title 1 Title 2 Title 3 Chapter 1 Chapter 2 Chapter 3 Chapter 1 Chapter 1 Chapter 2 DVD Audio discs are divide...

Страница 12: ...l take a look at the Glossary starting on page 70 When connecting this player up to your TV AV receiver or other components make sure that all components are switched off and unplugged 1 CONTROL IN OUT For passing remote control signals to other Pioneer components page 17 2 DIGITAL AUDIO OUT OPTICAL COAXIAL Digital audio outputs for connection to a PCM Dolby Digital DTS and or MPEG compatible AV r...

Страница 13: ...that allows you to play discs using just the cables supplied with the player In this setup stereo audio is played through your TV This player is equipped with copy protection technology Do not connect this player to your TV via a VCR using AV cables as the picture from this player will not appear properly on your TV This player may also not be compatible with some combination TV VCRs for the same ...

Страница 14: ...NT VIDEO OUT PB PR Y TV S VIDEO INPUT DV 656A DV 655A only If you connect both S video jacks but one of the connected components is not S1 S2 compatible the automatic aspect ratio switching will not work with either connected component Connecting using the component video output You can use the component video output instead of the standard video out jack to connect this player to your TV or other...

Страница 15: ... recommend connecting this player to it using the multichannel analog outputs Doing this will ensure that you can enjoy all kinds of disc including Dolby Digital and DTS DVD Video discs as well as high sampling rate and multichannel DVD Audio and for DV 655A SACD discs 1 Connect the MULTICHANNEL AUDIO outputs on this player to the multi channel audio inputs on your AV receiver It s convenient to u...

Страница 16: ...plied to connect the OPTICAL DIGITAL OUT jack to an optical input on your AV receiver When inserting the plug the protective shutter will open and you should hear the plug click into position when fully inserted Take care not to force the plug as this may damage the shutter the cable and or the player For a coaxial connection use a coaxial cable similar to the supplied video cable to connect the C...

Страница 17: ... use this player with it My VCR is already connected to my TV so there aren t any spare inputs What should I do If all your TV s inputs are already in use you can buy a video input selector from an electronics store which effectively gives you more inputs My TV only has one input for the sound What should I plug it into If you don t mind mono sound you can buy a stereo RCA to mono RCA cable from a...

Страница 18: ...ding mode 1 STANDBY ON Press to switch the player on or into standby 2 PROGRESSIVE button indicator Press to switch the progressive video output mode between progressive and interlace The indicator lights in progressive scan mode See page 19 for more information 3 VIDEO OFF button indicator Press to switch the video output on off The indicator lights when the video output is switched off when list...

Страница 19: ...rlace Some TVs display 4 3 material incor rectly in progressive scan mode This player has an Auto Progressive setting to correct this problem See page 53 for more information DV 656A only You can t switch the video output when an OSD is on screen The picture on some TVs may momen tarily break up when you switch the video output of this player Compatibility of this unit with progressive scan TVs Th...

Страница 20: ...umber 7 TITLE Indicates that the character display is showing a DVD Video title number 8 Lights when 2V TruSurround is active page 47 9 TRK Indicates that the character display is showing a track number 10 CHP Indicates that the character display is showing a DVD chapter number 11 REMAIN Lights when the character display is showing the time or number of tracks titles chapters remaining 12 Characte...

Страница 21: ...se to navigate on screen displays and menus Press ENTER to select an option or execute a command 7 SETUP Press to display or exit the on screen display 8 1 and e Use for reverse slow motion playback frame reverse and reverse scanning See page 35 9 3 Press to start or resume playback Remote control 0 1 2 3 4 5 6 7 8 9 CLEAR ENTER ANGLE AUDIO TOP MENU SETUP SUBTITLE PLAYMODE SURROUND ZOOM DISPLAY ME...

Страница 22: ...angle during DVD multi angle scene playback page 45 16 CLEAR Press to clear a numeric entry 17 ENTER Use to select menu options etc works exactly the same as the ENTER button in 6 above 18 MENU Press to display a DVD disc menu or the Disc Navigator if a DVD RW CD Video CD or MP3 disc is loaded 19 RETURN Press to return to a previous menu screen 20 and E Use for forward slow motion playback frame a...

Страница 23: ...thing is con nected properly and that the player is plugged in press STANDBY ON on the front panel or on the remote control to switch the player on Also switch on your TV and make sure that it is set to the input you connected the DVD player to STANDBY ON OPEN CLOSE 0 41 PROGRESSIVE VIDEO OFF Î STANDBY ON My DVD player switches on but there is nothing displayed on my TV Make sure that the TV is se...

Страница 24: ...e to Pioneer DVD Thank you for purchasing this Pioneer DVD player Before using please take a little time to setup your DVD player Put the batteries into the remote control Next press the ENTER button on the remote control and start the Let s Get Started Menu Next DV 655A Taiwan model only 2 Use the cursor left right buttons to select either Wide screen 16 9 or Standard size screen 4 3 according to...

Страница 25: ...ENTER buttons work in exactly the same way RETURN Returns to the previous menu without saving changes Information at the bottom of every OSD screen explains the currently selected menu item and shows which buttons can be used for that screen Setting up with the Setup Navigator Using the Setup Navigator you can make a number of other initial settings for this player We recommend using the Setup Nav...

Страница 26: ...r Select Connected or Not Connected Connected Not Connected AV Receiver 5 1ch Audio Out Language Settings Audio Out Settings Speaker Settings AV Receiver Func Setup Navigator 7 Did you connect a digital output to your AV receiver Select Connected or Not Connected Connected Not Connected AV Receiver 5 1ch Audio Out Digital Audio Out Language Settings Audio Out Settings Speaker Settings AV Receiver ...

Страница 27: ...tible Not Compatible Don t Know Dolby Digital DTS Language Settings Audio Out Settings Speaker Settings AV Receiver Func Setup Navigator 13 Is your AV receiver compatible with 96kHz Linear PCM audio Select Compatible Not Compatible or Don t Know Compatible Not Compatible Don t Know Dolby Digital DTS 96kHz Linear PCM Language Settings Audio Out Settings Speaker Settings AV Receiver Func Setup Navig...

Страница 28: ...o CD Super VCD also turn on your TV and make sure that it is set to the correct video input 2 Press 0 OPEN CLOSE to open the disc tray Load a disc with the label side facing up using the disc tray guide to align the disc Never load more than one disc at a time 3 Press 3 play to start playback If you re playing a DVD or Video CD Super VCD a menu may appear See pages 29 30 for how to navigate these ...

Страница 29: ...or CD SACD Video CD Super VCD MP3 If the disc is playing playback jumps to the start of the selected chapter or track within the current group for DVD Audio Front panel controls The 3 play 7 stop and 8 pause buttons on the front panel work in exactly the same way as their remote control equivalents The combined scan skip buttons on the front panel 4 1 and work slightly differently from the remote ...

Страница 30: ...ring browsable pictures press to display the browser screen Numbers Highlights a numbered menu option some discs only Press ENTER to select or wait a few seconds Video CD Super VCD PBC menus Some Video CDs Super VCD have menus from which you can choose what you want to watch These are called PBC Playback control menus You can play a PBC Video CD Super VCD without having to navigate the PBC menu by...

Страница 31: ...the PROGRESSIVE indicator isn t lit If it is press the PROGRESSIVE button to switch the video output back to interlace See also page 18 I have a widescreen TV so why are there black bars at the top and bottom of the screen when I play some discs Some movie formats are such that even when played on a widescreen TV black bars are necessary at the top and bottom of the screen This is not a malfunctio...

Страница 32: ...outputs Using the multichannel analog audio outputs for DVD Audio have none of these limitations My DVD Audio disc starts playing but then suddenly stops The disc may have been illegally copied My CD with MP3 tracks won t play Also make sure that the tracks are encoded in MPEG1 audio layer 3 format See also page 10 Some MP3 tracks don t show up Where are they File names that don t end with the ext...

Страница 33: ...Track 05 Track 06 Track 07 Track 08 Introduction Most of the features described in this chapter make use of on screen displays For an explanation of how to navigate these see Using the on screen displays on page 25 Many of the functions covered in this chapter apply to DVD and SACD discs Video CDs Super VCDs CDs and MP3 discs although the exact operation of some varies slightly with the kind of di...

Страница 34: ... speeds using the remote 1 During playback press 1 or to start scanning 2 Press repeatedly to increase the scanning speed MP3s can only be scanned at one speed The scanning speed is shown on screen 3 To resume normal playback press 3 play For SACD discs select a track within the current playback area Track 1 009 Track 001 Track 002 Track 003 Track 004 Track 005 Track 006 Track 007 Track 008 2ch Ar...

Страница 35: ...D Super VCD only supports forward slow motion playback The picture quality during slow motion playback is not as good as during normal playback Depending on the disc normal playback may automatically resume when a new chapter is reached For DVD Audio discs featuring browsable pictures page 70 press e E to view the previous next picture Frame advance frame reverse You can advance or back up DVD Vid...

Страница 36: ...ram Search Mode Play Mode 3 Press ENTER on B End Point to set the loop end point A Start Point B End Point Off A B Repeat Repeat Random Program Search Mode Play Mode After pressing ENTER playback jumps back to the start point and plays the loop 4 To resume normal playback press CLEAR or select Off from the menu Using repeat play There are various repeat play options depending on the kind of disc l...

Страница 37: ... disc and cancel repeat play press 7 stop You can also cancel repeat play without stopping playback by pressing CLEAR The disc will play to the end then stop You can t use repeat and random play at the same time If you switch camera angle during repeat play repeat play is canceled Using random play Use the random play function to play titles or chapters DVD Video groups or tracks DVD Audio or trac...

Страница 38: ...l play to the end then stop During random play the 4 and buttons function a little differently to normal 4 returns to the beginning of the current track chapter You can t go back further than this selects another track chapter at random from those remaining You can t use random play together with program or repeat play Creating a program list This feature lets you program the play order of titles ...

Страница 39: ...tle 01 Title 02 Title 03 Chapter 1 036 Chapter 001 Chapter 002 Chapter 003 Chapter 004 Chapter 005 Chapter 006 Chapter 007 Chapter 008 Program Program Step To add a chapter first highlight the title then press cursor right and select a chapter from the list 01 01 003 02 03 04 05 06 07 08 Title 1 03 Chapter 1 036 Program Title 01 Title 02 Title 03 Chapter 001 Chapter 002 Chapter 003 Chapter 004 Cha...

Страница 40: ...er folder track the step number automatically moves down one 4 Repeat step 3 to build up a program list A program list can contain up to 24 titles chapters groups folders tracks 5 To play the program list press 3 play Program play remains active until you turn off program play see below erase the program list see below eject the disc or switch off the player To exit the program edit screen without...

Страница 41: ...t does not erase the program list Program Delete Erases the program list and turns off program play Program Memory DVD Video only Select On to save the program list for the disc loaded Select Off to cancel the program memory for the disc loaded After saving a program list using the Program Memory feature whenever you load that disc the program list is automatically recalled and program play switch...

Страница 42: ...t be playing in order to use time search Search functions are not available with Video CDs Super VCD in PBC mode start non PBC playback by stopping playback then pressing then 3 play You can often select what you want to watch from a DVD disc menu See also pages 29 30 Switching subtitles Some DVD Video discs have subtitles in one or more languages the disc box will usually tell you which subtitle ...

Страница 43: ... main sub and mixed channels during playback 1 Press AUDIO repeatedly to select an audio channel option Audio Dolby Digital 1 1CH 1L Switching DVD Audio audio channel Depending on the disc you may be able to switch channels when playing DVD Audio discs see the disc box for details 1 Press AUDIO repeatly to select an audio channel option Audio Linear PCM 192kHz24bit 1 2CH Digital Out Converted When...

Страница 44: ... CD Super VCD have a fixed resolution picture quality will deteriorate espe cially at 4x zoom This is not a malfunc tion 2 Use the cursor buttons to change the zoomed area You can change the zoom factor and the zoomed area freely If the navigation square at the top of the screen disappears press ZOOM again to display it You can use the e or E buttons for frame reverse advance while the picture is ...

Страница 45: ... Tr Rate 9 5Mbps Group Play DVD 3 3 21 1 3 Current Total Elapsed 53 20 Remain 56 41 Total Audio DVD RW displays Audio Dolby Digital 2 0CH 1 Subtitle Title Play DVD RW Original 3 0 08 1 32 Current Total Elapsed 30 22 Remain 30 30 Total Tr Rate 4 3Mbps Chapter Play DVD RW Original 3 1 1 Current Total SACD displays Track Play SACD 3 0 22 1 9 Current Total Elapsed 3 38 Remain 4 00 Total During multich...

Страница 46: ...itching Audio DRC Dynamic Range Control to On can help by bringing up the quieter sounds while controlling loud peaks How much of a difference you hear depends on the material you re listening to If the material doesn t have wide variations in volume you may not notice much change 1 Press SETUP and select Audio Set tings from the on screen display Video Adjust Audio Settings Play Mode Setup Naviga...

Страница 47: ...itial Settings 2 Highlight TruSurround then use the buttons cursor left right to change to 2V TruSurround or Off as re quired Audio Settings 1 1 Audio DRC Virtual Surround Channel Level Off Off Fix 3 Press ENTER to make the setting and exit the Audio Settings screen You can also use the SURROUND button on the remote control to switch Virtual Surround on 2V TruSurround Off Virtual Surround does not...

Страница 48: ...reen Audio Settings 1 2 Audio DRC Virtual Surround Channel Level Off Off Variable 4 Variable setting only Set the channel levels for each speaker Audio Settings 2 2 Channel Level L Channel Level C Channel Level R Channel Level RS Channel Level LS Channel Level SW 0 0 dB 0 0 dB 0 0 dB 0 0 dB 0 0 dB 0 0 dB Use the buttons cursor up down to select a speaker Use the buttons cursor left right to adjust...

Страница 49: ...cture This setting is only effective when Fine Focus is On Chroma Level Adjusts how saturated colours appear Hue Adjusts the overall colour balance between red and green This is only effective when the player is connected using the VIDEO OUT or S VIDEO OUT jacks Video Adjust Default setting Standard From the Video Adjust screen you can select the standard video presentation or define presets of yo...

Страница 50: ...adjusts the picture so that it matches more closely the picture quality of a cinema screen You can see whether video on a DVD disc is film or video material by display ing the video transmission rate see page 45 If a hash mark appears next to the transmission rate display it is film material 4 Press ENTER to save the preset and exit the Video Adjust screen Creating your own progressive output pres...

Страница 51: ... connected component is Dolby Digital compatible set to Dolby Digital otherwise set to Dolby Digital PCM Using the Initial Settings menu The Initial Settings menu is where you can set preferences for language audio and video output and so on If a menu option is grayed out it means that it cannot be changed at the current time This is usually because a disc is playing Stop the disc then change the ...

Страница 52: ...f the digital outputs Digital Audio Out Video Output Language Display Options Speakers Digital Out Dolby Digital Out DTS Out Linear PCM Out MPEG Out MPEG MPEG PCM Initial Settings DTS Out Default setting DTS PCM You only need to make this setting if you connected this system to an AV receiver or other component using one of the digital outputs Digital Audio Out Video Output Language Display Option...

Страница 53: ... the Glossary on page 71 If your AV receiver or other connected component is compatible with MPEG audio set this to MPEG otherwise set it to MPEG PCM MPEG audio is converted to more compatible PCM audio Check the manual that came with the other component if you re unsure whether it is MPEG audio compat ible Video Output settings TV Screen Default setting 16 9 Wide Digital Audio Out Video Output La...

Страница 54: ...back using the AUDIO button This does not affect this setting See page 43 Some DVD discs set the audio language automatically when loaded overriding the audio language you set in the Initial Settings menu Discs with two or more audio languages usually allow you to select the audio language from the disc menu Press TOP MENU to access the disc menu Still Picture Default setting Auto Digital Audio Ou...

Страница 55: ...tle Language Default setting English excpet Taiwan model Traditional Chinese Digital Audio Out Video Output Language Display Options Speakers Audio Language Subtitle Language Auto Language DVD Menu Lang Subtitle Display English French German Italian Spanish Dutch Other Language Initial Settings DV 656A screen This setting is your preferred subtitle language for DVD Video discs If the lan guage you...

Страница 56: ... Audio Language Subtitle Language Auto Language DVD Menu Lang Subtitle Display On Off Assist Subtitle Initial Settings When set to On the player displays subtitles according to the Subtitle Language and Auto Language settings Set to Assist Subtitle to have the player display the extra assistive subtitles recorded on to some DVD discs Set to Off to switch subtitles off altogether Display settings O...

Страница 57: ...it can burn in leaving a ghost image on the screen Switch to On to make sure that a constant image is not displayed for a dangerously long time Options Parental Lock Default level Off Default password none Default country code us 2119 Some DVD Video discs feature a Parental Lock level If your player is set to a lower level than the disc the disc won t play This gives you some control about what yo...

Страница 58: ...can reset the system then register a new one See page 67 for how to reset the player Changing your password To change your password confirm your existing password then enter a new one 1 Select Password Change Digital Audio Out Video Output Language Display Options Speakers Parental Lock Bonus Group Auto Disc Menu Group Playback DVD Playback Mode CD Playback Password Change Level Change Country Cod...

Страница 59: ...he new level and return to the Options menu screen Setting changing the Country Code You may also want to refer to the Country code list on page 69 1 Select Country Code Digital Audio Out Video Output Language Display Options Speakers Parental Lock Bonus Group Auto Disc Menu Group Playback DVD Playback Mode CD Playback Password Change Level Change Country Code Initial Settings DV 656A screen 2 Use...

Страница 60: ...r When you play a DVD Audio disc that has a bonus group the key number input screen appears automatically Select Bonus Group to access the same screen Digital Audio Out Video Output Language Display Options Speakers Bonus Group Key Number Input Initial Settings 2 If you eject the disc switch the power off or unplug the player you will need to re enter the key number Auto Disc Menu Default setting ...

Страница 61: ... Output Language Display Options Speakers Parental Lock Bonus Group Auto Disc Menu Group Playback DVD Playback Mode CD Playback DVD Audio DVD Video Initial Settings DV 656A screen Some DVD Audio discs contain DVD Video content in addition to the DVD Audio Set to DVD Video to play a DVD Audio disc as if it were a DVD Video disc Note that in this case only the DVD Video part of the disc will play SA...

Страница 62: ...1 Channel if you connected only the stereo outs set to 2 Channel Even if you set Audio Output Mode to 5 1 Channel you ll only get sound from all speakers when playing a multi channel DVD Audio disc or Dolby Digital or DTS encoded DVD disc When set to 5 1 Channel only the front left right channels are output from the AUDIO OUT 2ch jacks Change to 2 Channel if you want to listen to downmixed stereo ...

Страница 63: ... the subwoofer to On The subwoofer can only be set to On or Off 4 Press cursor left to go back to the speaker list if you want to modify another speaker or press ENTER to exit the Speaker Installation screen When listening to a DVD Audio source the C LS and RS speakers will auto matically be set to the Large size setting However the sound will not be affected by the change Listening to another sou...

Страница 64: ...utput level of the current speaker Press cursor left to exit the test tone sequence or ENTER to save the settings and exit the channel level setting screen Manual Use the cursor up down buttons to select a speaker Digital Audio Out Video Output Language Display Options Speaker L C R RS LS SW Auto 0 0dB 0 0dB 0 0dB 0 0dB 0 0dB 0 0dB Initial Settings Press cursor right then use the cursor up down bu...

Страница 65: ...iscs only Use of shaped discs is not recommended for this product Pioneer disclaims all liability arising in connection with the use of shaped discs Taking care of your player and discs Handling discs When holding discs of any type take care not to leave fingerprints dirt or scratches on the disc surface Hold the disc by its edge or by the center hole and edge Damaged or dirty discs can affect pla...

Страница 66: ...epped on A damaged power cord can cause a fire or give you an electric shock Check the power cord once in a while If you find it damaged ask your nearest Pioneer authorized service center or your dealer for a replacement Cleaning the pickup lens The DVD player s lens should not become dirty in normal use but if for some reason it should malfunction due to dust or dirt consult your nearest Pioneer ...

Страница 67: ...op and bottom of the screen Standard TV users If you have a standard TV the TV Screen setting page 53 of this player should be set to 4 3 Letter Box or 4 3 Pan Scan depending on which you prefer Set to 4 3 Letter Box widescreen discs are shown with black bars top and bottom Set to 4 3 Pan Scan widescreen discs are shown with the left and right sides cropped Although the picture looks larger you do...

Страница 68: ... DVD 2ch downmix Dolby Digital 2ch downmix 2ch downmix 2ch downmix 5 DTS DTS DTS Dolby Digital Left Right Left Right Left Right Left Right Left Right Left Right Dolby Digital MPEG or PCM MPEG About the audio output settings The table below shows how the audio settings you make in the Initial Settings menu pages 51 52 62 affect the output from the 2 channel and the 5 1 channel analog outputs and fr...

Страница 69: ...sh ku 1121 Kirghiz ky 1125 Latin la 1201 Lingala ln 1214 Laothian lo 1215 Lithuanian lt 1220 Latvian lv 1222 Malagasy mg 1307 Maori mi 1309 Macedonian mk 1311 Malayalam ml 1312 Mongolian mn 1314 Moldavian mo 1315 Marathi mr 1318 Malay ms 1319 Maltese mt 1320 Burmese my 1325 Nauru na 1401 Nepali ne 1405 Norwegian no 1415 Occitan oc 1503 Oromo om 1513 Oriya or 1518 Panjabi pa 1601 Polish pl 1612 Pas...

Страница 70: ...essed audio file format Files are recognized by their file extension mp3 or MP3 See also pages 10 11 Selecting languages using the language code list Some of the language options such as DVD Language in the Setup Navigator allow you to set your prefered language from any of the 136 languages listed in the language code list on the previous page 1 Select Other Language 2 Use the cursor left right b...

Страница 71: ...uality audio disc format that can accomodate high sampling rate stereo and multi channel audio as well as conventional CD audio all on the same disc MPEG audio An audio format used on Video CDs Super VCDs and some DVD discs This unit can convert MPEG audio to PCM format for wider compatibility with digital recorders and AV amplifiers See also PCM MPEG video The video format used for Video CDs Supe...

Страница 72: ... screen display then press ENTER 3 Use the cursor up down buttons to select from the list on the left then press ENTER 4 Press ENTER English 5 Use the cursor up down buttons to select English from the list on the right then press ENTER English 6 Press SETUP Digital Audio Out Video Output Language Display Options Speaker OSD Language On Screen Display Angle Indicator Background Screen Saver English...

Страница 73: ...ollows AUTO NTSC NTSC PAL PAL AUTO The player s display shows the new setting You have to switch the player into standby press STANDBY ON before each change Watching NTSC on a PAL TV Most models of the newly developed countdown PAL TV system detect 50 Hz PAL 60 Hz NTSC and automatically switch vertical amplitude resulting in a display without vertical shrinkage If your PAL TV does not have a V Hol...

Страница 74: ...ch the number on the player the disc cannot be used page 11 Condensation inside the player Allow time for condensation to evaporate Avoid using the player near an air conditioning unit Disc is loaded upside down Reload the disc with the label side face up A Super VCD that does not conform with the IEC standards might not play normally The disc may have been illegally copied Press 7 then start play...

Страница 75: ...monitor is connected using an S video cable try changing the S Video Out setting page 53 This player is compatible with Macro Vision System copy guard Some discs include a copy prevention signal and when this type of disc is played back stripes etc may appear on some sections of the picture depending on the TV This is not a malfunction Due to the player s copy protection circuits connection of thi...

Страница 76: ...lifier receiver DVD Audio and SACDs do not output multichannel digital audio Listen through the player s analog outputs Check that the settings in the Speaker Installation screen are correct page 62 Check the audio options available from the disc menu Make sure that Linear PCM Out is set to Down Sample Off page 52 As a copy protection measure some DVDs do not output 96kHz audio In this case even i...

Страница 77: ...Super VCD that contains only one stereo soundtrack there may be no sound at all Press AUDIO to change the soundtrack TruSurround does not work with CD MP3 DVD Audio SACD or 96kHz linear PCM DVD The TruSurround effect is only output through the AUDIO OUT 2ch analog audio outputs Make sure that Audio Output Mode is set to 2 Channel page 62 The effectiveness of TruSurround varies with the disc Static...

Страница 78: ...Audio output 1 stereo pair Output level During audio output 200 mVrms 1 kHz 20 dB Number of channels 2 Jacks RCA jack Audio output multi channel L R C SW LS RS Output level During audio output 200 mVrms 1 kHz 20 dB Number of channels 6 Jacks RCA jack Digital audio characteristics Frequency response 4 Hz to 44 kHz DVD fs 96 kHz 4 Hz to 88 kHz DVD Audio fs 192 kHz S N ratio 118 dB Dynamic range 108 ...

Страница 79: ...Additional Information 09 79 En ...

Страница 80: ...Published by Pioneer Corporation Copyright 2002 Pioneer Corporation All rights reserved TPTZW 02D00001 Printed in VRB1296 A ...

Отзывы: