background image

20

  14

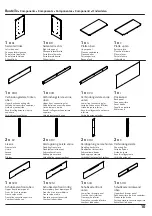
1 x 

SHO

1 x 

SB

1 x 

KUS

1 x 

SC

1 x 

SL

1 x 

SR

6 x


VS 4/40

  15

1 x


SVO

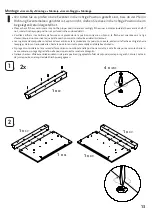
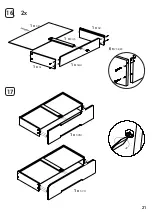
 •  Verbinden  Sie  die  Schubkastenteile  zunächst  nur  lose  miteinander.  Ziehen  Sie  die  Schrauben  erst                       

fest,  nachdem  Sie  sich  davon  überzeugt  haben,  dass  die  Schubkastenseiten  im  rechten  Winkel     
montiert  sind. 


  First,  connect  the  drawer parts  loosely. Tighten  the  screws  only  after  having  convinced  yourself  that  the  drawer sides  are  in  a                                                                                           

right angle.  


  Pendant  l'assemblage  du  tiroir,  les  vis  doivent  être  un  peu  lâches.  Visser  fortement  les  pièces  seulement  après  vous  avoir   

convaincu  que  les  panneaux  de  côté  sont  installés  à  angle droit.  


•  

Ensamblen  las  piezas  del  cajón  ligero.  Apreten  los  tornillos  sólo  después  de  que  se  han  asegurado Uds  que  las  piezas  del  

cajón  se  encuentran  montadas  en  ángulo  derecho.


  Collegate  I  pezzi  del  cassetto  senza  serrarli.  Serrare  le  viti  soltanto  dopo  che  vi  assicurati  che  i  pezzi  del  cassetto  siano 

assemblati  in  angolo  retto.


  De  onderdelen  van  de  losse  la  verbinden.  Maak  de  s chroeven  vast  nadat  u  gecheckt  heeft  dat  de  onderdelen  van  de  la  in  een 

rechte  hoek  gemonteerd  zijn.

!

Содержание 13 34 30 B

Страница 1: ...to bianco F r Kinder bis 15 kg For children weighing less than 15 kg 33 lbs Pour les enfants pesant moins de 15kg Para ni osdelom ximo15 kg Perbambinidi max 15 kg Voorkinderentot 15kg Item No N d art...

Страница 2: ...den Inbusschl ssel und einen Schraubenzieher Sollte Ihre Wickelkommode mit Rollen ausgestattet sein sind diese vor dem Gebrauchfestzustellen ImServicefall Sollte es trotz st ndiger Produktions berwach...

Страница 3: ...RUCCI N DE MONTAJE Y DEL RECIBO UNA POSIBLE QUEJA NO SIGUE SER TENIDA EN CUENTA ZONDER TERUGGAVE VAN DEZE MONTAGEAANWIJZING EN VAN DE KWITANTIE ZAL EEN EVENTUELE KLACHT NIET IN BEHANDELING WORDEN GENO...

Страница 4: ...e parts are broken torn or missing Should your changing unit be featured with castors they have to be locked beforeusing To avoid damaging the product do not use an electric screwdriver for tightening...

Страница 5: ...unmontageouund montageult rieur Utiliser pour le montage la cl six pans ci inclus et un tournevis Ne pas utiliser la commode si l une de ces parties est cass e endommag e ou manquante Si votre commode...

Страница 6: ...ornillador el ctrico para enchufe de campana de la herraje En el caso de que su c moda es prevista a rodillos los m smos deben serfijados antesdelautilizaci n Indicacionesparamontaje Quejas Si a pesar...

Страница 7: ...rficielisciaedorizzontale Ilprodottonondeveessereinclinato Alfinediproteggereilprodottoedilpavimentodagraffi consigliamodiutilizzarelaconfezionedelprodottodurantel assemblaggio comesottofondo Servizio...

Страница 8: ...tuervoordatdemontageopeenvlakke waterpasvloerwordtgedaan Hetartikelmoetnietscheefstaan Terbeschermingvanhetartikelenvanuwvloerentegenkrassen radenwijuaanombijdemontagedeverpakkingterbeschermingtegebru...

Страница 9: ...rotection anti chute Gabriel Instaladorparac modadefajar Gabriel Rialzo perilfasciatoio Gabriel Verhoogrand voordebabycommode Gabriel Wickelauflagen Changing mat Matelas langer Almojadadefajar Cuscini...

Страница 10: ...aison arri re Verbindungsleiste hinten sup rieur List n de junta arriba Asse di collegamento sinistra superiore Verbindingstengel boven 2 x KV Lisene F slate Lisi re rame Lesena Lesena Pilaster 2 x KD...

Страница 11: ...nk achter 3 x SB Schubkastenboden Drawer bottom Fond du tiroir Fondo caj n Base cassetto Ladebodem 3 x KUS Leiste unten Schubkasten Drawer bottom slat Latte inf rieure tiroir List n inferior caj n Ass...

Страница 12: ...25 x VS 3 5 14 Holzschraube Wood screw Vis panneaux Tornillo para madera Vite per legno Houtschroef 1 x N4 Riemen Strap Courroie Correa Cintura Riem 1 x WK U Scheibe Washer Rondelle Arandela Rotella...

Страница 13: ...ntournez lesjusqu lapositioncorrecte indiqu eend tailci dessous Les rogamos de comprobar si las levas de exc ntrico est n colocadas en la posici n correcta es decir si la flecha es dirigida hacia laes...

Страница 14: ...14 3 4 1 x KVU 1 x WBE 1 x KVU 1 x C 5 1 x KDV 1 x KDV 20 x WBE 6 x VFZ 6 40...

Страница 15: ...15 6 1 x KDH 1 x K 1 x K 1 x KDH 6 x VES 6 38 7 3 x WSD L und and et y e en 3 x WSD R und and et y e en 24 x VS 3 5 14...

Страница 16: ...16 8 1 x I 1 x KVO 1 x KHO...

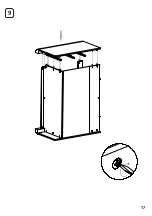
Страница 17: ...17 9...

Страница 18: ...18 11 10 1 x G 8 x WBE 1 x G...

Страница 19: ...19 13 12 20 x WBE 1 x SVO 1 x SVM 1 x SVU 2 x WBE 1 x SHO...

Страница 20: ...du tiroir les vis doivent tre un peu l ches Visser fortement les pi ces seulement apr s vous avoir convaincu que les panneaux de c t sont install s angledroit Ensamblen las piezas del caj n ligero Ap...

Страница 21: ...21 16 1 x SHU 1 x SB 1 x KUS 1 x SL 1 x SR 6 x VS 4 40 2x 17 1 x SVM 1 x SVU...

Страница 22: ...22 18 1 3 2 Detail 1 D etail 1 D tail 1 Detalle 1 Dettaglio 1 Detail 1 Detail 2 3 D etail 2 3 D tail 2 3 Detalle 2 3 Dettaglio 2 3 Detail 2 3...

Страница 23: ...23 19 20 3 x WBE 2 x VFZ 6 40 1 x KOR 1 x KOL 1 x GTV 1 x GTH...

Страница 24: ...24 21 22 1 x KOH 3 VFZ 6 40 1 x WI x und and et y e en 4 VFZ 6 60 1 x WI x und and et y e en...

Страница 25: ...25 23 1 x N4 und and et y e en 1 x WK und and et y e en 1 x VS 3 5 14 24...

Страница 26: ...ng van de babycommodein eenlatafel Apr slatransformationlacommodedoit treutiliserexclusivementcommeunecommodeclassique Despu slatransformaci n lac modadefajarser empleadaexclusivamentecomomuebleconcaj...

Страница 27: ...27 C D...

Отзывы: