background image

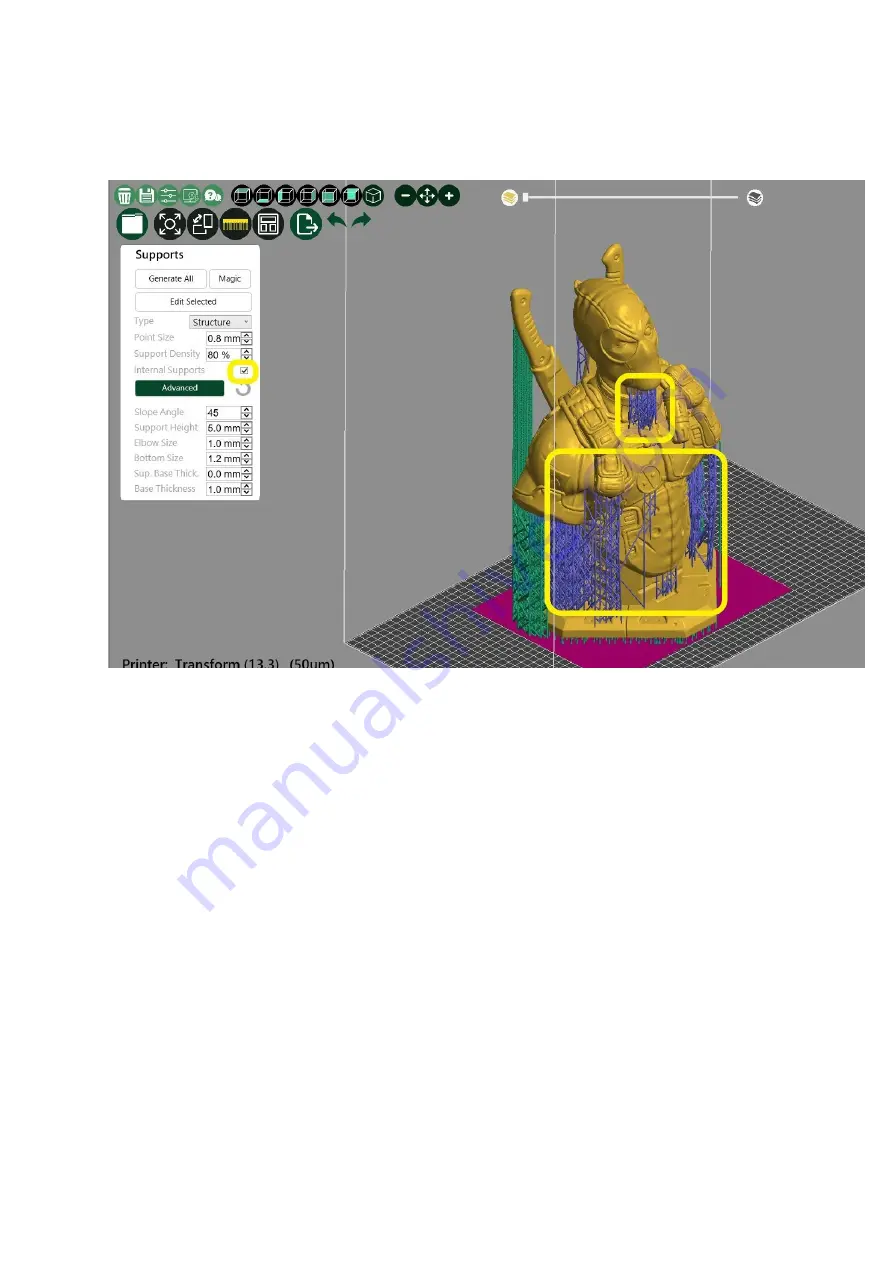
selected, the following place will be added. 


1. Select "Edit Support" 

2. The support will be converted to contact point mode; at this time, can manually 

add  the  support  by  pressing  the  left  mouse  button  at  the  color  change  of  the 

model.3. After clicking the left button to select the contact point to be removed, 

Содержание Transform

Страница 1: ... the contents of the package inside of the box General content includes Phrozen Transform Printer 1 pc Print stage and resin tank 1 set Print Accessibility Tool Set o Soft scraper 1 pc o Hard scraper 1 pc o Funnel 1 pc o Gloves 1 set Black power cord 1 pc If you have any missing component or problems please contact the Phrozen team directly ...

Страница 2: ...e machine and turn on the power switch above the socket When the power is turned on the machine will start to open the system and the first start will take about 2 minutes The opening screen is as follows After opening entering the main screen of the system the boot is finished ...

Страница 3: ...on Z axis calibration This is the only place where the Phrozen Transform needs to be corrected It is suggested use the touch panel on the machine The detailed steps are as follows 1 Open the front cover of the machine ...

Страница 4: ...Open the front cover of the machine It is suggested when facing the machine open the right front cover first 2 Click on the Z axis calibration icon on the homepage ...

Страница 5: ...3 Click on the right icon to enter the calibration function 4 Confirm that there is no foreign matter on the printing stage and remove the resin tank Place an A4 blank sheet over the LCD screen ...

Страница 6: ...5 Use the hex wrench to loosen the four fixing screws on the side of the printing ...

Страница 7: ...stage and click Next ...

Страница 8: ...rinting stage to the bottom At this time the printing stage will be flattened with blank paper One hand will gently fix the stage and the other hand will lock the table screw After the four screws are locked the Z AXIS calibration is done ...

Страница 9: ...7 Press DONE to complete the calibration procedure ...

Страница 10: ...calibration 9 The timing of Z AXIS calibration The first time use the machine After replacing the screen Because the Z AXIS calibration is not correct cause the printing fails When long distance movement or strong relocation causes the machine to shake Start printing Pour resin ...

Страница 11: ...ght of the tank UPLOAD FILES USB connection method After using the computer to process the 3D image file Transfer the phz file Phrozen software or zip file red rabbit slice and save the zip file to the USB and the machine is directly operated through the touch panel in front of the machine Insert the USB plug into the port on the back of the machine After inserting the touch panel on the front of ...

Страница 12: ...1 After clicking PLATES enter the import file screen 2 Click to read by USB ...

Страница 13: ...3 Select the file to be imported 4 4 The file will be displayed on the PLATES screen after importing it ...

Страница 14: ...re starting to print please make sure that the stage and resin tank have no foreign matter to avoid crushing the LCD panel Start printing Print completed after printing process o Take the printed items It is generally suggested to take the download station and use a hard scraper to slowly lift the model from the joint between the model and the stage Do not force hard stamps which may damage the mo...

Страница 15: ...g the removal process o Shutdown 1 Touch the screen operation On the main screen click SETUP 2 After clicking turn off the power of the machine according to the instructions Empty the tank After loosening the screws on both sides of the tank remove the resin tank Take an opaque sealable can such as a coffee can ...

Страница 16: ...again next time Precautions o If the resin is found to be insufficient in the middle of printing please replenish the resin immediately A good feeding timing is to pour the resin between the printing layers the stage is raised and the LCD is not lit o When cleaning the bottom of the tank use a napkin that does not drop the chips o If the resin is sprayed onto the machine wipe it off immediately o ...

Страница 17: ...ed 2 or 3 times the soaking time should not be too long to avoid the model cracking Air drying Dry the model by placing the model in a cool place for more than 30 minutes Second curing The curing mode is cured by a secondary curing lamp The curing time is determined by the intensity of the light source Generally the nail lamp issuggested for 3 5 hours and the Phrozen Cure professional curing ...

Страница 18: ...re at 20 30 C and keep it ventilated If it is printed overnight do not turn off the air conditioner Resin operation Avoid contact with sunlight when using resin It can be operated for a short time under normal light source less than 10 minutes After use please filter and seal in the bottle to avoid exposuring in the air It is suggested not to mix the new material and the used material Please shake...

Страница 19: ...s goggles and long sleeved clothing to handle the resin and wash your hands with detergent after each operation This material is forbidden to eat and swallow If it happens please to take medical treatment as soon as possible Avoid contact with the eyes If you touch it rinse with plenty of water and please to take medical treatment as soon as possible The material is slightly irritating to human sk...

Страница 20: ...is highly suggested for use in ventilated areas Please keep the resin in a safe place to prevent kids from touching Phrozen software operation Download Phrozen Software Download location Basic settings Open the software Set basic settings ...

Страница 21: ...1 Select the resin to be printed 2 Select the needed print layer thickness 3 Select Apply ...

Страница 22: ...oftware basic settings 1 Press the setting pattern 2 Select the slice storage location 3 Select language 4 Select the type of support can be adjusted during long support 5 Press OK to complete the setting ...

Страница 23: ...rt file After selecting the top left icon select the location to be imported into the STL file Mobile window The middle mouse button can rotate the screen in 3D and the right mouse button can move the screen ...

Страница 24: ... Set support ...

Страница 25: ...Select support icon 1 Select advanced features 2 Adjust the height of the base to 1mm ...

Страница 26: ...Adjust the support type to the bracket type ...

Страница 27: ...Select automatic support software automatically adds support ...

Страница 28: ...se the automatic support is the support between the base and the platform if the inner support is selected the following place will be added Internal support function for example the model itself has a base the automatic support is the support between the base and the platform if the inner support is ...

Страница 29: ...t Edit Support 2 The support will be converted to contact point mode at this time can manually add the support by pressing the left mouse button at the color change of the model 3 After clicking the left button to select the contact point to be removed ...

Страница 30: ...keyboard delete button to delete 4 After completing the editing support please select Edit Support once Simulation check support slice After selecting the moving direction of the model slice left click and hold the middle square to move left and right to view the simulated slice ...

Страница 31: ... Exporting slices ...

Страница 32: ...ters are correct 3 The model name can be changed at this time It is suggested to name it in short English 4 The storage location is preset and cannot be changed here 5 Select output after confirmation Please do not use non English name for the file name ...

Страница 33: ...s a progress bar at the bottom right If the file is too large the progress bar will repeat the same please be patient After the slicing is completed the software stores it automatically and it will show the time required for the slice When the number of layers is more the time required will also multiply File storage ...

Страница 34: ...After opening the file storage location save the php file to the USB Third party support software use 1 After the third party software is supported the STL file is exported and then ...

Страница 35: ...sliced with special software 2 Use red rabbit slice and save it as zip file Red rabbit slice should pay attention to slice thickness and machine setting resin parameter layer thickness ...

Отзывы: