background image

 UL Classified  Industrial / Commercial Evaporative Cooler Use and Care Manual    7

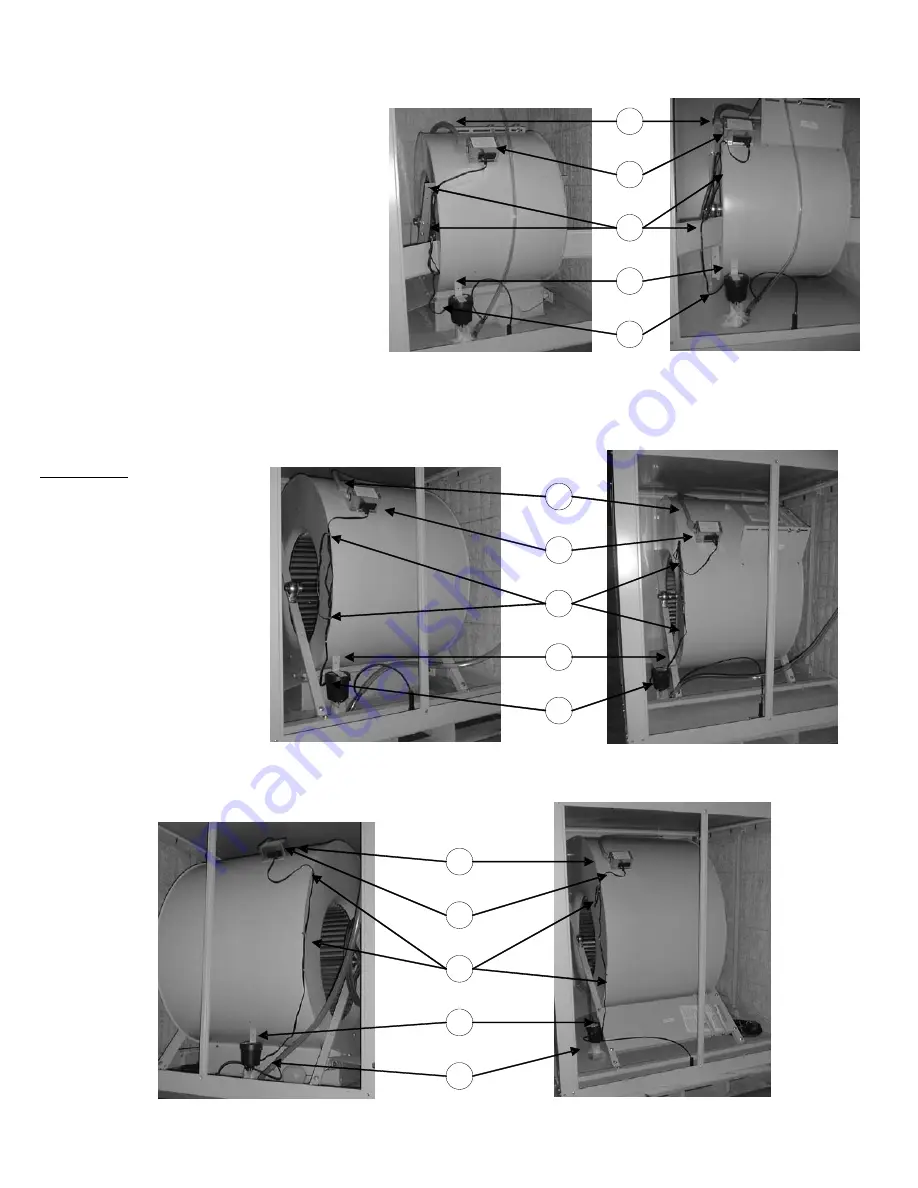
Legend

1.

Pump Cord Clips (approximate locations).

2.

Pump junction box assembly (JBK115 or 
JBK230). Using “Locate J-box here” label as a 
guide, position and install in indicated 
location using holes in junction box flanges 
as guides to locate self-drilling screws.

3.

Conduit and wiring from junction box to GFCI 

protected pump electrical supply (circuit 
must match pump voltage).

4.

Pump location and mounting procedure:

!

Position pump as shown for your specific 

model, make sure pump sits flat on bottom. 
Bend bracket as required to conform to the 
mounting surface.

!

Using slotted holes in bracket as a guide, 

mark and drill two 1/8” holes.

!

Secure pump with two #10 screws 

(provided).

5. Route pump cord as shown, making sure cord 

does touch water or wet pads and cannot be 
pulled into the moving blower wheel or drive 
assembly. Leave sufficient slack in cord to 
create a “drip” loop just before the cord enters 
pump housing.

CAUTION:

Route pump cord 
through wire clips 
making sure cord 
does not touch 
water in either the 
bottom pan or the 
pads in the frame.


D8801

H8801

D1425

H1425

D2231A

H2231
Содержание D8801

Страница 1: ...tives or treatments in this cooler will void the warranty Your warranty does not cover shipping damage Report all shipping damage at once to dealer or carrier making the delivery For future reference...

Страница 2: ...coolers are used to cool large areas such as factories auditoriums or supermarkets divide the area and strategically locate units of proper capacity in each area Install coolers in a location where on...

Страница 3: ...with the installation location and installed in accordance with N E C Articles 240 and 430 These devices shall be U L Listed short circuit protection devices sized and installed in accordance with spe...

Страница 4: ...and alignment is important proper setup reduces power consumption and prolongs life of belt and motor When installing or adjusting belt loosen the motor adjustment bolts and adjust to proper tension...

Страница 5: ...ts Check torque on setscrews and cabinet hardware Motor and Blower Pulley set screws 95 in lbs Blower Wheel set screws 1 per side 150 in lbs Cabinet hardware 25 in lbs GENERAL INSPECTION Initial Start...

Страница 6: ...otor blower assembly Check belt condition and replace it if frays or cracks appear Check alignment of blower pulley with motor pulley Cleaning Water Pump Hose CAUTION Disconnect all electrical power t...

Страница 7: ...sition pump as shown for your specific model make sure pump sits flat on bottom Bend bracket as required to conform to the mounting surface Using slotted holes in bracket as a guide mark and drill two...

Страница 8: ...xcessive humidity inside Musty or unpleasant odor POSSIBLE CAUSE 1 No electrical power to unit A Fuse blown B Circuit breaker tripped 2 Belt loose or broken 3 Motor overloaded and or frozen bearings A...

Отзывы: