UM EN OPC 7015/OPC 7022
8155_en_00 PHOENIX
CONTACT
8.2
T
OUCH SCREEN DRIVER INSTALLATION
Note:
When installing the driver, you'll have to take in account that the touch screen monitor is
internally connected with the USB interface!
The installation has to be carried out as described below:
The device does not have any integrated CD drive. The installation of the
operating system can therefore only be carried out by using the USB interface.
Access the service CD by using the Explorer and start the Installer file in the
TouchScreen folder.
Follow the on-screen instructions and acknowledge the licence terms and
conditions.
Once the installer has completed the installation, shut down the computer and
restart it subsequently.
After restarting, the touch screen monitor has to be calibrated. If the driver does
not automatically start, activate the setup menu via "Start => Settings =>
Control panel => Elo Touchscreen".
Via the "Calibration data" menu, calibrating the touch screen monitor can be
started, and the crosses appearing in a succession on the monitor have to be
pushed for calibration. Once the cursor position perfectly matches the touch point
of your finger, you can exit this control menu by pushing "OK".
Pos: 35 /Datentechnik/Software / Treiber Installation/Softkeyboard/Softkeytastatur für alle Gerät ohne internes Laufwerk(CD/DVD) @ 0\mod_1159175310134_6.doc @ 667 @
8.3
S
OFT KEYBOARD
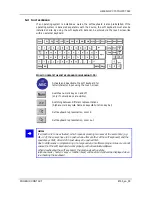
The soft keyboard must be installed from the enclosed service CD-ROM in order to ensure
usability of the five keys (except for the VMT series, where you have six keys) underneath
the monitor. The installation has to be carried out as described below:
Plug in connector of external drive at the device
Switch on PC, insert driver CD into drive after booting
Start installer from the service CD
Follow on-screen instructions, install the driver, select the language and confirm
the restart of the computer.
Note:
You can make further changes to the basic settings of the soft keyboard, if required.
You'll find more information about this topic in the "Readme" file in the installation folder
for the soft keyboard.
Pos: 36 /Datentechnik/Technische Daten/OPC-Serie/OPC7000-Serie/Technische Daten OPC7000-Serie @ 2\mod_1257151646428_6.doc @ 6743 @
Pos: 37 /Datentechnik/Service und Support/Service & Support @ 2\mod_1254312498746_6.doc @ 6472 @
Pos: 38 /Datentechnik/Sondergeräte-Module/OPC7000-Serie/Wechsel von Komponenten 7013 / 7015 / 7022 @ 2\mod_1259594103307_6.doc @ 6842 @
Содержание UM EN OPC 7015
Страница 2: ...UM EN OPC 7015 OPC 7022 8155_en_00 PHOENIX CONTACT...
Страница 15: ...UM EN OPC 7015 OPC 7022 PHOENIX CONTACT 8155_en_00 3 2 EXTERNAL DIMENSIONS OF THE OPC 7013 MODEL...
Страница 16: ...UM EN OPC 7015 OPC 7022 8155_en_00 PHOENIX CONTACT 3 3 INSTALLATION LAYOUT FOR OPC 7013...
Страница 17: ...UM EN OPC 7015 OPC 7022 PHOENIX CONTACT 8155_en_00 3 4 EXTERNAL DIMENSIONS OF THE OPC 7015 MODEL...
Страница 18: ...UM EN OPC 7015 OPC 7022 8155_en_00 PHOENIX CONTACT 3 5 INSTALLATION LAYOUT FOR OPC 7015...
Страница 19: ...UM EN OPC 7015 OPC 7022 PHOENIX CONTACT 8155_en_00 3 6 EXTERNAL DIMENSIONS OF THE OPC 7022 MODEL...


