background image

BDL4235DL

7

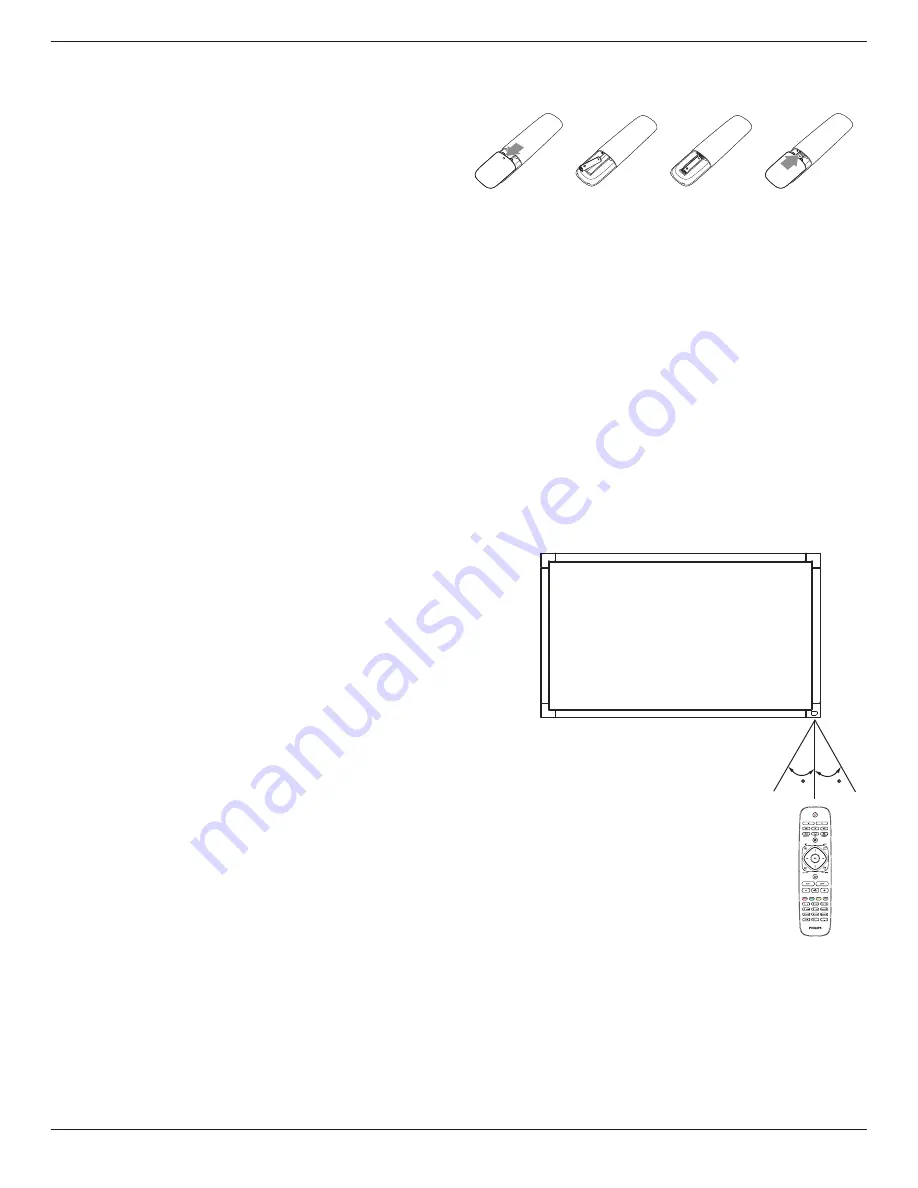
2.3.2.  Inserting batteries in the remote control

The remote control is powered by two 1.5V AAA batteries.

To install or replace batteries: 
1.  Press and then slide the cover to open it. 
2.  Align the batteries according to the (+) and (–) indications inside the 

battery compartment. 

3.  Replace the cover. 

Caution:

The incorrect use of batteries can result in leaks or bursting. Be sure to follow these instructions: 
•  Place “AAA” batteries matching the (+) and (–) signs on each battery to the (+) and (–) signs of the battery compartment.
•  Do not mix battery types.
•  Do not combine new batteries with used ones. It causes shorter life or leakage of batteries.
•  Remove the dead batteries immediately to prevent them from liquid leaking in the battery compartment. Don’t touch exposed battery acid, as it can 

damage your skin.

NOTE

:   If you do not intend to use the remote control for a long period, remove the batteries.

2.3.3.  Handling the remote control

•  Do not subject to strong shock.
•  Do not allow water or other liquid to splash the remote control. If the remote control gets wet, wipe it dry immediately.
•  Avoid exposure to heat and steam.
•  Other than to install the batteries, do not open the remote control.

2.3.4.  Operating range of the remote control

Point the front of the remote control toward this display’s remote control sensor when 

pressing a button.
Use the remote control within a distance of less than 10m/33ft from this display’s sensor, 

and a horizontal and vertical angle of less than 30 degrees.

NOTE

:   The remote control may not function properly when the remote control sensor 

on this display is under direct sunlight or strong illumination, or when there is an 

obstacle in the path of signal transmission.

30

30


Содержание Signage Solutions BDL4235DL

Страница 1: ...www philips com welcome BDL4235DL User Manual English ...

Страница 2: ...avoid the risk of shock or permanent damage to the set do not expose the display to dust rain water or an excessively moist environment If your display becomes wet wipe it with dry cloth as soon as possible If a foreign substance or water gets in your display turn the power off immediately and disconnect the power cord Then remove the foreign substance or water and send the unit to the maintenance...

Страница 3: ...te a screen saver program during your application If a still image in high contrast remains on the screen for an extended period of time it may leave an after image or ghost image on the front of the screen This is a well known phenomenon that is caused by the shortcomings inherent in LCD technology In most cases the afterimage will disappear gradually over a period of time after the power has bee...

Страница 4: ...ion Polish Center forTesting and Certification Notice The equipment should draw power from a socket with an attached protection circuit a three prong socket All equipment that works together computer display printer and so on should have the same power supply source The phasing conductor of the room s electrical installation should have a reserve short circuit protection device in the form of a fu...

Страница 5: ...or by the Earth symbol or coloured GREEN or GREEN YELLOW 2 The BLUE wire must be connected to the terminal which is marked with the letter N or coloured BLACK 3 The BROWN wire must be connected to the terminal which marked with the letter L or coloured RED Before replacing the plug cover make certain that the cord grip is clamped over the sheath of the lead not simply over the three wires China Ro...

Страница 6: ... accordance to local state and federal regulations For additional information on recycling contact www eia org Consumer Education Initiative Waste Electrical and Electronie Equipment WEEE Attention users in European Union private households This marking on the product or on its packaging illustrates that under European Directive 2012 19 EU governing used electrical and electronic appliances this p...

Страница 7: ...g in Portrait Position 3 1 5 1 How to use the logo guider for portrait position 3 1 5 2 How to remove the logo 3 2 Parts and Functions 4 2 1 Control Panel 4 2 2 Input OutputTerminals 5 2 3 Remote Control 6 2 3 1 General functions 6 2 3 2 Inserting batteries in the remote control 7 2 3 3 Handling the remote control 7 2 3 4 Operating range of the remote control 7 3 Connection 8 3 1 Connecting Extern...

Страница 8: ...ączenia Подключение Bağlantı 连接性 連接性 LCD Display LCD Display Pantalla LCD Écran LCD Display LCD Wyświetlacz LCD ЖК монитор LCD Ekran 监视器 監視器 BDL4235DL The supplied power cord varies depending on destination Power Cord Remote Control and AAA Batteries VGA Cable CD ROM RS232 Cable Quick Start Guide Logo Guider Power switch cover and screw M3x8 x1 NOTES For all other regions apply a power cord that c...

Страница 9: ...nt or injury to the user or installer Product warranty does not cover damage caused by improper installation 4 For the wall mounting kit use M6 mounting screws 20 mm long plus the thickness of the mounting bracket and tighten them securely Caution To prevent the display from falling For wall or ceiling installation we recommend installing the display with metal brackets which are commercially avai...

Страница 10: ...nd press the guider with your left hand Put the logo sticker with its adhesive side down into the logo hole with your right hand and press to make it stick tightly onto the front bezel 3 Remove the guider 1 2 3 1 5 2 How to remove the logo 1 Prepare a piece of paper with a cutting area of logo as a protector to prevent the front bezel from scratching 2 Using a knife carefully remove the logo stick...

Страница 11: ... adjustment while OSD menu is on or to decrease the audio output level while OSD menu is off 6 button Press to move the highlight bar up to adjust the selected item while OSD menu is on 7 button Press to move the highlight bar down to adjust the selected item while OSD menu is on 8 button Press to access the OSD menu 9 Remote control sensor and power status indicator Receives command signals from ...

Страница 12: ...ut from external AV device 9 AUDIO OUT RCA Audio signal output to connect your external AV device 10 AUDIO IN 3 5mm Audio input from your PC 11 SPDIF OUT Digital audio signal output to connect your external AV device 12 IR OUT 13 IR IN 3 5 mm IR signal output input for the loop through function NOTES This display s remote control sensor will stop working if the jack IR IN is connected To remotely ...

Страница 13: ...ION buttons Navigate through menus and select items 7 button Confirm an entry or selection 8 ADJUST button Access currently available options picture and sound menus 9 BACK button Return to the previous menu page or exit from the previous function 10 VOLUME button Adjust volume 11 MUTE button Press to turn the mute function on off 12 COLOR buttons Select tasks or options 13 NUMERIC buttons Enter t...

Страница 14: ...h exposed battery acid as it can damage your skin NOTE If you do not intend to use the remote control for a long period remove the batteries 2 3 3 Handling the remote control Do not subject to strong shock Do not allow water or other liquid to splash the remote control If the remote control gets wet wipe it dry immediately Avoid exposure to heat and steam Other than to install the batteries do not...

Страница 15: ...oses only 3 1 Connecting External Equipments DVD VCR VCD PC STEREO AMPLIFIER COMPONENT OUT YPbPr AUDIO OUT DVI OUT VGA OUT USB AUDIO OUT AUDIO IN HDMI OUT AC IN Y Pb Pr R L R L USB AUDIO OUT USB RS232C IN OUT IR IN OUT AUDIO IN PC LINE IN SPDIF HDMI IN DVI IN RJ 45 VGA IN COMPONENT IN ...

Страница 16: ...2C RS232C OUT RS232C IN RS232C OUT 3 2 2 IR connection optional DISPLAY 1 DISPLAY 2 IR IN IR OUT IR IN External IR Receiver IR OUT NOTE This display s remote control sensor will stop working if the IR IN is connected 3 3 IR Pass through Connection optional DISPLAY DVD VCR VCD DVD VCR VCD BDL4235EL Remote Control IR OUT IR IN ...

Страница 17: ...on the router and switch on its DHCP setting 2 Connect the router to this display with an Ethernet cable 3 Press button on the remote control then select Setup 4 Select Connect to network then press button 5 Follow the on screen instructions to install the network 6 Wait for this display to find the network connection 7 If you are prompted agree to the End User Licence Agreement NOTE Connecting wi...

Страница 18: ...isplay is playing video source press button 2 Press or button to select then press button 3 Press or button to select an option then press button Personal Apply your personalised sound settings Original Settings that suit most environments and types of audio Movie Ideal settings for movies Music Ideal settings for listening to music Game Ideal settings for games News Ideal settings for spoken audi...

Страница 19: ... J to control playing Supported file system FAT32 Supported file format Music MP3 WMA M4A AAC AC3 Movie AVI MP4 MOV RM RMVB Photo JPEG BMP GIF Caution The manufacturer is not responsible if the USB device is not supported nor is it responsible for damage to or loss of data in the device Do not overload the USB port If you connect a USB storage device that consumes more than 500mA power make sure t...

Страница 20: ...udio language Repeat Select Repeat to play the video file repeatedly or Play once to play the video file once Media server When you play content from a media server you can select another media server Shuffle On Shuffle Off Enable or disable random play of video files DivX R VOD Display the DivX registration and deregistration codes for this display NOTE To view information about a video for examp...

Страница 21: ...2 Press or button to select menu item or adjust its value 3 Press button to confirm menu selection and enter its submenu 4 Press button to exit the OSD menu 5 1 Quick Picture and Sound You can select picture and sound settings with the help of the settings assistant which demonstrates the effect of your chosen setting immediately 1 Press button to display the OSD menu 2 Select Setup Press button 3...

Страница 22: ...a computer is connected through HDMI select Computer Make sure that Format and edges Picture format Unscaled is selected so as to view maximum detail Format and edges Access advanced settings to control the displaying format of the picture Picture format Change the picture format Screen edges Change the picture size Picture shift If available move the position of the picture 5 2 2 Sound menu Sound...

Страница 23: ...y on the remote control to disable this function Local KB lock Choose to enable or disable the keyboard control buttons function of this display Unlock Enable the keyboard function Lock all Lock all keyboard function Lock but volume Disable all the keyboard function except the and button Lock but power Disable all the keyboard function except the button RC lock Choose to enable or disable the butt...

Страница 24: ...ion Active Resolution Refresh Rate Pixel Rate Aspect Ratio Stand for Mode H Pixels V Lines 720p 1280 720 50 Hz 74 25 MHz 16 9 Normally DVB Mode 60 Hz 1080i 1920 1080 25 Hz 74 25 MHz 16 9 Normally ATSC Mode 30 Hz 1080p 1920 1080 50 Hz 148 5 MHz 16 9 Normally ATSC Mode 60 Hz The PC text quality is optimum in HD 1080 mode 1920 1080 60 Hz Your PC display screen might appear different depending on the ...

Страница 25: ...el or picture element is composed of three sub pixels in the primary colors of red green and blue Many pixels together form an image When all sub pixels of a pixel are lit the three colored sub pixels together appear as a single white pixel When all are dark the three colored sub pixels together appear as a single black pixel Other combinations of lit and dark sub pixels appear as single pixels of...

Страница 26: ...ome liquid crystal display LCD panels This is known within the industry as Mura which is a Japanese term for unevenness It is used to describe an irregular pattern or area in which uneven screen uniformity appears under certain conditions Mura is a result of the deterioration of the liquid crystal alignment layer and is most commonly caused by long term operation under high ambient temperatures It...

Страница 27: ...int free cloth If the surface becomes dirty soak a soft lint free cloth in a mild detergent solution Wring the cloth to remove excess liquid Wipe the surface of the display to remove dirt Then use a dry cloth of the same type to dry Do not scratch or hit the surface of the panel with fingers or hard objects of any kind Do not use volatile substances such as insert sprays solvents and thinners Cabi...

Страница 28: ...een The zoom mode is not correctly set Use the Zoom mode or Custom zoom function in the Screen menu to fine tune display geometry and time frequency parameter Can hear sound but no picture Improperly connected source signal cable Make sure that both video inputs and sound inputs are correctly connected Can see picture but no sound is heard 1 Improperly connected source signal cable 2 Volume is tur...

Страница 29: ...annel L R Supports LPCM only DVI D Input DVI D jack Digital RGB TMDS Video VGA Input D Sub Jack 1 15 pin Analog RGB 0 7V p p 75Ω H CS V TTL 2 2kΩ SOG 1V p p 75Ω MAX 720p 1080p 1920 1080 60 Hz WUXGA Component Input RCA Jack 3 Y 1V p p 75Ω Pb 0 7V p p 75Ω Pr 0 7V p p 75Ω MAX 480i 576i 480p 576p 720p 1080i 1080p SPDIF Output SPDIF Port Serial digital audio output when input is HDMI IR Input Output 3 ...

Страница 30: ...ps N V All rights reserved Philips and the Philips Shield Emblem are registered trademarks of Koninklijke Philips N V and are used under license from Koninklijke Philips N V Specifications are subject to change without notice ...

Отзывы: