Service Modes, Error Codes, and Fault Finding
5.
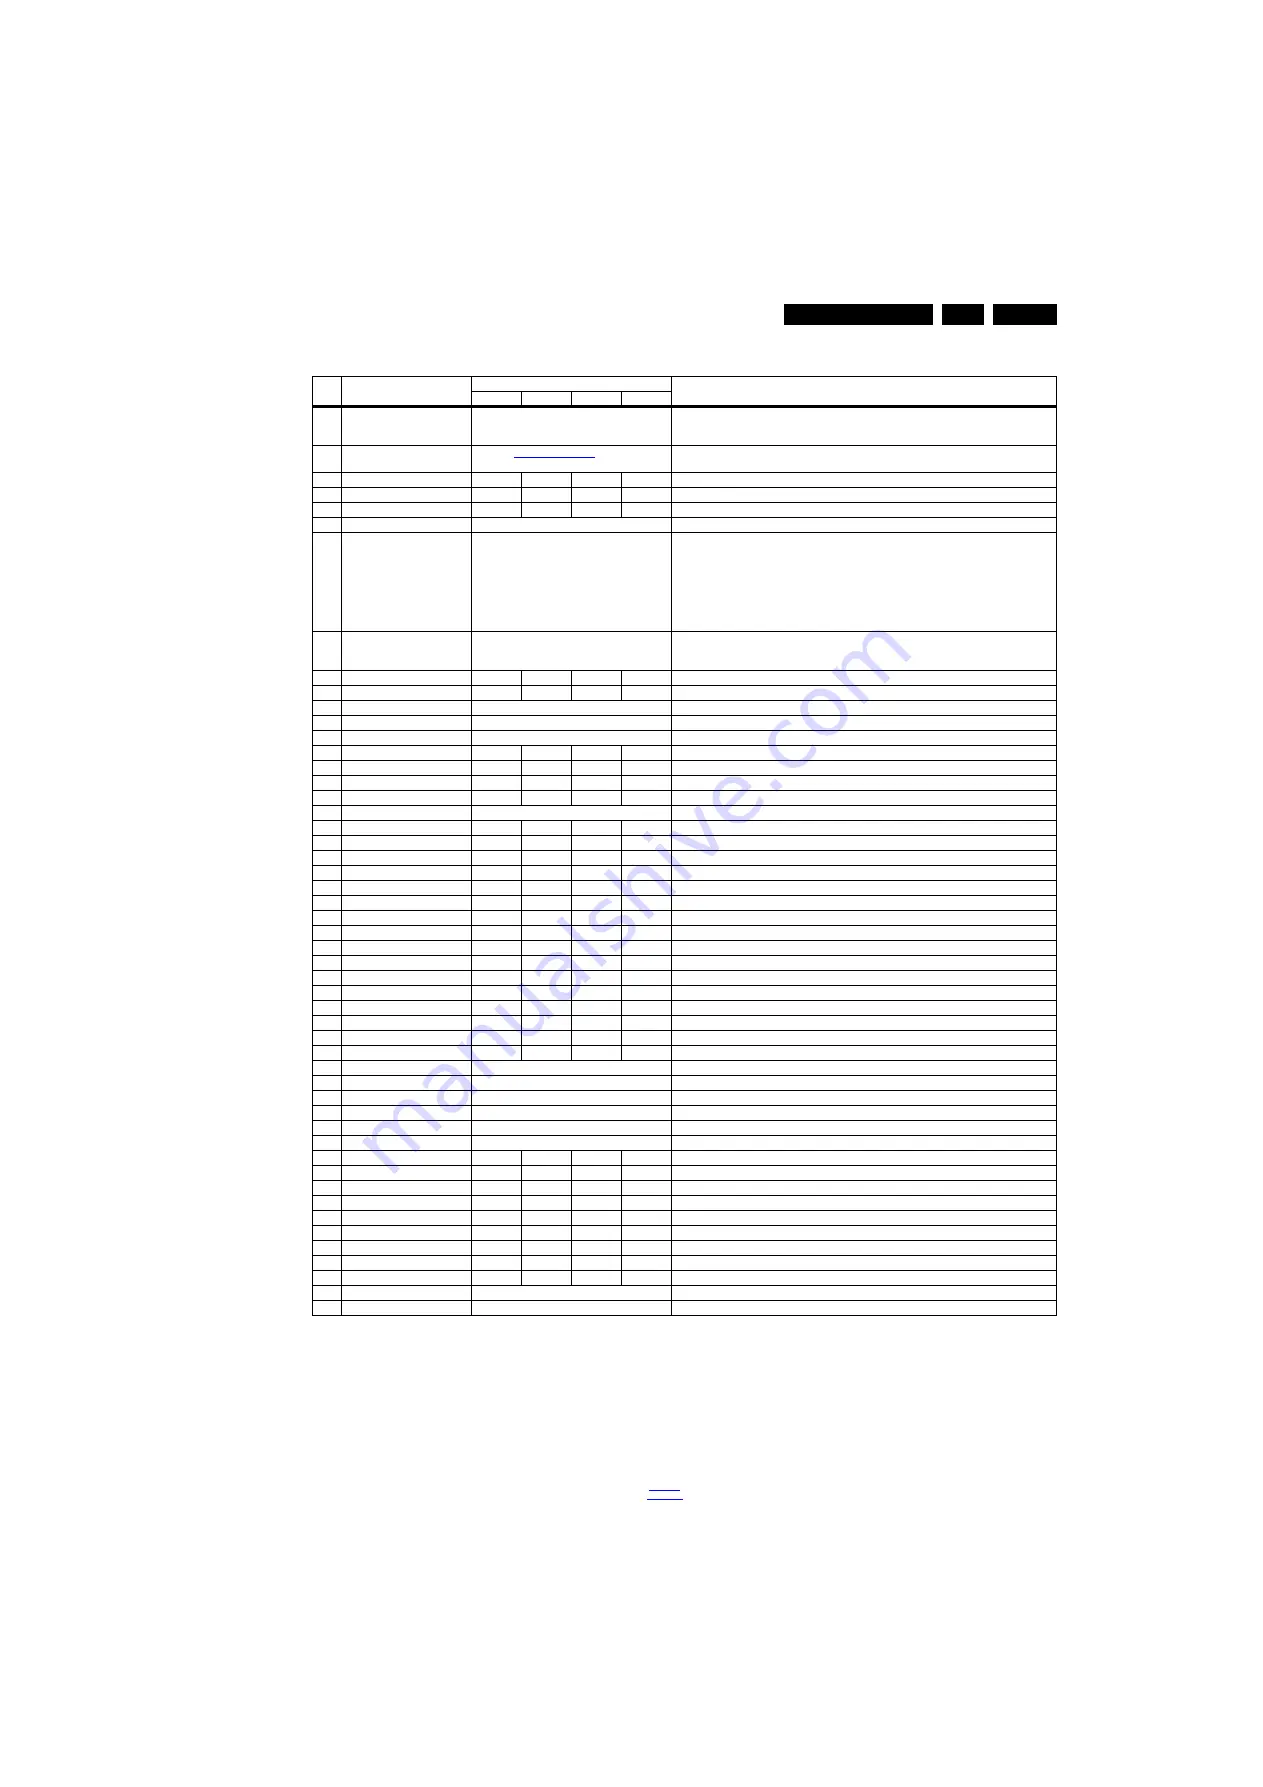
Table 5-2 Factory mode overview
How to Exit the Factory mode
Use one of the following methods:
•
Select EXIT_FACTORY from the menu and press the “OK”
button.
Note: When the TV is switched “off” by a power interrupt, or
normal switch to “stand-by” while in the factory mode, the TV
will show up in “normal operation mode” as soon as the power
is supplied again. The error buffer will not be cleared.
5.2.4
Customer Service Mode (CSM)
Purpose
The Customer Service Mode shows error codes and
information on the TVs operation settings.The call centre can
instruct the customer (by telephone) to enter CSM in order to
identify the status of the set.This helps the call centre to
diagnose problems and failures in the TV set before making a
service call.
Item
Item value
Default value
Description
43"
49"
55"
65"
0
F/W VERSION
Press OK
Displays the software versions of the supplier, Flash PQ, Smart Picture, BL Dimming,
Source Meter, the Picture Quality checksum, the Dimming library, the Source meter library, the
Flash AQ, MCU and OAD software versions.
1
PANEL_ID
See table
Displays and changes the Panel ID with the left and right cursor; be careful changing this, it can
result in not correct displaying the screen!
2
DEMOD_TYPE
5
5
5
5
Choose demod type.
3
NVM ADDRESS
0
0
0
0
NVM address 0 to 8191, Use Item 6 to change and 7 to store the data to the correct NVM address
4
NVM VALUE
0
0
0
0
Displays the value at the NVM address of item 5
5
NVM STORE
Press OK
Use this option to save the data of item 6 to NVM address of item 5
6
COPY NVM to USB
Press OK
Use this to store the NVM data to the REPAIR folder of a FAT formatted USB memory stick. The
TV will write two files in the REPAIR folder of the memory stick. It will create this folder if it does
not exist. The items are “Channel list”, “Personal settings”, “Option codes”, “Display-related
alignments” and “History list”. In case the download to the USB stick was not successful “Failure”
will appear. In this case, check if the USB stick is connected properly. Now the settings are stored
onto the USB stick and can be used to download onto another TV or other SSB. Uploading is of
course only possible if the software is running and if a picture is available. This method is created
to be able to save the customer’s TV settings and to store them into another SSB.
7
COPY NVM to TV
Press OK
Use this to store the NVM data from the USB memory stick to the TV. The TV will save the two
files which were created in item 8 to the NVM of the set. Use these options when replacing a SSB.
When “USB to TV Success” is displayed remove the power and restart the TV
8
TV Settings KEY
1
1
1
1
TV Settings Key
9
TV Settings VALUE
0
0
0
0
TV Settings VALUE
10
TV Settings STORE
Press OK
TV Settings STORE
11
COPY TV Settings to USB
Press OK
COPY TV Settings to USB
12
COPY TV Settings to TV
Press OK
COPY TV Settings to TV
13
VIRGIN_MODE
Off
Off
Off
Off
Use this to return the set to virgin mode. Depends whether the set has been used already.
14
ORT_MODE
Off
Off
Off
Off
ORT mode
15
DRM WARNING
On
On
On
On
Warning the data rights management
16
AGEING MODE
Off
Off
Off
Off
Use this for aging a new LCD panel
17
COLOR TEMP MODE
Normal
Colour temperature mode
18
CLR_TEMP_R
127
127
127
127
Red colour temperature setting
19
CLR_TEMP_G
105
105
105
105
Green colour temperature setting
20
CLR_TEMP_B
95
95
95
95
Blue colour temperature setting
21
ADC_GAIN_R
255
255
255
255
Red ADC gain
22
ADC_GAIN_G
255
255
255
255
Green ADC gain
23
ADC_GAIN_B
255
255
255
255
Blue ADC gain
24
ADC_OFFSET_R
127
127
127
127
Red ADC offset
25
ADC_OFFSET_G
127
127
127
127
Green ADC offset
26
ADC_OFFSET_B
127
127
127
127
Blue ADC offset
27
AUD_GAIN_HDMI
0
0
0
0
HDMI audio gain
28
AUD_GAIN_ATV
12
12
12
12
Analogue TV audio gain
29
AUD_GAIN_DTV
0
0
0
0
Digital TV audio gain
30
AUD_GAIN_USB
0
0
0
0
USB audio gain
31
AUD_GAIN_SPDIF
0
0
0
0
SPDIF audio gain
32
AUD_GAIN_LINE_IN
0
0
0
0
LINE_IN audio gain
33
AQ INDEX
3
3
3
3
Audio Quality index
34
COPY PQ to USB
Press OK
Saves the picture quality data to a file “pq.bin” to the root of a FAT formatted USB memory stick
35
COPY PQ to TV
Press OK
Loads the picture quality data from a file “pq.bin” in to the TV
36
COPY AQ to USB
Press OK
Loads the audio quality data from a file “AQ.bin” in to the USB
37
COPY AQ to TV
Press OK
Loads the audio quality data from a file “AQ.bin” in to the TV
38
COPY DB CHL to USB
Press OK
Copy the USB channel list to USB
39
COPY DB CHL to TV
Press OK
Copy the TV channel list to TV
40
LIGHT SENSOR TYPE
0
0
0
0
Light sensor type
41
TEMP SENSOR TYPE
0
0
0
0
Tempreture sensor
42
LED TYPE
0
0
0
0
The type of LED
43
AMBILIGHT TYPE VALUE
0
3
0
0
The type of Ambient light
44
3D
0
0
2
2
3D on/off
45
BLUETOOTH
1
1
1
1
BLUETOOTH
46
ARC TEST
On
On
On
On
ARC test
47
HDMI ARC OUTPUT ORDER
EU
EU
EU
EU
HDMI ARC output order
48
UART ENABLE
On
On
On
On
Uart enable
49
RESET MAC ADDRESS
Press OK
Reset Mac address
50
EXIT_FACTORY
Press OK
Exits the Factory mode


