background image

English

15

Preparation

Setting the clock

After connecting MCB275 to the power supply,
set the clock first.

1

 Press and hold 

STANDBY-ON/ ECO

POWER 

to switch the set to Standby mode.

➜ 

The display shows the set time.

2

In the standby mode, press and hold 

CLOCK

on the remote control.

➜ 

The hours digits start flashing.

3

Press 

4

 / 

¢

  (or

 ¡ 

 on the remote

control) repeatedly to set the hours.

4

Press 

CLOCK 

to confirm.

The minute digits start flashing.

5

Press 

4

 / 

¢

  (or

 ¡ 

 on the remote

control) repeatedly to set the minutes.

6

Press 

CLOCK

 to confirm.

–  To exit without storing the clock setting press

STOP 

9

.

Helpful hints:

– The clock setting will be erased when the system
is disconnected from the power supply.

– The set will exit from the clock setting mode if
no button is pressed within 90 seconds.

– To set the clock automatically by using a time
signal which is broadcast together with the RDS
signal see chapter 

RDS:  Automatic clock

setting via RDS

.

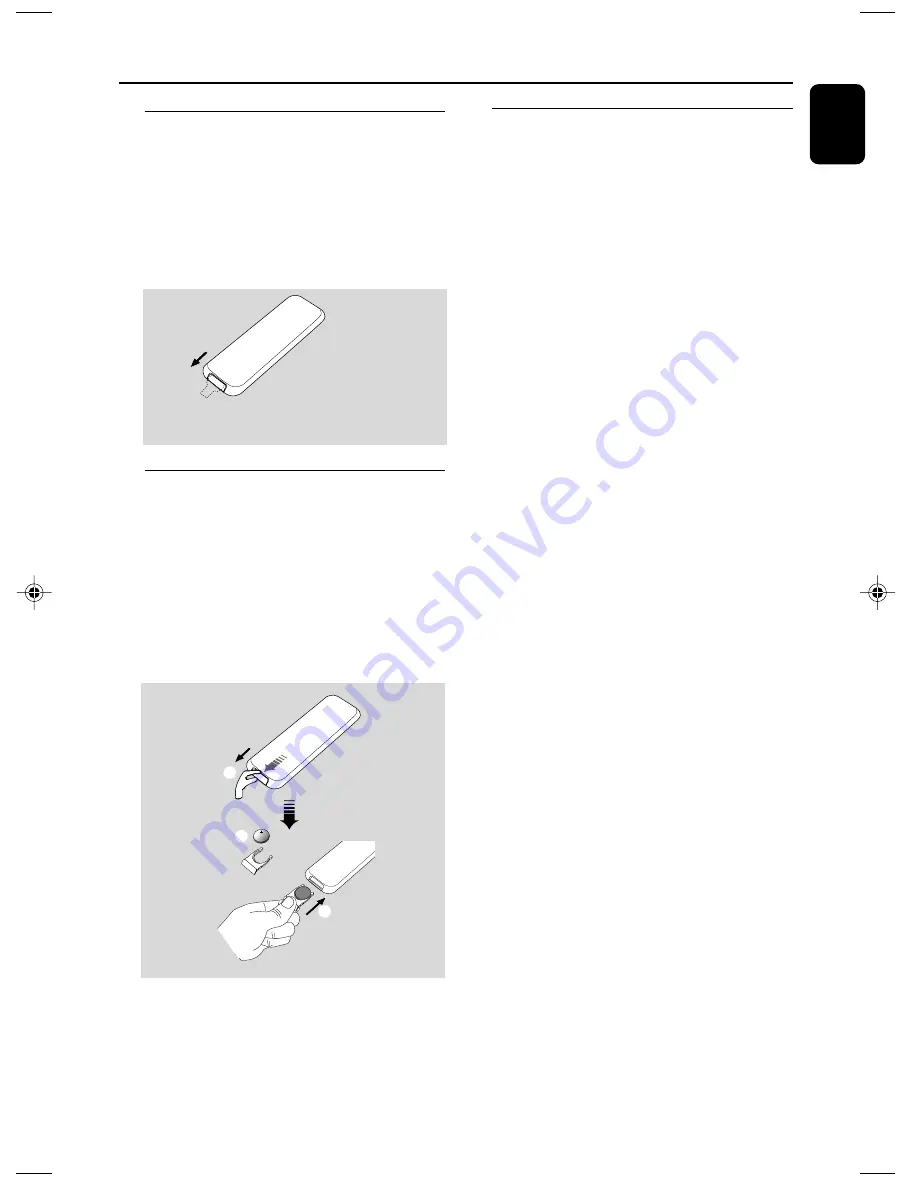
Before using the remote control

1

Pull out the plastic protective sheet.

2

Select the source you wish to control by
pressing one of the source select keys on the
remote control (for example DISC, FM).

3

Then select the desired function (for example

ÉÅ

 ,   

à

 , 

á

).


Remove the plastic protective sheet

Replacing battery (lithium
CR2025) into the remote
control

1

Press the slot on the battery compartment.

2

Pull out the battery compartment.

3

Replace a new battery and fully insert the
battery compartment back to the original
position.


1

2

3

CR2025

CAUTION!
Batteries contain chemical substances, so
they should be disposed of properly.

P001-P030_MCB275_05_Eng

2007.6.13, 10:28

15

Содержание MCB27

Страница 1: ...MCB275 Micro Hi Fi System User manual Brugervejledning Brukerhåndbok ...

Страница 2: ...ollowing code blue neutral N brown live L As these colours may not correspond with the colour markings identifying the terminals in your plug proceed as follows Connect the blue wire to the terminal marked N or coloured black Connect the brown wire to the terminal marked L or coloured red Do not connect either wire to the earth terminal in the plug marked E or e or coloured green or green and yell...

Страница 3: ...3 1 2 3 7 6 5 4 8 9 0 MENU OK SCAN PROGRAM ...

Страница 4: ...4 ...

Страница 5: ...5 English Dansk Bokmål Index English 6 Dansk 31 Bokmål 56 ...

Страница 6: ...the clock 17 CD Discs for playback 17 Playing discs 17 18 Selecting and searching 18 Selecting a different track Finding a passage within a track during playback Programming tracks 18 19 Erasing the program Different play modes REPEAT SHUFFLE 19 Display track information MP3 only 19 DAB Reception Tuning to DAB for the first time 20 Re tuning 20 Manual tuning 20 DAB information display 21 Menu oper...

Страница 7: ...s such as lighted candles should be placed on the apparatus No objects filled with liquids such as vases shall be placed on the apparatus Install this unit near the AC outlet and where the AC power plug can be reached easily If the system is brought directly from a cold to a warm location or is placed in a very damp room moisture may condense on the lens of the disc unit inside the system Should t...

Страница 8: ...ume Using headphones at a high volume can impair your hearing This product can produce sounds in decibel ranges that may cause hearing loss for a normal person even for exposure less than a minute The higher decibel ranges are offered for those that may have already experienced some hearing loss Sound can be deceiving Over time your hearing comfort level adapts to higher volumes of sound So after ...

Страница 9: ...lume level 8 n n n n n 3 5 mm headphone socket Helpful hints Adjust the volume to a moderate level before you plug in the headphones Connecting headphones will switch off the speakers 9 ALBUM PRESET CD USB selects albums for MP3 WMA only FM DAB selects a preset radio station 4 CD USB skips or searches CD tracks titles backwards forwards FM DAB tunes to radio stations Clock Timer adjusts the hours ...

Страница 10: ...ck timer adjusts the hours and minutes for FM and DAB tunes to preset FM radio station or DAB frequency 9 5 6 for CD MP3 CD USB fast searches back and forward within a track disc press and hold 0 ENTER ÉÅ starts or interrupts playback press to select an option DAB only TIMER sets the timer function ALB for MP3 CD USB skips to the beginning of a current previous subsequent album Numerical Keypad 0 ...

Страница 11: ...place you will hear a click See Appendix How to mount your MCB275 onto walls to learn more about wall mounting Mounting MCB275 onto walls INTRO for CD MP3 USB starts scanning of all tracks DISPLAY for CD MP3 USB displays track information during playback VOL adjusts the volume level adjusts the hours and minutes for the clock timer function SLEEP selects the sleeper time 9 stops disc playback or e...

Страница 12: ...ll be negatively affected Connect the cable of the left speaker to LEFT red and black and the cable of the right speaker to RIGHT red and black as follows a Press the clip of the red terminal and fully insert the stripped portion of the colored or marked speaker cable into the socket then release the clip Speaker left DAB FM T type antenna AC power Speaker right b Press the clip of the black termi...

Страница 13: ...g of the USB cable to the USB output terminal of the USB device or for the memory card a Insert the memory card into a card reader not supplied b Use a USB cable not supplied to connect the card reader to the socket on the set s foldable control panel 4 Select AUX mode on the set Helpful hints Always refer to the owner s manual of other equipment for complete connection Connecting a non USB device...

Страница 14: ...ower To disconnect the system from the power supply completely remove the power plug from the wall socket The type plate is located on the rear of the set For users in the U K please follow the instructions on page 2 Warning To avoid overheating of the system a safety circuit has been built in Therefore your system may switch to Standby mode automatically under extreme conditions If this happens l...

Страница 15: ...wer supply The set will exit from the clock setting mode if no button is pressed within 90 seconds To set the clock automatically by using a time signal which is broadcast together with the RDS signal see chapter RDS Automatic clock setting via RDS Before using the remote control 1 Pull out the plastic protective sheet 2 Select the source you wish to control by pressing one of the source select ke...

Страница 16: ...um volume level of 12 will be retained in the set s memory Auto standby When the set has reached the end of CD playback and remains in the stop position for more than 15 minutes the set will switch off automatically to save power Volume control Volume adjustment Adjust the volume by using theVOLUME rotary on the set or by pressing VOLUME on the remote control VOL and the actual value between 1 and...

Страница 17: ... following Empty albums an empty album is an album that does not contain MP3 WMA files and will not be shown in the display Non supported file formats are skipped This means that e g Word documents doc or MP3 files with extension dlf are ignored and will not be played DRM protected WMA files WMA files in Lossless orVBR format IMPORTANT Make sure that the file names of MP3 files end with mp3 For DR...

Страница 18: ...te control and 4 or on the remote control to select the desired album and track MP3 Display shows current album track number Finding a passage within a track during playback 1 During playback press and hold 4 or 5 6 on the remote control The CD plays at a high speed 2 When you recognize the passage you want release 4 or or 5 6 on the remote control Normal playback resumes Programming tracks You ma...

Страница 19: ...d source Open the CD door PROG disappears while PROGRAM CLEAR scrolls Different play modes REPEAT SHUFFLE REPEAT TRACK plays the current track continuously REPEAT ALL plays the entire disc program continuously SHUFFLE plays all the tracks in random order 1 During playback press once or more REPEAT ST or SHUFFLE to select play modes 2 To return to normal playback press REPEAT ST or SHUFFLE repeated...

Страница 20: ...iplex ensemble CH N Press SCAN briefly The display panel shows FULL SCAN and the system will start full scan to search for all available Band III channels again automatically Press and hold SCAN for more than 2 seconds The display panel shows QUICK SCAN and the system will start a quick scan process to search for Band III channels again automatically If you press 9 during scanning the scanning pro...

Страница 21: ...y panel 2 Press 4 or 5 6 on the remote control to select an item you want 3 Press OK ÉÅ or ENTER ÉÅ on the remote control to confirm Programming DAB stations You can save up to 20 DAB stations in the system memory 1 Press PROG on the remote control The display shows PN where N stands for the preset number 2 Press ALBUM PRESET or on the remote control to select your desired preset number Then press...

Страница 22: ...is selected default is preset 1 and all your presets will be erased 2 Press and hold SCAN PROGRAM or PROG on the remote control until AUTO appears Available stations are programmed RDS stations followed by FM stations See RDS After all stations are stored the last preset station will then be played Manual programming 1 Tune to your desired station see Tuning to radio stations 2 Press SCAN PROGRAM ...

Страница 23: ...INFO RDS on the remote control repeatedly to switch through the following information if available Station name Program type for example News Sport etc Radio text messages Frequency Note NO PS NO TYPE or NO TEXT is displayed if you press INFO RDS and no RDS signal is available Automatic clock setting via RDS When the set is on the clock can be automatically set by a time signal broadcast together ...

Страница 24: ... only supports unprotected music with the following file extension mp3 wma b Music bought from on line music stores are not supported because they are secured by Digital Rights Management protection DRM c File name extensions that end with the following are not supported wav m4a m4p mp4 aac and etc No Direct connection can be made from Computer USB port to the product even you have either or both ...

Страница 25: ...Check the USB device has been properly connected See Installation Connecting an additional appliance 2 Press SOURCE once or more to select USB or USB on the remote control NO AUDIO appears if no audio file is found in the USB device 3 Play the USB s audio files as you do with the albums tracks on a CD See CD Notes For compatibility reasons the album track information may differ from what it is dis...

Страница 26: ...ake up volume Press TIMER to confirm The timer is now set and activated Note The set will exit from the timer setting mode if no button is pressed within 90 seconds Activating and deactivating TIMER Press TIMER on the remote repeatedly to activate or deactivate the timer If activated the last set source and start time are displayed If deactivated TIMER OFF appears Helpful hints The timer will not ...

Страница 27: ...cations AMPLIFIER Output power 2 x 5 W RMS 10 W 10 W MPO Signal to noise ratio 75 dBA Frequency response 50 20 000 Hz 3 dB Input sensitivity AUX 0 5V max 2 V Impedance loudspeakers 4 Ω Impedance headphones 32 Ω 1000 Ω 0 5W CD PLAYER Frequency range 30 18000 Hz Signal to noise ratio 75 dBA TUNER FM wave range 87 5 108 MHz DAB wave range 174 240 MHz Number of presets 40 Antenna FM 75 Ω wire SPEAKERS...

Страница 28: ...uts are reversed Problem Solution Insert a disc Wait until the moisture condensation at the lens has cleared Replace or clean the disc see Maintenance Use a finalised CD RW or a correct MP3 WMA CD format disc Check if the number of folders exceeds 99 or the number of titles exceeds 999 Hang up one end of theT shape antenna and keep the other end at horizontal angle to it Increase the distance betw...

Страница 29: ...he distance between the remote control and the system Insert the battery with its polarities signs aligned as indicated Replace the battery Point the remote control directly toward IR sensor on the front of the system Check the set is switched off Set the clock correctly PressTIMER to switch on the timer Power has been interrupted or the power cord has been disconnected Reset the clock timer Troub...

Страница 30: ...NT The wall mounting instructions are for the use of the qualified wall mounting person only Ask a qualified person to help you with the wall mounting which includes drilling holes on the wall and mounting the set onto walls 2 x screws What else you ll need Drilling tools e g electric drill Preparation 1 To find a suitable location for mounting try your necessary rear connections see the chapter I...

Отзывы: