background image

24

6

5

SLEEP

POWER

AV

ON/OFF

POSITION

FREEZE

TV

VCR

ACC

SWAP

SOURCE

PIP CH

UP

DN

SMART

SOUND

SMART

PICTURE

MENU

SURF

VOL

CH

MUTE

CC

STATUS

CLOCK

A/CH

EXIT

TV/VCR

RECORD

MEDIA

INCREDIBLE

VCR

MULTI

1

3

2

FEATURES

CLOSED CAP

   CAPTION MODE

   TEXT MODE

.

.

  TXT 1

..

.

FEATURES

CLOSED CAP


   CAPTION MODE

   TEXT MODE

.

.


   CC 1

..

FEATURES

CLOSED CAP

   CAPTION MODE

   TEXT MODE

.

.

 OFF

..

FEATURES

TIMER

SmartLock

NR

CO

PIP

CLOSED CAP

..

.

.

CAPTION MODE

TEXT MODE

..

FEATURES

REVIEW

PICTURE

SOUND

FEATURES

INSTALL

TIMER

SmartLock

NR

CO

PIP

CLOSED CAP

.

.

TIMER

SmartLock

NR

CO

PIP

CLOSED CAP

..

..

.

.

TIME

ACTIVATE

CHANNEL

START TIME

DISPLAY

..

OFF
TXT 1
TXT 2
TXT 3
TXT 4

OFF
CC 1
CC 2
CC 3
CC 4
CC MUTE

4

7

..

REVIEW

PICTURE

SOUND

FEATURES

INSTALL

MOVIE RATING

– – – – – –

TV RATING

– – – – – – 

BLOCK UNRATED   OFF

NO RATING          OFF

.

.

.

.

.

.

...

.

.

..

.

..

..

..
.

..

..

.

..

..

..

.

..

8

STEREO

C

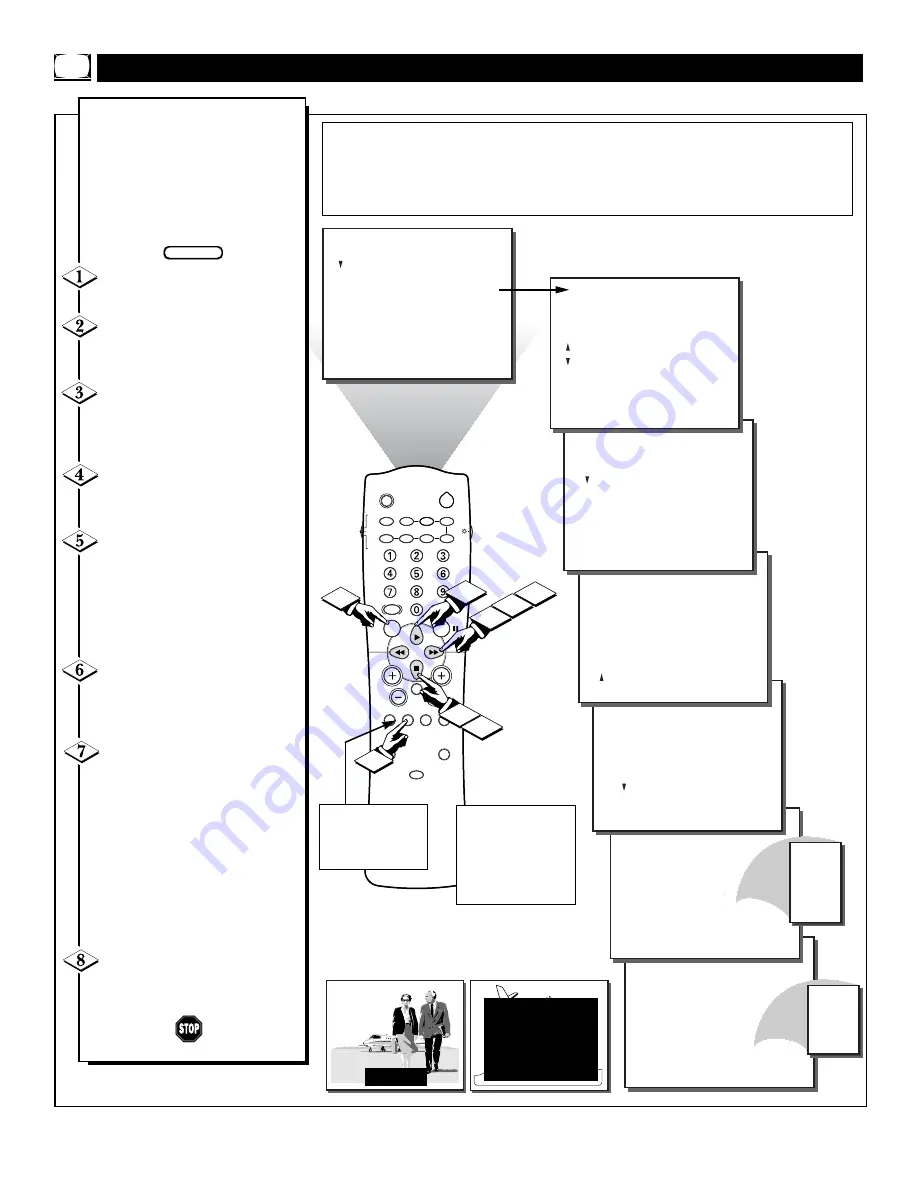
losed Captioning (CC) allows
you to read the voice content of

television programs on the TV
screen. Designed to help the hear-
ing impaired, this feature uses on-
screen “text boxes” to show dia-
logue and conversations while the
TV program is in progress.   

Press the MENU button 

on the

remote to show the on-screen menu.

Press the CURSOR DOWN

button

three times to select the

FEATURES

menu.

Press the CURSOR RIGHT

button 

and the menu will

shift to the left. 

TIMER

will be

highlighted.

Press the CURSOR DOWN

button to highlight the 

CLOSED

CAP

control.

Press the CURSOR RIGHT

button again. 

The menu will

shift to the left and 

CAPTION

MODE

will be highlighted. Then

you could 

press the CURSOR

DOWN 

button

to select 

TEXT

MODE.

Press the CURSOR RIGHT

button

again to highlight the

CAPTION MODE (or TEXT
MODE) 

options area.

Press the CURSOR UP

or

CURSOR DOWN

buttons

to

select the mode you want.

CAPTION MODE:

CC1, CC2,

CC3,CC4, CC MUTE, or OFF
-dialogue and descriptions for the
action on the captioned TV program.

TEXT MODE:

TXT1, TXT2,TXT3,

TXT4, or OFF - often used for chan-
nel guides, schedules, or bulletin
board information for CC programs.

Press the STATUS/EXIT but-

ton

to remove the menu from the

screen.

U

SING THE

C

LOSED

C

APTION

C

ONTROL

BEGIN

JOHN: Why did they move  the
meeting up to this week?
MARSHA: I don't know, but they
are pushing to close the deal.

CLOSE CAPTION PROGRAMS ON WXYZ

ALL ITEMS ARE EASTERN STANDARD TIME (EST)

CHECK LOCAL LISTINGS

FOR TIMES IN YOUR AREA

6:00

TOP OF THE MORNING

12:00   NOONDAY NEWS

6:00

WORLD NEWS FOR TODAY

10:00   THE BEST LITTLE CALL-IN SHOW EVER

9:00

PLAYHOUSE MOVIE OF THE WEEK

1:30

AS YOUR LIFE TURNS MY WORLD AROUND

NOTE: Not all TV programs and product commercials

are broadcasted with

Closed Caption (CC) information. Neither are all Closed Caption modes (CAPTION
1-4 or TEXT 1-4) necessarily being used by broadcast stations during the transmis-
sion of a closed caption program. Refer to your area's TV program listings for the
stations and times of Closed Caption shows.

CAPTION mode 

Example Display

TEXT mode Example Display

TV screen will be 

blocked from viewing

NOTE: 

The CC MUTE

option can be used to set
the TV to turn the
Closed Caption mode
“ON” whenever the
MUTE button is
pressed.

The CC button on the

remote can also be used

to enter the CLOSED

CAPTION menu

directly.

Содержание MAGNAVOX TP2784C199

Страница 1: ...Instructions for use Color Television TP2784C1 3135 015 12641 ...

Страница 2: ...r unit may cause an electrical shock For the safety of everyone in your household please do not remove product covering sThe exclamation point calls attention to features for which you should read the enclosed lit erature closely to prevent operating and maintenance problems WARNING TO PREVENT FIRE OR SHOCK HAZARD DO NOT EXPOSE THIS EQUIPMENT TO RAIN OR MOISTURE CAUTION To prevent electric shock m...

Страница 3: ...ns or as marked on the appliance 11 Power Cord Protection Power supply cords should be routed so that they are not likely to be walked on or pinched by items placed upon or against them paying particular attention to cords and plugs convenience receptacles and the point where they exit from the appliance 12 Cleaning The appliance should be cleaned only as recommended by the manufacturer 13 Power L...

Страница 4: ...ss and Balance Sound Controls 26 Setting the TV for Stereo and SAP Programs 27 Using the Incredible Stereo Control 28 Using the Volume Bar Control 28 Setting the Audio Out Control 29 Using the TV Speaker Control and Audio Output Jacks 30 Using the Audio Video Input Jacks 31 32 TABLE OF CONTENTS SmartClock SmartLock SmartPicture and SmartSound are trademarks of Philips Consumer Electronics Company ...

Страница 5: ...terature included with your TV information packet Please retain all these materials and keep them handy for future reference 1 75 UHF VHF ANT CABLE REAR SURROUND EXT SPEAKERS VCR AUX IN VIDEO AUDIO R L R L 8 R L VIDEO OUT VAR AUDIO OUT SUR AUDIO OUT 75 UHF VHF ANT CABLE REAR SURROUND EXT SPEAKERS VCR AUX IN VIDEO AUDIO R L R L 8 R L VIDEO OUT VAR AUDIO OUT SUR AUDIO OUT 2 Acombination outdoor or i...

Страница 6: ...ight the word PICTURE Press the CURSOR RIGHT button and the menu will shift to the right to display an adjustment bar in front of the BRIGHTNESS control Use the CURSOR LEFT or RIGHT buttons to adjust the BRIGHTNESS level of the pic ture After adjusting the BRIGHT NESS control press the CURSOR DOWN button to select another Picture adjustment COLOR PIC TURE SHARPNESS TINT or COLOR TEMP Use the CURSO...

Страница 7: ...utton three times to select the FEATURES menu Press the CURSOR RIGHT button and the menu will shift to the left to display the TIMER controls Press the CURSOR RIGHT button again to shift the dis play left and highlight the TIME control Press the CURSOR RIGHT button again to highlight the time indicator area Press the NUMBERED buttons to enter the correct time Use the CURSOR UP or CURSOR DOWN butto...

Страница 8: ... 30 12 00 PM OFF 6 4 5 STEREO Just like an alarm clock you can set the TV to turn itself on at the same time everyday Press the MENU button on the remote to show the on screen menu Press the CURSOR DOWN button three times to select the FEATURES menu Press the CURSOR RIGHT button and the menu will shift to the left to display the TIMER controls Press the CURSOR RIGHT button again to shift the dis p...

Страница 9: ... Timer feature you can select a spe cific channel that the television will tune to when the Timer ACTIVATE control is turned ON Press the MENU button on the remote to show the on screen menu Press the CURSOR DOWN button three times to select the FEATURES menu Press the CURSOR RIGHT button and the menu will shift to the left to display the TIMER controls Press the CURSOR RIGHT button again to shift...

Страница 10: ...ature you can select a spe cific time the television will turn on when the Timer ACTIVATE control is turned ON Press the MENU button on the remote to show the on screen menu Press the CURSOR DOWN button three times to select the FEATURES menu Press the CURSOR RIGHT button and the menu will shift to the left to display the TIMER controls Press the CURSOR RIGHT button again to shift the dis play lef...

Страница 11: ...s been set you can use your television as a clock The Timer DISPLAY control allows you to per manently display the time in the upper right corner of the screen Press the MENU button on the remote to show the on screen menu Press the CURSOR DOWN button three times to select the FEATURES menu Press the CURSOR RIGHT button and the menu will shift to the left to display the TIMER controls Press the CU...

Страница 12: ... or more of the following violence sexual situations coarse language or suggestive dialogue R Restricted This programming is specifi cally designed for adults Anyone under the age of 17 should only view this program ming with an accompanying parent or adult guardian It contains one or more of the fol lowing intense violence intense sexual sit uations strong coarse language or intensely suggestive ...

Страница 13: ...rents it isn t possible for your child to unblock a channel without know ing your access code or changing it to a new one If your code changes and you didn t change it then you know it s been altered by someone else and blocked channels have been viewed SmartLock allows parents to block out or censor any chan nels they think children should not watch A channel blocked by the SmartLock control cann...

Страница 14: ...CHANNELS Note You can also block out the use of the A V external inputs on the rear of the TV This stops the viewing of VCR DVD etc programs which can be shown through the A V Input jacks Select AV 1 or AV 2 and select block After your personal access code has been set see previous page you are now ready to select the channels or inputs you want to block out or censor Press the MENU button on the ...

Страница 15: ...V RATING FEATURES SmartLock TV Y TV Y7 TV G TV PG TV RATING 3 6 7 8 9 9 10 TV PG BLOCK V ON S After your personal access code has been set see page 13 you may select specific movie ratings that you want to censor Press the MENU button on the remote to show the on screen menu Press the CURSOR DOWN button three times to select the FEATURES menu Press the CURSOR RIGHT button to shift the menu to the ...

Страница 16: ... you want to cen sor Press the MENU button on the remote to show the on screen menu Press the CURSOR DOWN button three times to select the FEA TURES menu Press the CURSOR RIGHT button to shift the menu to the left then press the CURSOR DOWN button to highlight the SMARTLOCK control Press the CURSOR RIGHT button again to shift the display left Enter current access code will appear within the menu E...

Страница 17: ...G 3 6 7 9 FEATURES SmartLock BLOCKING BLOCK UNRATED NO RATING BLOCK OPTIONS OFF FEATURES SmartLock BLOCKING BLOCK UNRATED NO RATING BLOCK OPTIONS ON 8 After you block specific channels or ratings you must set BLOCKING to ON or OFF in order to activate the blocking To set BLOCKING to ON or OFF follow these steps Press the MENU button on the remote to show the on screen menu Press the CURSOR DOWN bu...

Страница 18: ...ES SmartLock BLOCKING BLOCK UNRATED NO RATING BLOCK OPTIONS ON FEATURES SmartLock BLOCKING BLOCK UNRATED NO RATING BLOCK OPTIONS ON 9 10 In addition to blocking specific ratings or channels you may choose to block all programming that is unrated See explanation on page 12 Press the MENU button on the remote to show the on screen menu Press the CURSOR DOWN button three times to select the FEATURES ...

Страница 19: ...KING BLOCK UNRATED NO RATING BLOCK OPTIONS ON FEATURES SmartLock BLOCKING BLOCK UNRATED NO RATING BLOCK OPTIONS ON 9 8 Some programming is not encod ed with content advisory data by the MPAA or the television broad casters See explanation on page 12 To block such programming follow these steps Press the MENU button on the remote to show the on screen menu Press the CURSOR DOWN button three times t...

Страница 20: ... and all BLOCK OPTIONS are ON Areview screen is available to remind you which ratings you have blocked and which Block Options you have selected Press the MENU button on the remote to show the on screen menu REVIEW should be highlighted The ratings that you have blocked will appear on the right side of the menu If you have blocked specific sub rat ings such as V for Violence in the TV PG category ...

Страница 21: ...ll appear when someone tries to view blocked programming Shown here are examples of these mes sages The message is determined by how the current programming is blocked You may view the blocked programming and turn off the SmartLock feature by entering your access code Access a channel directly by pressing the Numbered buttons on the remote control If the programming is blocked a message will appea...

Страница 22: ...K UNRATED OFF NO RATING OFF 6 7 STEREO Due to many reasons such as poor cable reception the pic ture can sometimes appear slightly speckled signal noise in the pic ture The NR Noise Reduction control can help eliminate this type of interference and improve the quality of the picture Press the MENU button on the remote to show the on screen menu Press the CURSOR DOWN button three times to select th...

Страница 23: ...ATURES INSTALL MOVIE RATING TV RATING BLOCK UNRATED OFF NO RATING OFF STEREO The Contrast feature helps to sharpen the picture quality The black portions of the picture become richer in darkness and the whites become brighter Press the MENU button on the remote to show the on screen menu Press the CURSOR DOWN button three times to select the FEATURES menu Press the CURSOR RIGHT button and the menu...

Страница 24: ...uld press the CURSOR DOWN button to select TEXT MODE Press the CURSOR RIGHT button again to highlight the CAPTION MODE or TEXT MODE options area Press the CURSOR UP or CURSOR DOWN buttons to select the mode you want CAPTION MODE CC1 CC2 CC3 CC4 CC MUTE or OFF dialogue and descriptions for the action on the captioned TV program TEXT MODE TXT1 TXT2 TXT3 TXT4 or OFF often used for chan nel guides sch...

Страница 25: ...cal ly turning itself off Press the SLEEP button on the remote control The SLEEP timer on screen display will appear in the lower center of the display Within five seconds press the SLEEP button repeatedly to pick the amount of time 15 minutes to 2 hours ahead before the TV will turn itself off An on screen count down will appear during the last minute before the TV shuts itself off USING THE SLEE...

Страница 26: ...r BALANCE may all be used to adjust the sound playback of TV programs Press the MENU button on the remote to show the on screen menu Press the CURSOR DOWN button twice to select the SOUND menu Press the CURSOR RIGHT button and the menu will shift to the right to display an adjustment bar in front of the TRE BLE control Use the CURSOR LEFT or RIGHT buttons to adjust the TREBLE high frequency level ...

Страница 27: ...T buttons to select STEREO or MONO With STEREO selected the television will reproduce any stereo broad cast signal it receives SAP is an additional part of the stereo broadcast system Sent as a third audio channel SAP can be heard apart from the current TV program sound TV stations are free to use SAP for any number of purposes but many experts believe it will be used for foreign language translat...

Страница 28: ...IBLE STEREO CONTROL The Incredible Stereo feature adds greater depth and dimen sion to both monaural MONO and stereo TV sound With the con trol turned ON the TV s speakers can add even wider sound separa tion to normal broadcasts Press the INCREDIBLE STEREO button on the remote to turn the Incredible Stereo feature ON When the TV signal is being received in STEREO the on screen display will read I...

Страница 29: ...DIO OUTPUT jacks to the AUDIO INPUT jacks on a stereo receiver set AUDIO OUT to either VARIABLE or FIXED to determine whether you adjust the volume at the stereo or at the TV If you select VARIABLE change the vol ume at the TV using the TV s remote control If you select FIXED adjust the volume at the stereo using the stereo s controls To select FIXED or VARIABLE follow these steps Press the MENU b...

Страница 30: ... ight and L eft AUDIO OUT jacks on the TV to the R and L Audio Input jacks on your amplifier or sound system Set the audio system s volume to a normal listening level Turn the TV and audio system ON You can now adjust the sound level coming from the audio sys tem with the VOLUME or buttons on the TV or remote To hear the TV sound from only the audio system speakers Press the MENU button on the rem...

Страница 31: ...e TV ON Use the AV button on the remote to select the AV 1 chan nel With the VCR ON and a prere corded tape inserted press the PLAY button to view the tape on the television AUDIO IN RED WHITE VCR EQUIPPED WITH VIDEO AND AUDIO OUTPUT JACKS VIDEO IN YELLOW USING THE AUDIO VIDEO INPUT JACKS BEGIN BACK OF VCR NOTE Repeatedly pressing the AV button on the remote will toggle the picture source from the...

Страница 32: ...r disc on the TV AUDIO IN RED WHITE SMART HELP The S VIDEO and VIDEO IN 1 inputs are in parallel The S VIDEO input is will take prece dence when in use If separate video signals are connected to the S Video and VIDEO IN 1 inputs the signal from the VIDEO IN 1 input will not be useable If you have added AV 1 to the TV s channel memory just press the CHANNEL or buttons until the AV 1 channel mode is...

Страница 33: ...e Each SmartPicture setting is preset at the factory to automatically adjust the TV s Brightness Color Picture Sharpness Tint and Color Temperature levels Press the SMART PICTURE button on the remote control The current SmartPicture setting will appear in the middle of the screen Press the SMART PICTURE button repeatedly to select either PERSONAL MOVIES SPORTS WEAK SIGNAL or MULTI MEDIA picture se...

Страница 34: ...ewing Music for musical pro gramming and Voice when the program is mainly dialogue To select any of the options follow the directions below Press the SMART SOUND but ton on the remote control The cur rent SmartSound setting will appear in the middle of the screen Press the SMART SOUND button repeatedly to toggle between the four settings PERSON AL VOICE MUSIC or THEATRE Remember only the PERSONAL ...

Страница 35: ...emote The on screen display may read THE SURF LIST IS EMPTY Press to add While the Surf list message or the Surf channel list appears on the screen press the CURSOR RIGHT button to add the pre sent channel to the SURF list Press the CURSOR RIGHT button again to delete the present channel from the SURF list Repeat steps 1 through 3 to add additional channels up to 10 to the SURF list USING THE CHAN...

Страница 36: ...tial check to see if going on to the following section is necessary Place the TV VCR ACC Mode Switch in the proper posi tion Point the remote control at the device and press the POWER button Does the remote turn the device ON If YES stop and try other func tion buttons on the remote If they also work the device then the remote is ready and no fur ther steps are needed If NO continue Cable Converte...

Страница 37: ...oper posi tion Press the VCR RECORD button on the remote control and release Press the SMART SOUND button on the remote within 30 seconds then release Enter the THREE DIGIT REMOTE CODE NUMBER for your desired device The remote is now ready to send commands to the unit Point the remote at the Device Press the POWER button on the remote to turn the unit ON Cable Converter SMART HELP Remember if this...

Страница 38: ...ce you are attempting to pro gram Place the TV VCR ACC Mode Switch in the proper posi tion Press and hold the VCR RECORD and the SMART SOUND buttons simultaneous ly The device will begin to change channels after the remote identifies the correct code When the channels start to change release the VCR RECORD and SMART SOUND buttons The remote should be ready to oper ate the device Cable Converter SM...

Страница 39: ...ende 297 320 321 Okano 346 Olympus 035 226 Optimus 037 048 058 104 162 432 454 Optonica 062 Orion 004 295 348 352 479 Panasonic 035 077 162 225 226 378 454 Penney 035 037 038 040 042 065 105 Pentax 042 065 105 Philco 035 Philips 035 062 081 110 403 Pilot 037 Pioneer 058 067 Portland 020 Profax 322 Profitronic 240 Protec 072 Pulsar 039 051 Quarter 046 Quartz 046 Quasar 035 077 162 454 RCA 042 060 0...

Страница 40: ...etwork System 749 Jerrold 627 Magnavox 722 724 Memorex 724 Panasonic 701 Philips 722 724 Primestar 627 RCA 566 Sony 639 Toshiba 790 Uniden 724 REMOTE Satellite CODE NO AST 351 Akai 515 Alba 352 515 613 Aldea 288 Amstrad 080 252 345 461 509 689 Ankaro 220 288 369 Anitron 183 Armstrong 243 Astra 108 Avalon 396 Axis 369 BT 515 668 Beko 189 Best 369 Boca 243 513 Bush 067 Cambridge 344 515 Channel Mast...

Страница 41: ... Pause FAST FORWARD BUTTON Press to rapidly advance the tape For some VCRs you may need to press the STOP button first then the FAST FORWARD but ton During playback press or press and hold the button to view the picture moving rapidly in the forward direction CHANNEL BUTTONS Press to scan up or down through the VCR channel numbers CLOCK TV VCR BUTTON Press to select VCR position VCR indicator on t...

Страница 42: ... Also be sure that there is a nor mal Cable or Antenna signal con nection between the VCR and the TV This completes the basic PIP hookup Refer to pages 46 47 for More PIP Connections Move to the next page after the VCR to TV PIP connections have been completed SMART HELP Remember for other pos sible connections see pages 46 47 for the More PIP Connections section If you have a single Monaural Audi...

Страница 43: ...n the TV and VCR or other device hooked to the exter nal A V connections ON Press the PIP ON OFF but ton on the remote control The PIP window should appear in the upper right hand portion of the screen Press the PIP SOURCE but ton on the remote to toggle between the different external connections The PIP SOURCE may come from the following AV 1 AV 2 SVID R for picture signal coming from the externa...

Страница 44: ...the PIP picture from the screen Press the PIP POSITION button on the remote to move the PIP picture to any of the four corners Press the PIP FREEZE but ton on the remote to stop the action within the PIP window Press the PIP FREEZE button again to resume the normal view ing action Press the PIP CH annel UP DN buttons on the remote to choose a different channel or a different PIP source Press the P...

Страница 45: ... menu Press the CURSOR RIGHT button again to shift the dis play to the COLOR and TINT adjustment bars Press the CURSOR DOWN or CURSOR button to select COLOR or TINT then press the CURSOR RIGHT and CURSOR LEFT buttons to adjust the COLOR and TINT bars to the desired levels Press the STATUS EXIT but ton to remove the menu from the screen ADJUSTING THE PIP COLOR AND TINT SMART HELP Remember although ...

Страница 46: ... the ANTENNA plug on the rear of the television Connect the CABLE OUT on the Converter to the ANT IN on the VCR Connect the VIDEO OUT jack on the VCR to the VIDEO IN jack on the TV Also connect the AUDIO OUT right and left jacks from the VCR to the AUDIO IN jacks on the television MORE PIP PICTURE IN PICTURE CONNECTIONS BEGIN REAR OF TV AUDIO CABLES RED AND WHITE VIDEO CABLE YELLOW VCR CABLE TV CO...

Страница 47: ...nd white Audio Cables from the AUDIO OUT jacks on the VCR to the AUDIO IN jacks on the rear of the TV labeled AUDIO L R MONO IN 2 Connect a second yellow Video Cable from the VIDEO OUT jack on the Video Disc Player to the VIDEO IN jack on the TV labeled VIDEO IN 1 Then connect a sec ond set of red and white Audio Cables from the AUDIO OUT jacks on the Digital Video Disc Player to the AUDIO IN jack...

Страница 48: ... channel selection Add desired channel numbers CHANNEL EDIT control into TV memory Check to be sure the TUNER control is set to the CABLE option Please make these simple checks before calling for ser vice These tips can save you time and money since charges for TV installation and adjustment of customer controls are not cov ered under your warranty Cleaning and Care To avoid possible shock hazard ...

Страница 49: ...l Television Sound MTS broadcast stan dard The most frequently proposed use for SAP is the simultaneous bilingual broadcast of TV program material Status Exit Allows the user to quickly confirm what channel number is currently being viewed Status can also be used to clear the Television of on screen displays or information rather than waiting for the displays to time out or automatically disappear...

Страница 50: ...RENEWED 90 DAY LIMITED WARRANTY ...

Отзывы: