Service Modes, Error Codes and Fault Finding
GB 23
L01.1A
5.
•
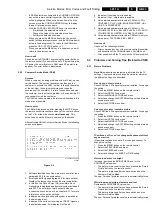
In SAM, select menu items with the CURSOR UP/DOWN
key on the remote control transmitter. The selected item
will be highlighted. When not all menu items fit on the
screen, move the CURSOR UP/DOWN key to display
the next / previous menu items.
•
With the CURSOR LEFT/RIGHT keys, it is possible to:
–
(De)activate the selected menu item.
–
Change the value of the selected menu item.
–
Activate the selected submenu.
•
When you press the MENU button twice, the set will
switch to the normal user menus (with the SAM mode still
active in the background). To return to the SAM menu
press the OSD / STATUS button [ i+ ].
•
When you press the MENU key in a submenu, you will
return to the previous menu.
How to exit
Switch the set to STANDBY by pressing the power button on
the remote control (if you switch the set 'off' by removing the
AC power, the set will return in SAM when AC power is re-
applied). The error buffer is
not
cleared.
5.2.3
Customer Service Mode (CSM)
Purpose
When a customer is having problems with his TV-set, he can
call his dealer. The service technician can than ask the
customer to activate the CSM, in order to identify the status
of the set. Now, the service technician can judge the
severness of the complaint. In a lot of cases he can advise
the customer how to solve the problem, or he can decide if it
is necessary to visit the customer.
The CSM is a read only mode, therefore modifications in this
mode are not possible.
How to enter
The CSM will be turned on after pressing the MUTE key on
the remote control transmitter and any of the control buttons
on the TV for at least 4 seconds
simultaneously
. This
activation only works if there is no menu on the screen.
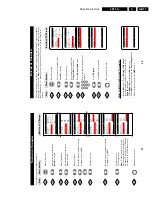
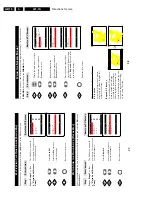
After switching ON the Customer Service Mode, the following
screen will appear:
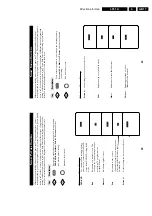
Figure 5-5
1. Software identification of the main micro controller (see
paragraph 5.2.2 for an explanation).
2. Error code buffer (see paragraph 5.5 for more details).
Displays the last seven errors of the error code buffer.
3. In this line, the Option Bytes (OB) are visible. Each
Option Byte is displayed as a decimal number between 0
and 255. The set may not work correctly when an
incorrect option code is set. See chapter 8.3.1 for more
information on the option settings.
4. Indicates which color and sound system is installed for
the selected pre-set.
5. Indicates if the set is not receiving an ‘IDENT’ signal on
the selected source. It will display ‘Not Tuned’.
6. Indicates if the sleep timer is enabled.
7. Indicates if the V-chip feature is enabled.
8. Value indicates parameter levels at CSM entry. CO=
CONTRAST, CL= COLOR, BR= BRIGHTNESS, HU=
HUE, SH= SHARPNESS
9. Value indicates parameter levels at CSM entry. VL=
VOLUME LEVEL, BL= BALANCE LEVEL, AVL= AUTO
VOLUME LEVEL LIMITER, DV= DELTA VOLUME
10. Value indicates parameter levels at CSM entry (only for
stereo sets). TR= TREBLE, BS= BASS
How to exit
Use one of the following methods:
•
After you press ‘any’ key of the remote control transmitter
with exception of the CHANNEL and VOLUME keys.
•
After you switch-off the TV set with the AC power switch.
5.3
Problems and Solving Tips (Related to CSM)
5.3.1
Picture Problems
Note:
Below described problems are all related to the TV
settings. The procedures to change the value (or status) of
the different settings are described.
No colours / noise in picture
Check CSM line 4. Wrong colour system installed. To change
the setting:
1. Press the MENU button on the remote control.
2. Select the INSTALL sub menu.
3. Select the MANUAL STORE sub menu.
4. Select and change the SYSTEM setting until picture and
sound are correct.
5. Select the STORE menu item.
Colours not correct / unstable picture
Check CSM line 4. Wrong colour system installed. To change
the setting:
1. Press the MENU button on the remote control.
2. Select the INSTALL sub menu.
3. Select the MANUAL STORE sub menu.
4. Select and change the SYSTEM setting until picture and
sound are correct.
5. Select the STORE menu item.
TV switches ‘off’ (or ‘on’) or changes the channel without
any user action
(Sleep)timer switched the set ‘off’ or changed channel. To
change the setting:
1. Press the MENU button on the remote control.
2. Select the FEATURES sub menu.
3. Select the TIMER sub menu.
4. Select and change the SLEEP or TIME setting.
Picture too dark or too bright
Increase / decrease the BRIGHTNESS and / or the
CONTRAST value when:
•
The picture improves after you have pressed the ‘Smart
Picture’ button on the remote control.
•
The picture improves after you have switched on the
Customer Service Mode
The new ‘Personal’ preference value is automatically stored.
White line around picture elements and text
Decrease the SHARPNESS value when:
•
The picture improves after you have pressed the ‘Smart
Picture’ button on the remote control.
•
The picture improves after you have switched on the
Customer Service Mode
The new ‘Personal’ preference value is automatically stored.
1
A A A B C D
X . Y
C S M
2
C O D E S
X X X X X X X X X X
3
O P
X X X
X X X
X X X
X X X
X X X
X X X
X X X
4
D E T E C T E D S Y S T E M D E T E C T E D S O U N D
5
N O T T U N E D S K I P P E D
6
T I M E R
7
8
C O
X X
C L X X
B R X X H U X X
S H X X
9
V L
X X
B L
X X
A V L
D V
X X
10
T R
X X
B S
X X
CL 16532008_046.eps
220501
Содержание L01.1A
Страница 48: ...Spare Parts List GB 88 L01 1A 10 ...
Страница 66: ...44 L01 1A 7 Schematics and PWB s Layout Large Signal Panel Top View CL 16532053_005 eps 050601 ...
Страница 78: ...56 L01 1A 7 Schematics and PWB s Layout PIP Panel Top View CL 16532010_010 eps 210301 ...
Страница 79: ...Schematics and PWB s 57 L01 1A 7 Layout PIP Panel Bottom View CL 16532010_011 eps 210301 ...
Страница 88: ...66 L01 1A 7 Schematics and PWB s Personal Notes Personal Notes ...

