background image

English

EN


 29

Pl

ay

Play from USB device 

This unit can only play/view MP3, WMA, DivX 
(Ultra) or JPEG 

fi

 les that are stored on such 

devices.

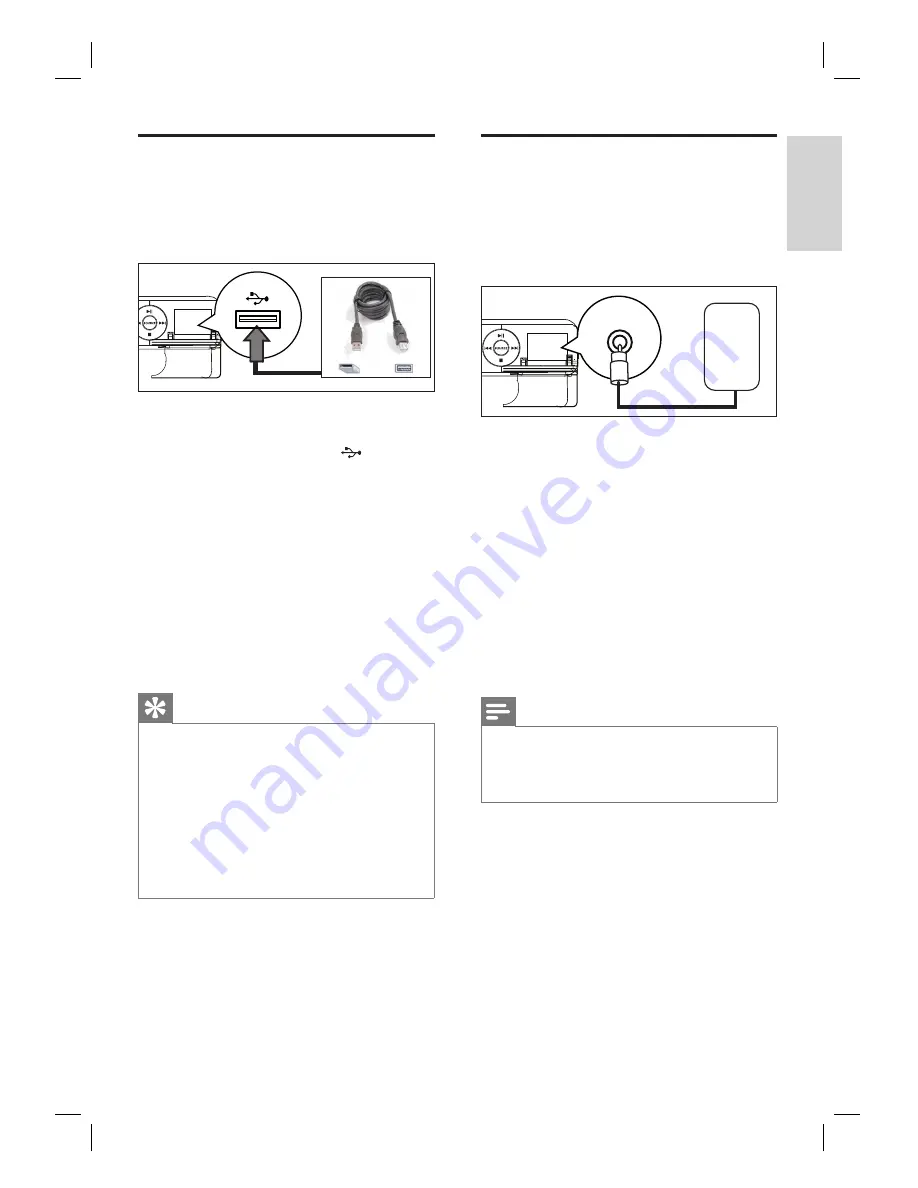
Connect a digital camera that comply with 
the PTP standard, USB 

fl

 ash drive, or USB 

memory card reader to the


(USB)


socket on this unit. 

Press 

USB

.

  A contents menu is displayed.

Select a 

fi

 le to play, then press 

u

For more information, see chapters 
‘Play music, Play photo, Play video’ for 
details.

To stop play, press


x

 or remove the USB 

device.


Tips

If the device does not 

fi

 t into the USB socket, 

connect it through a USB extension cable.
If a multiple USB card reader is used, only one of the 
connected USB drive contents can be accessed. 
If a USB HDD is used, ensure that an auxiliary 
power cord connected to the USB HDD for proper 
operations.
Digital cameras that use PTP protocol or require 
additional programme installation when connected 
to a PC are not supported.

Play from portable media 

player

Simply connect your portable media player (e.g. 
MP3 player) to this unit to enjoy superb sound 
quality from your music collections.

MP3 LINK

Connect a 3.5mm stereo audio cable (not 
supplied) from the 

MP3 LINK

 socket on 

this unit to the ‘headphone’ socket on your 
portable media player.

Press 

AUX/DI /MP3 LINK

 repeatedly until 

‘MP3 LINK’ is displayed.

Start play on your portable media player.

See chapter ‘Adjust Sound’ to enhance 
the audio output.

To stop play, press STOP button on your 
portable media player.

 Note

Control playback is only possible on your portable 
media player.
Stop play on the portable media player before you 
switch to other play media/source.

Содержание HTS3568DW

Страница 1: ...HTS3568DW Register your product and get support at www philips com welcome EN DVD Home Theatre System 5 ZH_CN DVD 家庭影院系统 49 ZH_TW DVD 家庭劇院系統 95 MS_MY SistemTeater Rumah DVD 141 ...

Страница 2: ...has been tested and found to comply with the limits for a Class B digital device pursuant to Part 15 of the FCC Rules These limits are designed to provide reasonable protection against harmful interference in a residential installation This equipment generates uses and can radiate radio frequency energy and if not installed and used in accordance with the instructions may cause harmful interferenc...

Страница 3: ...rect viewing channel 17 Select menu display language 17 Turn on Progressive Scan 18 Change speakers settings 19 Activate EasyLink control 20 Select a play source 21 5 Play 22 Play from disc 22 Play video 23 Play music 26 Play photo 27 Play from USB device 29 Play from portable media player 29 Play from iPod 30 Play from radio 31 6 Adjust sound 33 Control the volume 33 Select surround sound 33 Sele...

Страница 4: ...sassembly is prohibited 1 Important Safety and important notice Warning Risk of fire or electric shock Ensure that air can circulate freely through the ventilation holes on this unit Allow at least 5 10 cm clearance around the unit Never expose this unit to direct sunlight naked flames or heat Never place this unit on other electrical equipment Keep away from this unit during lightning storms Neve...

Страница 5: ...devices over HDMI It enables the connected devices to control each other with a single remote control Note Philips does not guarantee 100 interoperability with all HDMI CEC devices Listen to rich uncompressed multi channel surround sound This DVD Home Theatre supports 5 1 channels of uncompressed audio which realises real to life sound and makes you feel that you are really there USB direct and MP...

Страница 6: ... MP3 LINK switch to AUX1 AUX2 DI DIGITAL IN or MP3 LINK that corresponds to the socket you used to connect the external device DOCK switch to the iPod that is connected to the docking station d INFO Display the current status or disc information Display photo files in 12 thumbnails view e OPTIONS Access or exit Options menu this menu provides various setting options f u Play Pause Start or pause d...

Страница 7: ...D version 2 0 or SVCD with PBC turned on return to the menu during playback n í ë Previous Next Skip to the previous or next title chapter track RADIO select a preset radio station o H Mute Mute or restore the volume p VOL Adjust the volume level q SURROUND Switch audio output to multi channel surround stereo or party mode r Numeric buttons Enter a preset number or item to play s SUBTITLE Select D...

Страница 8: ...vious or next title chapter track Press and hold for fast backward or forward search RADIO select a preset radio station g SOURCE Select a play media DISC FM AUX1 AUX2 DI DIGITAL IN MP3 LINK or DOCK Note The following sockets are under the flap at the right corner of the main unit OPEN B h MIC socket To connect microphone i MP3 LINK socket To connect portable audio player j MIC LEVEL Switch to mic...

Страница 9: ...om the power outlet Place the unit Never place this unit an enclosed cabinet Install this unit near the AC outlet where the AC power plug can be easily reached SUBWOOFER FRONT RIGHT FRONT LEFT CENTER REAR RIGHT REAR LEFT 1 3 2 4 2 2 2 2 1 Place this DVD Home Theatre unit near to the TV 2 Place the speakers system as per the diagram shown above Find the most suitable placement for the speakers base...

Страница 10: ...e not supplied from the HDMI OUT on this unit to the HDMI IN socket on your TV Note The HDMI connector is only compatible with HDMI compliant TVs and DVI TVs Tips To optimise the video output see chapter Adjust settings Video Setup HDMI Setup for details This unit is HDMI CEC compatible It enables connected TV device to control each other over HDMI see chapter Activate EasyLink control for details...

Страница 11: ...ct to S Video socket S VIDEO IN S VIDEO 1 Connect a S video cable not supplied from the VIDEO OUT S VIDEO socket on this unit to the S Video input socket on your TV Tips The component video input socket on your TV may be labelled as Y C or S VHS This type of connections provide standard picture quality Option 4 Connect to Video CVBS socket CVBS VIDEO IN 1 Connect a composite video cable yellow sup...

Страница 12: ...1 Connect the speaker cables to the matching colour sockets on the speakers or speaker stands Connect speaker to speaker stand 1 Attach the speakers to the speaker stands and secure the position with screws Connect speakers and subwoofer FRONT LEFT FRONT RIGHT FRONT CENTER SUBWOOFER 1 Connect the centre front left front right speakers and subwoofer to the matching sockets on this unit Note Ensure ...

Страница 13: ...ds to the wall 2 Connect the power cord when all the required connections are done and you are ready to enjoy this DVD Home Theatre unit Connect other devices This section describes how you can route the sound from other devices to this DVD Home Theatre unit in order enjoy sound output or audio play with multi channel surround capabilities Connect audio from TV AUX 1 1 Connect an audio cable not s...

Страница 14: ... to digital socket COAXIAL OUT DIGITAL OUT 1 Connect a coaxial cable not supplied from the DIGITAL IN COAXIAL socket on this unit to the COAXIAL DIGITAL OUT socket on the device Note To listen to the audio output from this connection press AUX DI MP3 LINK repeatedly until DI is displayed on the display panel Connect portable media player MP3 LINK MP3 1 Connect a 3 5mm stereo audio cable not suppli...

Страница 15: ...atre unit only support audio play from your iPod To listen to the audio output from this connection press DOCK Connect to power outlet Note Before connect to power outlet ensure that the voltage selector at the rear of this unit is set to the local power line voltage 1 Connect the power cords from the DVD Home Theatre unit and other devices to the power outlets when all the required connections ar...

Страница 16: ...ies Control a play source 1 Select the source you wish to control by pressing the DISC USB RADIO AUX DI MP3 LINK or DOCK button 2 Then select the desired function for example í ë Navigate through the menu 1 Point the remote control directly at the remote sensor on this unit and select the desired function 2 Use the following buttons on the remote control to navigate through the on screen menus But...

Страница 17: ...select the correct input on your TV Select menu display language Note You can skip this setting if this unit is connected to a HDMI CEC compliant TV It switches automatically to the same OSD menu language as per your TV setting 1 Press DISC 2 Press OPTIONS General Setup menu is displayed 3 Press B 4 Press vV to select OSD Language in the menu then press B General Setup Auto Screen Saver DivX R VOD...

Страница 18: ...then press OK A warning message is displayed 6 To proceed select OK in the menu and press OK The progressive setup is complete Note If a blank distorted screen is displayed wait for 15 seconds for the auto recover If no picture displayed turn off the progressive scan mode as follows 1 Press Z to open the disc compartment 2 Press b 3 Press AUDIO SYNC 7 To exit the menu press OPTIONS 8 You can now t...

Страница 19: ...Front Right Center Subwoofer Rear Left Rear Right 0dB 0dB 0dB 0dB 0dB 0dB 5 Press b B to adjust the volume level then press OK The test tone is emitted from the speaker which you are adjusting Repeat the above setting for other speakers until all the speakers output level sounds equally balance To set the output delay time centre and rear speakers only 6 Select Speakers Delay in the menu then pres...

Страница 20: ...udio Control This unit is able to render the audio signals from the active source It switches automatically to the corresponding audio input and output the sound from its speakers system Before you can enjoy this function you have to map the audio inputs to the connected devices You can use any HDMI CEC TV device remote control to adjust the volume Note To enable one touch play function a video di...

Страница 21: ...map other connected devices 10 To exit the menu press OPTIONS Select a play source On the main unit 1 Press SOURCE button repeatedly to select DISC FM AUX1 AUX2 DI DIGITAL IN MP3 LINK DOCK DISC On the remote control Press DISC to switch to DISC mode Press USB to switch to USB mode Press RADIO to switch to FM band Press DOCK to switch to iPod mode Press AUX DI MP3 LINK repeatedly to listen to the a...

Страница 22: ...ther than discs into the disc compartment Never look into the laser beam inside the Home Theatre unit 1 Press Z to open the disc compartment 2 Insert a disc with its label facing up For double sided disc load the side to play faces up 3 Press Z to close the disc compartment and start disc play To view disc play turn on the TV to the correct viewing channel for this DVD Home Theatre unit 4 To stop ...

Страница 23: ...v V Slow motion reverse forward play To change play speed press this button repeatedly For VCD only forward play is possible Change video play 1 Play a title 2 Use the remote control to change the video play Button Action Change audio language Only applicable to discs with multiple audio language or channel Change subtitle language Only applicable to discs with multiple subtitle language Toggle th...

Страница 24: ...During playback you can press MENU to return to the menu if the PBC mode is on 2 To preview the contents of the disc press DISC To exit the menu press DISC Select Digest Type Track Digest Disc Interval Track Interval Track Digest It plays the first few seconds of each track in a disc Disc Interval It divides the total disc time by six and plays the first few seconds of these intervals Track Interv...

Страница 25: ...Time chapter time Disc Time disc time Track Time track time 3 Press the number buttons to change the time where you want to skip to then press OK Set repeat play for a specific section 1 During playback press INFO The disc status menu is displayed 2 Select Repeat in the menu then press B 3 Move to A B in the menu then press OK to set the starting point 4 Press OK again to set the ending point Repe...

Страница 26: ...General Setup DivX R VOD Code for details If the subtitle does not appear correctly change the subtitle language see chapter Adjust settings Preferences DivX Subtitle for details The subtitle can only be displayed up to an average of 45 characters This unit can play DivX video files that are up to 4GB in size Play music Note For some commercial audio disc playback may resume from the point where i...

Страница 27: ...rted Some WMA is protected by Digital Rights Management DRM it cannot be played on this unit Folders files exceed the supported limit of this unit will not be displayed or played Tips To display the data disc contents without folders see chapter Adjust settings Preferences MP3 JPEG Nav for details Play photo Play photos as slideshow This unit can play JPEG photos files with jpeg or jpg extensions ...

Страница 28: ...t be displayed or played Control photo play 1 Play photo slideshow 2 Use the remote control to control the photo Button Action b Skip to the previous photo B Skip to the next photo v Rotate the photo clockwise V Rotate the photo anti clockwise Zoom in out Play will pause while in zoom mode Stop play Play musical slideshow Play MP3 WMA music files and JPEG photo files simultaneously to create music...

Страница 29: ...sure that an auxiliary power cord connected to the USB HDD for proper operations Digital cameras that use PTP protocol or require additional programme installation when connected to a PC are not supported Play from portable media player Simply connect your portable media player e g MP3 player to this unit to enjoy superb sound quality from your music collections MP3 LINK 1 Connect a 3 5mm stereo a...

Страница 30: ...s and iPhones are not supported Prepare the docking station If your iPod cannot be fit into the docking station adjust the support as below A B A adjustable support B knob 1 Turn the knob B at the bottom of the docking station anti clockwise to loosen the adjustable support 2 Adjust the support A until it can fit your iPod 3 Turn the knob clockwise to tighten it Control iPod music DOCK 1 Connect t...

Страница 31: ...ix its ends to the wall 1 2 Tips For better FM stereo reception connect an external FM antenna not supplied Position the antenna as far away as possible from your TV VCR or other radiation source to prevent interference First time tuning The first time when you access RADIO mode follow the instructions to install the radio stations 1 Press RADIO AUTO INSTALL PRESS PLAY is displayed 2 Press u All t...

Страница 32: ...ss than 5 stations are detected during radio installation CHECK ANTENNA is displayed Search and store radio stations individually 1 Press RADIO 2 Press m M The radio frequency indication starts to change until a radio station is detected 3 Repeat step 2 until you tune to the radio station you wish to store To finetune the radio frequency press vV 4 Press PROGRAM If no action is carried out within ...

Страница 33: ... Pro Logic II STEREO Stereo sound Select a preset sound effect 1 Press SOUND MODES repeatedly to select a sound effect that most suits the video or music you play Video Music Descriptions CONCERT CLASSIC Flat and pure sound mode Ideal for listening to classical music and watching live concert DVDs DRAMA LOUNGE Moderate sound mode suitable for lounge music and watching dramas ACTION ROCK Enhanced l...

Страница 34: ...d Once you sing through the microphone the vocal will be cancelled automatically Note You cannot cancel the voice output from MP3 JPEG or SACD discs Microphone settings 1 Turn on the TV to the correct viewing channel for this unit 2 Press KARAOKE Microphone Setup menu is displayed 3 Select an option and change the setting then press OK Mic Turn on or off microphone output On turn on microphone Off...

Страница 35: ...isc in the disc compartment maximum 40 discs can be locked Lock restrict access to the current disc The next time you want to play this disc or unlock it you need to enter the password Unlock all discs can be played Tips To set or change your password go to Preferences Password Display Dim Change the brightness level of the display panel to suit the lighting in your room 100 normal brightness 70 m...

Страница 36: ...vX videos rented or purchased through the DivX VOD Video On Demand service can be played only on the device to which it is registered Audio setup 1 Press OPTIONS General Setup menu is displayed 2 Press V to select Audio Setup then press B 3 Select an option then press OK Audio Setup Speakers Volume Speakers Delay HDMI Audio CD Upsampling Audio Sync See the explanations of the above options in the ...

Страница 37: ... 1ms setting for every 30cm distance between the speaker and the listening position HDMI Audio When you connect this unit and TV with HDMI cable select the audio output setting for this connection All the sound is output through both your TV and this speakers system If the audio format on the disc is not supported it will be downmix to two channel sound linear PCM Off disable audio output from you...

Страница 38: ...n your country PAL for PAL system TV NTSC for NTSC system TV Multi for TV that is compatible with both PAL and NTSC TV Display Select the screen format according to how you want the picture to appear on your TV 4 3 LetterBox LB 4 3 PanScan PS 16 9 Widescreen 4 3 Pan Scan for standard TV a full height screen display with the sides trimmed 4 3 Letter Box for standard TV a wide screen display with bl...

Страница 39: ...e disc Note This setting is only available if you have set the TV Display setting to 16 9 Wide Screen HDMI Video select a video resolution that is compatible with your TV display capability Options Descriptions Auto It detects and selects the best supported video resolution automatically 480p 576p 720p 1080i 1080p Select a video resolution that best supported by your TV See your TVs manual for det...

Страница 40: ...turn on the HDMI CEC operations on your TV devices before you can enjoy the EasyLink controls See your TVs devices manual for details Philips does not guarantee 100 interoperability with all HDMI CEC compliant devices Closed Caption Turn on or off display captions On show the sound effects in subtitle Only applicable to disc with Closed Caption information included and your TV supports this featur...

Страница 41: ...nt To allow all discs to play select 8 Some DVDs have ratings printed on them but are not recorded with ratings This function has no effect on such DVDs Tips To set or change your password go to Preferences Password PBC For VCDs SVCDs recorded with PBC playback control you can access the disc content through an interactive menu On an index menu is displayed when you load a disc for play Off skip t...

Страница 42: ... Hebrew Hebrew Chinese Simp Simplified Chinese Korean Korean Note Ensure that the subtitle file has the exact same file name as the movie file If for example the filename of the movie is Movie avi then you will need to name the text file Movie sub or Movie srt Default Reset all the settings of this unit to factory default except for Disc Lock Password and Parental settings Version info Display the...

Страница 43: ...lable for this unit 5 If the latest software version is higher than the software version of this unit download it and store onto a CD R or USB flash drive 6 Insert the CD R or USB flash drive to this Home Theatre unit 7 Press DISC or USB then follow the instruction on the TV to confirm upgrade operation Note Do not remove the CD R or USB when software upgrade is in progress 8 Once software upgrade...

Страница 44: ...FM 60 dB Signal to noise ratio FM 50 dB Harmonic distortion FM 3 Frequency response FM 180 Hz 10 kHz 6dB Stereo separation FM 26 dB 1 kHz Stereo Threshold FM 29 dB USB Compatibility Hi Speed USB 2 0 Class support UMS USB Mass Storage Class MTP Media Transfer Protocol iPod docking station Dimensions WxHxD 35 6 x 104 mm Weight 164 g Main unit Power supply 110 127 V 220 240 V 50 60 Hz switchable Powe...

Страница 45: ...e disc compartment Press b Press AUDIO SYNC for progressive scan or SUBTITLE for TV Type 1 2 3 No picture on HDMI connection Check if the HDMI cable is faulty Replace a new HDMI cable If this happens when you change the HDMI video resolution you have to switch to its default mode Press Z to open the disc compartment Press b Press ZOOM 1 2 3 Warning Risk of electric shock Never remove the casing of...

Страница 46: ...er Ensure that the DivX video file is complete The aspect ratio of the screen is not aligned with the TV display setting The aspect ratio is fixed on the DVD DivX subtitle are not displayed correctly Ensure that the subtitle file name is the same as the movie file name Select the correct character set Press OPTIONS Press B then select DivX Subtitle in the menu Select the character set that support...

Страница 47: ... specification that provides a secure transmission of digital contents between different devices to prevent unauthorised copyright JPEG A very common digital still picture format A still picture data compression system proposed by the Joint Photographic Expert Group which features small decrease in image quality in spite of its high compression ratio Files are recognised by their file extension JP...

Отзывы: