background image

21

Using your HD recorder

EN

G

LI

SH

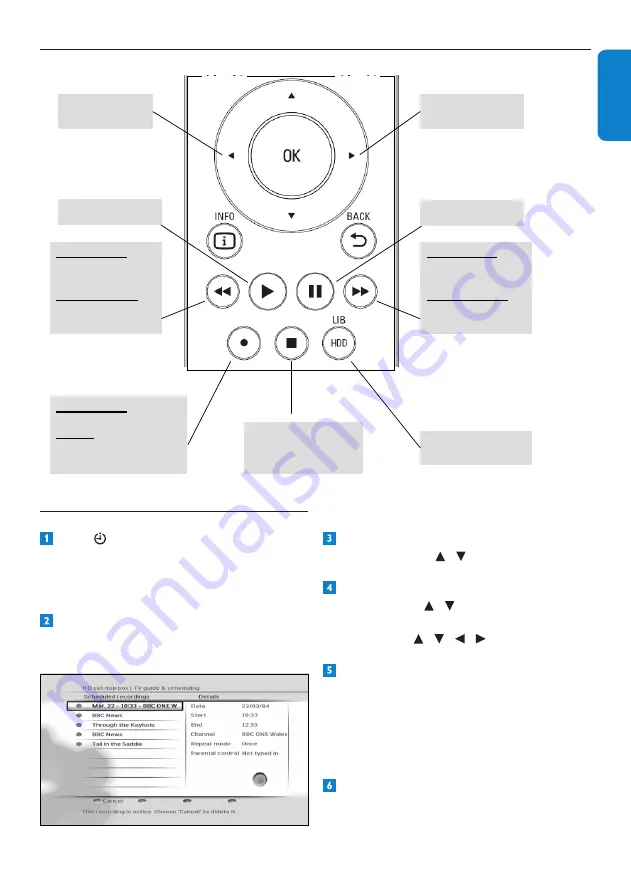
4.9.4  Controlling playback and recording

Instant

 Replay 

Commercial 

skip 

Pause 

Open / Close 

HDD Library 

In Play mode

One Touch Recording 

In EPG

Schedule a recording 

Stop playback 

or stop recording 

or return to live TV

on selected program 

Play 

In play mode: 

Fast Rewind 

(x2, x4, x32, x128) 

In Pause mode

Slow backward 

(x1/2, x1/4) 

In play mode: 

Fast Forward 

(x2, x4, x32, x128) 

In Pause mode

Slow forward 

(x1/2, x1/4) 

4.9.5  Viewing scheduled recordings

  Press 

 to display the 

Scheduled 

recordings

 menu. You can also access this 

menu from the 

Main

 menu (

MENU

 > 

TV guide & scheduling 

>

 Scheduled 

recordings

)

  The 

Scheduled recordings

 menu appears, 

which shows all the programmes you have 

selected to record. 

  To cancel the scheduled recording of a 

programme, use 

 / 

 to highlight it and 

press the 

red

 button.


To change the end time of an instant 

recording, use 

 /   to highlight 

End time


and press the 

OK

 button. In the menu that 

appears, use 

 /   /   / 

 to change the end 

time.

  Any scheduled recording conflicts, which 

are caused due to a change in the time of 

the broadcast programme, are indicated by 

a warning symbol next to the programme 

name. To resolve such conflicts, select a 

programme that you no longer want to 

record and press the 

red

 button to cancel it.

  Press 

EXIT

 to remove the 

Main

 menu.

Содержание HDT8520

Страница 1: ...www philips com support For support call 0800 331 60 15 EN High Definition Digital Terrestrial Recorder HDT 8520 ...

Страница 2: ... 2 ...

Страница 3: ...nnels 14 4 3 Adjusting volume 14 4 4 Using the channel banner 14 4 5 Using channel lists 16 4 6 Using the TV guide 16 4 7 Using the Tools menu 17 4 8 Pausing live TV 17 4 9 Recording programmes 18 5 Using more of your HD recorder 23 5 1 HD recorder 23 5 2 Remote control 24 5 3 Front panel display messages 25 5 4 Using the Main menu 27 6 Maintenance 33 6 1 Cleaning 33 6 2 Replacing 33 6 3 Disposing...

Страница 4: ... separate collection process for electrical and electronic products Please act according to your local rules and do not dispose of your old products with your normal household waste The correct disposal of your old product will help prevent potential negative consequences for the environment and human health The Material recyclability symbol affixed on the package cardboard and user manual means t...

Страница 5: ... its face Use a screwdriver to lever off the fuse cover replace the fuse with a new one and refit its cover Never use a plug if its fuse cover is missing The fuse is inside the rewireable plug Use a screwdriver to remove the plug s back cover Never put the plug into the mains socket when its cover is removed Lever out the fuse and replace it with a new one Replace the plug s back cover If the supp...

Страница 6: ...s or other equipment that produce heat Protect it from direct sunlight In order to ensure a free flow of air around your HD recorder allow at least 5 cm of space above and around it This prevents overheating of your HD recorder Do not place any combustible objects such as candles etc on your HD recorder Never stand objects filled with liquids such as vases on top of your HD recorder Do not place a...

Страница 7: ...any button on it or your remote control for 3 hours configurable see Automatic eco mode on page 30 your HD recorder will automatically get into the standby mode If you are not going to use your HD recorder for several days you can cut its energy consumption to zero by unplugging it from the mains wall socket In the off and standby modes your HD recorder cannot receive updates from the network Howe...

Страница 8: ...ps com welcome With your HD recorder you will never need to schedule your life around your favouriteTV programmes Thanks to the built in hard disk drive HDD that records programmes as you watch them you can pause live TV or repeat a scene you missed Want to record a programme so that you can watch it later Just press the record button Once you begin to record you are free to watch other recorded p...

Страница 9: ...2 0 connector 10 Top lighting Rear Panel 1 Antenna IN 2 Antenna output to TV VCR antenna signal 3 Optical S PDIF audio out digital 4 USB 2 0 connector 5 RJ45 Ethernet connector 6 AUX SCART connector 7 DIGITAL audio out digital 8 L R audio out analogue 9 HDMI connector 10 12V power connector Safe extra low voltage Remote control 1 Standby 2 Text Picture format Radio Exit TV guide Menu Options 3 Up ...

Страница 10: ...atteries with your domestic waste Used batteries should be recycled at the end of their useful life Do not dispose of batteries in a fire 2 4 How to read this manual Danger Describes situations of injury or loss of life Warning Describes actions that may cause damage to the product Caution Describes actions that are required to avoid dangerous or illegal situations Note Additional information Tip ...

Страница 11: ...able to connect the RF output connector labelled ToTV VCR of your HD recorder to the RF input connector of your TV To connect your HD recorder to your standard definition TV see page 34 3 3 Installing your HD recorder Before you start installation make sure you have made all the required connections Insert the two way connector on the supplied mains lead into the 12V power supply unit Connect the ...

Страница 12: ...hen analogue broadcasting in your region is switched off there should be a quality improvement in digital broadcasting As digital switch over happens the number of digital channels available in each region may also increase Please visit this website to find out when the digital switch over is scheduled for your area www digitaluk co uk On the Code entry menu use or the number buttons to enter your...

Страница 13: ...In case your HD recorder does not find any channels check your connections see pages 11 and 34 and press the red button to start the first installation setup again If your HD recorder is still not able to find any channels press the yellow button Use to manually check the quality and strength of the signals received by your antenna in various channel frequencies If the Signal strength bar is green...

Страница 14: ...BACK to return to the channel banner 4 Using your HD recorder 4 1 Standby wake up To put your HD recorder into standby press on your HD recorder s front panel or remote control To take your HD recorder out of standby press again You can also press BACK P P or any number button on your remote control to wake up your HD recorder See page 7 for more information 4 2 Changing channels To change channel...

Страница 15: ...e desired program Press OK to watch the selected program Current channel list Current program name Time before next program starts Next program name Network change information Start time End time progress status of current program Banner for the reception of a broadcast program Banner for a playback of Either an HDD library program Or a paused program Recording duration for a playback from HDD lib...

Страница 16: ...age 19 Some channels may not offer an extensive TV guide 4 5 Using channel lists You use the channel list menu to switch to any TV or radio channel from the AllTV or All Radio channel list or your favourite lists Changing channel Press OK to display the current channel list Use to select the channel you want to watch Press OK to preview the channel press OK again to watch it Changing current chann...

Страница 17: ... your HD recorder automatically starts recording the programme that is being played and stores it temporarily in the time shift buffer When you switch to a different channel your HD recorder discards the previously recorded programme and starts recording the current programme This feature enables you to pause a live programme at any moment and later continue watching it from that point or instantl...

Страница 18: ...anel also lights up Note Until you return to live TV viewing you will not be able to use any other function of your HD recorder 4 8 1 Instant replay You can instantly replay what you have seen or missed during the last few seconds Press while watching live TV The time shift bar appears and you are taken back 15 seconds by default To increase this time see the Instant Replay duration setting on pag...

Страница 19: ...he programme you want to record and press the red button In the menu that pops up use to highlight Record the selected programme or Record the selected series and press OK to confirm If the programme is on now your HD recorder starts recording instantly If it is on at a later time your HD recorder will record the programme when it starts The programme is highlighted in red in the TV guide You can ...

Страница 20: ...cords the program you are watching This recording may fill in a buffer for a maximum of 3 hours You can Pause live TV while your HD recorder keeps on recording the live programme Restart watching from the pause Go to live TV or any program sequence in between The time shift bar helps you watch paused live TV from the buffer Note The contents of the buffer are flushed when you change the channel x ...

Страница 21: ...this menu from the Main menu MENU TV guide scheduling Scheduled recordings The Scheduled recordings menu appears which shows all the programmes you have selected to record To cancel the scheduled recording of a programme use to highlight it and press the red button To change the end time of an instant recording use to highlight End time and press the OK button In the menu that appears use to chang...

Страница 22: ...hlight it and press OK or play To pause playback at any moment press pause K Press to move to back 15 seconds or forward 30 seconds by default To change this time see the Instant Replay duration and Commerical Skip duration settings on page 29 To rewind or forward at high speed press rewind or fast forward during playback up to 4 times to choose the speed x2 x4 x32 or x128 To rewind or forward in ...

Страница 23: ...8 Record indicator Lights up when your HD recorder is recording a programme 9 USB 2 0 Universal Serial Bus port 10 Top lighting Safe extra low voltage Rear panel 9 1 2 3 4 5 6 7 8 10 1 Antenna IN To connect your aerial cable from the wall socket 2 ToTV VCR Antenna output to TV VCR antenna signal 3 SPDIF audio out To connect an optical cable to an hi fi amplifier 4 USB 2 0 Universal Serial Bus port...

Страница 24: ...up down left right within lists or menus 7 Return to the previous channel or menu screen 8 K Pause live TV 9 F Fast forward 10 HDD LIB Open close Recordings menu 11 Open close Scheduled recordings menu 12 P Change channel up down 13 Number buttons Alphanumeric keypad 14 Turn subtitles on off 15 Change picture format 16 TEXT Open close MHEG applications 17 MENU Open close Main menu 18 Open close TV...

Страница 25: ...tenna signal is not available Subtitle on Subtitle off Main menu is open Channel list is open TV guide is open Your HD recorder is in the standby mode HDMI is the active A V output recommended of your HD recorder AUX SCART is the active A V output of your HD recorder Picture format is 4 3 with black bars Picture format is 4 3 stretched to 16 9 Picture format is 4 3 zoomed in to the screen width ...

Страница 26: ...uccessful update Automatic resolution adjustment recommended Resolution is set to 576i Resolution is set to 576p Resolution is set to 720p Resolution is set to 1080i Resolution is set to 1080p Recording library is open Play Rewind Pause Fast forward Fast rewind Your HD recorder is in the first installation setup ...

Страница 27: ...e list On the Main menu make sure that Favourites is highlighted and press or OK The Favourites menu appears Use to highlight either TV channels or Radio channels and press or OK The menu now displays the selected full channel list AllTV or All Radio and the existing favourite lists Press the red button to create a new favourite list Your HD recorder by default names the new favourite list as List...

Страница 28: ...use to highlight the channel you want to add and press OK Press the green button to save your changes To remove a channel use to highlight it and press the green button To reorder the channels in your favourite list use to highlight a channel you want to move and press the blue button Use to move the channel up or down and press OK Press to return to the Favourites menu Deleting favourite lists Fr...

Страница 29: ...uage Use this to set your preferred language for subtitles to English default Gaelic Welsh or Irish Recording Instant replay duration Use this to set the instant replay duration see page 18 It is also used while moving through the time shift bar see page 18 or a recording see page 22 You can set this to 15 seconds default 30 seconds 1 minute 2 minutes or 5 minutes Commercial skip duration Use this...

Страница 30: ...f 3 hours default 4 hours 5 hours 6 hours 7 hours or 8 hours Return channel Use this to configure your HD recorder to connect to the internet which then serves as a return channel to your Digital TV service provider The return channel is necessary to use any interactive applications that your Digital TV service provider may offer Before configuring the return channel be sure to connect your HD rec...

Страница 31: ...and press or OK Use the number buttons to first enter your current PIN code and then enter your new PIN code Use the number buttons to enter your new PIN code again for confirmation If you correctly entered the PIN codes your HD recorder briefly displays a message confirming that your PIN has been changed and then returns to the Parental Control menu Note Your new PIN code can be any 4 digit numbe...

Страница 32: ...ng on the update then be required to complete the first installation setup see page 11 Restoring factory default settings From the Settings menu use to highlight Set up and press or OK In the Set up menu that appears use to highlight Factory reset and press OK twice A message appears asking you to confirm If you are sure press the green button or press the red button to cancel and return to the pr...

Страница 33: ...not receive the antenna signal To see information about your HD recorder press and highlight System information Details such as software version model number serial number etc are displayed on the right To see the available space on your HD recorder s hard disk drive press and highlight Hard disk drive information To format your HD recorder s hard disk press to highlight Factory reset and press or...

Страница 34: ...ions are managed by your audio equipment and not by your HD recorder Option C HDMI connection Digital Recent amplifiers are fitted with one or more HDMI source input s and one HDMI output Recommended connection Connect the HDMI output of your HD recorder to an HDMI source input of your amplifier Connect the HDMI output of your amplifier to an HDMI input of your TV System settings For your HD recor...

Страница 35: ...connector of your TV 8 Guarantee and service For the Philips warranty applicable to your HD recorder please visit the Philips website www philips com guarantee In case you do not have an Internet connection please contact your local Philips Consumer Care Centre see page 42 9 Technical data This product is in conformity with European 95 47 EC and 2002 21 EC directives The product complies with the ...

Страница 36: ...ED 16 digit whiteVFD display 5 x buttons Standby P P Res V Out 1 x USB on product side Programme list editing Add Move Delete Parental control Child lock 8 days Electronic Programme Guide Event timer 8 Event programming via EPG DVB subtitling Digital TXT MHEG with Interaction channel Video scaling on HDMI output Auto Original 576i 576p 720p 1080i 1080p50 Dolby Digital 5 1 audio output ECO power ma...

Страница 37: ...er see page 11 There may be a temporary problem with the reception caused for example by bad weather try again later Check if there is any network message related to this signal loss You can access the Network messages menu from Menu Settings Network messages The time shift bar with Live indication appears when you try to change a programme Repeat the programme change request to watch the programm...

Страница 38: ... settings Also refer to your TV s user manual Your HD recorder displays err on the front panel display when you plug in a USB memory stick Reformat your USB memory stick using a computer Ensure that the filesystem is FAT16 or FAT32 You cannot find all the channels you think should be available Retune your HD recorder see page 31 Alternatively reset your HD recorder to its factory default settings ...

Страница 39: ... some channels were missing Your HD recorder has an automatic retuning feature this allows it to keep up to date with minor service changes However when the signal level of nearby relay transmitters are high or if the antenna signal is being amplified these problems can occur To solve this problem Turn off the automatic channel updates feature of your HD recorder see page 32 Remove any signal ampl...

Страница 40: ...spect ratio Aspect ratio refers to the length to height ratio of TV screens The aspect ratio of a standard TV is 4 3 while the ratio of a high definition or widescreen TV is 16 9 The letterbox format allows you to watch a video with a wider aspect ratio on a standard 4 3 TV DHCP Dynamic Host Configuration Protocol DHCP is a network protocol that enables a router or server to automatically assign I...

Страница 41: ... digital multi channel audio It delivers perfect picture and sound quality completely free from noise HDMI is fully backward compatible with DVI HDTV High Definition Television Lip Synchronisation Setting used to synchronise audio with video in case a delay is experienced in particular if speech does not match lip movements MPEG Motion Picture Experts Group A collection of compression systems for ...

Страница 42: ... 23 Indoor antenna Powering 11 33 Rear panel 23 Record Instantly 18 Scheduled 19 21 Remote control 24 Restore factory settings 32 Retune 31 Return channel 30 Scheduled recordings 19 21 Software update 31 System settings 32 Time shift bar 18 20 TV guide 16 Wake up your HD recorder 14 Watch recorded programmes 22 Contact information HDT 8520 05 Serial number UNITED KINGDOM Phone 0800 331 60 15 ...

Страница 43: ...emarks of Dolby Laboratories HDMI the HDMI logo and High Definition Multimedia Interface are trademarks or registered trademarks of HDMI licensing LLC in the United States and other countries Trademark of the DVB DigitalVideo Broadcasting Project 1991 to 1996 The FREEVIEW service is subject to coverage The FREEVIEW FREEVIEW FREEVIEW HD and FREEVIEW HD words and logos are trademarks of DTV Services...

Страница 44: ... 2010 Koninklijke Philips Electronics N V All rights reserved Document order number 502 1039801 ...

Отзывы: