background image

English

8

INSTALLATION

Installation

Connections - back side of your
DVD recorder

- Please refer to your TV set, VCR, Stereo System and
any other User Manual(s) as necessary to make the
optimal connections.
- Do not connect the power until all other connections
are made.
- Do not connect your DVD recorder to your TV set
via your VCR, because the video quality could be
distorted by the copy protection system.
- For better sound reproduction you can connect the
recorder audio outputs to your amplifier, receiver,
stereo system or A/V equipment. For this see
‘Connecting to A/V receiver or A/V amplifier’.

Caution:
Do not connect the recorder’s audio output to
the phono input of your audio system in order to
avoid damage to your equipment. 

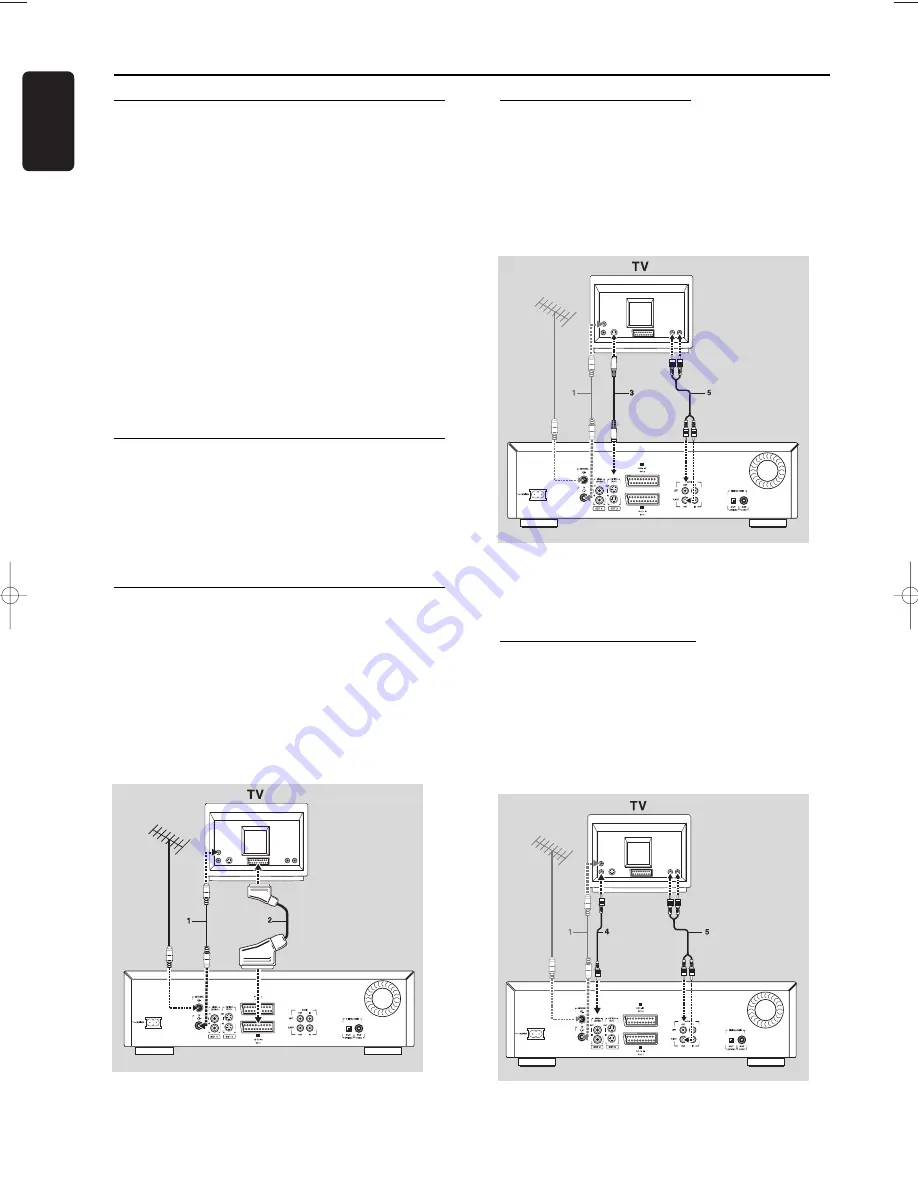
Connecting to the antenna

l

Remove the antenna (aerial) cable plug from your
TV set and insert it into the antenna socket at the
back of the DVD recorder.

l

Plug one end of the antenna (aerial) cable supplied 

(1)

into the TV socket on the DVD recorder and the other
end into the antenna input socket on your TV set.

Connecting to a TV set

To obtain the highest possible picture and sound quality
from your TV set it is recommended to use the 

SCART

connector on both DVD recorder and TV set.

l

Connect the bottom 

SCART

connector (EXT 1) to

the TV set, using the 

SCART

cable supplied 

(2)

as

shown in the drawing. If your TV set is equipped
with EasyLink or Cinema Link, make sure you use
the correct scart connector. For this refer to the
user manual of your TV set.

If your TV set is not equipped with a 

SCART

connector,

you can connect the DVD recorder with the S-video
(Y/C) sockets. 

S-video (Y/C) connection 

l

Connect the S-video output socket to the
corresponding input socket on the TV set, using the
supplied S-video cable 

(3)

.

l

Connect the audio Left (white) and Right (red)
output sockets to the corresponding sockets on the
TV set using the audio cable supplied 

(5)

.

If your TV set is not equipped with S-video sockets, then
connect the DVD recorder with the CVBS sockets to
your TV set.

Video (CVBS) connection

l

Connect the Video (CVBS) output socket (yellow)
to the corresponding input socket on the TV set
using the video cable supplied 

(4)

.

l

Connect the audio Left (white) and Right (red)
output sockets to the corresponding sockets on the
TV set using the audio cable supplied 

(5)

.

03DVDR990UKD4  06-06-2002  14:45  Pagina 8

Содержание DVDR990

Страница 1: ......

Страница 2: ... WENN ABDECKUNG GEÖFFNET NICHT DEM STRAHL AUSSETSEN DANGER VISIBLE AND INVISIBLE LASER RADIATION WHEN OPEN AVOID DIRECT EXPOSURE TO BEAM ATTENTION RAYONNEMENT LASER VISIBLE ET INVISIBLE EN CAS D OUVERTURE EXPOSITION DANGEREUSE AU FAISCEAU LASER Type InGaAlP semiconductor laser DVD AlGaAs semiconductor laser CD Wavelenght 660 nm DVD 780 nm CD Output Power 20 mW DVD writing out of objective 0 8 mW D...

Страница 3: ..._________________________________11 First time set up virgin mode ________________________________11 Automatic setting ________________________________________11 Manual setting ___________________________________________12 Functional overview Front of recorder __________________________________________14 Rear of recorder___________________________________________15 Display_________________________...

Страница 4: ...___35 Moving to another title track _______________________________35 Moving to another chapter index ____________________________35 Slow Motion ____________________________________________35 Still Picture and Step Frame ________________________________36 Search _________________________________________________36 Repeat _________________________________________________36 Repeat A B _______________...

Страница 5: ...c Name __________________________________45 Protection of recordings___________________________________45 Erasing a disc ____________________________________________45 Finalising a DVD R disc ___________________________________45 Making your edits DVD compatible __________________________46 Favourite Scene Selection____________________________________46 Calling up the FSS menu ____________________...

Страница 6: ...s process can be repeated more than a thousand times DVD Recordable DVD R uses discs based on an organic dye a technology pioneered with the successful CD Recordable format to produce discs that keep your data for a lifetime Your Philips DVD recorder is a recorder and player for digital video discs with a two way compatibility to the universal DVD Video standard This means that existing pre record...

Страница 7: ...eave the DVD recorder in a warm environment for two hours before use so the moisture can evaporate l The recorder should not be exposed to dripping or splashing no objects filled with liquids such as vases should be placed on the recorder Cleaning discs Some problems may occur because the disc inside the recorder is dirty To avoid these problems clean your discs regularly in the following way l Wh...

Страница 8: ...ecting to a TV set To obtain the highest possible picture and sound quality from your TV set it is recommended to use the SCART connector on both DVD recorder and TV set l Connect the bottom SCART connector EXT 1 to the TV set using the SCART cable supplied 2 as shown in the drawing If your TV set is equipped with EasyLink or Cinema Link make sure you use the correct scart connector For this refer...

Страница 9: ...can only be obtained if your receiver is equipped with a Digital Multi channel decoder If you cannot connect your DVD recorder to an A V receiver with Multi channel decoder choose one of the following alternatives Connecting to a receiver equipped with two channel digital stereo PCM l Connect the recorder s digital audio output to the corresponding input on your receiver Use the supplied video CVB...

Страница 10: ...Connections frontside of your DVD recorder Camcorder connection l If you have a DV or Digital 8 camcorder connect the i link DV input socket 1 to the corresponding output socket on the camcorder using the i link cable of your camcorder l If you have a Hi 8 or S VHS C camcorder connect the S video input socket to the corresponding output socket on the camcorder using the S video cable supplied 2 an...

Страница 11: ...for the very first time the virgin mode screen will appear In virgin mode you may have to set your preferences for some of the recorder features If the virgin mode screen does not appear your DVD recorder has been installed already You may still change the settings via the installation menu Depending on the kind of TV set preferences will have to be set manually or they will be taken over automati...

Страница 12: ...anguage The subtitles of DVD Video discs will be in the language you choose provided this is available on the disc in play If not subtitles will revert to the first subtitle language on the disc TV Shape You can choose 16 9 if you have a wide screen 16 9 TV set 4 3 if you have a regular 4 3 TV set In this case you can also choose between Letterbox for a wide screen picture with black bars at the t...

Страница 13: ...annel auto search is completed the actual Time and Date are also set automatically If the time in the DVD recorder display is not correct the clock must be set manually l Adjust Time Year Month Date if required with the w down cursor or v up cursor key l Change values with the the t left cursor or u right cursor key or the digit keys 0 9 l To end press OK Note All these items may have to be set af...

Страница 14: ...English Functional overview 14 FUNCTIONAL OVERVIEW Front of recorder ...

Страница 15: ...Y C outputs AUX I O EXT II for connection to a satellite receiver decoder video recorder set top box etc via SCART TO TV I O EXT I for connection to a TV with SCART AUDIO OUT L R connection to an amplifier receiver stereo system or to a TV that is not equipped with a SCART connector AUDIO IN L R connection to the audio output of a video source that is not equipped with a SCART connector OUT OPTICA...

Страница 16: ...English 16 FUNCTIONAL OVERVIEW Display ...

Страница 17: ...English FUNCTIONAL OVERVIEW 17 Remote control ...

Страница 18: ...te protected playback always starts automatically You can always unload a disc by pressing OPEN CLOSE again or pressing 9 STOP on the remote control for two seconds Note If Child Lock is set to ON and the disc inserted is not in the child safe list not authorized the PIN code must be entered and or the disc has to be authorized see Access Control Disc types You will recognize the different types o...

Страница 19: ...t be used at all neither for recording nor for playback DVD RAM DVD Audio On screen display information System menu bar The system menu bar can be called up by pressing any of the following keys on the remote control SYSTEM MENU T C ANGLE Z SUBTITLE Y AUDIO and a ZOOM Widescreen 16 9 TV sets may show only part of the system menu bar in certain screen modes Select a different screen mode on the TV ...

Страница 20: ...item are displayed next to the item l Press OK to confirm and return to the main menu The following functions can be operated via the user preference menu User preference menu icons Picture settings Sound settings Language settings Feature settings Remote control settings Record settings Installation l You can navigate between the various items of the user preferences menu with the v up cursor and...

Страница 21: ... Copy protected signal Timer info box The timer info box is located above the tuner info box and is displayed in monitor mode It displays the current status of the timer When a timer is programmed it shows a timer indication and the start time or date of the first programmed recording Timer event due today Timer event due on another day When an OTR recording is in progress it shows the end time OT...

Страница 22: ...u navigate trough the list of titles with w v down up cursor or J PREVIOUS K NEXT the disc pointer will move along l Press 9 STOP to reset the disc pointer to the beginning of the disc l To move the disc pointer to the end of the last title keep K NEXT pressed l If you navigate from an Index Picture to the box right next to it containing name rec mode etc you enter the title settings menu see unde...

Страница 23: ...g is such that the video will be centered on your screen Use this setting to adjust the position of the picture on your TV set by scrolling it to the left or right SCART Video Factory setting is RGB Select S video Y C via SCART when connecting to an S VHS recorder Sound settings Digital output Factory setting All means that both coaxial and optical outputs are switched on and that Dolby Digital Mu...

Страница 24: ...change the pin code See Acces Control Adapt disc format This option is only available when a DVD RW or DVD R disc recorded on a different brand of recorder is loaded You can adapt the menu to your own recorder A DVD RW R video disc that has been recorded on a different type or brand of recorder can be played but may not provide all features commonly available to DVD RW R discs such as the on scree...

Страница 25: ... a disc Mode Picture quality Total recording time HQ best possible 60 minutes High Quality picture quality SP pre recorded 120 minutes Standard Play DVD quality SP pre recorded 150 minutes Standard Play DVD quality LP better than 180 minutes Long Play S VHS picture quality EP better than 240 minutes Extended Play VHS picture quality EP 360 minutes Extended Play VHS picture quality In practice the ...

Страница 26: ...ou can manually insert chapter markers afterwards See Managing disc content Edit in playback mode Filter Mode In long play or extended play recording mode you can select the Sport setting to optimize the video recording for images that contain fast movements like sports programmes The setting does not influence high quality or standard play recording mode Factory setting is Stndrd Installation Aut...

Страница 27: ...matic TV channel setting Important This re tuning is only necessary and useful in special cases e g when stripes appear on your TV screen when using a cable TV system l Press OK to store the TV channel l To end press SYSTEM MENU Connecting a decoder l Switch on the TV set and select the programme number for the DVD recorder l Select the TV programme you wish to link with the decoder function with ...

Страница 28: ... disc containing PAL recordings no NTSC recordings can be made and vice versa On an empty disc either type of recordings can be made No recordings can be made from so called Pseudo PAL or PAL 60 sources A disc can hold up to 48 titles including empty titles When this maximum is reached the on screen message Too many titles appears if you want to make a new recording You have to erase a title first...

Страница 29: ...l Hold the RECORD key on the recorder or REC OTR key on the remote control press for about two seconds until SAFE RECORD appears on the display l The recorder automatically jumps to the end of the last title on the disc and starts recording If no free space is left The display will show DISC FULL Safe record is not possible then Recordings on DVD R are always automatically made after the last titl...

Страница 30: ...nformation mentioned above in a timer block You can programme up to six timer blocks one month in advance When you have programmed the timer a red line on the disc bar both on the display and on the Index Picture Screen indicates what part of the disc will be overwritten by the programmed recording from the current disc position on DVD RW or after the last title on DVD R When all timer blocks are ...

Страница 31: ...idual day of the week for recording at weekly intervals on the same day of the week l Press u right cursor l Use SELECT to switch VPS PDC on or off When VPS PDC is switched on the start time is marked with an asterisk l Press u right cursor l Use SELECT to select the recording mode l Confirm with OK The data has been stored in a timer block l To end press TIMER l Make sure that you inserted a reco...

Страница 32: ...nk If your television is also equipped with this function you can mark TV programmes on the television for programming These TV programmes will automatically be transmitted to a timer block on the DVD recorder If you clear the marking of the TV programme on the television the corresponding timer block on the DVD recorder will also be cleared For more information read the instruction manual of your...

Страница 33: ...u want to check or alter with t or u left right cursor l Alter data with w or v down up cursor or with the digit keys 0 9 l Confirm with OK l To end press TIMER l Switch off by pressing B STANDBY ON How to clear a timer block l Press TIMER on the remote control l Select Timer list with w or v down up cursor l Press u right cursor l Select the timer block you want to clear with w or v down up curso...

Страница 34: ...art of the disc You can however resume play from the point at which you stopped the last time the disc was played by pressing 2 PLAY when appears on screen The currently playing title and chapter number are displayed on the recorder display The elapsed time is shown also Notes DVD movies to be released at different times in different regions of the world all players have region codes and discs can...

Страница 35: ...ter or a track has more than one index you can move to another chapter index as follows l Press K NEXT during play to select the next chapter index l Press J PREVIOUS during play to return to the beginning of the current chapter index Rapidly press J PREVIOUS twice to step back to the previous chapter index l To go directly to any chapter or index enter the chapter or index number using the numeri...

Страница 36: ...s v up cursor to delete the fast motion menu To search forward or backward through different speeds you can also press 5 REVERSE or 6 FORWARD again Repeat DVD Discs Repeat chapter title disc l To repeat the currently playing chapter press REPEAT appears on screen l To repeat the currently playing title press REPEAT a second time appears on screen l To repeat the entire disc press REPEAT a third ti...

Страница 37: ...nd play starts from the selected time position Zoom The Zoom function allows you to enlarge the video image and to pan through the enlarged image l Select a ZOOM in the system menu bar l Press w v down up cursor to activate the Zoom function and select the required zoom factor 1 33 or 2 or 4 The recorder will go into pause mode The selected zoom factor appears below the Zoom icon in the system men...

Страница 38: ...tions and chapters for the title l To exit the title menu press DISC MENU again Note Most DVD discs do not have separate disc and title menus Disc menu If a DVD Video disc has separate disc and title menus you can navigate to the disc menu as follows l Press T C followed by DISC MENU The disc menu is displayed l To remove the disc menu press DISC MENU again Camera Angle If the disc contains sequen...

Страница 39: ...ated on the TV screen until your chosen passage starts to play If a PBC menu consists of a list of titles you can select a title directly l Enter your choice with the numerical keys 0 9 l Press RETURN to go back to the previous menu Playing an audio CD l Insert the disc After loading the disc playback starts automatically If the TV set is on the Audio CD screen appears During play the current trac...

Страница 40: ... during play to return to the beginning of the current track Rapidly press J PREVIOUS twice to step back to the previous track l To go directly to any track enter the track number using the numerical keys 0 9 Repeat track disc l To repeat the currently playing track press REPEAT Repeat track appears on screen l To repeat the entire disc press REPEAT a second time Repeat disc appears on screen l To...

Страница 41: ...screen also the names of the album the track and the artist are shown l To stop play at any time press 9 STOP The number of albums will be shown on the screen and the recorder display Pause l Press PAUSE during play l To return to play press 2 PLAY Moving to another album track l In play mode you can use the J PREVIOUS K NEXTkeys and the numerical keys 0 9 to select a specific track l In stop mode...

Страница 42: ...he very first time see above The code is changed see Changing the 4 digit code The code is cancelled see Changing the 4 digit code Both Child Lock and Parental Control are switched Off and the code is requested Authorizing discs when Child Lock is activated l Insert the disc The Child protect dialog will appear You will be asked to enter your secret code for Play once or Play always If you select ...

Страница 43: ... to 8 for the disc inserted Rating 0 displayed as Parental Control is not activated The disc will be played in full Ratings 1 to 8 1 childsafe 8 adults only The disc contains scenes not suitable for children If you set a rating for the recorder all scenes with the same rating or lower will be played Higher rated scenes will not be played unless an alternative is available on the disc The alternati...

Страница 44: ...the new 4 digit PIN code l Enter the code a second time and reconfirm with OK l Press SYSTEM MENU to exit the menu Note If you forgot your code press 9 STOP four times while in the access control PIN code box and exit with OK Access control is now switched off You can then enter a new code as described above Access control Status box Autoresume Low power standby PBC Features off on off Child lock ...

Страница 45: ...ndex Picture Screen select the required title with wv down up cursor l Press u right cursor to enter the title settings menu l Select Erase this title The message This will completely erase this title Press OK to confirm is shown l Press OK to confirm Erasing title is shown until the action is completed After the title has been erased the Index Picture Screen will show an empty space instead If th...

Страница 46: ...ble for DVD RW discs that are not erase protected l In the Disc Info Screen press u right cursor You will now enter the disc settings menu l Select Erase disc and press OK The message This will erase all titles is displayed l Press OK to confirm or t left cursor to cancel Erasing disc is shown until the action is completed After the disc has been erased the Index Picture Screen will show the free ...

Страница 47: ...ers With the FSS menu any chapter can be made hidden or made visible again Normally during recording chapter markers are inserted automatically every five to six minutes this setting can be changed in the record settings menu After the recording is finished you can manually add and remove chapter markers via the FSS menu Both automatically generated and manually inserted chapter markers can be rem...

Страница 48: ...er in the current title by deleting the chapter at the beginning of the current chapter l In play mode press FSS on the remote control to call up the FSS menu l Select Delete chapter marker l Press OK on the remote control to confirm Deleting marker will appear You can delete all chapter markers manually and automatically generated in the current title l In play mode press FSS on the remote contro...

Страница 49: ...wo titles use the above procedure several times Append recording This function is only available on DVD RW discs If you want to append a video recording to an earlier recorded title do the following l On the Index Picture Screen select the title to which you want to add a video recording l Press 2 PLAY l At the point where you want to append the title press PAUSE l To monitor the video input you m...

Страница 50: ... the DVD recorder after selecting the correct programme number on your TV set when a timer recording takes place This way you can still view another device e g a satellite receiver Distorted picture distorted sound Check the disc for fingerprints and clean with a soft cloth wiping from centre to edge Sometimes a small amount of picture distortion may appear This is not a malfunction Recorder does ...

Страница 51: ... if the problem is solved Disc errors A disc might be corrupted because of dust scratches or fingerprints If the disc cannot be accessed anymore use the back up disc erase procedure to repair it Proceed as follows 1 Clean the disc 2 Put disc in the drawer do not close the tray 3 Press and hold CLEAR for several seconds until the tray closes Two languages are mixed when When the TV set does not aut...

Страница 52: ... procedure with the 3 key on the remote control Note Modifying the disc can solve the problem for a specific player model but playback in other DVD players may no longer be possible It is therefore recommended to use this procedure carefully and only when needed To revert the disc to the original state follow the same procedure with the 1 key on the remote control0 Note To achieve maximum compatib...

Страница 53: ...onsult your dealer or the Philips Customer Care Centre for further assistance in solving the problem l If the problem remains then consult your Philips Customer Care Centre System limitations DVD RW and DVD R discs may not play on certain DVD Video players A DVD RW video disc that has been recorded on a different type or brand of recorder can be played but may not provide all features commonly ava...

Страница 54: ...asyLink If your TV set and your video recorder are equipped with this feature they can exchange information to adjust certain settings to each other such as the TV channel order and other user preferences FSS Favorite Scene Selection see Managing disc content i LINK Also known as FireWire and IEEE 1394 A cable for transfer of high bandwidth digital signals as used by Digital Video camcorders Index...

Страница 55: ...TV system S video Sometimes also called S VHS or Super VHS A high quality video connection standard SVCD Super Video Compact Disc Title It is the name given to the unit of recording on the disc A title typically represents one recording TruSurround A system for simulating Multi channel sound reproduction via a two channel set up by SRS Labs Inc TV system There are various systems for transmitting ...

Страница 56: ...2 097 099 206 56 APPENDIX Using your DVD recorder remote control with your TV set Your DVD recorder remote control can transmit several commands to TV sets of different brands The following keys will always operate the TV set VOL increase TV volume VOL decrease TV volume c c mute TV Some other keys normally operate the DVD recorder but will operate the TV set when you keep the button on the side o...

Страница 57: ... 291 Panasonic 078 277 677 Pathe Cinema 347 243 Pausa 036 Penney 074 087 057 048 205 078 066 046 083 183 Perdio 347 Philco 172 046 057 081 490 Philips 064 039 081 401 581 Phonola 064 039 Pilot 046 057 066 Pioneer 136 193 Portland 046 066 119 Prism 078 Profex 036 Proline 348 Proscan 074 Protech 064 129 036 458 244 291 445 Proton 205 Pulsar 044 046 Pye 039 Quasar 078 277 192 677 Quelle 064 097 037 5...

Страница 58: ... 825 889 789 Germany tel 49 0 180 535 6767 Greece tel 30 0 0800 3122 1280 Ireland tel 353 1 7640292 Italy tel 800 820026 Toll Free Luxembourg tel 352 404061215 Netherlands tel 0900 8406 Norway tel 22 748 250 Portugal tel 352 1 4163063 Spain tel 34 902 113 384 Sweden tel 08 5985 2250 Switzerland tel 0844 800 544 United Kingdom tel 44 0 208 665 6350 Poland tel 48 22 571 0571 ...

Страница 59: ...English NOTES 59 Notes ...

Страница 60: ...English 60 NOTES Notes ...

Страница 61: ...kHz 105 dB Dynamic Range 1kHz 100 dB Crosstalk 1kHz 110 dB Distortion Noise 1kHz 90 dB FRONT CONNECTIONS i LINK DV IEEE 1394 4 pin S video Input Hosiden 4 pin Video Input Cinch yellow Audio Left Right Input Cinch white red REAR CONNECTIONS SCART 1 CVBS S video RGB out Decoder SCART 2 CVBS S video RGB in Decoder S video Input Hosiden 4 pin S video Output Hosiden 4 pin Video Input Cinch yellow Video...

Страница 62: ...hrift des Händlers Naam adres en handtekening van de handelaar Nombre dirección y firma del distribuidor Nome indirizzo e firma del fornitore Nome morada e assinatura do vendedor Forhandlerens navn adresse og underskrift Återförsäljarens namn adress och namnteckning Myyjän nimi osoite ja allekirjoitus 2002 PHILIPS Printed in Belgium 3104 125 2453 1 The products and services described herein are no...

Отзывы: