background image

English

61

Setup Menu Options

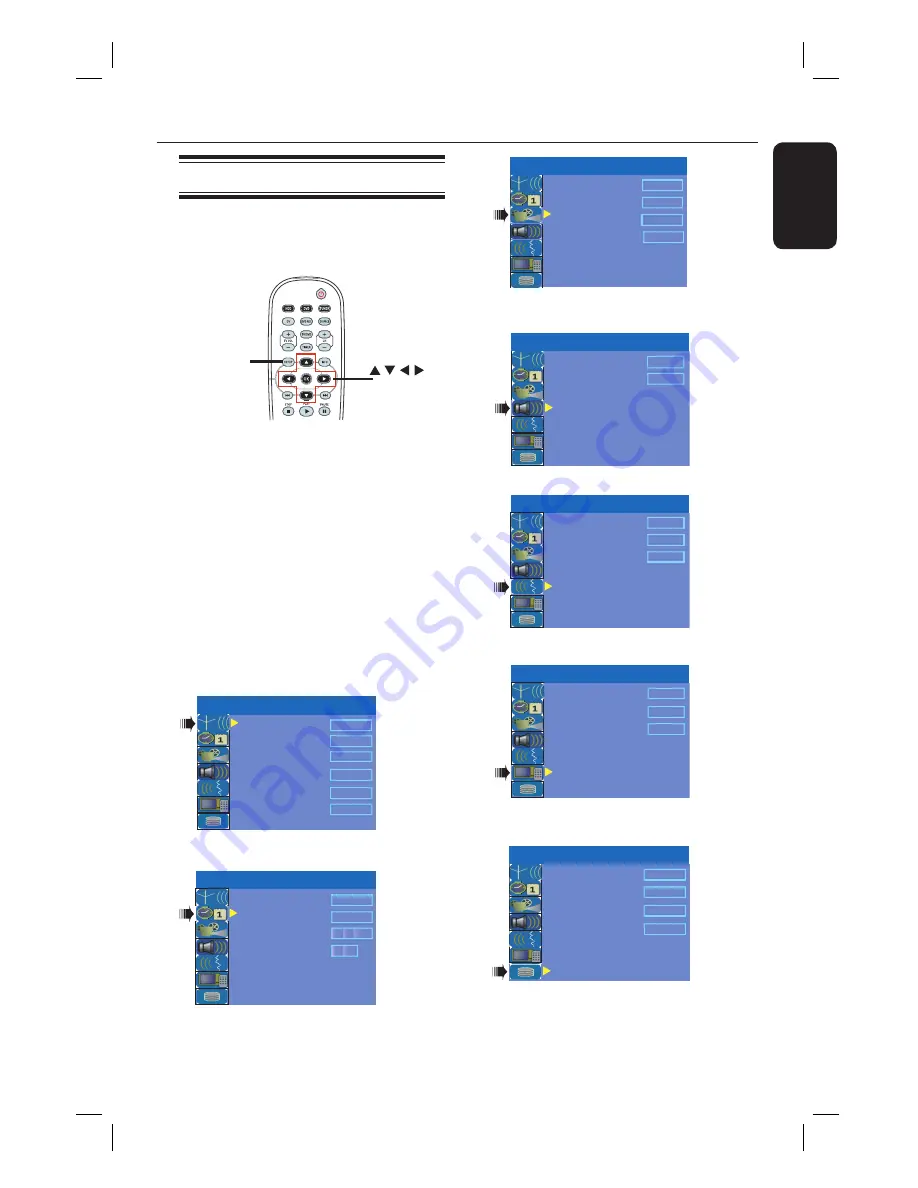
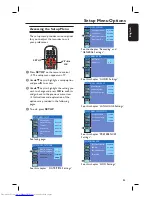
Accessing the Setup Menu

The setup menu provides various options
for you to adjust the recorder to suit
your preferences.

OK

SETUP

A

 Press 

SETUP

 on the remote control.

 The setup menu appears on TV.

B

 Use 

ST

 keys to highlight a setup option 

and press 

X

 to access.

C

 Use 

ST

 keys to highlight the setting you 

wish to change and press 

OK

 to confi rm 

and go back to the previous menu item.

 Instructions and explanation of the

options are provided in the following
pages.

D

 To exit, press 

SETUP

.

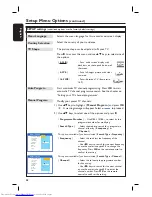
TV Shape

Auto Program

Manual Program

4:3 LB

Search

Edit

Sort 

OK

Menu Language

English

SETUP MENU - SETUP

Country Selection 

Austria

See facing page.

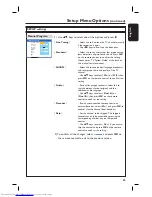
SETUP MENU - DATE/TIME

Time(hh:mm)

Date(dd/mm/yyyy)

Date-Time Programme

Date-Time Setting

Auto

P001 Ch005

01 01  2006

10  : 33  


See this chapter “ DATE/TIME Settings”.

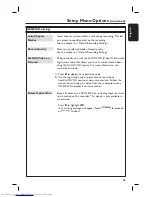
SETUP MENU - GENERAL

Record Quality

SP

Auto Chapter Marker

5min.

DivX(R) Video on Demand 

OK

Delete Optical Disc 

OK

See the chapter “Recording” and 
“GENERAL Settings”.

SETUP MENU - AUDIO

LPCM Output 

LPCM 96Hz

SPDIF Output 

RAW

See this chapter “AUDIO Settings”.

SETUP MENU - LANGUAGE

Audio Language

Subtitle Language

Off

Disc Menu Language

English

English

See this chapter “LANGUAGE Settings’.

SETUP MENU - PREFERENCES

Change Password

Reset Menu Settings

Screensaver

OK

OK

On

See this chapter “PREFERENCES 
Settings”.

SETUP MENU - HDD

HDD Info 

Space Management

Automatic

Save Time Shift Buffer 

Delete HDD
 

Yes

Show

OK

See this chapter “HDD Settings”..

Содержание DVDR3440H

Страница 1: ...HDD DVD Player Recorder DVDR3440H User Manual ...

Страница 2: ...brown wire to the terminal marked L or coloured red Do not connect either wire to the earth terminal in the plug marked E or e or coloured green or green and yellow Before replacing the plug cover make certain that the cord grip is clamped over the sheath of the lead not simply over the two wires Copyright in the U K Recording and playback of material may require consent See Copyright Act 1956 and...

Страница 3: ...a Stömbrytaren är sekundärt kopplad och bryter inte strömmen från nätet Den inbyggda nätdelen är därför ansluten till elnätet så länge stickproppen sitter i vägguttaget SF Luokan 1 laserlaite Varoitus Laitteen käyttäminen muulla kuin tässä käyttöohjeessa mainitulla tavalla saattaa altistaa käyttäjän turvallisuusluokan 1 ylittävälle näkymättömälle lasersäteilylle Oikeus muutoksiin varataan Laite ei...

Страница 4: ...4 ...
Страница 5: ...ademarks of Dolby Laboratories DivX DivX Certified and associated logos are trademarks of DivX Inc and are used under license SHOWVIEW is a registered trademark of Gemstar Development Corporation The SHOWVIEW system is manufactured under license from Gemstar Development Corporation LASER Type Semiconductor laser InGaAlP DVD AIGaAs CD Wave length 658 nm DVD 790 nm CD Output Power 30 mW DVD RW write...

Страница 6: ...vice 19 Connecting to a VCR and Cable Box Satellite Receiver 20 Connecting a camcorder 21 Step 3 Installation and Setup 23 Finding the viewing channel 23 Setting the OSD language 23 Select the country of your residence 24 Setting your TV channel programmes 24 Setting the date time 25 Watching TV Control TV programmes 26 Switching on to TV programmes 26 Pause live TV function 26 Instant Replay func...

Страница 7: ...ccessing disc editing menu 53 Playing your recordings DVD R on other DVD players 55 About DVD title editing 56 Accessing DVD title edit menu 56 About video editing 58 Accessing video editing menu 58 Other Information Setup Menu Options 61 Accessing the Setup Menu 61 SETUP settings underlined options are the factory default settings 62 DATE TIME settings underlined options are the factory default s...

Страница 8: ...s of danger on the apparatus e g liquid filled objects lighted candles Cleaning discs Some problems occur because the disc inside the recorder is dirty frozen picture sound disruptions picture distortions To avoid these problems discs should be cleaned on a regular basis To clean a disc use a micro fibre cleaning cloth and wipe the disc from the centre to the edge in a straight line CAUTION Do not...

Страница 9: ...der Helpful Hints If you have any questions or if problems occur during operation see the chapter Troubleshooting If you need further assistance please call the customer support service for your country The corresponding telephone numbers and e mail addresses are given in the guarantee booklet Refer to the type plate on the rear or bottom of the product for identification and supply ratings Access...

Страница 10: ... pause the programme by pressing PAUSEÅkey Resume playback at the scene it was interrupted by pressing the PLAYÉkey To return to the live TV programme press and holdÉ Direct Recording to DVD This feature enables you to record content directly on to a recordable DVD Press the DVD REC key on the remote control to activate direct recording to the recordable DVD This is a simple programming system for...

Страница 11: ...or the current video input source Red indicator lights up while recording to the HDD or a recordable DVD disc is in progress Sockets behind the flap Flip down the door as indicated by the OPENÉlabel at the right hand corner i S VIDEO S video input for SVHS Hi8 camcorders or SVHS Hi8 video recorders In tuner mode press SOURCE on the remote control repeatedly to select CAM2 when using this input sou...

Страница 12: ...D recorder f CH While in tuner mode selects the next previous TV channel g TIMER Enters exits the timer recording menu h INFO Displays the Time Shift video bar It shows the timing of the TV programmes stored in the temporary HDD storage Displays the on screen help text i OK Stores confirms an entry Confirms a selection j W X Cursor keys for moving to the left right or making a forward reverse sear...

Страница 13: ...sc tray s PLAYÉ Plays a disc Plays a recording t REC Starts recording the current TV channel or the current video input source u RETURN Returns to the previous menu of a video CD VCD or some DVDs v SHUFFLE Switches to random playback of an audio CD Video CD VCD picture CD or DVD disc In HDD title menu select to sort the titles In tuner mode selects between dual language broadcasts w SELECT Selects...

Страница 14: ...tly at the remote sensor IR on the front panel E Select the source you want to control by pressing the TUNER HDD or DVD key on the remote control F Select the desired function for example CAUTION Remove batteries if they are exhausted or if the remote control will not be used for a long time Do not mix batteries old and new or carbon and alkaline etc Batteries contain chemical substances and shoul...

Страница 15: ... Box Satellite Receiver see the chapter Step 2 Optional Connections for the possible connections to your TV A Connect the existing Antenna Cable TV signal or from the Cable Box Satellite Receiver RF OUT or TO TV to the ANTENNA socket on the recorder B Use the supplied RF coaxial cable to connect the TV socket on the recorder to the antenna input socket or labelled as VHF UHF RF IN on your TV Helpf...

Страница 16: ...onding SCART input socket on the TV Helpful Hints If your TV set displays a selection for the SCART socket select VCR as the source for the SCART socket The EXT2 AUX I O scart socket is intended only for additional devices Option 2 Using an S Video cable Use an S video cable not supplied to connect the S VIDEO Y C socket on the recorder to the S Video input socket or labelled as Y C or S VHS on th...

Страница 17: ...L IN TV AV amplifier receiver Option 1 Option 2 Option 2 Using a coaxial cable You can connect the recorder to an AV amplifier receiver in order to enjoy multichannel surround sound Use a coaxial cable not supplied Connect the COAXIAL DIGITAL AUDIO socket on the recorder to the digital input of the amplifier receiver Before you start operating set the digital audio output settings accordingly see ...

Страница 18: ...ur Cable Box Satellite Receiver has a SCART output socket A Keep the existing antenna connection to your Cable Box Satellite Receiver B Use a RF coaxial cable to connect the Cable Box Satellite Receiver signal or labelled as RF OUT or TO TV to the ANTENNA socket on the recorder C Use another RF coaxial cable to connect the TV socket on the recorder to the antenna input socket on the TV D Use the S...

Страница 19: ...eeds Just unplug all the connections to your VCR A Connect the existing Antenna Satellite Cable TV signal or from the Cable Box Satellite Receiver labelled as RF OUT or TO TV to the ANTENNA socket on the recorder B Use another RF coaxial cable to connect the TV socket on the recorder to the antenna input socket on the TV C Use the SCART cable to connect the EXT1 TO TV I O scart socket on the recor...

Страница 20: ...er RF coaxial cable to connect the TV socket on the recorder to the antenna input socket on the TV D Use the SCART cable to connect the EXT1 TO TV I O scart socket on the recorder to the corresponding SCART input socket on the TV E Use another SCART cable to connect the EXT2 AUX I O scart socket on the recorder to the Scart output socket or labelled as TV OUT or TO TV on the VCR F Use another scar...

Страница 21: ... connection if you have a Digital Video or Digital 8 camcorder The DV socket conforms to the i LINK standard It provides the best picture quality Use an i LINK 4 pin cable not supplied to connect the DV IN socket on the recorder to the appropriate DV OUT socket on the camcorder Before you start operating press DV on the remote to select DV as the input channel See the chapter Recording for details...

Страница 22: ...anel of the recorder to the corresponding S VHS or Video output socket on the camcorder B Use an audio cable red white ends to connect the AUDIO L R sockets on the front panel of the recorder to the audio output sockets on the camcorder Before you start operating press SOURCE on the remote control repeatedly to select CAM1 or CAM2 as the input channel depending on your connections See the chapter ...

Страница 23: ...e channel down key repeatedly until you see the Video In channel Alternatively the TV remote control may have a key or switch that chooses different video modes Setting the OSD language Select the menu language for this recorder s on screen display The language options are different depending on your country or region It may not correspond to the illustrations shown in the user manual Language set...

Страница 24: ...urTV channel programmes Before the recorder starts recording any TV channel programmes you need to search for the available TV channels and store them in this recorder Before you start Make sure you have successfully made all the required connections to the recorder the TV and Satellite Receiver Cable Box if any and turned them on Tuner settings can only be changed when the recorder is not playing...

Страница 25: ...annel information of the selected preset channel A Press SETUP The setup menu appears B Use ST keys to highlight SETUP MENU DATE TIME and press X to access the menu SETUP MENU DATE TIME Time hh mm Date dd mm yyyy Date Time Programme Date Time Setting Auto P001 Ch005 0101 2006 10 33 C Use ST keys to highlight Date Time Programme press X to access the options D Select the desired programme channel t...

Страница 26: ...he temporary HDD storage Time Shift Buffer see next page Pause liveTV function You may be interrupted whilst watching your favourite TV programme You can pause the show by pressing PAUSEÅ and pressing PLAYÉto resume playback of the programme at the scene it was interrupted You can pause the live TV broadcast up to a maximum period of 6 hours It behaves exactly as if you were in control of the live...

Страница 27: ...l be deleted and the start time will be updated accordingly cStatus of source of video input LIVE or the time of current playback being viewed HH MM SS dIcon which shows the status of the time shift buffer playback of content stored in the time shift buffer marks the beginning of content recording marks the current recording in progress the current screen has been paused from playback This will no...

Страница 28: ... markers within a title during recording This allows you to access to specific points on the recording A Use ST keys to highlight Auto Chapter Marker and press X to access its options B Use ST keys to select your preferred setting C Press OK to confirm Default Recording Quality The setting defines the picture quality of recordings and the maximum recording time on the HDD Important When copying fr...

Страница 29: ...s are inserted during recording at every 20 minutes interval 30min Chapter markers are inserted during recording at every 30 minutes interval Off The feature is disabled Record Quality Select this option to preset your preferred mode of recording quality Press X to access the menu and use ST keys to select one of the options Hours of Recording that can be stored Record Quality 1 2 2 5 3 4 6 8 17 3...

Страница 30: ...orary HDD storage where you want to start recording C Press RECâ on the remote control to start recording To cancel press SELECT To save all current programmes stored in the time shift buffer press and hold RECâ D To stop recording press STOPÇon the remote control To record directly to a recordable DVD see the chapter Record on Recordable DVD Recording from a DV camcorder You can record video dire...

Страница 31: ...ted when you begin another recording To record directly to a recordable DVD see the chapter Record on Recordable DVD Recording from an external device Camcorder VCR DVD player A copy protection system has been built into this recorder to prevent the transfer of data from pre recorded DVDs or other copy protected material onto the recordable DVD You can only store the contents in the temporary HDD ...

Страница 32: ...e recording before the scheduled ending press STOPÇ To record directly to a recordable DVD see the chapter Record on Recordable DVD Instant recording This function allows you to make a recording with a pre determined duration without using the timer programming A Press RECâ repeatedly to toggle between recording options of 30 minute increments 30 60 and up to 360 minutes of recording B The recorde...

Страница 33: ... will be displayed on the recorder s system display panel To switch back to recorder mode press TV DVD on the remote control Helpful Hint Remember to switch the TV back to its video input channel if you want to watch the TV channel through the recorder or playback the recorded disc Watching HDD title playback You can playback another HDD title whilst recording is in progress Press HDD to view the ...

Страница 34: ...length of recording Index picture of title Discs for recording There are several formats of recordable DVD discs which can be used with this recorder DVD RW DVD ReWritable discs Discs that are rewritable can be used for multiple recordings once the existing data has been erased DVD R DVD Recordable discs Discs that can only be used for a single recording Each new recording is always added at the e...

Страница 35: ... go to edit menu 00 20 20 SP PAL 25 001 CH001 CH003 CH009 CH004 CH002 CH008 002 003 004 005 006 Date Time No Ch Title 14 05 05 20 05 05 25 04 05 30 04 05 28 03 05 12 04 05 14 00 16 00 Travel Nature News Drama News Title 3 03 30 20 30 08 30 11 00 1 Press SELECT to mark or unmark recordings 2 Press HDD to copy marked recordings to DVD Press SHUFFLE to sort by title or time CH012 007 05 08 05 News 21...

Страница 36: ...Input source from the device connected to the EXT1 TO TV I O scart socket on the back panel EXT 2 Input source from the device connected to the EXT2 AUX I O scart socket on the back panel Alternatively Press DV to record from the DV camcorder connected to the DV IN socket on the front panel E Press SELECT to toggle between the different modes of record quality Hours of Recording that can be stored...

Страница 37: ... from the VPS PDC broadcast time you must disable the VPS PDC recording option Timer recording SHOWVIEW System This is a simple timer programming system To use enter the SHOWVIEW programming number associated with your television programme You can find this number in your TV listings magazine All the information needed by this recorder for programming is contained in the programming number A Switc...

Страница 38: ... or DVD to enter the recording destination Rec Mode Use ST keys to select your option Mode Use ST keys to select Once Daily Weekly Mon Fri Mon Sat Weekend recordings Date Use ST keys or the numeric keypad 0 9 to enter the date for recording Start Use ST keys or the numeric keypad 0 9 to enter the start time of recording End Use ST keys or the numeric keypad 0 9 to enter the end time of recording T...

Страница 39: ...de SPP OK OK OK CANCEL E Use ST keys to select an entry in the menu and press X to enter its options Source Use ST keys to select the recording input source Rec To Use ST keys to select HDD or DVD to enter the recording destination Rec Mode Use ST keys to select your option Mode Use ST keys to select Once Daily Weekly Mon Fri Mon Sat Weekend recordings Date Use ST keys or the numeric keypad 0 9 to...

Страница 40: ...OK to confirm C Keep the Satellite Receiver Cable Box switched on for the recording D Press STANDBY ON 2 to turn off the recorder TIPS Set the appropriate mode of record quality for HDD recording the same record quality will be transferred from HDD to a recordable DVD Timer Recording continued Changing Deleting a timer recording A Switch on the TV Select the correct Video In channel at the TV B Pr...

Страница 41: ...ess SELECT to mark or unmark recordings 2 Press HDD to copy marked recordings to DVD Press SHUFFLE to sort by title or time CH012 007 05 08 05 News 21 30 CH010 008 30 06 05 Discover 22 30 C During playback you can use the following keys on the remote control to access additional playback features PAUSE PLAY STOP SOURCE ZOOM INFO 0 01 15 30 00 00 00 move to the beginning or previous next chapter ho...

Страница 42: ...c is for the same region as your player Do not push on the disc tray or put any objects other than discs on the disc tray It may cause the disc player to malfunction Starting disc playback A Press STANDBY ON 2 to switch on the recorder B Press OPEN CLOSE ç on the front of the recorder The disc tray opens C Place the disc onto the tray with the label facing up then press OPEN CLOSEç D Switch on the...

Страница 43: ...This allows you to play the video CDs interactively following the menu on the display A Insert a Super Video CD Press DVD on the remote control If the PBC is on the disc index menu will appear on the TV B Use numeric keypad 0 9 to input your selection or to select a play option Press RETURN on the remote control to return to the previous menu To turn on off the Playback Control mode press INFO key...

Страница 44: ...oor encoding of the content Playing a MP3 disc A Insert a MP3 CD Press DVD on the remote control The disc content menu appears File Play Stop0 00 00 0 00 00 Directory Playlist Bee Gees Phil Collins Bryan Adams Collin Raye Nat King Cole UB40 Jordan Hill Faith Hill 1 2 3 4 5 6 7 8 Note It may require a longer time for the recorder to display the disc content menu on the TV due to the large number of...

Страница 45: ...ile Play Stop 0 00 00 0 00 00 Directory Playlist P1010001 JPG P1010008 JPG BUTTER 1 JPG NATURE 1 JPG BUTTER 1 JPG P1022500 JPG P1023000 JPG MERLIO 1 JPG 1 2 3 4 5 6 7 8 If the disc contains MP3 music and JPEG picture files you can start a musical slide show playback Select an MP3 file and press OK to start playback then select a picture file in the menu and press OK to start the musical slide show...

Страница 46: ...forward or fast reverse a disc at two four sixteen or thirty two times the normal playback speed A During playback press and hold fast reverse or fast forward to switch to the search function Press the same key repeatedly for various search speed options B During disc playback press X RIGHT to access the playback menu Use ST keys to highlight Trick Mode Play and press X RIGHT to access the search ...

Страница 47: ...to cancel the repeat mode and return to normal playback Repeat A B Select this to repeat the playback of a specific segment within a title chapter track Press OK to mark the start and end of the segment you want to repeat Repeat Chapter Select this to repeat playback of the current chapter DVD recordable DVDs only Repeat Track Title Select this to repeat playback of the current track title Repeat ...

Страница 48: ...s to select the track file chapter to programme and press SELECT on the remote control To start programme play F Press X key to move to the right screen and press OK Playback will start from the selected track file chapter according to the programmed sequence To exit programme play G Press STOP to exit programme play Changing the audio soundtrack language This operation works only on DVDs with mul...

Страница 49: ...D Switching camera angles This option is only available with DVDs that contain sequences recorded from different camera angles This allows you to view the picture from different angles A Press INFO twice on the remote control The playback menu appears B Use ST keys to select Angle and press X to enter its options The camera angles available for selection appears C Use ST keys to select the camera ...

Страница 50: ... Use ST keys to highlight a title recording and press X The HDD title edit menu appears 001 CH001 CH003 CH009 CH008 CH002 CH008 002 003 004 005 006 Date Time No Ch Title HDD 10 Titles 14 02 06 20 01 06 25 03 05 30 04 06 28 03 06 12 04 06 10 00 09 00 Travel Nature News Drama CSI Title 3 03 30 08 30 08 30 11 00 Press OK to play title 00 20 20 SP NTSC Play Title Delete Title Divide Title Edit Title R...

Страница 51: ...isible again A In HDD title edit mode use ST keys to highlight Edit Title and press OK The edit title playback screen appears B During playback press PAUSE Åand use WX keys to navigate through the title Press OK to mark the beginning of a segment to hide C To mark the end of a segment to hide press OK again To hide more segments repeat steps B C for each segment you want to hide To unhide the scen...

Страница 52: ...info panel is now updated To exit select Exit on the keyboard and press OK Lock Unlock a title You can choose to lock a title to prevent any unauthorised playback of the recording If a title has been locked the user will be prompted to enter a 4 digit password preset in the system setup menu To set reset this password see the chapter Setup Menu Options PREFERENCES Settings Change Password In HDD t...

Страница 53: ...t possible to unfinalise the disc Make Compatible DVD RWs only To ensure the edited changes remain when the disc is played back on another DVD player eg hidden chapters to remain hidden Lock Unlock Disc DVD RWs only Lock or unlock a disc to prevent accidental erasure or changes being made Accessing disc editing menu OK DVD REC A Insert a recordable DVD into the recorder Press DVD on the remote con...

Страница 54: ...updated To exit select Exit on the keyboard and press OK Erase disc DVD RWs only This erases the content of the DVD RW disc including those that was not recorded on this recorder Once the existing content is erased it can be used for recording A In disc editing menu use ST keys to select Erase Disc and press OK A warning message will appear B Select OK YES in the menu to proceed or OK NO to abort ...

Страница 55: ... A In disc editing menu use ST keys to select Lock Disc and press OK The disc is locked for this DVD recorder only When the disc is locked the option in the disc editing menu will change to Unlock Disc B If you want to overwrite or edit on the protected disc select Unlock Disc Playing your recordings DVD R on other DVD players It is necessary to finalise a DVD R disc before you can play it on any ...

Страница 56: ...menu A Insert a recordable DVD into the recorder Press DVD on the remote control The Index Picture screen appears on the TV During playback press DVD to access the Index Picture screen B Use ST keys to highlight a title recording and press X The title editing menu appears 3 My movie 11 04 2004 12 31 53 HQ 00 05 59 Edit Title Rename Title Erase Title Overwrite Title Play Title Overwrite Disc Append...

Страница 57: ...o abort then press OK to confirm Overwrite title DVD RW only This function allows you to record a new title from the beginning of the current title in the DVD RW disc A In title editing menu use ST keys to select Overwrite Title and press OK B Select the source you want to record from and press REC to start recording Overwrite from the selected title You can select to overwrite only the recordings...

Страница 58: ...elect a scene in the recording as the index picture screen Split Title DVD RWs only Divide the recording into two separate titles Edit Recordings Recordable DVD continued Accessing video editing menu OK SETUP DVD PLAY SELECT A Insert a recordable DVD into the recorder The Index Picture screen appears on the TV B Use ST keys to highlight a title recording and press X to access the menu The title ed...

Страница 59: ... create a chapter by inserting chapter marker at any point within a title during playback This will allow you to access a specific point in the recording easily or set a chapter you wish to hide Title Chapter Chapter Chapter Chapter chapter markers A In edit mode use ST keys to select Chapter Marker and press OK B Use ST keys to select one of the options and press OK to confirm Insert Marker Selec...

Страница 60: ...diting mode Changing Index Picture The index picture is the picture of the title you will see when the recorder loads up the Index menu Normally the first frame of a recording is shown as the title s index picture A In edit mode use ST keys to select Index Picture and press OK The display will be in playback mode B Use WX keys on the remote control to search for the scene to use then press OK to c...

Страница 61: ...SETUP Country Selection Austria See facing page SETUP MENU DATE TIME Time hh mm Date dd mm yyyy Date Time Programme Date Time Setting Auto P001 Ch005 0101 2006 10 33 See this chapter DATE TIME Settings SETUP MENU GENERAL Record Quality SP Auto Chapter Marker 5min DivX R Video on Demand OK Delete Optical Disc OK See the chapter Recording and GENERAL Settings SETUP MENU AUDIO LPCM Output LPCM 96Hz S...

Страница 62: ...the options and press X Programme Number Use CH CH to select by the programme number for modifying Search Type Select the mode to search for a programme channel either by Frequency or Channel This option is available if you have selected Search Type Frequency Frequency Select this to adjust the frequency of the channel Use WX keys to search for the next frequency or use the numeric keypad 0 9 to c...

Страница 63: ...or dual language broadcasts select this to switch between stereo original and the additional audio language Use ST keys to select Dual A or Dual B then press OK on the remote control to confirm the setting Decoder If you have connected the recorder to an external decoder select On and press OK to confirm for the channel from decoder Skip Set the channel to be skipped The skipped channels can only ...

Страница 64: ...ctivate deactivate the automatic setting of date and time Auto Select to activate automatic setting of date and time The date and time setting will be updated according to the broadcast channel information of the selected preset Program Number under the Date Time Programme setting Manual Select this to manually set date and time Date Time Programme This option is available only if you have selecte...

Страница 65: ...ration code that allows you to rent and purchase videos using the DivX VOD service For more information visit www divx com vod 1 Press X to display the registration code 2 Use the registration code to purchase or rent videos fromDivX VOD service at www divx com vod Follow the instructions and copy the video from your computer onto a CD R RW for playback on this recorder Delete Optical Disc Erase a...

Страница 66: ...th sampling rates of 48 kHz In addition the disc you are playing back must be recorded in 48kHz LPCM format LPCM 96 kHz Select this if the connected audio device is capable of processing digital signal input with sampling rates of 96 kHz In addition the disc you are playing back must be recorded in 96kHz LPCM format LANGUAGE settings Audio Language Selects the preferred audio language for DVD play...

Страница 67: ...the default password is 3308 3 Enter your new password and press T 4 Re enter your new password and select OK OK then press OK on the remote control to confirm Reset Menu Settings Restore all the settings of this recorder to factory settings Press X to reset the menu settings of this recorder A warning message will appear Select OK OK in the menu to proceed or OK CANCEL to abort then press OK to c...

Страница 68: ...Management This option determines how the recorder will respond when the HDD is full of recordings Automatic During recording when the HDD is full the recorder will proceed to overwrite any unprotected recordings in the HDD The oldest unprotected recordings will be deleted first Manual During recording when the HDD is full recording will be stopped A warning message The hard disk is full Please er...

Страница 69: ...e is continuously refined for greater stability and compatibility of the recorder Caution Power supply must not be interrupted during upgrade Visit Philips website at www philips com support to check for the availability of the latest software upgrade Note When checking for the latest software upgrade please also check for any accompanying instructions on installing the software ...

Страница 70: ...nd Chapters of a book A Title is often a complete movie and is broken down into Chapters or individual scenes from the movies Title Chapter Title Chapter Chapter Chapter Chapter chapter markers A programme is recorded as a single title it may consist of one chapter or a few chapters within a title depending on the recording settings How do I set up Titles and Chapters The recorder will automatical...

Страница 71: ...bit 27 MHz Audio Performance DA Converter 24 bit 192 kHz AD Converter 24 bit 96 kHz Signal Noise 1kHz 100 dB Dynamic range 1kHz 95 dB Crosstalk 1kHz 105 dB Tuner Reception Transmission TV System PAL SECAM Aerial input 75 ohm coaxial IEC75 Storage Media Recording DVD R DVD RW DVD R DVD RW Hard Disk Capacity 80GB HDD recording enhancements Instant Replay Time Shift Buffer Extra Hard Disk Technology ...

Страница 72: ...im the remote control directly at the IR sensor on the front of the recorder not towards TV Remove any obstacles between the recorder and remote control Batteries are weak replace the batteries Switch on your TV and set to the correct Video In channel for the recorder You may go to Channel 1 on your TV then press the channel down key on your TV s remote control until you see the TV programme Check...

Страница 73: ...disc is defective by trying another disc The disc does not match with the TV colour system standard PAL NTSC The disc is dirty clean the disc Sometimes a small amount of picture distortion may appear This is not a malfunction Have your antenna or cable TV signal checked Fine tune your TV channel Read chapter Step 3 Installation and Setup Setting your TV channel programmes for details Do not connec...

Страница 74: ...red TV channel 2 Press OK to confirm 3 Check the channel number in the Program input field If this does not correspond to the desired TV channel select this entry field and change the channel number 4 Press OK to confirm If a recording is too short it is possible that a DVD player recorder cannot detect it Please observe the following minimum recording times Mode of record quality High Quality HQ ...

Страница 75: ... cannot be re used The disc can be used as a normal blank disc You have to re copy the files to the disc again Parts of the signal may be copy protected by the broadcaster This portion of the time shift video bar will be shown in a different colour You can only start or stop a recording if the selected portion does not contain any copyright content Use WX keys or keys to navigate to a non protecte...

Страница 76: ... RW or DVD R An Index Picture represents each recording JPEG A very common digital still picture format A still picture data compression system proposed by the Joint Photographic Expert Group which features small decrease in image quality in spite of its high compression ratio MP3 A file format with a sound data compression system MP3 is the abbreviation of Motion Picture Experts Group 1 or MPEG 1...

Страница 77: ... The system setup menu disc menu or title menu display is on HDDMENU The hard disk menu display is on NO DISC No disc has been inserted If a disc has been inserted then it is possible that the disc cannot be read OPEN Disc tray is opened or opening READING Disc is being recognised by the recorder PHILIPS The recorder has been turned on SCANXXX Please wait until this message disappears The recorder...

Страница 78: ... 5 CHILE NTSC M NTSC M 4 CHINA PAL D 6 COLOMBIA NTSC M NTSC M 4 COSTA RICA NTSC M NTSC M 4 CROATIA PAL B PAL G 2 CUBA NTSC M NTSC M 4 CYPRUS PAL B PAL G CZECH REPUBLIC PAL D PAL K 2 DAHOMEY SECAM K1 DENMARK PAL B PAL G 2 DJIBOUTI SECAM B SECAM G 5 DOMINICAN REP NTSC M NTSC M 4 ECUADOR NTSC M NTSC M 4 EGYPT SECAM B PAL B SECAM G PAL G 2 EL SALVADOR NTSC M NTSC M 4 EQUAT GUINEA PAL B 5 ESTONIA PAL B...

Страница 79: ... M NTSC M 4 NIGER SECAM K1 5 NIGERIA PAL B PAL G 5 NORWAY PAL B PAL G 2 OMAN PAL B PAL G 2 PAKISTAN PAL B 5 PANAMA NTSC M NTSC M 4 PARAGUAY PAL N PAL N 4 PERU NTSC M NTSC M 4 PHILIPPINES NTSC M NTSC M 3 POLAND PAL D PAL K 2 PORTUGAL PAL B PAL G was SECAM D 2 PUERTO RICO NTSC M NTSC M 1 QATAR PAL B 2 REUNION SECAM K1 RUMANIA PAL D PAL K 2 RUSSIA SECAM D SECAM K 5 RWANDA SECAM K1 5 SABAH SAWARA PAL ...

Страница 80: ...CLASS 1 LASER PRODUCT Meet Philips at the Internet www philips com http www philips com support English 3139 245 24271 Sgp 0625 31 1 DVDR3440H ...

Отзывы: