background image

English

16

Optional Connections

 (continued)

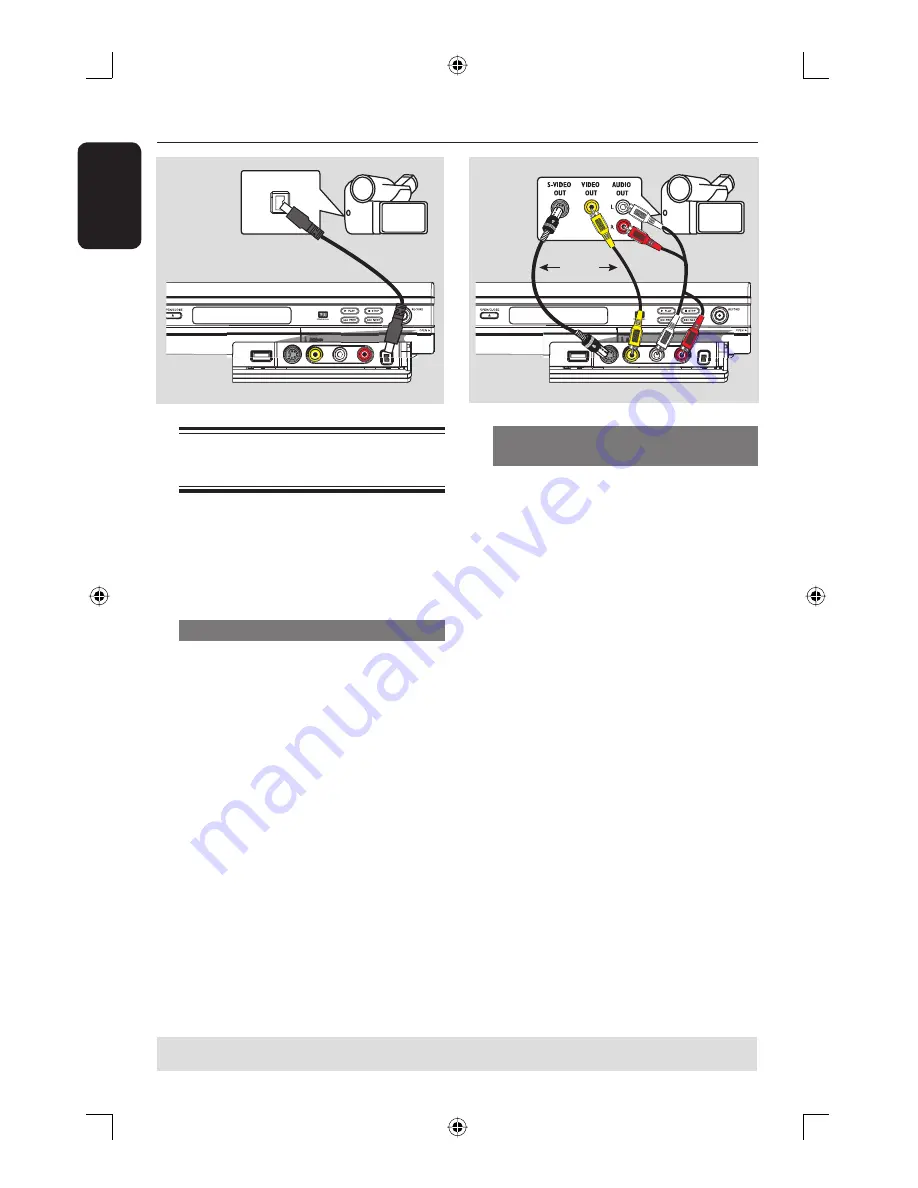
DV OUT

B

OR

Connecting a camcorder to 
the front jacks

You can use the front jacks to copy
camcorder recordings. These jacks are
located behind the fl ap on the right hand
side and provides convenient connections
for a camcorder.

Option 1: Using DV IN jack

Use this connection if you have a Digital
Video or Digital 8 camcorder. The DV
jack conforms to the i.LINK standard.
It provides the best picture quality.

  Use an i.LINK 4-pin cable (not supplied)

to connect the 

DV IN 

jack on the DVD

recorder to the appropriate DV OUT
jack on the camcorder.

Before you start operating, press 

REC

SOURCE

 on the remote control

repeatedly to select ‘DV’ as the input
channel. For recording, see pages 26~28.

Helpful Hints:
– The DV IN jack does not support a
connection to a Personal Computer.
– It is not possible to record from the DVD 
recorder to your camcorder via the DV IN 
jack on your DVD recorder.

Option 2: Using S-VIDEO In or 
VIDEO In jack

Use S-VIDEO connection if you have a
Hi8 or S-VHS(C) camcorder. It provides
better picture quality.

Alternatively, you can use VIDEO
connection if your camcorder has only a
single video output (Composite Video,
CVBS).

A

 Connect the 

S-VIDEO

 or 

VIDEO

 jack 

at the front panel of the DVD recorder 
to the corresponding S-VHS or Video 
output jack on the camcorder.

B

 Use an audio cable (red/white ends) to 

connect the 

AUDIO L/R

 jacks at the 

front panel of the DVD recorder to the 
audio output jacks on the camcorder.

 Before you start operating, press 

REC

SOURCE

 on the remote control

repeatedly to select ‘Front S-VIDEO’ or
‘Front CVBS’ as the input channel,
depending on your connections.
For recording, see pages 26~28.

A

TIPS: 

Before making or changing any connections, make sure that all the devices are disconnected 
from the power outlet.

dvdr3365_75_eng_16752.indd   16

dvdr3365_75_eng_16752.indd   16

2005-11-02   2:21:36 PM

2005-11-02   2:21:36 PM

Содержание DVDR3365

Страница 1: ...English User Manual dvdr3365_75_eng_16752 indd 1 dvdr3365_75_eng_16752 indd 1 2005 11 02 2 21 03 PM 2005 11 02 2 21 03 PM ...

Страница 2: ...AY CAUSE ARTIFACTS TO BE DISPLAYED IN THE PICTURE IN CASE OF 525 OR 625 PROGRESSIVE SCAN PICTURE PROBLEMS IT IS RECOMMENDED THAT THE USER SWITCH THE CONNECTION TO THE STANDARD DEFINITION OUTPUT IF THERE ARE QUESTIONS REGARDING OUR TV SET COMPATIBILITY WITH THIS MODEL 525p AND 625p DVD PLAYER PLEASE CONTACT OUR CUSTOMER SERVICE CENTER For Customer Use Read carefully the information located at the b...

Страница 3: ... uses only unless other wise authorized by Macrovision Reverse engineering or disassembly is prohibited U S Patent Number 4 631 603 4 819 098 4 907 093 5 315 448 and 6 516 132 G CODE is a registered trademark of Gemstar Development Corporation The G CODE system is manufactured under licence from Gemstar Development Corporation dvdr3365_75_eng_16752 indd 3 dvdr3365_75_eng_16752 indd 3 2005 11 02 2 ...

Страница 4: ...1394 This connection is used for the transfer of high bandwidth digital signals as used by digital video DV camcorders Audio and video signals are transmitted using a cable This is a simple programming system for DVD recorders To use it enter the programming number associated with your television program You can find this number in your favorite listings magazine Special Features dvdr3365_75_eng_1...

Страница 5: ...protected What are Titles and Chapters A DVD disc contains Titles and Chapters which are similar to the Titles and Chapters of a book A Title is often a complete movie and is broken down into Chapters or individual scenes from the movies Title Chapter Title Chapter Chapter Chapter Chapter chapter markers Programs are recorded as a single title it may consist of one chapter or a few chapters within...

Страница 6: ...ontrol 18 Main Unit 20 Jacks behind the flap 20 Getting Started Step 1 Inserting Batteries 21 Using the remote control to operate the system 21 Step 2 Finding the viewing channel 21 Step 3 TV channel programming 22 Automatic TV channel search 22 Modifying Channel Information 23 Sorting the TV channels 24 Step 4 Setting the language 24 Step 5 Setting the time date 25 Recording Discs for recording 2...

Страница 7: ...card reader 44 Additional Playback Features Changing to another title chapter track 45 Pausing playback and step play 45 Searching forward backward 45 Zooming in 45 Using T C options 46 Selecting various repeat shuffle functions 46 Programming disc tracks 47 Changing the audio soundtrack language47 Changing subtitle language 48 Switching camera angles 48 Time search 48 DVD System Menu Options Acce...

Страница 8: ...ted batteries and old equipment Care and Safety Information CAUTION High voltage Do not open the device You run the risk of getting an electric shock The machine does not contain any user serviceable parts Please leave all maintenance work to qualified personnel Setup precautions Finding a suitable location Place the set on a flat hard and stable surface Do not place the set on a carpet Do not pos...

Страница 9: ... type plate on the rear or bottom of the product for identification and supply ratings Accessories supplied Remote control and batteries Audio Video AV cables RF coaxial cable Quick Use Guide User Manual Region codes DVD films are usually not released at the same time in all regions of the world thus all DVD players are keyed to a specific region code The regional code is shown at the back panel o...

Страница 10: ...d the cable programs If you want to connect to a VCR and or Cable Box Satellite Receiver see page 13 15 for the complete connection to your TV A Connect the existing Antenna Cable TV signal or from the Cable Box Satellite Receiver RF OUT or TO TV to the ANTENNA jack on the DVD recorder B Use the supplied RF coaxial cable to connect the TV jack on the DVD recorder to the antenna input jack on your ...

Страница 11: ...Using a Component Video cable best picture quality A Use the component video cables red blue green not supplied to connect the Y Pb Pr OUT1 jacks on the DVD recorder to the corresponding component video input jacks or labeled as Y Pb Cb Pr Cr or YUV on the TV B If your TV accepts Progressive Scan signal see page 50 for detailed Progressive Scan set up IMPORTANT The progressive scan video quality i...

Страница 12: ... AV amplifier receiver with a digital multichannel sound decoder in order to enjoy multichannel surround sound Use a coaxial cable not supplied Connect the recorder to the receiver amplifier from the coaxial jack of the recorder to the digital input of the receiver Before you start operating set the Digital Audio Output accordingly see page 53 If the Digital Output setting does not match your ster...

Страница 13: ...r TV B Use the audio video cables to connect the VIDEO AUDIO IN EXT on the DVD recorder to the matching VIDEO AUDIO output jacks on the Cable Box Satellite Receiver C Use the audio video cables to connect the VIDEO AUDIO OUT 2 on the DVD recorder to the matching VIDEO AUDIO input jacks on the TV RF S VIDEO OUT IN AUDIO R L VIDEO AU D IO O U T S V ID E O IN V ID E O IN TV Back of a Cable Box or Sat...

Страница 14: ...he VIDEO AUDIO IN EXT on the DVD recorder to the matching VIDEO AUDIO output jacks on the VCR E Use the audio video cables to connect the VIDEO AUDIO OUT 2 on the DVD recorder to the matching VIDEO AUDIO input jacks on the TV Helpful Hints You may use the S VIDEO Y C jack instead of VIDEO CVBS jack if the connected device has the same S VIDEO input output jack This video connection provides better...

Страница 15: ... the VIDEO AUDIO IN EXT on the DVD recorder to the matching VIDEO AUDIO output jacks on the VCR E Use the audio video cables to connect the VIDEO AUDIO OUT 2 on the DVD recorder to the matching VIDEO AUDIO input jacks on the TV Helpful Hints You may use the S VIDEO Y C jack instead of VIDEO CVBS jack if the connected device has the same S VIDEO input output jack This video connection provides bett...

Страница 16: ... the DVD recorder to your camcorder via the DV IN jack on your DVD recorder Option 2 Using S VIDEO In or VIDEO In jack Use S VIDEO connection if you have a Hi8 or S VHS C camcorder It provides better picture quality Alternatively you can use VIDEO connection if your camcorder has only a single video output Composite Video CVBS A Connect the S VIDEO or VIDEO jack at the front panel of the DVD recor...

Страница 17: ...r C To stop playback press STOP or remove the USB flash drive USB memory card reader from the USB port Helpful Hints The USB port only supports the playback of JPEG MP3 files The USB port does not support the connection to other USB devices except for a USB flash drive USB memory card reader If the USB jack does not fit into the USB port a USB extension cable is required Optional Connections conti...

Страница 18: ...t TV channel or the current video input source g Skips to previous or next Chapter Track h TOP MENU For DVD R RW only Enters the disc editing menu i AUDIO Selects an audio language DVD VCD or an audio channel j RETURN Returns to the previous menu of a video CD VCD or some DVDs or USB k SUBTITLE Selects a DVD subtitle language l REC MODE Toggles between recording modes 1 2 4 and 6 hour mode This de...

Страница 19: ... drive USB memory card reader r PLAYÉ Plays a disc s STOP Stops playback recording Holding down the button will open close the disc tray tÅ Pauses the playback or recording Press repeatedly to advance a paused picture one frame at a time u EDIT For DVD R RW only Enters exits the video editing menu v ZOOM Enlarges a picture on the TV screen w T C Title Chapter Enters exits the T C menu x CLEAR Clea...

Страница 20: ...the right hand corner i USB Input for USB flash drive USB memory card reader Press USB in order to view the input source j S VIDEO S video input for SVHS Hi8 camcorders or SVHS Hi8 video recorders Press REC SOURCE on the remote control to select Front S Video in order to view the input source k VIDEO Video input for camcorders or video recorders Press REC SOURCE on the remote control to select Fro...

Страница 21: ...iewing channel A Press STANDBY ON 2 on the DVD recorder to turn it on B Turn on the TV and set it to the correct video in channel You should see the blue DVD background screen Usually this channel is between the lowest and highest channels and may be called FRONT A V IN VIDEO See your TV s manual for more details Or you may go to channel 1 on your TV then press the Channel down button repeatedly u...

Страница 22: ...lly scan all the receivable analog local TV channels and store these channels on the DVD recorder A Press SYSTEM MENU on the remote control The system menu appears on the TV B Use ST keys to highlight System Menu Channel Setup and press X System Menu Channel Setup ModifyChannelInformation SortChannel ChannelSearch Search Edit Sort C Use ST keys to highlight Channel Search and press OK The automati...

Страница 23: ... System Set the TV system that produces the least distortion of picture and sound Use ST keys to select a suitable sound mode then press OK to confirm See chapter TV System Guide at the back of this manual for more information NICAM Turn on or off the digital sound transmission system which improves the sound quality of the TV channel Use ST keys to select On or Off then press OK to confirm Audio ...

Страница 24: ... language for subtitles and audio for DVD playback For some DVDs the subtitle audio language can only be changed via the DVD disc menu If the selected language is not available on the disc the disc s default language will be used instead The menu language on screen display for the system will remain as you set it Language settings can only be changed when there is no disc in the disc tray A Press ...

Страница 25: ...uto C Press OK to set Date dd mm yy D Use ST keys to change number and use WX keys to select different entry fields then press OK to confirm Alternatively you can key in the numbers using the numeric keypad 0 9 on the remote control E Press OK to confirm F Move to Time hh mm ss and repeat step D E Note For information on Show DivX registration code see page 54 Getting Started continued TIPS Press ...

Страница 26: ... Unrecordable pictures Television programs films video tapes discs and other materials may be copy protected and therefore cannot be recorded on this recorder Recording settings The default recording settings allow you to set the auto chapter markers preferred recording input source and recording mode Any changes made using the remote control will only apply to the current recording settings the d...

Страница 27: ... source from the device connected to the S VIDEO and AUDIO L R jacks on the front panel Rear CVBS Input source from the device connected to the VIDEO CVBS IN EXT and AUDIO L R jacks on the back panel Rear S Video Input source from the device connected to the S VIDEO Y C IN EXT and AUDIO L R jacks on the back panel DV Input source from the device connected to DV IN jack at the front panel C Press O...

Страница 28: ...e device connected to the S VIDEO Y C IN EXT and AUDIO L R jacks on the back panel DV Input source from the device connected to DV IN jack at the front panel D Press REC to start recording The recording will start automatically after the last recording on the DVD R RW E To stop the recording press STOP Pausing a recording A During a recording press Å You can use this function to avoid recording co...

Страница 29: ...Cancel OK E Use ST keys to select an entry in the menu and press X to enter its options About timer recording Use Timer Recording to automatically start and stop a recording at a later date time The DVD recorder will tune to the right program channel and begin recording at the specified time With this DVD recorder you can pre program up to 20 recordings To make a timer recording your DVD recorder ...

Страница 30: ...tomatically switch to standby mode to prepare for timer recording at the designated time The TIMER icon will light up on the display panel if a timer recording is set Helpful Hint Set the timer recording one minute ahead of the program s start time This helps to ensure the entire program is recorded as the disc requires about 30 seconds to prepare for recording Setting a timer recording from an ex...

Страница 31: ...ress CLEAR on the remote control To cancel the G CODE programming use ST keys to select CANCEL in the menu and press OK E To confirm your entry select CONFIRM in the menu and press OK The system will store the timer entry and return to the timer editor menu If the channel number of the TV channel has not been assigned to the programming number you will have to manually key in the channel number th...

Страница 32: ... Editor Rec Mode Mode Date Start End 2 Hour Mode Once Source Ch003 31 01 05 10 33 11 03 OK Cancel OK F Select the entry field and make the necessary changes G Once complete select OK in the menu and press OK to save the changes H Press TIMER to exit the menu TIPS Ensure that there is sufficient space available on the DVD R RW before recording You have to finalize the DVD R before it can be played ...

Страница 33: ...ngs of a recorded DVD R RW via the disc editing menu The edited contents may not be available when you play the disc on another DVD player The displayed options in the disc editing menu may differ depending on the type of disc Play Start playing from the beginning of the disc Rename Disc Change the name of the disc Erase Disc DVD RW only Erase all the recordings on the disc Record New Title Start ...

Страница 34: ... not recorded on this DVD recorder Once the existing content has been erased it can be used for more recording A Press TOP MENU then use ST keys to select Erase Disc and press OK A warning message will appear B Select YES in the menu to proceed or NO to abort then press OK to confirm Record new title This function allows you to start a new recording on the remaining empty space in the DVD RW A Pre...

Страница 35: ... protected disc select Unlock Disc Playing your recordings DVD R on other DVD players It is necessary to finalize a DVD R disc before you can play it on another DVD player Otherwise the DVD R will only playback on this DVD recorder Once a DVD R disc has been finalized no further recordings or editing can be made to it Make sure that you have completed all the recordings and editing before finalizi...

Страница 36: ...en appears on the TV During playback press DISC MENU to access the Index Picture screen B Use ST keys to highlight a title recording and press X The title editing menu appears 3 My movie 11 04 2004 12 31 53 HQ 00 05 59 Edit Title Rename Title Erase Title Overwrite Title Play Title Overwrite Disc Append Title C Use ST keys to access different options and OK to select Instructions and explanation of...

Страница 37: ...o go back to the previous menu Rename title The original title name is automatically generated by the DVD recorder You can give a new name to the title by following the steps below A In title editing menu use ST keys to select Rename Title and press OK The keyboard screen appears B Use W X ST keys to highlight a character and press OK to select The maximum input is up to 9 characters You can use t...

Страница 38: ...the recording as the index picture screen Split Title DVD RW only Divide the recording into two separate titles Accessing video editing menu EDIT PLAY OK A Insert a recorded DVD R RW into the DVD recorder The Index Picture screen appears on the TV B Use ST keys to select a title recording C Press PLAY X to start playback D Press EDIT on the remote control The video editing menu appears Edit Mode T...

Страница 39: ...apter by inserting a chapter marker at any point within a title during playback This will allow you to access a specific point in the recording easily or set a chapter you wish to hide Title Chapter Chapter Chapter Chapter chapter markers A During playback press EDIT to display the video editing menu then use ST keys to select Chapter Marker and press OK B Use ST keys to select one of the options ...

Страница 40: ... press PAUSE Å repeatedly to forward search to the frame you want Changing Index Picture The index picture is the picture of the title you will see when the DVD recorder loads up the Index menu Normally the first frame of a recording is shown as the title s index picture A During playback use WX keys on the remote control to search for the scene to use then pressÅ PressÅ again to move forward to t...

Страница 41: ...disc make sure the disc is for the same region as your player Do not push on the disc tray or put any objects other than discs on the disc tray It may cause the disc player to malfunction Inserting a disc A Press STANDBY ON to turn on the DVD recorder B Press OPEN CLOSE ç on the front of the DVD recorder The disc tray opens C Carefully place the disc into the tray with the label facing up then pre...

Страница 42: ...D Super Video CDs may feature the PBC Play Back Control This allows you to play the video CDs interactively following the menu on the display A Insert a Super Video CD If the PBC is on the disc index menu will appear on the TV B Use numeric keypad 0 9 to input your selection or to select a play option Press RETURN on the remote control to return to the previous menu To turn on off the Playback Con...

Страница 43: ...ST keys to navigate within the menu and press OK to access the folder album C Use ST keys to select the track file to play To move up to the previous level press RETURN D To create a playlist highlight the track file and press SELECT The selected tracks files will appear on the right screen Use WX keys to toggle between the left and right screen E To start playback move the cursor to the selection...

Страница 44: ...ack press STOP Playable JPEG picture disc File format The file extension has to be JPG JPE or JPEG It can only display DCF standard still pictures or JPEG pictures e g TIFF It cannot play back moving pictures Motion JPEG progressive JPEG and other formats or pictures in formats other than JPEG or pictures associated with sound It may require a longer time for the DVD recorder to display the disc c...

Страница 45: ...rd or fast reverse a disc at two four sixteen or thirty two times the normal playback speed A During playback press W reverse or X forward to switch to the search function The search status bar appears It displays the search speed FREV x32 FREV x16 FREV x4 FREV x2 FFWD x2 FFWD x4 FFWD x16 FFWD x32 The sound will be muted B Press W reverse or X forward to cycle through the search speeds C To resume...

Страница 46: ...o repeat the playback of a specific segment within a title chapter track Press OK to mark the start and end of the segment you want to repeat Repeat Chapter Select this to repeat playback on the current chapter DVD DVD R RW only Repeat Track Title Select this to repeat playback on the current track title Repeat Directory Select this to repeat playback on the current folder directory MP3 JPEG pictu...

Страница 47: ...rogramming disc tracks You can play the contents of the disc in the order you want by programming the tracks to be played A Press T C on the remote control The T C menu appears B Select Mode Program The program menu appears DVD Title Selection Title 1 Title 2 Title 3 Title 4 Title 5 Title 6 Title 7 Title 8 C If the disc is recorded with Titles Folders Albums press OK to access the tracks files cha...

Страница 48: ...s may be numbered or abbreviated such as En for English If the language selected is not available on the disc the disc s default setting language will be used instead Helpful Hint Some DVDs discs allow subtitle language changes only via the DVD disc menu To access the disc menu press DISC MENU Switching camera angles This option is only available with DVDs that contain sequences recorded from diff...

Страница 49: ...e following pages D To exit press SYSTEM MENU Screen Saver A screen saver prevents damage to the TV screen by avoiding exposure to a static image for too long A In System Menu General use ST keys to highlight Screen Saver and press OK On Select this if you wish to turn off the TV screen after playback had been stopped or paused for more than 15 minutes Off Select this to disable the screen saver B...

Страница 50: ...ystem determine the colour system of your TV A In System Menu General use ST keys to select Video Output Format and press OK NTSC Select this if the connected TV has the NTSC colour system It will change the video signal of a PAL disc and output it to NTSC format PAL Select this if the connected TV has the PAL colour system It will change the video signal of an NTSC disc and output it to PAL forma...

Страница 51: ...spect ratio of the DVD recorder according to the TV type you have connected The format you select must also be available on the disc If it is not the setting for TV display will not affect the picture during playback A In System Menu Playback use ST keys to select TV Aspect Ratio and press OK 16 9 Select this for wide screen TV frame ratio 16 9 4 3 Letterbox Select this for a wide screen display w...

Страница 52: ...all discs to play select Off Rating explanations Off Parental Control is not active 1 Kid Safe 2 G Childsafe acceptable for viewers of all ages 3 PG Parental Guidance suggested 4 PG13 Unsuitable for children under age 13 5 PG R 6 R Restricted recommended that parents restrict children under 17 from viewing or allow to view only when supervised by a parent or adult guardian 7 NC 17 No children unde...

Страница 53: ...pin code a second time E Move to OK in the menu and press OK to confirm To abort the change select CANCEL and press OK Digital Audio Output After connecting the DVD recorder to your TV and other devices you may need to change the digital output setting Adjust the Digital Output only if you used the DVD recorder s coaxial jack A In System Menu Playback useST keys to select Digital Audio Output and ...

Страница 54: ...sit us at www divx com vod A In System Menu Clock use ST keys to select Show DivX registration code and press OK The registration code will appear B Press SYSTEM MENU to exit C Use the registration code to purchase or rent the videos from DivX VOD service at www divx com vod Follow the instructions and download the video from your computer onto a CD R RW for playback on this DVD recorder Helpful H...

Страница 55: ... RW Picture CD Picture compression formats JPEG Picture enhancement Rotate Storage Media Recording media DVD R DVD RW Tuner Reception Transmission TV system PAL NTSC Aerial Input 75 Ohm coaxial IEC75 Connectivity Rear Connections S Video Out Video CVBS Out Audio left right Out Digital audio out coaxial RF antenna in RF TV out Mains Front Connections USB i LINK DV in IEEE 1394 4 pin S Video In Vide...

Страница 56: ... code The DVD must be coded for ALL regions or Region 3 in order to play on this DVD recorder There is no recording on the disc or wrong disc type Read chapter Playback Playable discs for details Make sure the disc is not scratched or warped Clean the disc or replace a new one Check if the disc is defective by trying another disc The recordings were made on another DVD recorder and hence cannot be...

Страница 57: ... 3 TV channel programming for details If a recording is too short it is possible that a DVD player cannot detect it Please observe the following minimum recording times Recording mode 1 hour 5 minutes 2 hours 10 minutes 4 hours 20 minutes 6 hours 30 minutes You have to finalize the DVD R Refer to chapter Playing your recordings DVD R on other DVD players for details This happens if you try to copy...

Страница 58: ... still picture data compression system proposed by the Joint Photographic Expert Group which features small decrease in image quality in spite of its high compression ratio MP3 A file format with a sound data compression system MP3 is the abbreviation of Motion Picture Experts Group 1 or MPEG 1 Audio Layer 3 By using the MP3 format one CD R or CD RW can contain about 10 times more data then a regu...

Страница 59: ...English 59 dvdr3365_75_eng_16752 indd 59 dvdr3365_75_eng_16752 indd 59 2005 11 02 2 21 42 PM 2005 11 02 2 21 42 PM ...

Страница 60: ...A RICA NTSC M NTSC M 4 CROATIA PAL B PAL G 2 CUBA NTSC M NTSC M 4 CYPRUS PAL B PAL G CZECH REPUBLIC PAL D PAL K 2 DAHOMEY SECAM K1 DENMARK PAL B PAL G 2 DJIBOUTI SECAM B SECAM G 5 DOMINICAN REP NTSC M NTSC M 4 ECUADOR NTSC M NTSC M 4 EGYPT SECAM B PAL B SECAM G PAL G 2 EL SALVADOR NTSC M NTSC M 4 EQUAT GUINEA PAL B 5 ESTONIA PAL B was SECAM PAL D 5 ETHIOPIA PAL B PAL G 5 FIJI PAL B FINLAND PAL B P...

Страница 61: ...MAN PAL B PAL G 2 PAKISTAN PAL B 5 PANAMA NTSC M NTSC M 4 PARAGUAY PAL N PAL N 4 PERU NTSC M NTSC M 4 PHILIPPINES NTSC M NTSC M 3 POLAND PAL D PAL K 2 PORTUGAL PAL B PAL G was SECAM D 2 PUERTO RICO NTSC M NTSC M 1 QATAR PAL B 2 REUNION SECAM K1 RUMANIA PAL D PAL K 2 RUSSIA SECAM D SECAM K 5 RWANDA SECAM K1 5 SABAH SAWARA PAL B ST KITTS NTSC M NTSC M SAMOA US NTSC M 1 SAUDI ARABIA SECAM B PAL B SEC...

Страница 62: ...English 62 dvdr3365_75_eng_16752 indd 62 dvdr3365_75_eng_16752 indd 62 2005 11 02 2 21 42 PM 2005 11 02 2 21 42 PM ...

Страница 63: ...English 63 dvdr3365_75_eng_16752 indd 63 dvdr3365_75_eng_16752 indd 63 2005 11 02 2 21 42 PM 2005 11 02 2 21 42 PM ...

Страница 64: ...39 246 16752 Sgp Meet Philips at the Internet http www philips com http www philips com support CLASS 1 LASER PRODUCT dvdr3365_75_eng_16752 indd 64 dvdr3365_75_eng_16752 indd 64 2005 11 02 2 21 42 PM 2005 11 02 2 21 42 PM ...

Отзывы: