background image

GENERAL INFORMATION

5

WARNING:

This device complies with Part 15 of the Federal
Communications Commission (FCC) (U.S.A.) Rules.
Operation is subject to the following two conditions: (1)
this device may not cause harmful interference, and (2)
this device must accept any interference received,
including interference that may cause undesired
operation.

NOTE:

This equipment has been tested and found to comply
with the limits for a Class B digital device, pursuant to
Part 15 of the FCC Rules. These limits are designed to
provide reasonable protection against harmful
interference in a residential installation! This equipment
generates, uses and can radiate radio frequency energy
and, if not installed and used in accordance with the
instructions, may cause harmful interference to radio
communications. However, there is no guarantee that
interference will not occur in a particular installation. If
this equipment does cause harmful interference to radio
or television reception, which can be determined by
turning the equipment off and on, the user is encouraged
to try to correct the interference by one or more of the
following measures:
• Reorient or relocate the receiving antenna.
• Increase the separation between the equipment and
receiver.
• Connect the equipment into an outlet on a circuit
different from that to which the receiver is connected. 
• Consult the supplier or an experienced radio/TV
technician for help.

IMPORTANT:

This product was FCC verified under test conditions
that included use of shielded cables and connectors
between system components.  It is important that you
use shielded cables to reduce the possibility of causing
interference to radios, televisions, and other electronic
devices. If you have any problems, contact your supplier.

Any change or modifications to the equipment by the
user not expressly approved by the grantee or
manufacturer could void the user's authority to operate
such equipment.

Laser safety

This unit employs a laser. To prevent possible eye injury,
only a qualified service person should remove the cover
or attempt to service this device.

USE OF CONTROLS OR ADJUSTMENTS OR
PERFORMANCE OF PROCEDURES OTHER
THAN THOSE SPECIFIED HEREIN MAY
RESULT IN HAZARDOUS RADIATION
EXPOSURE.

CAUTION

VISIBLE AND INVISIBLE LASER RADIATION.

WHEN OPEN AVOID EXPOSURE TO BEAM.
(WARNING LOCATION: INSIDE ON LASER
COVERSHIELD)

CAUTION 

ONLY QUALIFIED SERVICE PERSONNEL
SHOULD REMOVE THE COVER OR 
ATTEMPT TO SERVICE THIS DEVICE. 

For Customer Use:

Read carefully the information located on the back of your
DVD recorder and enter below the Serial No. Retain this
information for future reference.

Model No. DVDR1500
Serial No. __________________________

LASER

Type

Semiconductor laser GaAlAs

Wavelength

660 nm (DVD)
780 nm (CD)

Output Power

20 mW (DVD + RW writing)

(out of objective)

0,8 mW (DVD reading)
0,3 mW (CD reading)

Beam divergence

60 degrees.

NOTE TO CABLE TV SYSTEM INSTALLER:

This reminder is provided to call the Cable TV
(CATV) system installer’s attention to Article
820-40 of the NEC (National Electrical Code)
that provides guidelines for proper grounding
and, in particular, specifies that the cable
ground shall be connected to the grounding
system of the building, as close to the point of
cable entry as practical.

THIS DIGITAL APPARATUS DOES NOT EXCEED THE

CLASS B LIMITS FOR RADIO NOISE EMISSIONS FROM

DIGITAL APPARATUS AS SET OUT IN THE RADIO

INTERFERENCE REGULATIONS OF THE CANADIAN

DEPARTMENT OF COMMUNICATIONS.

CET APPAREIL NUMÉRIQUE N'ÉMET PAS DE BRUITS

RADIOÉLECTRIQUES DÉPASSANT LES LIMITES

APPLICABLES DANS LA RÈGLEMENT SUR LE BROUILLAGE

RADIOÉLECTRIQUES ÉDICTÉ PAR LE MINISTÈRE DES

COMMUNICATIONS DU CANADA.

Содержание DVDR1500

Страница 1: ...tatives can help you get the most from your new product by explaining Hookups First Time Setup and Feature Operation Do not attempt to return this product to the store F Fo or r f fa as st t h he el lp p c ca al ll l u us s f fi ir rs st t 1 1 8 80 00 0 5 53 31 1 0 00 03 39 9 Thank you for making Philips a part of your home Important Return your Warranty Registration Card within 10 days See why in...

Страница 2: ......

Страница 3: ... cause an electrical shock For the safety of everyone in your household please do not remove product covering The exclamation point calls attention to features for which you should read the enclosed literature closely to prevent operating and maintenance problems WARNING TO PREVENT FIRE OR SHOCK HAZARD DO NOT EXPOSE THIS EQUIPMENT TO RAIN OR MOISTURE CAUTION To prevent electric shock match wide bl...

Страница 4: ...les and the point where they exit from the appliance 13 Outdoor Antenna Grounding If an outside antenna or cable system is connected to the video product be sure the antenna or cable system is grounded so as to provide some protection against voltage surges and built up static charges Section 810 of the National Electrical Code ANSI NFPA 70 provides information with regard to proper grounding of t...

Страница 5: ...oblems contact your supplier Any change or modifications to the equipment by the user not expressly approved by the grantee or manufacturer could void the user s authority to operate such equipment Laser safety This unit employs a laser To prevent possible eye injury only a qualified service person should remove the cover or attempt to service this device USE OF CONTROLS OR ADJUSTMENTS OR PERFORMA...

Страница 6: ...6 ...

Страница 7: ...sh INDEX 7 English___________________________________________________8 Français__________________________________________________x Español __________________________________________________x Français Español ...

Страница 8: ...ion Corporation and is intended for home and other limited viewing uses only unless otherwise authorized by Macrovision Corporation Reverse engineering or disassembly is prohibited 8 Manufactured under license from Dolby Laboratories Dolby Pro Logic and the double D symbol are trademarks of Dolby Laboratories Confidential Unpublished Works 1992 1997 Dolby Laboratories Inc All rights reserved VCR P...

Страница 9: ...a TV with a Dolby Pro Logic decoder ____________16 Connecting to a receiver with two channel analog stereo ________16 Step4 Connecting to other equipment _________________________16 Step5 Connections Front of your DVD Recorder optional ______17 Camcorder connection____________________________________17 Step6 Power supply ________________________________________17 First time setup Initial setup ___...

Страница 10: ...__36 Recording Before you start recording___________________________________38 Switching on ______________________________________________38 Manual recording of a TV Channel ____________________________38 Recording_______________________________________________38 Manual audio control _____________________________________39 Recording with automatic switch off OTR One Touch Recording 39 Timer progra...

Страница 11: ...eo only ______________________________52 Activating Deactivating Parental Control ______________________52 Country__________________________________________________53 Changing the 4 digit code____________________________________53 Managing disc content Title settings ______________________________________________54 Changing name of a recording ______________________________54 Play full title _____...

Страница 12: ...e A high power laser is used to change the reflectivity of the recording layer This process can be repeated more than a thousand times Your Philips DVD Recorder is a Recorder and player for digital video discs with a two way compatibility to the universal DVD Video standard This means that existing pre recorded DVD Video discs can play on your Philips DVD Recorder and recordings made on your Phili...

Страница 13: ... the DVD Recorder is suddenly moved from cold to warm surroundings Playing or recording a disc is not possible then Leave the DVD Recorder in a warm environment for two hours before use so the moisture can evaporate Cleaning discs Some problems occur because the disc inside the Recorder is dirty To avoid these problems clean your discs regularly in the following way l When a disc becomes dirty cle...

Страница 14: ...VD Recorder and TV Progressive Scan connection l Connect the PROG SCAN OUT YPBPR jacks on the Recorder to the corresponding IN jacks on the TV using the Component Video cable supplied 2 as shown in the drawing l Connect the audio Left white and Right red OUT jacks on the Recorder to the corresponding AUDIO IN jacks on the TV using the audio cables supplied 4 Note The PROG SCAN OUT jacks do not car...

Страница 15: ...udio types supported by your DVD Recorder MPEG 2 Dolby Digital and DTS Check the receiver manual and the logos on the front of the receiver l Connect one of the DVD Recorder s DIGITAL AUDIO OUT jacks to the corresponding IN jacks on the receiver Use a digital coaxial cable 6 or a digital optical audio cable 7 If you do not have a digital coaxial audio cable you may use the supplied yellow video ca...

Страница 16: ...l analog stereo l If you have a receiver with only two channel analog stereo and none of the above mentioned sound systems connect the audio Left and Right AUDIO OUT jacks of the DVD Recorder to the corresponding AUDIO IN jacks on your receiver amplifier or stereo system Use the audio cable supplied 4 Step 4 Connecting to other equipment optional To connect other devices to the Recorder use the av...

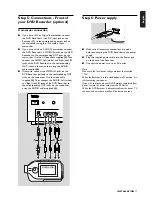
Страница 17: ...order yellow to the corresponding OUT jacks on the camcorder Use the video cable supplied 3 Then connect the AUDIO Left white and Right red IN jacks of the DVD Recorder to the corresponding OUT jacks on the camcorder using the AUDIO cable supplied 4 Step 6 Power supply l Make sure all necessary connections are made before connecting the DVD Recorder to the power supply l Plug the supplied power ca...

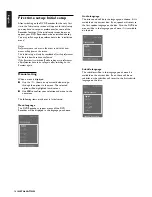
Страница 18: ...yed l Use the w v down or up cursor buttons to go through the options in the menu The selected option will be highlighted in white text l Use OK to confirm your selection and move to the next menu The following items may be set in Initial setup Menu language The DVD Recorder s system menus of the DVD Recorder will be displayed in the language you choose Audio language The disc sound will be in the...

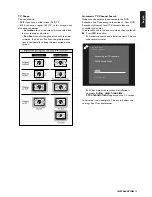
Страница 19: ...rch Make sure the antenna is connected to the DVD Recorder See Connecting to the antenna Your DVD Recorder will search for all TV channels that are available in your area It stores channels in the order in which they are found l Press OK to confirm Automatic search and installation starts This can take several minutes When Automatic search and installation is complete Autom search complete XXX cha...

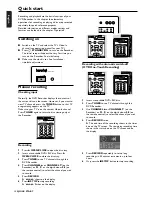
Страница 20: ...ER again to return to disc viewing only at the Recorder Recording 1 Press OPEN CLOSE to open the disc tray 2 Insert a recordable DVD RW disc Press OPEN CLOSE to close the disc tray 3 Press TUNER to see TV channels through the DVD Recorder 4 Press CHANNEL 3 or CHANNEL 4 on the Recorder or P P or the digit buttons 0 9 on the remote control to select the channel you wish to record 5 Press RECORD RECO...

Страница 21: ...and the date with w v down or up cursor or with the digit keys 0 9 5 Press u right cursor to move to CH channel 6 Enter the channel number you want to record using w v down or up cursor or 0 9 7 Press u right cursor to move to Start 8 Enter the Start time you want to record using w v down or up cursor or 0 9 9 Press u right cursor 10 Enter the End time you want to record using w v down or up curso...

Страница 22: ...aying title and chapter number appear on the Recorder display The elapsed playing time is shows in the Recorder display 3 To stop playback at any time press 9 STOP Playing a recordable DVD RW disc l Insert a recordable DVD RW disc If the disc is a new blank disc the display will show EMPTY DISC If the inserted disc is erase protected playback starts automatically l When you press 2 PLAY playback s...

Страница 23: ...ing disc playback R search forwardduring disc playback AUTO MAN REC VOLUME to adjust the recording volume level automatically or manually MANUAL 3 4 to increase decrease the recording volume level CHANNEL to select TV channels manually When the Recorder is in Tuner mode TITLE J selects previous title chapter track index or beginning of current title chapter track index K selects next title chapter...

Страница 24: ... video output signal of the Recorder PROG SCAN Progressive Scan for connection to a TV with progressive scan 480p input AUDIO OUT L R connection to an amplifier receiver stereo system or to a TV AUDIO IN L R connection to the audio output of a video source of which the video output is connected to the rear CVBS video input EXT2 or to the rear S Video input EXT 1 OUT OPTICAL connection to an amplif...

Страница 25: ...Play or Extended Play CHAPTER DVD chapter number STEREO The current channel is broadcasting in stereo SAP A second audio program is available on the current channel dB scale indicates recording volume when using manual controls Disc bar Displays disc content recording level or formatting progress MANUAL Appears when you manually adjust the recording level MPEG DIGITAL DTS PCM Active audio format C...

Страница 26: ... down up right left OK acknowledge menu selection RETURN go back to previous menu step EDIT displays edit menu for DVD RW disc during playback TIMER displays the Timer menu SELECT switches between different values in a menu 0 9 numerical keys to enter information or select channels CLEAR delete last entry clear a Timer OK acknowledge menu selection TITLE CHAPTER select title select chapter TUNER s...

Страница 27: ...o seconds Note If Child Lock is On and the disc inserted is not in the child safe list not authorized the PIN code must be entered and or the disc has to be authorized see Access Control Disc types You will recognize the different types of discs that can be used in your DVD Recorder by the logo Depending on the disc type you can either use it for recording and playback or playback only Some discs ...

Страница 28: ...contain Audio CD material Discs unsuitable for recording or playing DVD RAM DVD Audio On screen display information System menu bar Access the system menu bar by pressing any of the following buttons on the remote control SYSTEM MENU TITLE CHAPTER ANGLE SUBTITLE AUDIO and ZOOM A number of Recorder functions can be controlled via the system menu bar You can move between the two parts of the system ...

Страница 29: ...sor button to select in the system menu bars then press w down cursor The user preference menu appears 3 Use the t u v w left or right up or down cursor buttons to move through the menus sub menus and sub menu options When a menu item is selected the cursor buttons on the remote control to operate the item are displayed next to the item 4 Press OK repeatedly if necessary to confirm and return to t...

Страница 30: ...hecking input It displays the currently selected signal or which device you are viewing or recording from When tuner is selected it shows the channel number and or channel name For example if the tuner info box shows EXT 1 you are viewing or recording the material that is playing on the equipment that is connected to the EXT 1 AUDIO and VIDEO IN jacks on the back of the Recorder Current TV channel...

Страница 31: ...r is set it shows a timer indication and the start time or date of the first recording Timer event due today Timer event due on another day When an OTR is in progress the end time appears OTR recording started When no timer recording is scheduled the current time appears Current time Note The Tuner info box and Timer info box will disappear during playback and after a recording starts pm 10 15pm 4...

Страница 32: ...r indicates your current position on the disc From this point you may resume playback or recording l If you move through the list of titles with w v down or up cursor or J PREVIOUS K NEXT the disc pointer will move l Press 9 STOP to put the disc pointer at the beginning of the disc l To move the disc pointer to the end of the last title press and hold K NEXT l If you move from an Index Picture to ...

Страница 33: ...you want a wide screen picture with black bars at the top and bottom 4 3 Pan Scan if you have a regular TV and you want full height picture with the sides trimmed If a disc has Pan Scan the picture then moves pans horizontally to keep the main action on the screen Black level shift Adapts the color dynamics to obtain richer contrasts Select On or Off Video shift The factory setting centers the vid...

Страница 34: ...ins stereo or SAP SAP usually means a program is broadcast in a different language or with additional information Feature settings Access Control Access Control contains the following features Child Lock When Child Lock is on a 4 digit code needs to be entered in order to play discs Parental Level Allows the conditional presentation of DVD Video discs rated according to Parental Level information ...

Страница 35: ...elect DVD Player Factory setting is DVD Recorder Record settings Record mode By selecting a recording mode you define the picture quality of recordings and the maximum recording time for a disc Mode Picture quality Total recording time HQ best possible 60 minutes High Quality picture quality SP same picture quality Standard Play pre recorded as a 120 minutes DVD LP S VHS 180 minutes Long Play pict...

Страница 36: ...channel 2 Press w down cursor as often as required to select the channel to be changed 3 Press t u left or right cursor The selected channel toggles to Add or Del 4 Press OK to store your choice 5 Repeat steps 2 4 as often as necessary to add or delete all the channels you want 6 Press SYSTEM MENU twice to return to the previous menu VCR Plus ch If you intend to use the VCR Plus programming system...

Страница 37: ...tuned to the PBS channel of a different time zone to ensure the correct clock setting 6 Confirm each entry with OK 7 To end press SYSTEM MENU repeatedly to remove the menus The time and date will be set by the specified channel the next time you switch to Standby power mode The DVD Recorder downloads from the specified channel if possible If the specified channel does not carry date and time infor...

Страница 38: ...d on this disc after erasing it with the RECORD button A disc can hold up to 48 titles including empty titles When this maximum is reached the on screen message Too many titles appears if you want to make a new recording You have to erase a title first See Managing Disc Content Erasing a Title Note You can not access the system menu while recording Switching on l Switch on the TV and select the TV...

Страница 39: ... will show the current disc position and MANUAL disappears Note When recording from the equipment connected to DV the manual audio control is disabled The AUTO MAN REC VOLUME button is active only during TUNER mode or while recording Recording with automatic switch off OTR One Touch Recording 1 Insert a recordable DVD RW disc 2 Normally the DVD Recorder displays the contents of the disc on the scr...

Страница 40: ...our TV guide If you make a mistake press CLEAR 5 Confirm with OK 6 If the VCR Plus channel has not been set the DVD Recorder will ask you to enter the channel number Refer to a channel napping list You may find this in your TV Guide or newspaper Use t u left or right cursor to select the correct channel then conform with OK The timer programming information will appear on the TV screen Timer VCR P...

Страница 41: ... time with w v down or up cursor or the digit buttons 0 9 9 Press SELECT to toggle between AM and PM l Press u right cursor to select End l Enter the End time with w v down or up cursor or the digit buttons 0 9 Press SELECT repeatedly to choose AM or PM l Press u right cursor to select Record mode l Select the recording mode with w v down or up cursor l If you make a mistake go back with t left cu...

Страница 42: ...ry to remove the menus 10 Switch off the Recorder by pressing ON OFF on the remote control How to clear a timer block 1 Press TIMER on the remote control 2 Select Timer list with w v down or up cursor 3 Press u right cursor 4 Select the Timer Recording you want to clear with w v down or up cursor The selected Timer Recording will be highlighted in blue 5 Press CLEAR The Recording you selected will...

Страница 43: ... movies are released at different times in different regions of the world all players have region codes and discs can have an optional region code If you load a disc that has a different region code than your Recorder you will see the region code notice on the screen The disc will not play and should be unloaded The region code of this Recorder is one 1 This is stated on a label on the back of you...

Страница 44: ...Rapidly press J PREVIOUS again to step back to the previous title l To go directly to any title or track enter the title number using the numerical buttons 0 9 when playback is stopped Note If the Title number has more than one digit press the buttons in rapid succession If the system menu bar is on screen make sure the is selected If it is not press the t u left or right cursor buttons to select ...

Страница 45: ...k 1 Press SYSTEM MENU to access the system menu bar 2 Press t u left or right cursor buttons to select frame by frame in the system menu bar 3 Use the w down cursor button to enter the frame by frame menu Playback will pause 4 Use the t u left or right cursor buttons to move the picture backward or forward one frame at a time 5 Press 2 PLAY to resume regular playback 6 Press SYSTEM MENU to remove ...

Страница 46: ... play repeatedly l To exit the sequence and return to normal playback press REPEAT A B Scan Play the first 10 seconds of each chapter index on the disc l Press SCAN The first 10 seconds of each chapter will plays beginning with the current chapter l To continue play at your chosen chapter index press SCAN again or press 2 PLAY Time search Time Search allows you to start playing a disc at a specifi...

Страница 47: ... zoom mode and return to normal playback 7 Press SYSTEM MENU to remove the system menu bar Special DVD Video features Menus on the disc Some DVDs include disc menus for Title or Chapter selection or special playback features You can make selections from these menus Title menus 1 Press DISC MENU If the current title has a menu then menu will appear on the screen Otherwise the disc menu will be disp...

Страница 48: ... You can enter the required language number directly using the numerical buttons 0 9 Subtitles 1 Press the SUBTITLE button to select Z Subtitle in the system menu bar 2 Within five seconds press SUBTITLE or w v down or up cursor repeatedly to see the different subtitles or to switch the subtitles off You can enter a subtitle number directly using the numerical buttons 0 9 Special VCD features Play...

Страница 49: ...on search speed and direction are indicated on the screen each time 5 REVERSE or 6 FORWARD is pressed 4 To end the search press 2 PLAY or 9 STOP as desired Moving to another track l Press K NEXT during play to step forward to the next track l Press J PREVIOUS during play to return to the beginning of the current track Rapidly press J PREVIOUS repeatedly to step back to previous tracks l To go dire...

Страница 50: ... repeatedly l To exit the segment and return to normal playback press REPEAT A B again Scan Scan plays the first 10 seconds of each track on the disc 1 Press SCAN The first 10 seconds of each track will play beginning with the current track 2 To continue play at your chosen track press SCAN again or press 2 PLAY ...

Страница 51: ... the disc unauthorized discs will not be played unless the 4 digit code is entered The disc will be locked and the Recorder will ask for your 4 digit code the next time you try to play the disc You must turn the Recorder power Off then On for the Lock to take effect Note Reconfirmation of the 4 digit code is necessary when the code is entered for the very first time the code is changed see Changin...

Страница 52: ... left cursor to select in the system menu bar 3 Press w down cursor repeatedly to select then press u right cursor 4 Access control will be selected in the features menu Press u right cursor 5 Enter your 4 digit code using the digit buttons 0 9 If necessary enter the code a second time 6 Move to Parental level using w v down or up cursor 7 Select the Value Adjustment bar at the right of the screen...

Страница 53: ...re is not necessary 9 Press OK or t left cursor to confirm Press SYSTEM MENU to exit the menu Changing the 4 digit code 1 Press SYSTEM MENU 2 Press t left cursor to select in the system menu bar 3 Press w down cursor repeatedly to select then press u right cursor 4 Access control will be selected in the features menu Press u right cursor 5 Enter the old 4 digit code using the 0 9 buttons 6 Move to...

Страница 54: ... whole title instantly do the following 4 Press u right cursor to select Erase this title then press OK The message This will completely erase this title Press OK to confirm is shown 5 Press OK a second time Erasing title is shown until the action is completed After the title has been erased the Index Picture Screen will show an empty space instead of the Title If there was an empty space in front...

Страница 55: ...l as the complete edit menu Future editing or recording is only possible after resetting the Protection feature to Unprotected again Erase disc 6 With Erase disc selected and press OK The message This will erase all titles is displayed Press OK to confirm l Press OK to confirm and begin erasing or press t left cursor to cancel Erasing disc is shown until the action is completed After the disc has ...

Страница 56: ... the maximum number of chapter markers is 254 When the maximum number is reached the on screen message Too many chapters appears You will have to delete some before inserting new chapter markers Current chapter Initially all chapters are visible You can hide chapters or make them visible again during playback When playing a disc while the Favorite Scene Selection now is on the screen hidden chapte...

Страница 57: ...an two titles use the above procedure several times Append recording If you want to append a video recording to an earlier recorded title do the following 1 On the Index Picture Screen select the title to which you want to add a video recording 2 Press 2 PLAY 3 At the point where you want to append the new recording press PAUSE 4 Press TUNER then press P to select the channel you want to record 5 ...

Страница 58: ...nd the right disc type is inserted Clean the disc Check if the disc is defective by trying another disc Check if the region code of the disc matches the region code of the Recorder pre recorded DVD discs only See playing a pre recorded DVD Video disc Check if Child Lock is activated No sound Check audio connections If using a HiFi amplifier try another sound source Distorted sound from HiFi amplif...

Страница 59: ...eft right audio balance on the TV to amplify the one or the other language The disc can not be erased because the Index Picture Screen does not appear Open the tray while leaving the disc in Press and hold CLEAR for about five seconds The tray closes and the disc will be erased The Index Picture Screen does not appear but the titles on the disc still be play Take out the disc Clean the disc Insert...

Страница 60: ...to a power source and use the DVD Recorder again as usual System limitations A DVD RW disc may not play on certain DVD Video players A DVD RW disc recorded on a different type or brand of Recorder can play but may not provide all features commonly available to it such as the on screen disc bar the disc settings menu the title settings menu and editing Refer to Adapt disc format If the disc is eras...

Страница 61: ...er of high band width digital signals as used by Digital Video camcorders Index Picture Screen A screen that gives an overview of a DVD RW disc with index pictures that each represent a recording MPEG Motion Picture Experts Group A collection of compression systems for digital audio and video NTSC See TV system NTSC is the most common color system in the U S OSD On screen Display The menus by whic...

Страница 62: ...annel set up by SRS Labs Inc TV system There are various systems for transmitting television signals for example PAL PAL I PAL BG SECAM SECAM DK NTSC etc The TV system is country dependent The Recorder automatically selects the right TV system VCD Video Compact Disc VCR Video Cassette Recorder VCR Plus A system by which you can easily program the timer recording by entering a code of maximum eight...

Страница 63: ...English NOTES 63 Notes ...

Страница 64: ......

Страница 65: ...B Crosstalk 1kHz 110 dB Distortion Noise 1kHz 90 dB FRONT CONNECTIONS i LINK DV IEEE 1394 4 pin S video Input Hosiden 4 pin Video Input Cinch yellow Audio Left Right Input Cinch white red REAR CONNECTIONS Component Video In Cinch green blue red Component Video Out Cinch green blue red Progressive Scan Out Cinch green blue red S video In Hosiden 4 pin S video Out Hosiden 4 pin Video In Cinch yellow...

Страница 66: ...terschrift des Händlers Naam adres en handtekening van de handelaar Nombre dirección y firma del distribuidor Nome indirizzo e firma del fornitore Nome morada e assinatura do vendedor Forhandlerens navn adresse og underskrift Återförsäljarens namn adress och namnteckning Myyjän nimi osoite ja allekirjoitus 2001 PHILIPS Printed in Belgium 3104 125 2414 1 The products and services described herein a...

Отзывы: