background image

13

English

NTSC/PAL Conversion

This player is equipped with an NTSC/PAL
conversion feature that converts the video
output of the disc to match your TV system.  To
activate the conversion refer to page 15.

Switching On

1

Connect the AC power cord to the power
outlet.

2

Switch on the TV and DVD player.

3

Set the TV to the correct Video IN channel. (eg.
EXT1, EXT2, AV1, AV2, AUDIO/VIDEO, etc.
(Refer to your TV owner’s manual for detail)

 The player display lights up and the default

screen appears on the TV.

4

If you are using an external equipment (eg. audio
system or receiver), turn them on and select the
appropriate input source that was used to
connect to the DVD player output. Refer to the
equipment owner’s manual for detail.

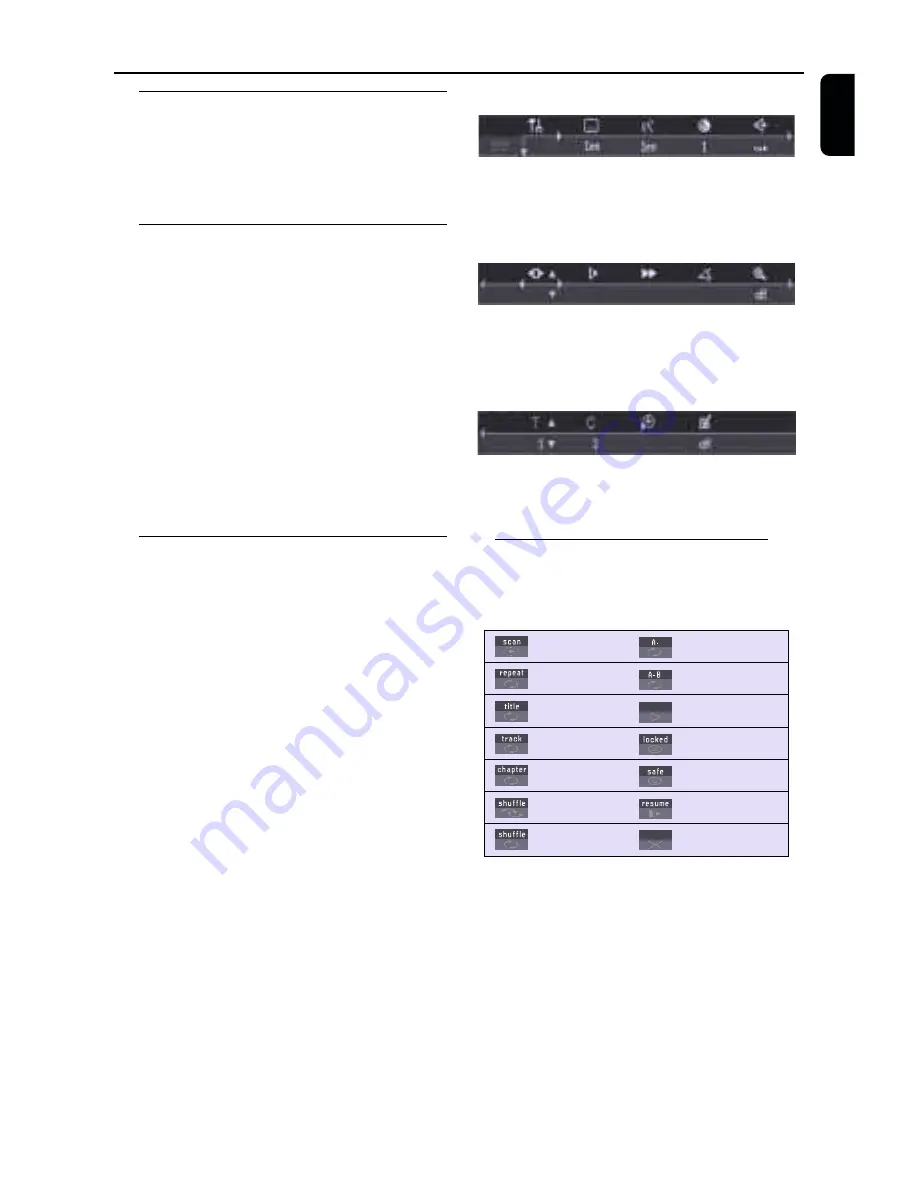
Menu Bars on TV Screen

Operations can be carried out directly via the
multiple menu bars on the TV screen.

The following functions are available via the
menu bars. Pressing SYSTEM MENU keys
repeatedly will toggle through menu bar 1, menu
bar 2, menu bar 3 and menu bar OFF:

Menu bar 1

From the left,
Personal Preferences 

 Subtitle Language 

Audio Language 

 Colour 

 Sound

Menu bar 2

From the left,
Step by step playback 

 Slow motion 

Fast motion 

 Angle 

 Zoom

Menu bar 3

From the left,
Title 

 Chapter 

 Time  Search 

Favourite Track Selection (FTS)

Temporary Feedback Field Icons

These icons will appear on the top left hand
corner of your TV screen.

Scan

Repeat All

Repeat Title

Repeat Track

Repeat Chapter

Shuffle

Shuffle Repeat

Repeat A to end

Repeat A–B

Angle

Child Lock On

Child Safe

Resume

Action Prohibited

Preparation

Содержание DVD743

Страница 1: ...DVD743 DVD743 DVDVideo Player ...

Страница 2: ...t Note for Users in the UK Mains plug This apparatus is fitted with an approved 13 Amp plug To change a fuse in this type of plug proceed as follows 1 Remove fuse cover and fuse 2 Fix new fuse which should be a BS1362 5 Amp A S T A or BSI approved type 3 Refit the fuse cover If the fitted plug is not suitable for your socket outlets it should be cut off and an appropriate plug fitted in its place ...

Страница 3: ... LASERSTRÅLNING NÄR DENNA DEL ÄR ÖPPNAD BETRAKTA EJ STRÅLEN VARO AVATTAESSA OLET ALTTIINA NÄKYVÄLLE JA NÄKYMÄTTÖMÄLLE LASER SÄTEILYLLE ÄLÄ KATSO SÄTEESEEN VORSICHT SICHTBARE UND UNSICHTBARE LASERSTRAHLUNG WENN ABDECKUNG GEÖFFNET NICHT DEM STRAHL AUSSETSEN ATTENTION RAYONNEMENT LASERVISIBLE ET INVISIBLE EN CAS D OUVERTURE EXPOSITION DANGEREUSE AU FAISCEAU English 5 Español 29 Italiano 53 Svenska 77...

Страница 4: ...her rights owners Use of this copyright protection technology must be authorised by Macrovision Corporation and is intended for home and other limited viewing uses only unless otherwise authorised by Macrovision Corporation Reverse engineering or disassembly is prohibited Laser safety This unit employs a laser Due to possible eye injury only a qualified service person should remove the cover or at...

Страница 5: ...serting batteries into the Remote Control 12 NTSC PAL Conversion 13 Switching On 13 Menu Bars onTV Screen 13 Personal Preferences 14 17 Operation Basic Playback 18 Playing a DVD Video 18 Playing aVideo CD 19 Playing an Audio CD 19 Special DVD features 19 20 SpecialVCD SVCD Features 20 Special CD MP3 Features 20 General Features 20 23 MP3 Disc Features 24 Access Control Access Control Child Lock 25...

Страница 6: ...the disc tray to be opened In cabinet allow about 2 5cm 1 inch of free space all around the player for adequate ventilation Do not expose your player to extreme of temperature or humidity If the DVD player is brought directly from a cold to a warm location or is placed in a very damp room moisture may condense on the lens of the disc unit inside the DVD player Should this occur the DVD player woul...

Страница 7: ...URE to access the colour settings menu bar SOUND to select Stereo Dolby Surr compt or 3D Sound TruSurround DISC MENU to access menu of a DVD disc 1 2 3 4 left right up down to select an item in the menu 2 PLAY PAUSE to start or interrupt playback OPEN CLOSE to open close the disc tray DISPLAY shows the current status of the player Disc Tray S PREV goes to previous chapter or track T NEXT goes to n...

Страница 8: ...ect to CVBS Video inputs of a TV MAINS AC Power Cord connect to a standard AC outlet AUX VCR IN VIDEO OUT connect to a VCR with SCART TV OUT VIDEO OUT connect to a TV with SCART Caution Do not touch the inner pins of the jacks on the rear panel Electrostatic discharge may cause permanent damage to the unit SUBWOOFER connect to an active subwoofer AUDIO OUT Left Right connect to AUDIO inputs of an ...

Страница 9: ... disc REPEAT A B repeat a specific segment SHUFFLE play tracks in random order SCAN play the first 10 seconds of each track chapter within a disc POWER B switch DVD ON or go to standby on mode 0 9 numerical key pad select numbered items in a menu CD TEXT DISPLAY activate deactivate CD text if available on the disc audio CDs to display bit rate indicator during playback DVD SVCD SYSTEM MENU access ...

Страница 10: ...er directly to yourTV instead of eg aVCR to avoid distortion because DVD video discs are copy protected Do not connect the DVD player AUDIO OUT to PHONO IN of your amplifier or receiver Connecting to aTV 1 Connect the SCART TV OUT on the DVD player to the corresponding connector on the TV Note Ensure that the TV indication on SCART cable is connected to theTV set and DVD indication on SCART cable ...

Страница 11: ...ptional Equipment A digital component with a built in MPEG 2 or Dolby Digital decoder allows you to enjoy the surround sound while producing the effect of being in a movie theater or a concert hall The player outputs the surround sound signals from the DIGITAL OUT COAXIAL or OPTICAL connectors If your receiver has a MPEG 2 or Dolby Digital decoder 1 Connect the COAXIAL or OPTICAL DIGITAL AUDIO OUT...

Страница 12: ...io is not available on the Digital Output Inserting batteries into the Remote Control 1 Open the battery cover 2 Insert batteries AA size with the correct polarity as indicated by the and symbols inside the battery compartment 3 Close the cover CAUTION Remove batteries if they are exhausted or not to be used for a long time Do not use old and new or different types of batteries in combination Batt...

Страница 13: ...r output Refer to the equipment owner s manual for detail Menu Bars onTV Screen Operations can be carried out directly via the multiple menu bars on theTV screen The following functions are available via the menu bars Pressing SYSTEM MENU keys repeatedly will toggle through menu bar 1 menu bar 2 menu bar 3 and menu bar OFF Menu bar 1 From the left Personal Preferences Subtitle Language Audio Langu...

Страница 14: ...isplayed on the upper and lower portions of theTV screen 4 3 PAN SCAN when you connect a normalTV to the DVD player Displays the wide picture on the wholeTV screen with a portion automatically cut off Note Pan Scan is subject to availability on the disc Black level shift NTSC output only Select ON for adapting the colour dynamics to obtain richer contrasts Video shift Use this setting to personali...

Страница 15: ...mode PAL NTSC PAL NTSC PAL AUTO 1 In the Personal Preferences Menu select TV System 2 Press 3 or 4 to select PAL NTSC or AUTO Notes If you have a PAL onlyTV ensure that your PAL NTSC setting is PAL AUTO can only be selected when using aTV that has both the NTSC and PAL systems This setting is applicable for CVBS output on cinch and SCART only Slight picture distortions may occur due to this conver...

Страница 16: ...ed 96kHz PCM data if available on disc stream will be converted to 48kHz Some 96kHz DVD are copy protected If your PCM output selection is 96kHz the digital output will be muted to comply with the standards In such cases select 48kHz to enable digital output Karaoke vocal Put this setting to ON only when a multi channel karaoke DVD is being played The karaoke channels on the disc will then be mixe...

Страница 17: ...y of the Status Window Bit Rate Indicator Press the DISPLAY key to activate the bit rate indicator When activated the bit rate for video and audio as well as the total bit rate is displayed This is only applicable during playback of DVD and SVCD discs Help text When set to ON help text describes the icons selected Select OFF if you no longer require the help text Low Power Standby If this is set t...

Страница 18: ... close the tray playback starts automatically TheTV screen s and DVD player s display shows the type of disc loaded disc s information and playing time 2 When the Disc Menu appear on theTV screen use 431 2 keys or numerical keys on the remote control to select an option and continue playback 3 If the titles are numbered press the numerical keys or use the 4 3 keys to select desired title in the me...

Страница 19: ...12 4 1 TRACKS AUDIO CD Playing a disc 1 Insert a disc and close the tray playback starts automatically TheTV screen will display the number of tracks for selection and current playing status 2 Playback will stop at the end of the disc 3 To stop playback press STOP Special DVD Features DVDs may contain menus to navigate the disc and access special features Press the appropriate numerical key or use...

Страница 20: ...Press CDTEXT DISPLAY on the remote control again to switch on the text display mode General Features Note Unless stated all operations described are based on remote control use Some operations can be carried out using the menu bar on theTV screen Moving to another title chapter DVD VCD When a disc has more than one title track or chapter you can move to another title chapter as follows 1 Press SYS...

Страница 21: ...back at your chosen chapter track press SCAN again or press PLAY Repeat DVD Repeat chapter title disc To repeat the current chapter press REPEAT REPEAT CHP appears on the front display To repeat the current title press REPEAT a second time REPEAT TTL appears on the front display To repeat the entire disc press REPEAT a third time REPEAT DISC appears on the front display To exit Repeat mode press R...

Страница 22: ...e edit box will disappear and playback starts from the selected time position on the disc 4 Press SYSTEM MENU to remove the menu bar Zoom DVD VCD The Zoom function allows you to enlarge the video image and to pan through the enlarged image 1 Select ZOOM 2 Press 3 4 to activate the ZOOM function and select the required zoom factor 1 33 or 2 or 4 Playback will continue The selected zoom factor and P...

Страница 23: ...ber 4 Press OK to erase the selection 5 Press SYSTEM MENU to exit Erasing all selections 1 While playback is stopped select VIDEO FTS c in the menu bar 2 Use 4 to select CLEAR ALL and press OK All selections will be erased 3 Press SYSTEM MENU to exit CD Storing a Programme 1 Load a disc and stop playback 2 Press 4 to go to the list of available tracks 3 Use 2 and 1 to select the required tracks or...

Страница 24: ...r MP3 disc Playback In compliance with the SDMI digital out is muted while playing MP3 discs Due to the recording nature of Digital Audio MP3 DAM only Digital Audio music will play The disc reading time may exceed 10 seconds due to the large number of songs compiled onto one disc For multi session discs with different formats only the first session will be available Album Title This feature allows...

Страница 25: ...rised and can always be played even if the Child Lock is set to ON Notes The player memory can maintain 120 authorised Child safe disc titles A disc will be placed in the list when Play Always is selected Each time a child safe disc is played it will be placed on top of the list When the list is full the last disc in the list will be replaced when a new disc is added Double sided DVDs and multi vo...

Страница 26: ...4 6 Press OK or 1 to confirm then press 1 again to exit the menu Changing the 4 digit code 1 When disc playback is stopped select ACCESS CONTROL in the Personal Preferences menu using the 3 4 keys 2 Enter the current 4 digit code 3 Move to CHANGE CODE using the 4 and press the 2 key 4 Enter the new 4 digit code 5 Enter the code a second time and reconfirm by pressing OK 6 Press 1 to exit the menu ...

Страница 27: ...ns Video Output 2x Cinch yellow Audio L R output Cinch white red Audio Subwoofer Cinch black Digital Output 1 coaxial 1 optical IEC958 for CDDA LPCM IEC1937 for MPEG1 2 Dolby Digital CABINET Dimensions w x h x d 435 x 77 5 x 303 5 mm Weight Approximately 2 8 Kg typical playing time for movie with 2 spoken languages and 3 subtitle languages Specifications subject to change without prior notice Spec...

Страница 28: ...es No sound and picture Check that the SCART cable is connected to the correct device See Connecting to aTV Picture freezes momentarily Check the disc for fingerprints scratches and during playback clean with a soft cloth wiping from centre to edge Disc can t be played Ensure the disc label is facing up Check if the disc is defective by trying another disc No return to start up screen when Reset t...

Отзывы: