background image

English

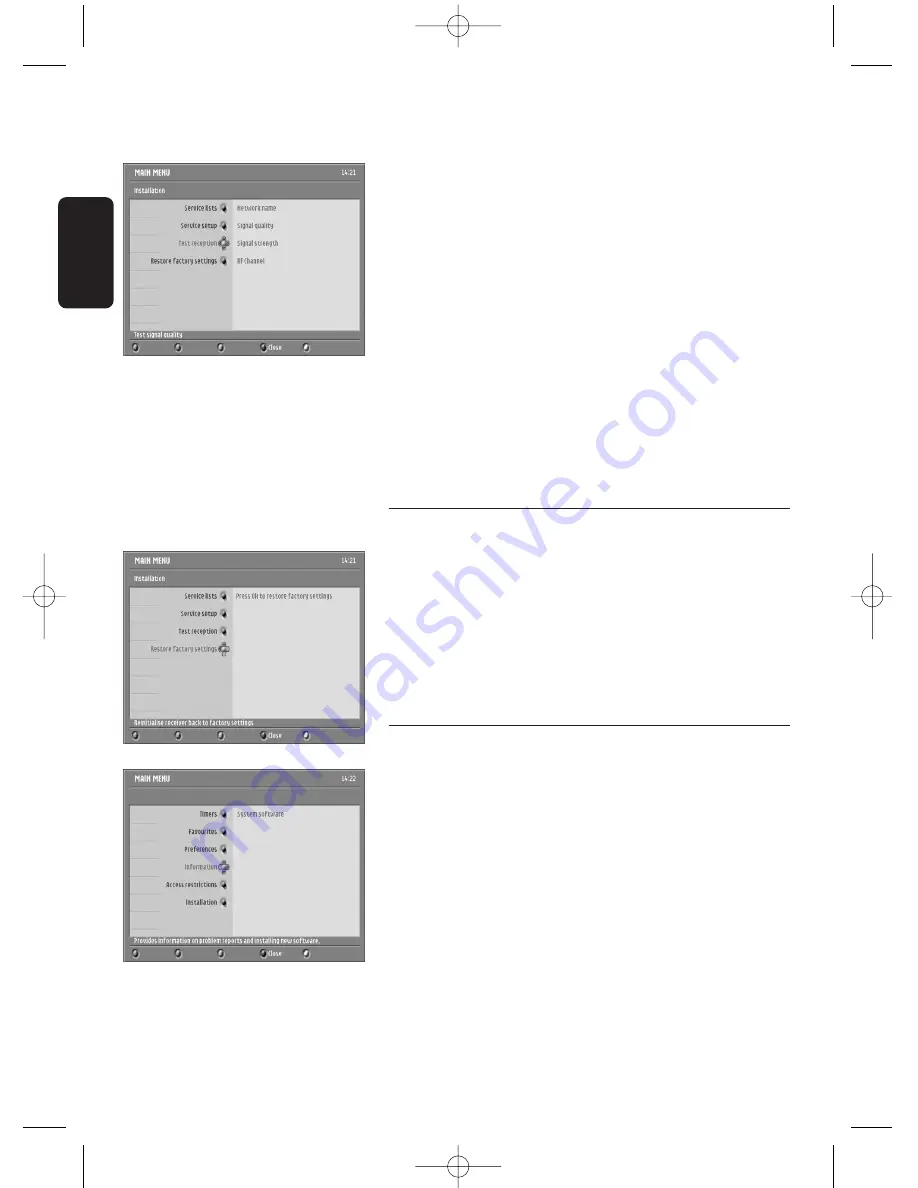
The selection is on RF channel.
-  Press 

i

to access the list of RF channels.

-  Scroll up or down the list to the RF channel you want to select.
-  Press <OK> to view the signal quality and strength for the

selected channel.

-  If need be, move your antenna to obtain an adequate

signal.When the signal is good enough, the name of the
corresponding network is displayed.

-  Press 

i

again to return the list of available RF channels

and proceed as described above to check the signal quality
and strength for another RF channel.

Note: if you cannot obtain an adequate signal, refer to the

troubleshooting guide.

-  Press 

u

to exit the screen and return to the Service lists

sub-menu, or press the blue colour button to exit the menu.

7.3.4

Restore factory settings

To restore the receiver factory settings:
-  Press <OK>.You are then prompted to enter your master

PIN code.

-  Enter the master PIN code. For more information on the

master PIN code, refer to the troubleshooting guide.

Note: when restoring the factory settings, you lose all your

favourite list settings.

7.4

Information

-  Press the 

i

button to access the System software sub-menu.

System software

This item is used to manage software updates, which are
necessary to keep your receiver up-to-date with the
developments in digital television and make new features
available. Updates are part of normal transmissions.
Your receiver is originally set up to automatically accept
software updates (recommended). If you want to be
prompted each time new software is available, follow the
instructions below.
-  Press the 

i

button to access the System software settings.

The current hardware/software version is displayed, and the
selection is on Always accept new software.

28

CHANGE THE SETTINGS OF YOUR RECEIVER

NOTICE DTR 500.qxd   7/09/2004  15:25  Page 28

Содержание DTR500/05

Страница 1: ...NOTICE DTR 500 qxd 7 09 2004 15 24 Page 1 ...

Страница 2: ...ons and features including Award winning noise free reception Automatic program installation Wide screen format TV SCART and VCR DVD SCART connector Personal channel list and favourite lists Electronic Programme Guide This User Manual covers the installation of your receiver and the necessary steps to use the various functions so you can optimally enjoy classic as well as unique features Lucas Cov...

Страница 3: ...ts on and the welcome screen appears Press OK to proceed The Setup screen appears The selection is on Service scan Press OK to start scanning for channels During the channel scan the following information is reported on screen scanning progress number of channels found When scanning is successfully completed a completion message is displayed Press OK to start watching TV To know more about using y...

Страница 4: ...d scanning failure 16 6 Day to day operation 17 6 1 Switch your receiver ON OFF standby 17 6 2 Select TV Radio mode 17 6 3 Change channel 18 6 3 1 Using number buttons 18 6 3 2 Using P P 18 6 3 3 Using BACK last channel recall 18 6 3 4 Using the channel list 18 6 3 5 Using your favourite lists 18 6 4 Channel banner 19 6 5 Volume control 19 6 6 Change temporarily the Subtitle selection circular tog...

Страница 5: ...3 2 1 Add new services 27 7 3 2 2 Reinstall all services 27 7 3 3 Test reception 27 7 3 4 Restore factory settings 28 7 4 Information 28 System software 28 7 5 Timers 29 7 5 1 Record Remind 29 7 5 2 Sleep 30 7 6 Favourites 30 7 6 1 TV Channels 31 7 6 2 Radio Stations 31 7 7 Access Restrictions 31 8 Menu tree 32 9 Advanced settings 34 9 1 Changing the remote control setting 34 9 2 More about record...

Страница 6: ...nsure the receiver is disconnected from the mains Do not disassemble the equipment There are no user serviceable parts 6 SAFETY INSTRUCTIONS The Batteries marking symbol means used batteries must not be disposed together with your household waste Please inquire about the local regulations regarding disposal of used batteries For information the Philips batteries supplied with your receiver remote ...

Страница 7: ...nect a plug The wires in the mains lead are coloured in accordance with the following code BLUE NEUTRAL N BROWN LIVE L 1 The BLUE wire must be connected to the terminal which is marked with the letter N or coloured BLACK 2 The BROWN wire must be connected to the terminal which is marked with the letter L or coloured RED 3 Do not connect either wires to the earth terminal in the plug that is marked...

Страница 8: ...r table Status indicator table 8 PRODUCT DESCRIPTION English 2 2 Front view LED LED1 LED2 Mode Red Green Orange Receiver in Standby ON OFF Watching TV OFF green Listening to the radio OFF blinking green orange Pressing a remote control button blinking Depending on current mode Timer active ON green Timer active in Standby ON orange Software download blinking Depending on current mode Q W E R NOTIC...

Страница 9: ...ect your video recorder 6 LAN Currently idle For future use 7 L R AUDIO OUT Left Right analogue audio cinch outputs to connect your HiFi audio receiver system 8 DIGITAL Digital audio cinch output to connect your HiFi audio receiver system 9 230V 50Hz 15W max Socket to connect the mains cord The label showing the type and serial number is underneath the receiver 1 SCART is also called Euroconnector...

Страница 10: ...em as shown in the diagram situated in the remote battery compartment Replace the cover Your remote is now ready to control your digital terrestrial receiver Note batteries are removable from the remote control with common household tools e g screwdriver Do not dispose of the batteries with your household waste NOTICE DTR 500 qxd 7 09 2004 15 24 Page 10 ...

Страница 11: ... STB Toggle between digital TV from your receiver or analogue transmission from your TV RED GREEN YELLOW BLUE Action depending on context FAV Display available favourite lists SUBTITLE Display available subtitle languages I II Display the available audio languages WHITE inactive MENU Open menu in digitalTV running mode Close menu in Menu mode CURSOR t y Previous Next channel Scroll up down in menu...

Страница 12: ...on your exiting set up choose the best suited connection method for incorporating your digital receiver into your existing Audio Video set up Please read chapters 4 1 and 4 2 Note when adding new equipment be sure to refer to the related installation instructions of the relevant manual 4 1 Connecting to a TV and a VCR both fitted with one SCART socket Incorporate your receiver in your existing ins...

Страница 13: ...T socket of your VCR by means of a SCART lead Plug all your equipment excluding your digital receiver into the mains Switch on your TV and select a channel Plug your digital receiver into the mains Your digital receiver will display the WELCOME screen the green LED will be illuminated Read on chapter 5 to proceed with the channel scan of your digital receiver Note 1 If you have a S Video VCR refer...

Страница 14: ...ot supplied Consult the user manual of your HiFi Audio receiver equipment to choose the proper digital audio input Note with this connection set up you can only control the audio volume up down and mute with your HiFi Audio Receiver remote control refer to the relevant user manual 4 3 Connecting to a video projector Connect the TV SCART socket of your digital receiver to your video projector Often...

Страница 15: ...1 Channel scan The Setup screen appears The selection is on Service scan Press OK to start scanning for channels Alternatively press t to scroll up to the setup option you want to modify and then press i to access the option values The following information is reported on screen scanning progress number of channels found When scanning is successfully completed a completion message is displayed Pre...

Страница 16: ...rs after a while refer to chapter 10 1 To check whether you can receive digital television in your region consult web site WWW FREEVIEW CO UK type in your postcode and click on GO to immediately get the answer 5 3 Repeated scanning failure No channels could be found even after checking the signal quality delivered by your aerial Either your aerial is not pointing properly at the digital TV transmi...

Страница 17: ...y button on the front panel Your receiver as any electronic equipment is power consuming In order to reduce power consumption please switch your receiver to standby whenever you are not using it For saving energy compared to the stand by mode if you are not using your receiver for a longer period of time we recommend to switch off the receiver by unplugging it from the mains 6 2 Select TV Radio mo...

Страница 18: ...e previously selected channel 6 3 4 Using the channel list You are watching digital TV or listening to a digital radio programme Press the OK button to open the channel list Press the t or y button to move to the desired channel Press OK to view the selected channel 6 3 5 Using your favourite lists You are watching digital TV or listening to a digital radio programme Press the FAV button to open t...

Страница 19: ...evious channel current programme In any case press INFO to display extended information on the current selection Alternatively Press INFO once to display the channel banner at any time Then press INFO again to display extended information And then press INFO again to close the channel banner 6 5 Volume control You are watching digital TV or listening to a digital radio programme Press to decrease ...

Страница 20: ...mme list called Now Next appears Press the ibutton to consult the current day programme list Press the y or t to move to the wanted channel Press the OK button to select the channel 6 9 Timers 6 9 1 Setting a timer when watching digital TV Press the TIMER button to access the timer list Then proceed as described in paragraph 7 5 1 6 9 2 Set a timer from the Guide Scroll to the programme for which ...

Страница 21: ...nnels transmit interactive television applications at all times Note programmes carrying interactive television are signalled by the icon in the banner 6 11 Using the TV STB button This button is used to switch between watching digital channels via your digital receiver and standard analogue channels on your TV You are watching digital TV Press the TV STB button to switch to analogue TV from your ...

Страница 22: ...ndow respectively Press MENU to exit any menu screen 7 1 2 Change setting The selection is on the first item of the menu Press the t or y button to scroll up down to bring the selection on the wanted menu item Press the ibutton to display the sub items corresponding to the highlighted item Repeat this step as many times as necessary to access the desired option Note press BACK to get back one leve...

Страница 23: ... audio languages Press the i button to access the language settings Scroll to the setting you want to change The corresponding values are displayed on the right hand side of the screen Press the i button to access the setting values Audio Subtitles Subtitling Mode Subtitles for hearing impaired Menu 7 2 2 Location The selection is on the Location item of the Preferences sub menu This item is used ...

Страница 24: ...its your TV Note it is recommended to use the RGB setting to get the best quality of the video at the TV screen If you use a video projector instead of a TV set theY C setting is recommended refer to paragraph 4 3 for connection and installation 7 2 3 2 VCR This item is used to select the format of the signal output for the VCR SCART socket Scroll to the setting you want to change The correspondin...

Страница 25: ...ss Press the i button to access the available values Move to the address you want to select 039 or 038 Default address is 039 which makes it possible to control your receiver using any Philips TV set remote control Press OK to confirm your selection Proceed as described in paragraph 9 1 Note if you do not complete the procedure as described in paragraph 9 1 you will not be able to control your rec...

Страница 26: ...nd appears in the installed services list To move the service you selected within the list Scroll to the position you want to move the service to Press OK to confirm 7 3 1 2 View new TV channels This feature is used to view the new channels found while your receiver is in standby Press i to view new channels found in the right hand side of the screen Scroll to the channel you want to view The sele...

Страница 27: ...of the screen The Puck moves to the Store button Press OK to store the new services Alternatively scroll down to the Discard button and press OK to discard the new services Note before storing discarding the services found you may scroll up to view the search results respectively for channels stations other services Press u to exit the screen and return to the Service setup sub menu or press the b...

Страница 28: ...gs Press OK You are then prompted to enter your master PIN code Enter the master PIN code For more information on the master PIN code refer to the troubleshooting guide Note when restoring the factory settings you lose all your favourite list settings 7 4 Information Press the i button to access the System software sub menu System software This item is used to manage software updates which are nec...

Страница 29: ... Press the green colour button to access the timer settings Scroll to the setting you want to change Press the i button to access the setting values Type of timer Service Enter your pin code if locked PIN code is required when channels to be recorded are locked move Parental Control from On to Off to enable recording of the selected channel Day Month Start time End time Audio language Subtitle lan...

Страница 30: ...he timer is removed from the list Note deletion is immediate Press the yellow colour button to exit the screen and return to the Timers sub menu or press the blue colour button to exit the menu Note when a recording timer is running you cannot zap through digital channels but you can switch to analogue TV using the TV STB button and zap through analogue channels To cancel a running timer Refer to ...

Страница 31: ...O button to switch to radio mode Proceed as indicated above 7 7 Access Restrictions This item is used to enable and edit access restrictions Press the i button to access the Access restrictions setting values Set PIN code protection select On to enable access restrictions Note if Set PIN code protection is set to No you cannot set the other access restriction settings Maturity rating select a matu...

Страница 32: ...aired Menu Country Time Zone TV VCR Digital Audio Output Channel Banner Volume Remote Control Current Software Version Always Accept New Software Name Active Select TV channels Add all services Remove all services Name Select Radio stations Add all services Remove all services Video Output Audio Output Screen Format Video Output Audio Output Easy Record Duration Transparency 32 MENU TREE English N...

Страница 33: ...m PIN code Enter new system PIN code Re enter new system pin code Rearrange services View new TV channels Listen to new Radio stations Add new services Reinstall all services Network name Signal quality Signal strength RF Channel Search TV channels found Radio stations found Other services found Store Discard Search TV channels found Radio stations found Other services found Store Discard NOTICE D...

Страница 34: ... to check if and how the Easy Recording feature is supported Most Philips VCR and DVD RW recorders support one of the two Easy recording options Verify that both your TV and VCR have two SCART sockets Incorporate your receiver in your existing installation Plug your aerial lead plug into the AERIAL IN socket of your digital receiver Connect the RF OUT socket of your digital receiver to the ANT IN ...

Страница 35: ...ut the applicable one Set your VCR to the mode allowing control by your digital receiver 9 2 3 Recording using the VCR control feature Your digital receiver TV and VCR are connected and set according to 9 2 1 You have programmed a timer on your digital receiver At timer start your VCR starts recording and at timer end your VCR stop recording under the control of your digital receiver You no longer...

Страница 36: ... local transmitter may not be working There could be a transmission problem Your aerial may have been moved for example by severe weather Your aerial connection has become loose or disconnected Check mains connection and press the Standby button on the front of the receiver Press either P or P button or any number button to bring the receiver out of standby Press the TV STB button on your remote C...

Страница 37: ...n and the receiver settings may not be correct Use the FAV button to select another Favourite list Use the All TV Channel list to see all available TV channels Enter your parental code to access the channel or unlock the channel See paragraph 7 7 for more details When prompted for your PIN code enter the Master PIN code This will allow you to proceed as well as reset the PIN code to the default PI...

Страница 38: ... MB Terrestrial antenna interface RF input IEC 169 2 female connector RF output bypass IEC 169 2 male connector Reception Demodulation Demodulation type COFDM 2K 8K Network MFN SFN Input frequency range VHF III UHF IV V Loop through frequency range MHz 47 862 MHz UHF Channel 21 69 Connections TV SCART Output CVBS Controlled audio L R RGB Slow blanking Fast blanking S Video for LCD projector VCR SC...

Страница 39: ...English NOTICE DTR 500 qxd 7 09 2004 15 25 Page 39 ...

Страница 40: ...NOTICE DTR 500 qxd 7 09 2004 15 25 Page 40 ...

Отзывы: