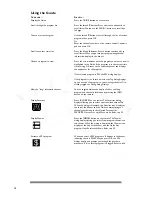
background image

12

Inserting your Access Card

The access card provided with your system includes information about your purchase authorization and other data.
To watch channels, your viewing access card needs to be inserted in the access card slot on the rear of your satellite
receiver.

When the card is removed, the system will not display any programming guides or video signal.The message, “Please
insert your Access Card” displays.

The access card only needs to be inserted during system setup and generally does not need to be removed. Each
access card has a unique number. Be sure to record this number in the space provided on the back cover of this
manual.

9

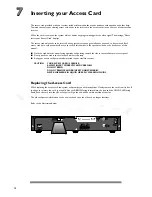
Hold the card with the arrow facing upwards and pointing toward the slot in the satellite receiver rear panel.

9

Gently push the card into the slot until it meets the stop.

9

Keep your access card permanently inserted in your satellite receiver.

CAUTION  

YOUR ACCESS CARD IS FRAGILE.
ALWAYS INSERT CORRECTLY AND CAREFULLY.
DO NOT BEND.
DO NOT REMOVE AND RE-INSERT UNNECESSARILY.
NEVER SUBMERGE IN LIQUID OR APPLY CLEANING FLUIDS.

Replacing the Access Card

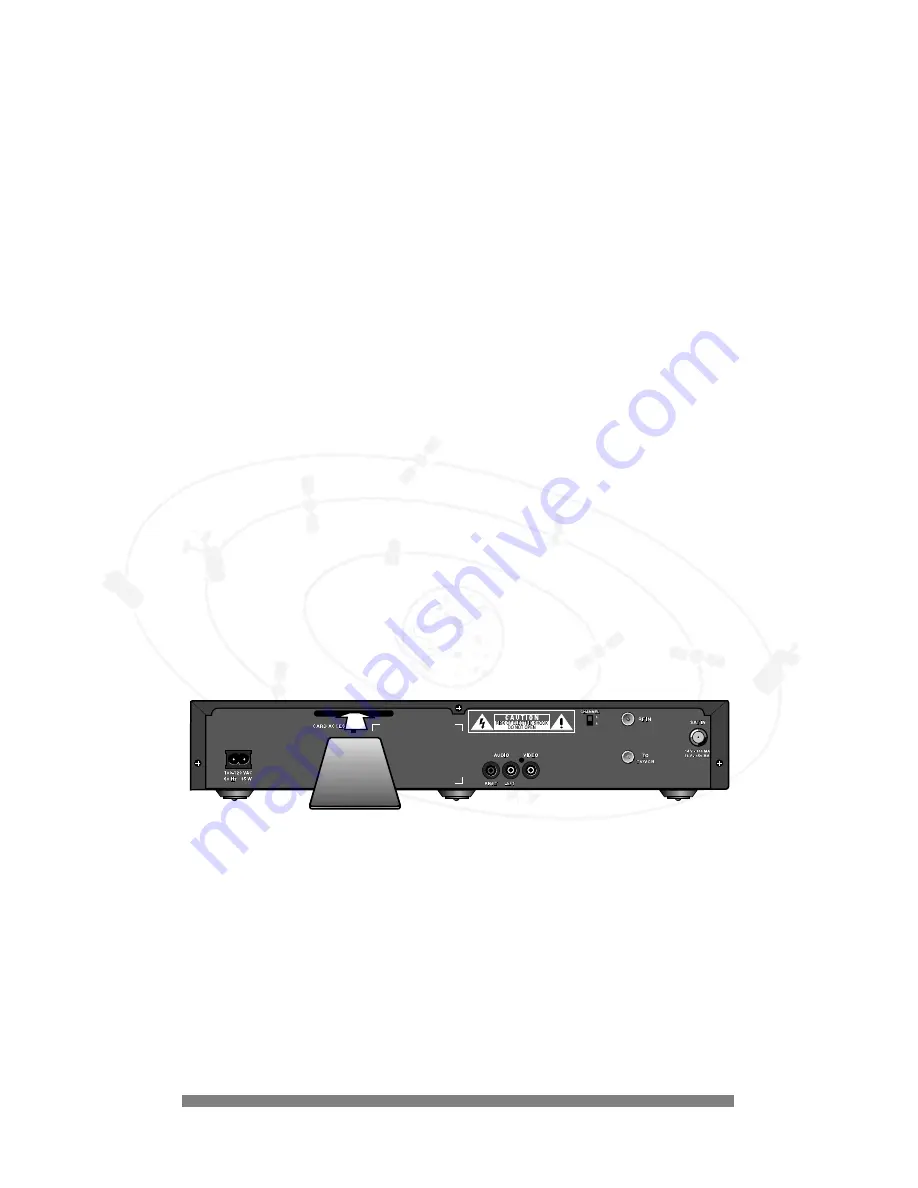
When replacing the access card, the system will prompt you with instructions. Gently remove the card from its slot. If
you have to reinsert the card, you should have the ARROW facing forward into the box and the GOLD CHIP facing
down. Push the card into the slot as far as it will go, the end will be visible outside of the slot.

The old card passes information to the new card, and then the old card no longer functions.

Refer to the illustration below:

7

7

Содержание DSX 5250

Страница 1: ......

Страница 2: ...d cart combination to overturn Ventilation Slots and openings on the cabinet are provided for ventilation and to ensure reliable operation of the product and to protect it from overheating These openings must not be blocked or covered The openings should never be blocked by placing the product on a bed sofa rug or other similar surface This product should not be placed near or over a radiator or h...

Страница 3: ...lt in a risk of fire or electric shock Object and Liquid Entry Never push objects of any kind into this product through openings as they may touch dangerous voltage points or short out parts that could result in a fire or electric shock Never spill liquid of any kind on the product Servicing Do not attempt to service this product yourself as opening or removing covers may expose you to dangerous v...

Страница 4: ...ted and found to comply with the limits for a Class B digital device pursuant to Part 15 of the FCC Rules These limits are designed to provide reasonable protection against harmful interference in a residential installation This equipment generates uses and can radiate radio frequency energy and if not installed and used in accordance with the instructions may cause harmful interference to radio c...

Страница 5: ... the terminal equipment DSX 5250 causes harm to the telephone network the telephone company will notify you in advance that temporary discontinuance of service may be required But if advance notice isn t practical the telephone company will notify the customer as soon as possible Also you will be advised of your right to file a complaint with the FCC if you believe it is necessary The telephone co...

Страница 6: ... have a TV and a VCR 11 7 INSERTING YOUR ACCESS CARD 12 Replacing the Access Card 12 8 INSTALLATION 13 Switching Your Receiver On and Off 13 Enter Zip Code 13 Dish Configuration 14 Point Dish 14 System Test 14 9 OPERATION 15 10 ABOUT THE BANNER 15 Zap Banner 15 Short banner 15 Long banner 15 Browse Banner 16 Song ID Displays 16 Notification Displays 16 11 USING THE DIRECTV PROGRAMMING GUIDE 17 Wha...

Страница 7: ...ESS CONTROL 27 Lock Unlock the System 27 Change Password 27 Channel Lock 28 Set Purchase Limit 28 Maturity Rating 28 22 REPLACE THE ACCESS CARD 29 23 PREFERRED LANGUAGE 29 Purchases 30 Completed Purchases 30 Pending Purchases 30 Upgrades 30 Mail 31 24 TROUBLESHOOTING 32 Where to Find Help 32 25 GLOSSARY 34 26 APPENDIX A INSTALLATION IN EXPERT MODE 36 Telephone Prefix 36 Application Type 36 System ...

Страница 8: ...you don t miss the start of a program you want to see 9 Create your own list of favorite channels 9 Restrict viewing access based on rating levels 9 Tag programs for future viewing 9 Receive mail messages from DIRECTV BeforeYou Start Before using your system check the following 9 Your system installation has been completed according to the instructions in the installation section 9 The access card...

Страница 9: ...ate Temporarily unlocked channels are NOT maintained when the system goes into standby mode but themes and or favorites selections are maintained TV Mode This is the normal viewing mode in which the program is viewed without a Guide Menu or program banner displayed Guide Mode In Guide mode you can view lists programs according to their time slot and channel With it you can tune to a program be not...

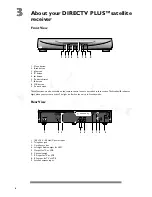
Страница 10: ...nd are described in that section The Standby IR indicator lights when yous system is active The light is off when the unit is in Standby mode Rear View 1 100 120 V 60 Hz AC power input 2 Telephone jack 3 Card Access slot 4 Left right Audio output for HIFI 5 Output for TV or VCR 6 Channel switch 7 RF input for TV or VCR 8 RF output for TV or VCR 9 Satellite antenna input 1 5 3 7 8 4 9 6 2 Multimedi...

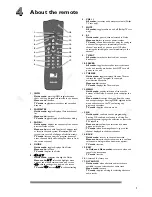
Страница 11: ...ing the third digit to tune immediately to the channel 9 TV SAT All modes switches to local cable or antenna broadcasts 10 POWER All modes toggles the satellite receiver between active and standby modes but does NOT turn off power to the unit 11 THEMES Guide mode toggles display of themes Themes indicate the type of program for example movie action adventure Menu mode inactive TV mode displays the...

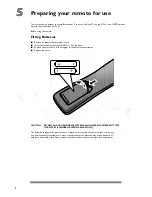
Страница 12: ... V supplied 9 Position them as shown in the diagram in the battery compartment 9 Replace the cover CAUTION DO NOT MIX OLD AND NEW BATTERIES AND NEVER MIX DIFFERENT TYPES OF BATTERY STANDARD ALKALINE AND SO ON The batteries supplied with your receiver s remote do not contain heavy metals such as mercury or nickel cadmium Nevertheless in many countries exhausted batteries may not be disposed of with...

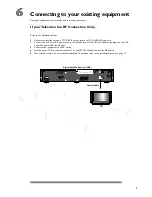
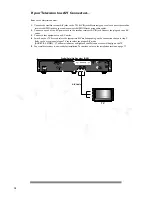
Страница 13: ...nput jack 2 Connect one end of the AC power cord to the satellite receiver s AC IN jack Connect the plug end to an AC outlet The power LED should light 3 Connect other equipment to an AC outlet 4 Switch on your TV first and select channel 3 on your TV The Welcome screen should display 5 Your satellite receiver is now ready for installation To continue refer to the installation section on page 17 T...

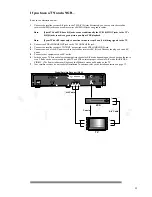
Страница 14: ...eiver s AC IN jack Connect the plug end to an AC outlet 3 Connect other equipment to an AC outlet 4 Switch on your TV first and select the appropriate A V mode depending on the connection chosen in step 2 Refer to the user manual of your TV set to select the proper A V mode AUX VCR S VIDEO The Power indicator will light and the Welcome screen will display on the TV 5 Your satellite receiver is now...

Страница 15: ...o the TV s UHF VHF IN jack 3 Connect the satellite receiver s TO TV VR output jack to the VCR s UHF VHF IN jack 4 Connect one end of the AC power cord to the satellite receiver s AC IN jack Connect the plug end to an AC outlet 5 Connect other equipment to an AC outlet 6 Switch on your TV first and select the appropriate channel or A V mode depending on the connection chosen in step 2 Refer to the ...

Страница 16: ...ow facing upwards and pointing toward the slot in the satellite receiver rear panel 9 Gently push the card into the slot until it meets the stop 9 Keep your access card permanently inserted in your satellite receiver CAUTION YOUR ACCESS CARD IS FRAGILE ALWAYS INSERT CORRECTLY AND CAREFULLY DO NOT BEND DO NOT REMOVE AND RE INSERT UNNECESSARILY NEVER SUBMERGE IN LIQUID OR APPLY CLEANING FLUIDS Repla...

Страница 17: ...s Once you have entered all the requested information a System Test screen displays When this screen is dismissed the satellite receiver will be enabled Be sure you have contacted DIRECTV and arranged for service For installing your satellite dish and making connections refer to the installation manual for the satellite dish After the initial installation you may want to access the installation fe...

Страница 18: ...stallation Point Dish 3 A dialog displays showing a signal strength meter 4 Use the 1 or 2 buttons to change the transponder for the selected satellite 5 Adjust the dish until the signal strength meter stabilizes at a maximum reading The range is 0 to 100 6 Press BACK to return to the Installation menu To point an oval dish 1 Press MENU on the remote 2 Choose Installation Point Dish 3 A dialog dis...

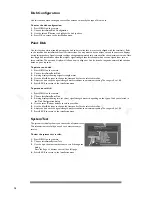
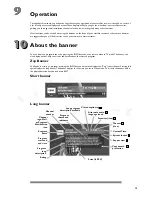
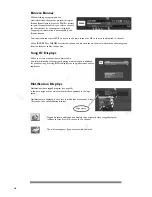
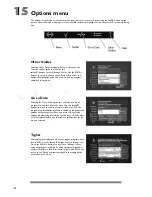
Страница 19: ...he INFO button on the remote when in TV mode The banner can also display notices help text icons and details about the selected program Zap Banner While you re viewing a program pressing the INFO button on remote displays the Zap short banner Pressing Info again displays the long banner The banner displays for the time you set in Menu mode To dismiss the banner before the display duration has expi...

Страница 20: ...m the favorites and or themes lists Song ID Displays When you select a channel that contains audio only information about the currently playing music selection is displayed for each new song Pressing INFO redisplays the song information and the zap banner Notification Displays Notifications that a tagged program see page 26 is about to begin and the arrival of new mail are displayed in the logo sp...

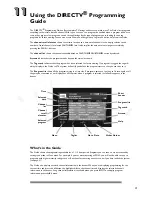
Страница 21: ...n the Guide cell The system will notify you before the program starts so that you can tune to it The Program list shows all the programs airing in a time slot If program names are too long to fit into a guide cell they may be truncated or not displayed at all However when a program is selected its full name appears in the banner What s in the Guide The Guide shows the programming available for a 1...

Страница 22: ...Tag dialog displays so you can add the program to your viewing schedule If it is already tagged the Untag dialog displays View the long information banner You can toggle between the display of short and long program and channel information by pressing the INFO button on the remote Display Favorites Press FAVORITES on the remote The Favorites dialog displays allowing you to select a personalized ch...

Страница 23: ...a checkmark to the right of the program name You can tag up to 25 programs When a program has been tagged for future viewing the notification banner displays 3 minutes before the program starts Press OK to tune to the channel You can still purchase future PPV programs after 25 but you will not receive a tag notice To tag a non PPV program 1 Highlight a future program to tag and press OK In the Tag...

Страница 24: ...alog displays containing alternate start times if available and pricing If you decide to purchase the program further dialogs display to guide you through the purchase To purchase a PPV program 1 Highlight the program in the Guide and press OK 2 In the purchase dialog choose Buy Now and press OK 3 If alternate start times or pricing are available a dialog displays in which you can choose the start...

Страница 25: ...ng Themes causes the Guide to highlight the programs whose themes match your choices When zapping you will go only to channels containing programs that have the selected themes smart surf You can choose any or all of the themes and sub themes When themes are selected the Themes icon displays on the top line of the banner To select Themes 1 Press THEMES on the remote The Themes dialog displays 2 Pr...

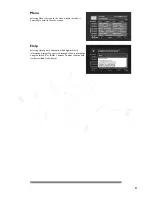
Страница 26: ...n lets you look at a list of programs for another day in the week Use the 3 and 4 buttons to move to the day of interest then press OK The programming information available is limited to the master and extended program guides When you press OK the Guide displays programming information for the same 1 5 hour block of time displayed before you selected Go to Date but for the day you selected Taglist...

Страница 27: ...ch is described in detail in the next section Help Selecting Help opens a window in which high level help information displays You can scroll through the help information using the 3 and 4 or PAGE buttons Context sensitive help is often available in the banner ...

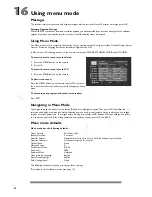
Страница 28: ... from the screen and accepts all the changes you have made To return to your program and cancel a transaction Press EXIT Navigating in Menu Mode To navigate through the menus use the 3 and 4 buttons to highlight an option Then press OK to confirm the selection and display a sub menu or dialog Selecting items on a sub menu displays a dialog in which you can change settings or review parameters To n...

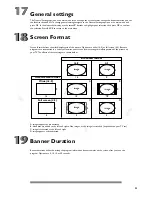
Страница 29: ...Because programs are transmitted in a variety of formats your screen format settings will affect position of the picture on your TV The effects of these settings are shown below A images appears as broadcasted B black bars are added to the left and right of the images or the image is stretched dependent on your TV set C image is truncated at the left and right D image appears as broadcasted Banner...

Страница 30: ...select the list you want to change 3 Press OK The Change Name submenu displays 4 Use the 3 and 4 buttons to choose Manual Select All or Deselect All Manual Select shows a list of all available channels A checkmark is displayed next to channels on your favorites list You can toggle the checkmark by highlighting the channel and pressing OK Select All selects all channels in the list You can then man...

Страница 31: ...will prompt you to enter the password whenever you want to change settings in the following lock channels change maturity levels change purchase limits change the password or replace the access card A locked system is indicated by the lock icon in the banner To unlock the system enter the password as described below To lock or unlock the system Choose Lock Unlock the System from the Access Control...

Страница 32: ...s limit is per program it is not a cumulative limit To set the Purchase Limit 1 Choose Purchase Limit from the Access Control menu and press OK A dialog displays the current purchase limit 2 Enter the purchase limit using the numeric buttons on the remote Or use the 1 and 2 buttons to move from digit to another then use the 3 and 4 buttons to scroll the numeric entry for each digit 3 Press OK to c...

Страница 33: ...o the previous menu 4 Discard the old card it no longer works Preferred language Many programs are broadcast with program guide information and audio tracks in different languages You can choose the language you prefer for the Menu and Guide and for the audio track Note Not all programs offer multiple languages If the selected program is not available in the preferred language it defaults to the f...

Страница 34: ...udes the program and channel name program date presentation start and end time price and rating Information for all purchases is stored on the access card and displayed with the most recent purchase first Note You cannot cancel a PPV purchase if you have already tuned to the program To cancel purchases 1 Choose Purchases from the main menu and press OK 2 Use the 3 and 4 buttons to choose Pending P...

Страница 35: ...rade is in progress Please consult the Upgrade Menu to find a schedule of upgrades or modifications planned by DIRECTV Mail Your service provider will periodically send you messages When you receive new mail the pigeon mail icon appears at the logo space on the main menu and Guide You can view and delete messages Each message includes the date and time it was sent A maximum of 30 messages can be s...

Страница 36: ...ubscribing to the station to which you want to tune Call your program provider if you are not sure 9 Be sure the system is not locked as indicated by the lock icon in the banner Cannot order PPV program 9 It may be too late to purchase this program Check for other showtimes 9 Make sure the PPV option is not locked see p 31 9 Program may exceed purchase limit 9 Your access card may be full Call DIR...

Страница 37: ...e program provider may not make available all the languages displayed in the Language screen accessed in the main menu Access card problems 9 Check that the card is inserted properly see p 16 Call DIRECTV Remote control doesn t work 9 Make sure the batteries are inserted correctly see p 12 and are not dead Be sure you are within operating range of the receiver No sound 9 Make sure the Mute isn t o...

Страница 38: ...umbers range from 0000 to 9999 but not all possible channels are defined and not all defined channels transmit programming all the time D DIRECTV High power direct broadcast satellite system and programming developed and managed by DIRECTV Inc E EPG Electronic program guide F favorites A selection of channels that you like G guide An onscreen television program guide When you press GUIDE on the re...

Страница 39: ...grams rated R TV M NR Mature or NC17 cannot be viewed without first entering a access code rating level Standard rating levels applied to movies and other programs to help customers determine the amount of strong language violence and or sex contained in that program S scroll A method of moving around a web page or text box when the contents are too big to fit the screen or box When you scroll par...

Страница 40: ...prefix number is displayed 5 Press BACK to return to the Installation menu Application Type Your satellite receiver can run special applications To run a special application 1 Press MENU and OK on the satellite receiver front panel 2 Choose Installation Application Type 3 Press the up or down arrow buttons to choose either Normal or Special 4 Press BACK to return to the Installation menu System Te...

Страница 41: ... Video output CVBS Audio output Audio L R Channel 3 4 TV VCR output RJ 11 Integrated telephone modem Return Path Built in RJ 11 connector Modem type v 22bis Bell 212A Bell 103 Dialing mode DTMF pulse Descrambling Type DES Implementation internal Smart card 1 for CA Electrical Main power supply 110V 10 60Hz Power consumption max 35W Max 450mA of LNB current Environmental Temperature Operating 5 to ...

Страница 42: ...ts this document is subject to change without notice This device incorporates an anti copy process technology that is protected by U S patents and other intellectual property rights The anti copy process is licensed for non commercial home use only Reverse engineering or disassembly is prohibited 2000 PHILIPS Printed in Belgium 3111 176 4985 1 Model no of product DSX5250 Date of purchase day month...

Отзывы: