background image

12

Text Entry

3. Text Entry

Text can be entered in editing screens in two different
ways: by using T9

®

 Predictive Text Input or basic text

input. The techniques for using these two methods
are discussed below.

T9

®

 text input

T9

®

 Predictive Text Input is an

intelligent editing mode for entering text
on a mobile phone. It allows you to enter
text more quickly by anticipating the
word you want to enter based on the

keys you have pushed. You press once on the key
corresponding to each letter needed to spell a word
and T9

®

 suggests a word based on your keystrokes. If

several words are available, the first word in the list is
displayed and highlighted. Press 

or 

to browse the

list and press 

,

 to insert the word.

How to use it?

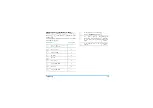
Letters and symbols represented by each key are as
follows:

Example: how to enter the word "home":

1. 

Press 

4


6


6


3

. The screen displays the

first word of a list: 

Good

.

2.

Press

 + 

to scroll and select 

Home

.

3. 

Press 

,

 or 

to confirm selection of the word

Home

.

Basic text input

Press 

*

 to switch from T9

®

 to basic text input. This

method requires multiple key presses to reach the
desired character: the letter "h" is the second letter on
the 

4

 key, so you must press it twice to enter "h".

Short press 

C

 to clear one entry, long press to clear

all text. 

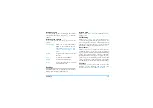
2

 to 

9

To key in letters.

+

or 

-

To browse the list of candidate words.

Tegic Euro. Pat. 

App. 0842463

>

Press this key to insert the selected word
followed by a space.

C

Short press to backspace, long press to
clear all text.

0

To shift letter case: Standard, lower or
UPPERCASE letters.

#

To view the table of symbols and
punctuation. Then press 

<

 or 

to browse

the 3 available tables.

*

To shift mode from 

T9

®

 to basic text

input to numeric.

Содержание CT9A9FBLK

Страница 1: ...tworks How to Alpha numeric keypad Microphone 65 000 colour main screen Pick up key Hang up cancel and on off key Charger headset connector OK key Cancel key Navigation keys Switch the phone On Off Long press Enter your PIN code Enter your PIN code using the keypad and press to confirm Make a call Enter the phone number on the keypad and press to dial End a call Press Answer a call Press when your...

Страница 2: ...h directions are represented in the present guide with the or signs to browse the icons and lists When navigating in a list a scroll bar located on the right hand side of the screen shows your current position in the list Within lists press to access the options related to the selected item press C to go back one level Access the Main Menu Press or in idle mode Go to previous menu Press C when ava...

Страница 3: ...tion of the SIM card battery etc Chapter 2 Main features Information on how to make and receive calls Chapter 3 Text entry Information on how to enter text using the numeric keypad Chapter 4 to 12 These chapters treat each element of the Main Menu one at a time Other sections After Chapter 12 appear the sections for Icons Symbols Precautions Troubleshooting Philips Authentic Accessories SAR inform...

Страница 4: ...input 12 4 Call Info 14 Mailboxes 14 Call list 14 Settings 15 Network 16 Call forward 17 Call barring 18 5 Messages 20 New MMS 20 New SMS 21 Inbox 22 Outbox 23 SMS Chat 23 Archive 23 Settings 23 Broadcast SMS 25 Template 26 6 Settings 27 Sounds 27 Display 27 Other settings 28 Hotkeys 28 Security 29 7 Multimedia 30 Picture album 30 Sound album 30 Memory status 31 8 Operator Services 32 WAP 32 Links...

Страница 5: ...tions 42 Calculator 42 Alarm clock 42 Organiser 43 12 Address Book 44 Select Address Book 44 Add a Contact 44 Edit and Manage Contacts 44 Icons symbols 47 Precautions 48 Troubleshooting 52 Philips Authentic Accessories 54 Trademark Declaration 55 Specific Absorption Rate Information International standards 56 Limited warranty 57 Declaration of conformity 60 ...

Страница 6: ...Inserting the SIM card Remove the back cover To insert the SIM card you must first remove the back cover Press the button and slide the cover to remove the cover Remove the battery To remove the battery pull the battery up by pressing the inner clip from the bottom left corner You may lose all your personal settings if you remove the battery when the phone is switched on Insert the SIM card Lift u...

Страница 7: ...Slide the battery into its slot metallic connectors facing downwards until it stops Then lock it by pushing it downwards Replace the back cover Replace the back cover by sliding it down into its slots until it stops Remove the protective film covering the screen before using the phone ...

Страница 8: ...battery is partially charged and a sound alert will warn you when the battery reaches low if the battery alert is On Once the battery and battery cover are back in place you can charge the phone Plug in the connector as shown below Then plug the other end into a main AC power socket Customize your mobile easily Press to accept customization Select your melody for incoming calls Press A list of mel...

Страница 9: ...hen disconnect the charger Keeping the charger plugged to the mobile when the battery is fully charged will not damage the battery The only way to turn off the charger is to unplug it so use an easily accessible AC power socket You can connect the charger to an IT supply Setting Hotkeys You can configure the numeric keys 2 to 9 to access your favourite features simply by long pressing on the numer...

Страница 10: ...the selected number is dialled 4 Press to hang up Answer and end a call When receiving a call the number of the caller may be displayed depending on whether or not the person calling has chosen to display his or her ID If the number is stored in the selected phonebook then the corresponding name is displayed instead of the number Answer the call press Reject the call press If you have activated Ca...

Страница 11: ...sfer to connect the two calls You are disconnected when the transfer is completed Conference to introduce the caller into a conference call Answering a second call When you receive a second call while being already in communication the phone emits a beep alert and the screen displays Call waiting You can then To receive a second call you must have deactivated the Call forward for voice calls and a...

Страница 12: ...cond one see above 2 Press and select Conference Repeat the process until five members are connected 3 Select Remove party to disconnect a member of the conference or select Private call to have a private call with this member only other members are put on hold 4 Press to disconnect all calls at once If there is an incoming call during the conference call and there are less than five members you c...

Страница 13: ...symbols represented by each key are as follows Example how to enter the word home 1 Press 4 6 6 3 The screen displays the first word of a list Good 2 Press to scroll and select Home 3 Press or to confirm selection of the word Home Basic text input Press to switch from T9 to basic text input This method requires multiple key presses to reach the desired character the letter h is the second letter o...

Страница 14: ... Long press 1 space 1 1 2 a b c 2 à ä å æ ç 2 3 d e f 3 é è Φ 3 4 g h i 4 Γ ì 4 5 j k l 5 Λ 5 6 m n o 6 ñ ò ö 6 7 p q r s 7 β Π Θ Σ 7 8 t u v 8 ü ù 8 9 w x y z 9 ø Ω Ξ Ψ 9 0 To shift letter case Standard lower or UPPERCASE letters 0 To open symbols and punctuation mode Then press or to browse the 3 available tables Changes the language used for text edition To shift mode T9 basic or numeric Also s...

Страница 15: ... of number The choices are Phone Fax and Data Make your selection and press 5 The new voicemail number is stored Editing an Existing Voicemail Number To edit an existing voicemail number select the number and press A screen appears showing the name number and type of the voicemail number Press again A Mailboxes screen appears to access the options Call list This menu provides you with the list of ...

Страница 16: ...edial Allows you to set On or Off the automatic redial of a number When On if the person you are calling is busy your phone will automatically redial the number until a successful connection is made or until the maximum number of attempts is reached 10 The phone beeps at the beginning of each attempt and emits a special beep if the connection is successful The time between redials increases with e...

Страница 17: ...cording to your preferences Register again Provides you with a list of the networks available in the area when the Manual mode is selected Select the network you want to register with and press to confirm Access settings This menu allows you to create different data profiles that can be used for connecting to various services for example when using WAP or when sending MMS the selected profile will...

Страница 18: ...activity time a value of over 30 seconds after which the phone disconnects automatically if a connection was in progress GPRS settings To change the GPRS settings Login Password Inactivity time The APN menu allows you to enter the addressof the external data network you want to connect to a text string used to establish the connection Always on Your phone automatically connects to the GPRS service...

Страница 19: ... This menu displays the status of all your call forwarding Call barring This menu allows you to restrict the phone from making and receiving calls You need to enter the password supplied by your service provider before you can use this feature 1 In idle mode press to enter the main menu 2 Select Call Info Call barring and press to choose the type of call to bar Outgoing or Incoming or to modify Se...

Страница 20: ...g for international calls Intl Exc Home Press to select On or Off for activating or deactivating call barring for outgoing international calls except those to your country of subscription Select Status to view the status of call barring for such calls All Press to select On or Off for activating or deactivating call barring for all incoming calls Select Status to view the status of call barring fo...

Страница 21: ...e has asked for a Read report a prompt will ask you to send it or not Once the MMS is downloaded it is available in Inbox MMS see below If the size of the MMS to download is bigger than the memory available in your phone you must free memory by deleting data picture sounds etc New MMS To compose and send an MMS follow the steps detailed below 1 In idle mode press to enter the main menu 2 Select Me...

Страница 22: ...s New SMS and press to to create a new SMS 3 Enter the text of the SMS message and press You are then presented with the following options You can send up to two attachments of two different types together with your SMS Images and animations and pictures are exclusive if you first select an animation and then an image only the image will be taken into account and vice versa Edit subject To edit an...

Страница 23: ... forward the selected message Note that attachments cannot be forwarded Delete To delete the selected message Call back To call the sender of the message operator dependent Move to phone To move SMS to archive menu Reset To reset the Inbox to empty state Play To switch back to automatic mode the MMS is then played as a continuous slide show Next previous slide To move to the next or previous slide...

Страница 24: ...ou to display received SMS on the idle screen You can then quickly reply to a message received by pressing entering your message in the edit screen and pressing again If you receive an SMS while you are reading one you can reply to the first one before reading the second Alternatively you can press Back to exit the first message The second message then appears on your screen Archive This menu allo...

Страница 25: ...allows you to add a signature at the end of your message You can Edit Change or Save the signature Reply path When On this option allows you to transmit the number of your SMS message centre together with the message The recipient can then reply using your own SMS centre and not theirs This speeds up the rate of transmission This feature is subscription dependent SMS centre To select your default ...

Страница 26: ... via an SMS when the status of the MMS you have sent has changed i e if it was read or deleted Delivery report This option can be set On or Off and informs you via an SMS of the status of delivery e g if your MMS was received or rejected Auto save This option can be set On or Off and allows you to automatically save the messages sent in the Outbox menu Slide duration Allows you to select the durat...

Страница 27: ... by the operator and if desired associate a name You can also select an existing topic in the list which you can rename or delete You can enter up to 15 different topics in the list To obtain the codes corresponding to the different topics contact your operator Template Contains a list of system supplied MMS and SMS messages ...

Страница 28: ...ibra alert Allows you to set the vibra alert On or Off when receiving a call when an event set in the organiser is due when you receive a message and when the alarm rings The vibra alert is always Off when you connect the charger or the Cigarette Lighter Adapter Messages ringer Allows you to set On or Off an alert for each time you receive a new message When On you can select the alert of your cho...

Страница 29: ...to set the time using the keypad or with the navigation keys Set date Allows you to set the date by pressing the appropriate numeric keys or the navigation keys Language This feature allows you to choose the language in which the messages will be displayed Keypad lock To set your keypad on or off In all cases the keypad is automatically unlocked when you receive a call Hotkeys Allows you to set up...

Страница 30: ...erator If you enter a wrong PIN2 code 3 times your SIM card is blocked To unblock it request the PUK2 code from your operator or retailer If you enter an incorrect PUK code 10 times in a row the SIM card will be blocked and unusable If this happens contactyouroperator or retailer Call restriction Allows you to restrict the calls to the Public names list when Public only is selected You can disable...

Страница 31: ...to enter the main menu 2 Select Multimedia Sound album and press to get more sound files or to listen to existing sound files Working with each sound file Once in a list you can select a sound file and press to access the menu options listed below MMS To send the selected picture in an MMS message Set as wallpaper To set the selected picture as wall paper Rename To Rename the selected picture Dele...

Страница 32: ...to to check the memory status The display shows you the percentage of memory free the percentage of memory used and the total memory in Kilobytes KB 3 Press again to check the actual percentage of memory used by each of the following six features Picture album Sound album SMS MMS In phone Java and Miscellaneous 4 Press again from on of the above feature will display the memory used in KB by that f...

Страница 33: ...and will connect to your operator s WAP homepage To change this default homepage see Options on page 34 Bookmarks This menu allows you to store your favourite WAP site addresses rename them and access them quickly from the list Press Options while browsing then select Bookmarks the name and URL fields will be automatically filled in with the information of the page you are browsing Select Add book...

Страница 34: ...he phone s memory where the pages browsed during a WAP session are stored Network Homepage To change the homepage name and address start entering the new name for the edit screen to appear Network access allows you to select one of the data profiles you have defined in Settings Access settings see page 27 Bearer allows you to select the type of network used by the selected profile when launching a...

Страница 35: ...g press Options to access Links This menu contains links for the URLs Homepage To access the default homepage Back To go back to the previously browsed page Forward To go to the next browsed page Refresh To reload the currently browsed page from its original server Set as homepage To save the currently browsed WAP page as the default homepage Save as To save images embedded in the pages that are d...

Страница 36: ...ns 1 Start the WAP browser 2 Browse to a website with the desired Java files WAP will automatically launch Java to start up the download installation process 3 The Java application is then stored in the product and the installation process begins If the installation does not start automatically perform the following steps Installing a Java application 1 Open the Applications folder then press the ...

Страница 37: ...s and confirm by pressing the key Pawns are displayed on the left of the screen after each guess no pawn the form is not in the final combination red pawn the form is in the final combination but at a different location green pawn the form is in the final combination and at the same location The game is over when the player has guessed the combination or no other attempts are allowed Selecting dif...

Страница 38: ...nt Bearer DNS address and Proxy Network account It allows you to select one of the data profiles you have defined in Call Services Network In the list that appears select the connection setting of your choice and press to confirm Bearer It allows you to select the type of network used by the selected profile when launching a connection GSM or GPRS your mobile will only use the GSM or the GPRS netw...

Страница 39: ...ver for Java network connections Proxy address IP address of the proxy server It should be provided by the operator Proxy port port number of the proxy server It should be provided by the operator Login user name to log in to the system so as to establish a network connection through the proxy server Password user password to be used with the user name It is not always necessary to use a login and...

Страница 40: ...your operator s WAP homepage To change this default homepage see Options on page 41 Bookmarks This menu allows you to store your favourite WAP site addresses rename them and access them quickly from the list Press Options while browsing then select Bookmarks the name and URL fields will be automatically filled in with the information of the page you are browsing Select Add bookmark and start enter...

Страница 41: ...t entering the new name for the edit screen to appear Cache To empty an area of the phone s memory where the pages browsed during a WAP session are stored Network Homepage allows you to change the homepage name and address start entering the new name for the edit screen to appear Network access allows you to select one of the data profiles you have defined in Settings Access settings Bearer allows...

Страница 42: ... is full a message will advise you to delete some messages in WAP Push Inbox Options While browsing press Options to access Homepage To access the default homepage Back To go back to the previously browsed page Forward To go to the next browsed page Refresh To reload the currently browsed page from its original server Set as homepage To save the currently browsed WAP page as the default homepage S...

Страница 43: ...arm should repeat To set an alarm follow the steps below 1 Select an alarm and set it On 2 Then enter the time and press the key 3 Then select the frequency Once Daily On weekdays 4 Finally select the type of alarm the Buzzer or a Melody from the sounds album and press the key Repeat above steps to set other alarms The alarm clock will ring even if your mobile phone is switched off and or the ring...

Страница 44: ...en time The reminder only applies to Meeting and To Do events It will be updated when changing time zones Deleting old events This menu allows you to delete past events Enter the starting date past or future from which all previous events will be deleted and press the key twice to delete all events preceding this date To delete all events set in your organiser enter a starting date several years a...

Страница 45: ...he first then last name up to 20 latin characters one of the two fields can be empty but not both Press 3 Enter the contact number and press 4 Then select the Number type Phone Fax and Data etc Alphanumeric fields note and e mail can only be changed or deleted Adding Contacts to the SIM Phone Book 1 Select New and press to create a new contact 2 Enter the name and the number of your choice then th...

Страница 46: ...ice to access the letter U The first record starting with this letter is selected in the list Press this key then enter the first letters of the name you are searching and press to go directly to that name Details Flash Dial Send SMS Change Call Delete Copy to Phone Call Send SMS Change name Select group Delete Memory status Show Call To call the number listed in the phone book Send SMS To send an...

Страница 47: ...e you can do it manually with this option Selecting this option twice will duplicate all the names Memory status Display the memory storage capacity of your phone Groups setting Allows you to manage the settings of the contact group You can Select melody Select picture or Change name of the group Show Display the details of the selected contact name phone number office number mobile phone number e...

Страница 48: ...gistered to a network other than your own especially when you re abroad SMS full Memory for messages is full Delete old messages to receive new ones Call Forward Unconditional to number All your incoming voice calls are being forwarded to a number other than voice mail Call Forward to voice mailbox All your calls are being forwarded to voice mail Home zone A zone designated by your network operato...

Страница 49: ...phone in a safe place and keep it out of small children s reach Avoid writing down your PIN code Try to remember it instead Switch off the phone and remove the battery if you are going to leave it unused for a long time Change your PIN code after purchasing the phone and to activate call restriction options The design of your phone complies with all applicable laws and regulations However your pho...

Страница 50: ...the applicable safety rules In areas where you are requested to turn off radio transmitting devices such as quarries or other areas where blasting operations are in progress Check with the vehicle manufacturer that electronic equipment used in your vehicle will not be affected by radio energy Pacemakers If you have a pacemaker Always keep the phone more than 15 cm from your pacemaker when the phon...

Страница 51: ...s well as avoiding unnecessary navigating in the menus will also help to save the battery s energy for longer phoning and stand by performances Battery information Your phone is powered by a rechargeable battery Use specified charger only Do not incinerate Do not deform or open the battery Do not allow metal objects such as keys in your pocket to short circuit the battery contacts Avoid exposure t...

Страница 52: ...s casing might increase especially when featuring a metallic finish Be very careful in this case when picking up your phone and also avoid using it with an ambient temperature over 40 C Environmental care Remember to observe the local regulations regarding the disposal of the packaging materials exhausted batteries and old phone and please promote their recycling Philips has marked the battery and...

Страница 53: ... check that the antenna is in place if your mobile has an external antenna or contact your network operator for assistance information The display doesn t respond or the display responds slowly to key presses The display responds more slowly at very low temperatures This is normal and does not affect the operation of the phone Take the phone to a warmer place and try again In other cases please co...

Страница 54: ... Contact your operator for detailed information on this subject The display shows INSERT YOUR SIM CARD Check that the SIM card has been inserted in the right position If the problem remains your SIM card might be damaged Contact your operator The autonomy of your phone seems lower that indicated in the user guide The autonomy is linked to your settings e g ringer volume backlight duration and the ...

Страница 55: ...hilips mobile phone and not to void the warranty always purchase Philips Authentic Accessories that are specially designed for use with your phone Philips Consumer Electronics cannot be held liable for any damage due to use with non authorised accessories Charger Charges your battery in any AC outlet Small enough to carry in a briefcase handbag Carry case Protects your phone from nicks and scratch...

Страница 56: ...55 Trademark Declaration JAVA is a trademark of Sun Microsystems Inc T9 is a trademark of Tegic Communications Inc Tegic Euro Pat App 0842463 ...

Страница 57: ...y IEEE SA IEEE Std 1528 for the head Tests for SAR have been conducted using recommended operating positions with the mobile phone transmitting at its highest certified power level in all tested frequency bands Although the SAR is determined at the highest certified power level the actual SAR levels of the mobile phone while operating are generally below the maximum SAR value This is because the p...

Страница 58: ... from the date of purchase 3 What Will Philips Do if The Product is Not Free From Material Defects in Materials and Workmanship During The Limited Warranty Period During the limited warranty period Philips or its authorized service representative will at its option either repair or replace without charge for parts or labour a materially defective Product with new or refurbished parts or Product an...

Страница 59: ...f Philips You may contact the local Philips office for the location of the nearest authorized service center b The SIM card must be removed from the Product before it is given to Philips Philips assumes no liability for damaged or loss of the SIM card or the data contained therein c If the Product failure is not covered by this limited warranty or this limited warranty is inapplicable void or inva...

Страница 60: ...OSS OF DATA AND CLAIMS BY THIRD PARTIES RESULTING FROM PURCHASE OR USE OF THE PRODUCT TO THE FULLEST EXTENT ALLOWED BY LAW WHETHER OR NOT PHILIPS HAS BEEN ADVISED OF THE POSSIBILTY OF SUCH DAMAGES THESE LIMITATIONS SHALL APPLY NOTWITHSTANDING THE FAILURE OF THE ESSENTIAL PURPOSE OF ANY LIMITED REMEDY This limited warranty represents the complete and exclusive agreement between the Consumer and Phi...

Страница 61: ... 60950 EN 50360 and EN 301 489 07 EN 301 511 v 9 0 2 We hereby declare that all essential radio test suites have been carried out and that the above named product is in conformity to all the essential requirements of Directive 1999 5 EC The conformity assessment procedure referred to in Article 10 and detailed in Annex V of Directive 1999 5 EC has been followed related to articles 3 1 and 3 2 with...

Отзывы: