background image

ColorBlaze 

TRX  Product 

Guide

20

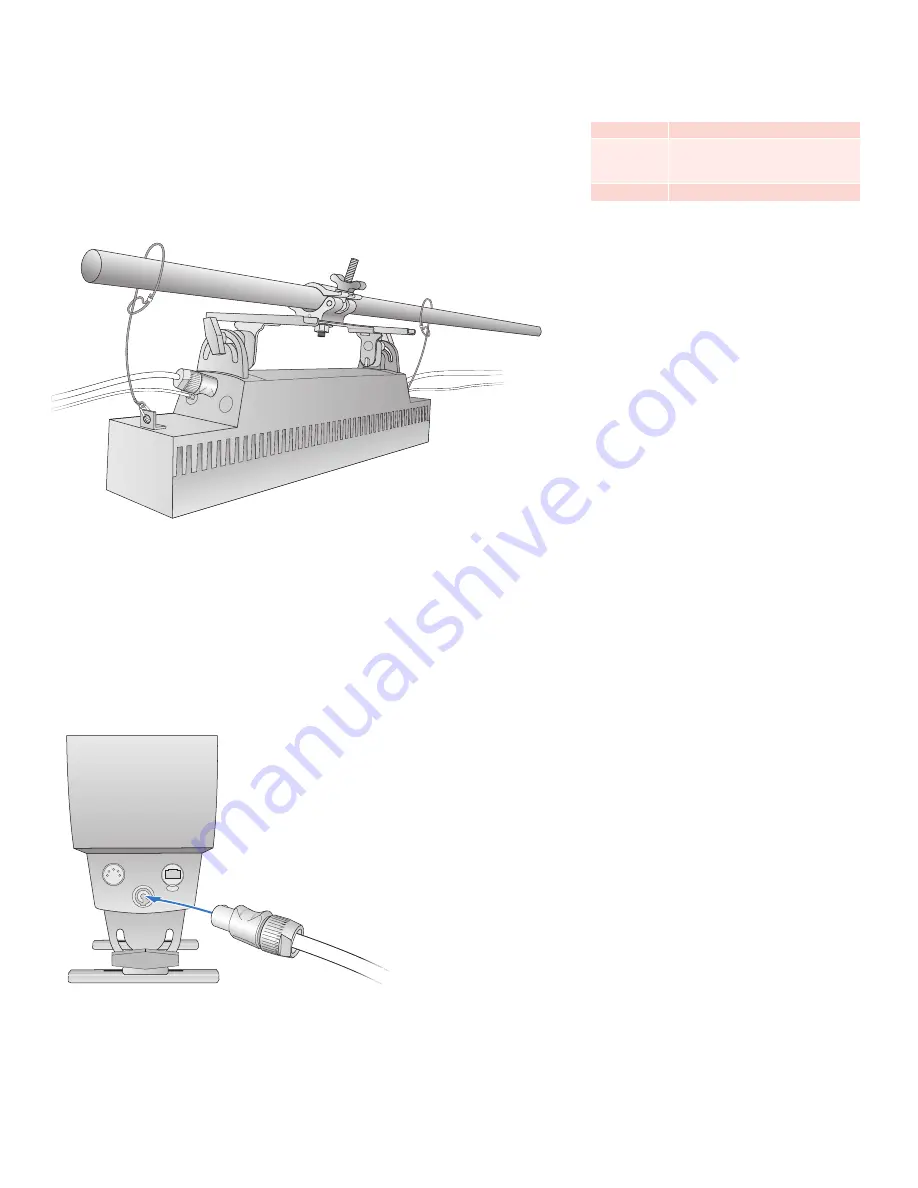
Attach Safety Cables 

(Optional)


Each ColorBlaze TRX fixture is designed for use with safety cables to tether 

fixtures to secure anchor points. When suspending or installing ColorBlaze TRX 

fixtures overhead, or when dictated by local or state code or advised by a structural 

engineer, loop safety cables through the restraining holes located at the either end of 

the ColorBlaze TRX housing. Securely anchor the safety cables using a method that 

follows code or engineer’s requirements.

Connect Data and Power

Make sure the power is OFF before connecting ColorBlaze TRX fixtures.
1.  Supply power to the first ColorBlaze TRX fixture in a series by plugging a power 

cable with Neutrik PowerCon connector into the blue Power In port on the input 

side of the fixture.

PUSH

1

5

3

2

4

From line power

Safety cable minimum requirements

Material

316 Stainless Steel

Size

5/64 to 3/16 in (2 to 5 mm) nominal 

diameter. Minimum break load must be 

greater than 400 lb (181 kg)

Construction

7 x 7 (49 wires) preformed stranded

Содержание ColorBlaze TRX

Страница 1: ...ColorBlazeTRX Advanced theatrical and rental LED batten with intelligent RGBAW light ...

Страница 2: ...inning algorithm sets a new standard for the color consistency and uniformity of LED sources used in manufacturing Chromasync technology achieves unprecedented consistency of light performance and color precision across multiple fixtures in an installation while maximizing intensity and color range Field serviceable for on site maintenance Most fixture components are field serviceable and replacea...

Страница 3: ...4 65 4 3 4 5 4 75 1 2 1 2 2 85 0 0 0 0 0 90 0 0 0 0 0 Multiply all candela values by 10 Cd 0 17 167 34 333 51 500 68 667 85 833 103 000 VA 0º 10º 20º 30º 40º 90º 80º 70º 60º 50º 0º H 90º H Center Beam fc Beam Width 4 0 ft 8 0 ft 12 0 ft 16 0 ft 20 0 ft 24 0 ft 1794 fc 449 fc 199 fc 112 fc 72 fc 50 fc 1 7 ft 3 4 ft 5 1 ft 6 8 ft 8 4 ft 10 1 ft 1 7 ft 3 4 ft 5 1 ft 6 8 ft 8 5 ft 10 2 ft Vert Spread ...

Страница 4: ...90 0 0 0 0 0 Cd 0 2 000 4 000 6 000 8 000 10 000 12 000 VA 0º 10º 20º 30º 40º 90º 80º 70º 60º 50º 0º H 90º H Center Beam fc Beam Width 4 0 ft 8 0 ft 12 0 ft 16 0 ft 20 0 ft 24 0 ft 2431 fc 608 fc 271 fc 152 fc 97 fc 68 fc 1 0 ft 1 9 ft 2 9 ft 3 8 ft 4 8 ft 5 8 ft 2 1 ft 4 2 ft 6 4 ft 8 5 ft 10 6 ft 12 7 ft Vert Spread 13 7º Horiz Spread 29 7º Illuminance at Distance Polar Candela Distribution Effe...

Страница 5: ...8 83 80 77 76 5 93 85 79 75 91 84 78 74 82 77 74 80 76 73 79 75 72 71 6 88 80 74 70 87 79 73 69 77 73 69 76 72 69 75 71 68 67 7 84 75 69 65 83 75 69 65 73 68 65 72 68 65 71 67 64 63 8 81 71 66 62 79 71 65 61 70 65 61 69 64 61 68 64 61 59 9 77 68 62 58 76 67 62 58 66 61 58 65 61 58 65 61 58 56 10 74 64 59 55 73 64 59 55 63 58 55 63 58 55 62 58 55 53 Coefficients Of Utilization Zonal Cavity Method Z...

Страница 6: ...5 in 12 7 mm 9 3 in 236 mm 3 5 in 89 mm 8 5 in 217 mm 51 in Ø13 mm 9 3 in 236 mm 24 in 610 mm Item Specification 2 ft 610 mm 6 ft 1 8 m Output Beam Angle 10 native no spread lens LED Channels Red Green Blue Amber White Lumens 7079 2 ft length RGBAW channels full on Lumen Maintenance 50 000 hours L50 25 C 35 000 hours L50 50 C Electrical Input Voltage 100 240 VAC auto switching 50 60 Hz Power Consu...

Страница 7: ...10503701967 Primary lens 2 ft 120 000131 00 910503701968 Primary lens 6 ft 120 000131 01 910503701969 LED board carrier 120 000132 00 910503701970 Secondary lens rail pair 2 ft 120 000133 00 910503701971 Secondary lens rail pair 6 ft 120 000133 01 910503701972 Lens clip assembly pair 120 000134 00 910503701973 Diffuser spacer assembly pair 120 000134 01 910503701974 Top end cap assembly pair 120 0...

Страница 8: ...alled in fixed locations and reconfigured for different purposes and events In such situations you can configure ColorBlaze TRX fixtures in position using the onboard controls or you can perform certain configurations over the lighting network using a personal computer and QuickPlay Pro addressing and configuration software Because it s the most common situation the installation sections that foll...

Страница 9: ...es a Neutrik PowerCon connector to which you can connect a power cable with flying leads appropriate for your geographic location You can connect ColorBlaze TRX data control in series using XLR 5 data cables for DMX or Ethercon or RJ45 for Ethernet ColorBlaze TRX fixtures can work as a single pixel or you can set fixtures to have multiple segments that display different colors simultaneously for d...

Страница 10: ...tents for any damage that may have occurred in transit Because each 6 ft ColorBlaze TRX fixture is bulky and weighs 43 lb 19 5 kg you may need two people to lift the fixture out of the box 2 Each ColorBlaze TRX fixture is assigned a date code and unique serial number We recommend recording the serial numbers and date codes in a layout grid typically a spreadsheet or list to aid in servicing and tr...

Страница 11: ...pack the fixture and place it in a staging area or other location where the power and data ports on the ends of the fixture are readily accessible 2 Connect the appropriate length of 3 wire power cable from line power to the Neutrik PowerCon connector Following the connector manufacturer s instructions assemble the connector connecting ground earth line and neutral 3 Insert the assembled power con...

Страница 12: ...on properly For example a 2 ft fixture with 4 in segments set to RGBAW in out at 8 bit resolution requires 30 DMX addresses 5 addresses per each of six segments Therefore the fixture s DMX starting address should be 483 or lower Addressing in a DMX Lighting Network Since each DMX universe is limited to 512 DMX addresses you must take care to configure and address your fixtures to ensure that enoug...

Страница 13: ...ze TRX fixtures in the same series while maintaining consistent segment lengths of 4 in 8 in 12 in or 24 in If you install fixtures of the same length end to end you can create virtual segments that span multiple fixtures For example you can create virtual 9 ft segments with 6 ft ColorBlaze TRX fixtures by alternating fixtures with 72 in and 36 in segment sizes Addressing and Configuration Methods...

Страница 14: ...tandalone mode a ColorBlaze TRX fixture ignores DMX and Ethernet data input and displays either a pre set show or a ColorPlay 3 show stored on the fixture s SD card ColorBlaze TRX offers three pre set shows Fixed Color Color Wash and Chasing Rainbow which you can configure using the fixture s on board menus You can download light shows and triggers onto a fixture s installed SD card from ColorPlay...

Страница 15: ...es Ethernet input and output ports To listen to the DMX or KiNET output from the master fixture the input source of downstream slave fixtures must be set to DMX Ethernet Downstream fixtures set to Standalone do not respond to the master fixture but instead play their currently configured standalone effect or light show For consistent results make sure that all master and slave fixtures in a run ar...

Страница 16: ...oller Keypad to a Power over Ethernet port on an Ethernet switch then connect the master fixture to another port on the switch As shown below buttons 1 8 on the Ethernet Controller Keypad activate triggers 1 8 stored on a ColorBlaze TRX fixture s SD card If the fixture is currently playing a pre set show pressing buttons 1 8 stops the pre set show and activates the trigger associated with the pres...

Страница 17: ...hat if you trigger the same set of shows from the individual SD cards of multiple ColorBlaze TRX fixtures in a run the fixtures can fall out of synch with each other especially when displaying lengthy shows To ensure consistent results we recommend using a DMX trigger in conjunction with master slave mode 10 9 8 7 6 5 4 3 2 1 0 10 9 8 7 6 5 4 3 2 1 0 10 9 8 7 6 5 4 3 2 1 0 10 9 8 7 6 5 4 3 2 1 0 1...

Страница 18: ...clips integrated into the fixture housing Spread lenses are available in 2 ft sections and can be laid end to end for full coverage in 6 ft fixtures 1 Using fingers or a flathead screwdriver loosen captive screws on lens clips and lift out of the way 2 Rest lens or lenses in lens rail 3 Fold lens clips back into position and secure using fingers or a flathead screwdriver ...

Страница 19: ...ting trunion or mounting feet designed for 1 2 in mounting hardware Fixtures can be mounted to a surface or to a pipe or truss with standard pipe clamps or Cheeseborough clamps Ensure that the installation is suitable and safe and that the hardware is properly rated for the task When mounting ColorBlaze TRX fixtures on the floor or a base also ensure that the fixture sits flush to the surface The ...

Страница 20: ...ng Securely anchor the safety cables using a method that follows code or engineer s requirements Connect Data and Power Make sure the power is OFF before connecting ColorBlaze TRX fixtures 1 Supply power to the first ColorBlaze TRX fixture in a series by plugging a power cable with Neutrik PowerCon connector into the blue Power In port on the input side of the fixture PUSH 1 5 3 2 4 From line powe...

Страница 21: ... RJ45 Ethercon or XLR 5 data cable 4 If connecting in series for power connect the power output port on the first fixture to the power input port on the next fixture using a power cable with a gray Neutrik NAC3FCB Power Connector Type B on one end and a blue Neutrik NAC3FCA Power Connector Type A on the other end PUSH PUSH 1 5 3 2 4 XLR 5 RJ45 PUSH 1 5 3 2 4 XLR 5 RJ45 To next fixture E We recomme...

Страница 22: ...te and Aim Fixtures Make sure the power is ON before rotating and aiming ColorBlaze TRX fixtures Be careful not to look directly into the beam 1 Loosen the locking knobs at each end of a ColorBlaze TRX fixture to allow the fixture to rotate freely through 165 2 Rotate the fixture to the desired position 3 Hand tighten the locking knobs Terminator DMX Data in PUSH 1 5 3 2 4 10º 165º E Do not look d...

Страница 23: ...nd board temperatures and fan speeds Overview of the Onboard Menus The ColorBlaze TRX onboard menus appear in a control panel on the front of the fixture with the fixture s input side to the left and the output side to the right The control panel displays menu option names icons indicating current button behavior and fixture configuration and status information You can navigate the menus and make ...

Страница 24: ...on Direction Cycle Speed Brightness Width 2 170 1 512 0 255 0 255 0 255 0 255 0 255 1 second 2 seconds 3 10 seconds 15 20 25 30 45 1 2 5 10 15 30 45 minutes 1 hour 0 100 0 100 1second 2 seconds 3 10 seconds 15 20 25 30 45 1 2 5 10 15 30 45 minutes 1 hour 0 100 0 100 10 is factory default Initial System Setting RGBAW in out RGB in out RGB RGBAW Thermally Regulated Fast Delay 1 Delay 2 Delay 3 Delay...

Страница 25: ...7B LED Controller 8A LED Controller 8B LED Controller 9A LED Controller 9B LED Controller 4A LED Controller 4B LED Controller 5A LED Controller 5B LED Controller 6A LED Controller 6B LED Controller 7A LED Controller 7B LED Controller 8A LED Controller 8B LED Controller 9A LED Controller 9B Fan 1A Fan 1B Fan 3A Fan 3B Main Controller LED Controller 1A LED Controller 1B LED Controller 2A LED Control...

Страница 26: ...splaying and Setting Fixture Mode ColorBlaze TRX can work in either DMX Ethernet mode or Standalone mode When in DMX Ethernet mode ColorBlaze TRX responds to data input from a DMX or Ethernet controller In Standalone mode ColorBlaze TRX ignores any data input and displays a pre set show such as Fixed Color Color Wash or Chasing Rainbow You can configure various properties of the shows as described...

Страница 27: ...dress To set a fixture s DMX start address 1 Select DMX Start Address from the main menu 2 Select a DMX start address 1 512 3 Press Enter to confirm your selection Configuring Pre Set Show Properties When you put a ColorBlaze TRX fixture in Standalone mode it ignores any data input and displays a selected pre set show You can configure the properties of each pre set show to produce a desired effec...

Страница 28: ...Select Direction then select Forward or Reverse Press Enter to confirm your selection Cycle Speed is how long it takes from 1 second to 1 hour to cycle through the color sequence Select Cycle Speed then a cycle time Press Enter to confirm your selection Saturation is the maximum colorfulness of each color in the sequence Transitions fade colors in from 0 colorfulness to the Saturation setting Sett...

Страница 29: ... three channels of LEDs the amber and white channels are not used RGB RGBAW ColorBlaze TRX accepts three channels of DMX data red green and blue and maps the input to five channels of LEDs red green blue amber and white To set a fixture s color control mode 1 Select Configuration Color Control Mode 2 Select RGBAW in out RGB in out or RGB RGBAW 3 Press Enter to confirm your selection Setting Fixtur...

Страница 30: ...o confirm your selection Setting Fixture Dimming Curve Dimming curves describe how slowly or quickly a fixture dims at different levels of input For finer control ColorBlaze TRX offers three different dimming curves for use in different situations and applications Normal The non linear gamma dimming curve used in most Philips Color Kinetics LED lighting fixtures Use this dimming curve to achieve c...

Страница 31: ...tion Using Master Slave Mode When in master mode a ColorBlaze TRX fixture acts as a master controller for fixtures that follow it in a run When connected together properly downstream slave fixtures can be configured to show the same output as the master fixture You can configure the master fixture to send DMX or Ethernet KiNET data For data integrity reasons do not set the master mode output type ...

Страница 32: ...re thermally regulated that is the fan speed is automatically adjusted based on internal operating temperatures You can also set the fans to a constant speed which can limit the amount of fan noise in hot operating environments where fans need to run continuously To regulate a fixture s fan speed 1 Select Configuration fan Control 2 Select Thermally Regulated or Constant Fan Speed If you select Co...

Страница 33: ...o 1 by default Most Philips Color Kinetics devices including ColorBlaze TRX fixtures accept both KiNET mode 1 and KiNET mode 2 Some accept KiNET mode 1 only or KiNET mode 2 only as shown in the table below When you set KiNET output mode to 2 you can also set the number of ports on power data supplies with multiple ports such as sPDS 480ca To change a fixture s KiNET output mode 1 Select Configurat...

Страница 34: ... the menu display 1 Do one of the following When the menus are locked press the Flip Display button When the menus are unlocked select Configuration User Interface Flip Display 2 Select Yes menu is upside down or No menu is right side up 3 Press Enter to confirm your selection Power Status Data Status Problem Status LED Mode Meaning Power Status Blue Connected to AC power Off Not connected to AC p...

Страница 35: ...s Select Test Fans Auto The test runs then automatically returns to the Test menu To run the automatic LED channel self test Select Test LEDs Auto In sequence the test illuminates the red green blue amber and white LED channels illuminates all channels dim illuminates all channels bright then turns all channels off To run a manual LED channel self test 1 Select Test LEDs Manual 2 Test the proper o...

Страница 36: ...ugh the list Serial Numbers displays the serial numbers assigned to the fixture s main controller board and the LED controller boards three LED boards for each 2 ft fixture nine for each 6 ft fixture 3 Press Return to exit Serial Numbers To display temperatures 1 Select Utilities Information Temperature 2 Using the Up and Down buttons scroll through the list Temperatures displays in degrees C the ...

Страница 37: ...omatically discover all connected fixtures for easy configuration 1 Connect a computer running QuickPlay Pro to an available port on an Ethernet switch or to the data input on the first ColorBlaze TRX fixture in a series using a standard RJ45 patch cable 2 Run QuickPlay Pro and click Fixture Configuration 3 Click the Refresh button to the right of the Controller list QuickPlay Pro automatically di...

Страница 38: ...der select Normal or Reverse from the Segment Order drop down list To set the orientation of the menu display area select Yes or No from the Flip Display drop down list To set the menu display timeout select 15 sec 30 sec 1 min or 2 min from the Display Timeout drop down list To set the fan mode select Thermally Regulated or Constant from the Fan Mode drop down list When Fan Mode is set to Constan...

Страница 39: ...riodically updated to improve system performance and functionality To maximize system performance make sure your ColorBlaze TRX fixtures are running the most recent version of the firmware Download ColorBlaze TRX Firmware If a more recent version of the ColorBlaze TRX firmware is available download the firmware file hex extension 1 Visit the Firmware Updates page at www philipscolorkinetics com su...

Страница 40: ... Ethernet Switch E Your computer must have a static IP address of the form 10 x x x and the subnet mask must be set to 255 0 0 0 Philips Color Kinetics 3 Burlington Woods Drive Burlington Massachusetts 01803 USA Tel 888 385 5742 Tel 617 423 9999 Fax 617 423 9998 www philipscolorkinetics com Copyright 2011 2012 Philips Solid State Lighting Solutions Inc All rights reserved Chromacore Chromasic CK t...

Отзывы: