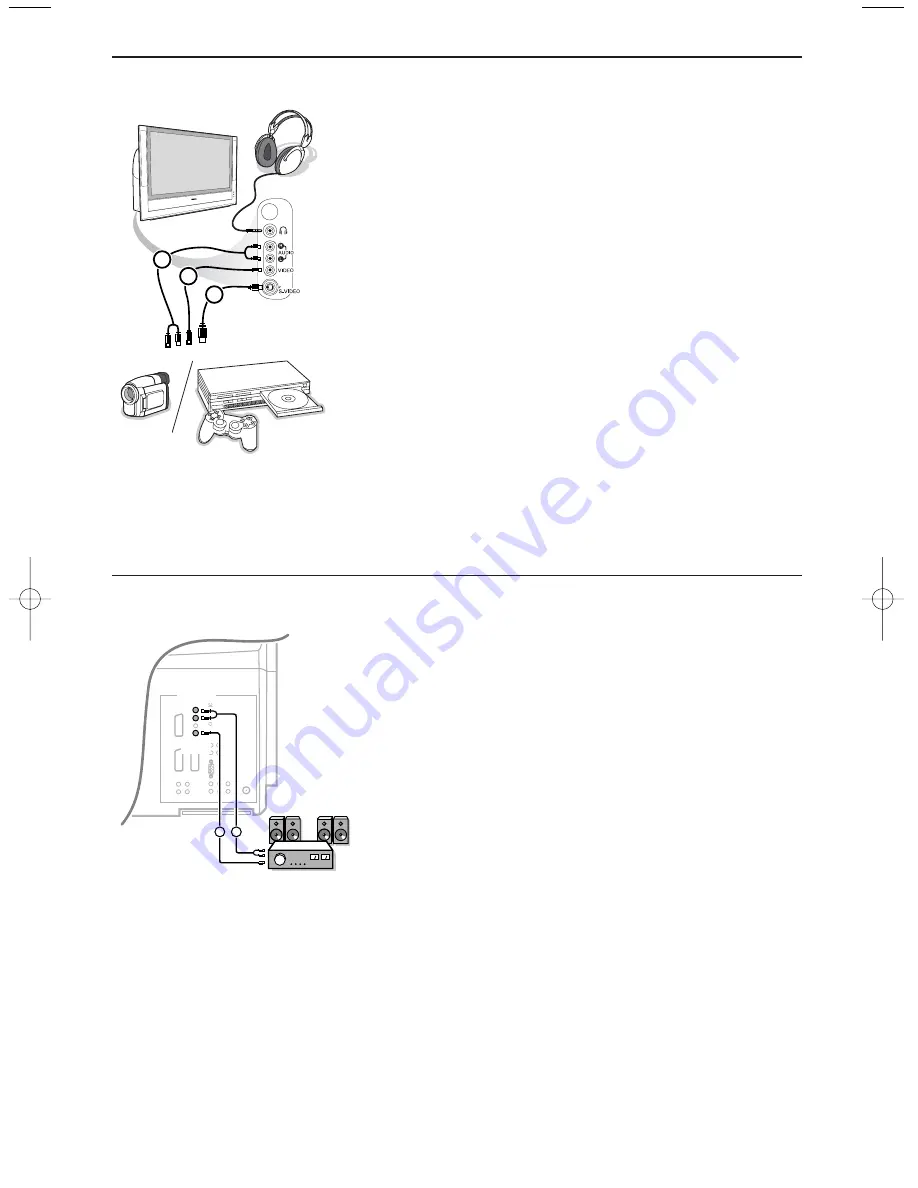
background image

19

Side connections

Camera, Camcorder or Game system

&

Connect your camera, camcorder or game system as shown.

é

Connect to 

VIDEO 

2

and 

AUDIO L

3

for mono equipment.

For stereo equipment also connect 

AUDIO R

3

.

S-VHS quality with an S-VHS camcorder is obtained by connecting
the S-VHS cables with the 

S-VIDEO

input 

1

and 

AUDIO

inputs

3

.

Do not connect cable 

1

and 

2

at the same time. This may cause

picture distortion !
The side connections allow vertical panning with the cursor up/down. Left
and right panning with the cursor left/right is possible when the input has
been labelled 

Game

in the 

Setup, Source

menu.

Headphone

&

Insert the plug into the headphone socket 

L

as shown.

é

Press 

¬

on the remote control to switch off the internal

loudspeakers of the TV.

The headphone impedance must be between 8 and 4000 Ohm. The
headphone socket has a 3.5 mm jack.

In the Sound menu select 

Headphone volume

to adjust the

headphone volume.

1

2

3

Multi channel surround receiver

&

Connect the audio cables to the Multichannel surround receiver
and to 

MONITOR OUT L

and 

R

at the back of your TV 

1

.

é

If you want the loudspeakers of your TV to act as centre
speaker, also connect an audiocable to the multi channel
Surround receiver and to the 

CENTRE IN

at the back of your

TV 

2

.

Select 

Centre Mode On

in the Setup, General menu. See p. 9.

The loudspeakers of the TV will now only produce centre
sound, the loudspeakers connected to the audio receiver will
produce Surround Sound.The volume has to be controlled via
the multi channel Surround receiver.

Note: No sound will be heard when a TV channel or external source is
blocked via the Child lock menu (see p. 13).

DVI

TUNER

SUB
OUT

R

L

STANDARD/

HD INPUTS

STANDARD/

HD INPUTS

RGB+HV

EXT 3

EXT 1

EXT 2

EXT 7

EXT 6

EXT 4

EXT 5

2

1

MONITOR

OUT

CENTER

IN

2275.2 en  05-04-2004  07:59  Pagina 19

Содержание Cineos 55PL9874

Страница 1: ...HDTV Monitor with Pixel Plus HDTV Monitor with Pixel Plus ...

Страница 2: ...ehplatte und oder Untergestell Montare l opzione girevole e o da supporto Montaje del sistema giratorio y o soporte opcionales Montagem de la mesa rotativa e ou do suporte opcional Уcтaнoвкa дoпoлнитeльнoгo пoвopoтнoгo кpeплeния и или пoдcтaвки 1 3 4 2 1 2 4x 2x 2x 2x ...

Страница 3: ...ing environmentally friendly in green focal areas Your new TV contains materials which can be recycled and reused At the end of its life specialised companies can dismantle the discarded TV to concentrate the reusable materials and to minimise the amount of materials to be disposed of Please ensure you dispose of your old TV according to local regulations Help If this instruction manual does not g...

Страница 4: ...witch B on the left side of your TV An indicator on the front of the TV lights up and the screen comes on If the TV is in standby mode red indicator press the P keys on the remote control Note Due to the complexity and advanced design of your TV a switch on time of 16 seconds should be expected When you switch the TV off it remains in Active Standby mode orange indicator for 30 seconds and will no...

Страница 5: ... freeze the picture VCR DVD SAT AMP CD Audio and Video equipment keys p 23 v Select your computer or other peripherals p 22 x Pixel Plus demo on off In the right part Pixel Plus and Digital Natural Motion are switched on bTeletext on off see p 16 Press this key to activate Teletext OK Press this key to activate your choice when in the menus MENU Main menu on off see p 5 V To adjust the volume Inte...

Страница 6: ... or a non vertical squeezed picture size Move the puck to the blue ball in the left screen Press P to select another TV channel Press the b key to switch off dual screen h Active control see p 11 q Picture format Press this key repeatedly or press the cursor up down to select another picture format Auto format Super zoom 4 3 Movie Expand 14 9 Movie Expand 16 9 Subtitle zoom or Wide screen Auto for...

Страница 7: ...ey to activate return or switch main menu on off Installation Press the MENU key on the remote control é Use the cursor down to select Install Use the cursor right to select Language Follow the instructions on screen Use the cursor up down to select your preferred language and press the OK key to confirm your selection Use the cursor right to select Country Select the country where you are now loc...

Страница 8: ...hannel Make your choice with the cursor and press the OK key After language and country are set correctly you can now search for and store the TV channels in two different ways using Automatic Installation or Manual Installation tuning in channel by channel Select your choice with the cursor right Automatic install Install Start Install Manual installation Automatic installation Searching for and ...

Страница 9: ...hlighted character in the name entered Shift to display upper or lowercase characters on the keyboard Special to display special characters on the keyboard Press OK to confirm Press the cursor left repeatedly when you have finished the name giving Select another programme number and repeat steps to 7 Give name Reshuffle the programme list p π Space Delete ABCDEFG 123 HIJKLMN 456 OPQRSTU 789 VWXYZ ...

Страница 10: ...EXTVIEW provider Select a TV broadcaster that provides NEXTVIEW data How to make use of NEXTVIEW see p 14 OSD On Screen Display See Use of the remote control p 4 i On screen information Select OSD é Select Normal to activate the continuous display of the programme number Also TV channel and programme information are extended Minimum will display reduced channel information Note When subtitles is s...

Страница 11: ...ned factory settings which is Centre mode Off Only if a Multichannel surround receiver with Front Speakers is connected select Centre mode On In this setting the centre channel in surround mode is directed to all three internal TV speakers left centre and right Subwoofer To enhance the sound reproduction of your TV you can connect an externally powered subwoofer See Subwoofer p 20 The volume of th...

Страница 12: ...tached to the selected input é Select the peripheral device with the cursor up down Once you have selected the source type e g DVD this source will automatically be selected when your remote control is in DVD mode see p 3 and when you press the v key on the remote control Source EXT1 EXT2 EXT3 EXT4 EXT5 EXT6 EXT7 Side Setup If a decoder or a descrambler is connected see p 18 you can define one or ...

Страница 13: ...o that especially text can be displayed with an optimal sharpness Use the cursor left right to adjust Phase only available when a VGA source has been connected This control allows you when necessary to adjust the pixel phase of the picture to avoid picture interference Use the cursor left right to adjust Auro adjust only available when a VGA source has been connected This makes the picture fill th...

Страница 14: ...ge levels when the bar scale is centred Smart sound Select Smart sound to display a list of predefined sound settings each corresponding with specific factory settings of Treble and Bass Personal refers to the personal preference settings of sound in the sound menu Notes Some menu items are only available in case of a Cinema Link configuration and when the Cinema Link is activated Others are steer...

Страница 15: ...u Important You have forgotten your code See p 9 Select one of the menu items of the child lock menu Lock if you want to lock all channels and externals Custom lock and press the cursor right The items Age lock and Category lock are only available when NEXTVIEW broadcast is available Select Age lock if you want to lock programmes related to a certain age off 2 4 16 Lock after if you want to lock a...

Страница 16: ...he 0 key See Setup General menu Smart surf p 8 Display of a NEXTVIEW page The information is set by the channel that transmits the NEXTVIEW service See also Setup menu General NEXTVIEW provider p 8 NEXTVIEW guides Use the cursor key left right to select Time Channel Theme the Date guide The Time guide provides an overview of all programme titles active in the selected time block The Channel guide ...

Страница 17: ...e function is not available Review this menu provides a list of programmes that are marked as reminders those that have to be recorded and those that are locked This menu can be used to change or remove marked programmes Record to programme the recording of the video recorder if it has a NEXTVIEWLink function and is connected to EXT 2 Remind automatically switch on the TV if it is in standby or by...

Страница 18: ...genumber Press the cursor up down to select the next or previous subpage or enter the subpagenumber with the digit keys Special teletext functions Hold Press S to stop the automatically rotating of the subpages or to stop the page counter from seeking when you have entered a wrong page number or when the page is not available Enter another page number Hypertext With hypertext you can select and se...

Страница 19: ...letext page To continue the search press the OK key twice When a word is not found a message appears To search for a new word select Keyboard and press OK Select the new word Reveal Reveals conceals hidden information on a page such as solutions to riddles and puzzles Press the OK key to activate Press OK again to return to the Teletext menu Cycle subpages Makes the subpages cycle automatically Pr...

Страница 20: ...between 90 and 99 see Manual installation p 6 See the handbook of your recorder Decoder and Recorder Connect a eurocable 4 to your decoder and to the special euroconnector of your recorder See also the recorder handbook See Decoder p 10 You can also connect your decoder directly to EXT 1 or 2 with a eurocable Other equipment satellite receiver decoder DVD games etc Connect the aerial cables 1 2 an...

Страница 21: ... between 8 and 4000 Ohm The headphone socket has a 3 5 mm jack In the Sound menu select Headphone volume to adjust the headphone volume 1 2 3 Multi channel surround receiver Connect the audio cables to the Multichannel surround receiver and to MONITOR OUT L and R at the back of your TV 1 é If you want the loudspeakers of your TV to act as centre speaker also connect an audiocable to the multi chan...

Страница 22: ...ENTER IN TV IN VCR IN CINEMA LINK Extra subwoofer To enhance the sound reproduction of your TV you can connect an externally powered subwoofer Connect the audio cable to the SUB OUT connector of your TV and to the SUBWOOFER IN connector of the subwoofer The volume of the subwoofer is controlled by the TV Select SubwooferYes in the Setup General menu p 9 For details please refer to the subwoofer s ...

Страница 23: ... scrolling images wrong colours or no colour no picture or even combinations of these on your screen check if the connections are done in the correct way or move your digital device further away from your TV Note EXT 4 and EXT 5 allow horizontal and vertical picture panning using the cursor left right up down R L STANDARD H D INPUTS STANDARD H D INPUTS Pr Pb Y EXT5 EXT4 R L Pr Pb Y OUT Connecting ...

Страница 24: ...VI EXT7 1 2 Press the v key on the remote control repeatedly to select EXT1 EXT2 EXT3 EXT4 EXT5 EXT6 EXT7 or SIDE according to where you connected your equipment at the back or the left side of your TV Remark Most equipment decoder recorder carries out the switching itself when it is switched on To select connected equipment Recorder or DVD with EasyLink The recorder VCR or DVD RW or DVD can be op...

Страница 25: ...nformation MENU to switch the menu on or off P for chapter channel track selection 0 to 9 digit entry 0 tape index VCR select a DVD chapter select a frequency AMP U VCR timer Q surround on off AMP CD cursor up down to select the next or the previous disc CD cursor left right to select the previous or following track CD search up down AMP In TV mode it is possible to start a direct recording of the...

Страница 26: ...age The message will reappear every 15 minutes as long as the temperature remains too high If the temperature remains too high for 1 minute a warning message alerting you that the TV is shutting down will appear The TV will enter Standby mode The TV is off Place your fingers under one of the filter slots located at either bottom left or right in the back of the TV cabinet é Grasp the filter and ge...

Страница 27: ...ains plug é Gently slide the lamp door at the back of the TV next to the power cable completely to the right to open Caution the lamp gets extremely hot Allow a cool down time before removing the lamp Unscrew the thumbscrews Lift the handle out Grasp the handle then pull out and slightly down to remove Warning Dispose of the lamp according to local regulations Caution When installing the new lamp ...

Страница 28: ...sionally vacuum the ventilation slots on the back cover of the set Never use thinners insecticide sprays or other chemicals on or near the cabinet as they might cause permanent marring of the cabinet finish The television contains plastic parts DO NOT use benzine thinners or other chemicals to clean DO NOT use insecticide or other volatile substances nearby DO NOT allow the TV to come into contact...

Страница 29: ... plugs tightly connected in the aerial socket Is the aerial cable in good condition and does it have suitable plugs No sound No sound on any channel Check the volume isn t at minimum Is the sound interrupted with the mute key No Surround Perhaps the channel is not broadcasting good quality surround sound sound No sound from the rear speakers or the centre speakers Select an appropriate surround mo...

Страница 30: ...28 ...

Страница 31: ......

Страница 32: ...Printed in Belgium 3104 315 2275 2 ...

Отзывы: