background image

4

2. Setting up the monitor

2.  Setting up the monitor

2.1  Installation

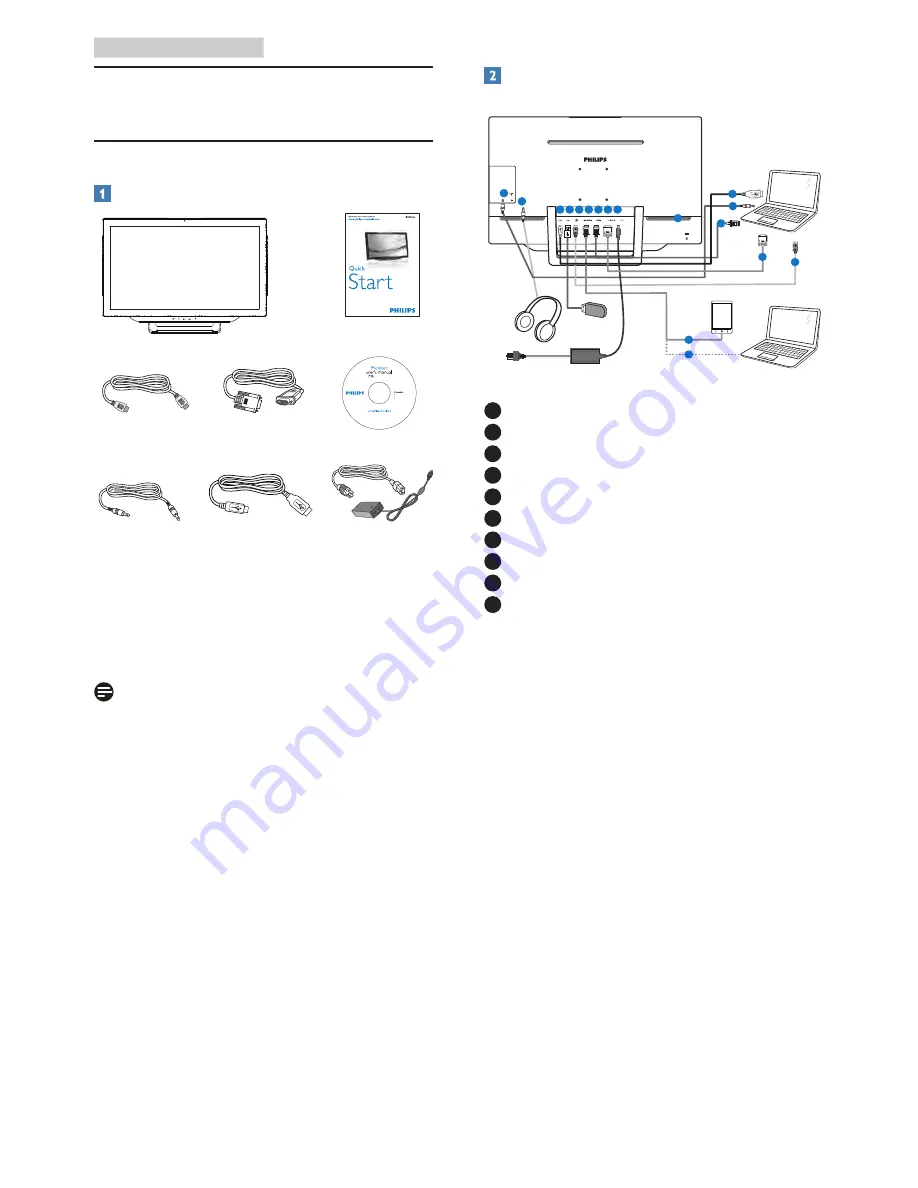
   Package contents

VGA Cable

Power Cable

Audio Cable

USB Cable

* HDMI  Cable

©

 20

14

 K

on

ink

lijk

e P

hilip

s N

.V. A

ll rig

hts 

rese

rved

. Un

autho

rized d

uplicatio

n is a violation of applicable laws. Mad

e and

 prin

ted

 in 

Ch

ina

. Ve

rsi

on

Philips and the Philips’ Shield Emblem are registered trademarks of 
Koninklijke Philips N.V. and are used under license from Koninklijke 
Philips N.V.

Monitor drivers
SmartControl software

User’s Manual


使用

前请阅读使用说明

保留备用

Display design may differ from that illustrated

*Depends on country. 

221C5


Note

Use only the AC/DC adapter model: Philips 

ADPC1965

   Connecting to your computer or 

SmartPhone

1

2

3

4

5

6

7

8

5

3

2

9

10

9

7

4

4

1

   DC power input

2

   VGA input

3

   HDMI input

4

   MHL-HDMI  input

5

   DisplayPort input

6

   USB  downstream

7

   USB  uptream

8

   Earphone  jack

9

   Audio  input

10

  Kensington anti-theft lock

Connect to PC

1.  Connect the power cord to the back of 

the monitor firmly.

2.  Turn off your computer and unplug its 

power cable.

3.  Connect the monitor signal cable to the 

video connector on the back of your 

computer.

4.  Connect the PC audio cable to the audio 

connector on the back of your computer.

5.  Plug the power cord of your computer and 

your monitor into a nearby outlet. 

6.  Connect the USB upstream port on 

the monitor and the USB port on your 

computer with a USB cable.  

The USB downstream port is now ready 

for any USB device to plug in.

7.  Turn on your computer and monitor. If the 

monitor displays an image, installation is 

complete.

Содержание BRILLIANCE 221C5

Страница 1: ...www philips com welcome 221C5 EN User manual 1 Customer care and warranty 29 Troubleshooting FAQs 34 ...

Страница 2: ...tContrast 9 3 3 Philips SmartControl Premium 9 4 Built in Webcam with Microphone 17 4 1 PC system requirements 17 4 2 Using the device 17 5 MHL Mobile High Definition Link 18 6 SmoothTouch 19 7 Technical Specifications 20 7 1 Resolution Preset Modes 22 8 Power Management 23 9 Regulatory Information 24 10 Customer care and warranty 29 10 1 Philips Flat Panel Monitors Pixel Defect Policy 29 10 2 Cus...

Страница 3: ...cord wait for 6 seconds before attaching the power cable or DC power cord for normal operation Please use approved power cord provided by Philips all the time If your power cord is missing please contact with your local service center Please refer to Customer Care Consumer Information Center Do not subject the monitor to severe vibration or high impact conditions during operation Do not knock or d...

Страница 4: ...ersonnel If there is any need for any document for repair or integration please contact with your local service center please refer to the chapter of Consumer Information Center For transportation information please refer to Technical Specifications Do not leave your monitor in a car trunk under direct sun light Note Consult a service technician if the monitor does not operate normally or you are ...

Страница 5: ...r utmost to make the packaging easily separable into mono materials Please find out about the local regulations on how to dispose of your old monitor and packing from your sales representative Taking back Recycling Information for Customers Philips establishes technically and economically viable objectives to optimize the environmental performance of the organization s product service and activiti...

Страница 6: ...ting to your computer or SmartPhone 1 2 3 4 5 6 7 8 5 3 2 9 10 9 7 4 4 1 DC power input 2 VGA input 3 HDMI input 4 MHL HDMI input 5 DisplayPort input 6 USB downstream 7 USB uptream 8 Earphone jack 9 Audio input 10 Kensington anti theft lock Connect to PC 1 Connect the power cord to the back of the monitor firmly 2 Turn off your computer and unplug its power cable 3 Connect the monitor signal cable...

Страница 7: ...on 9 2 0 Megapixel Webcam 10 Webcam activity light 11 Microphone Description of the On Screen Display What is On Screen Display OSD On Screen Display OSD is a feature in all Philips monitors It allows an end user to adjust screen performance or select functions of the monitors directly through an on screen instruction window A user friendly on screen display interface is shown as below Basic and s...

Страница 8: ...日本語 한국어 Horizontal Vertical Transparency OSD Time Out Auto H Position V Position Phase Clock Resolution Notification Reset Information Wide Screen 4 3 0 100 0 100 On Off On Off Off Fast Faster Fastest On Off 1 8 2 0 2 2 2 4 2 6 On Off On Off On Off 0 100 On Off Audio In HDMI MHL HDMI DisplayPort 5000K 6500K 7500K 8200K 9300K 11500K Red 0 100 Green 0 100 Blue 0 100 0 100 0 100 Off 1 2 3 4 5s 10s 20...

Страница 9: ...mage or injury 1 Place the monitor face down on a smooth surface Pay attention not to scratch or damage the screen 2 Use your fingers to squeeze the hinge cover gently till the hook slip out of the slot 3 Use a screwdriver to loosen 4 screws 4 Remove the stand from the monitor body Note This monitor accepts a 75mm x 75mmVESA Compliant mounting interface 75mm 75mm ...

Страница 10: ... Economy and Off 3 The SmartImage on screen display will remain on screen for 5 seconds or you can also press OK to make confirmation There are seven modes to select Text Office Photo Movie Game Economy and Off Text Helps improve reading of text based application like PDF ebooks By using a special algorithm which increases the contrast and boundary sharpness of text content the display is optimize...

Страница 11: ... activate SmartContrast it will analyse the content you are displaying in real time to adjust colors and control backlight intensity This function will dynamically enhance contrast for a great entertainment experience when viewing videos or playing games 3 3 Philips SmartControl Premium The new SmartControl Premium software by Phillips allows you to control your monitor via an easy to use on scree...

Страница 12: ...hout wizard by Standard pane Start with Standard pane Adjust menu Adjust Menu allows you to adjust Brightness Contrast Focus Position and Resolution You can follow the instruction and do the adjustment Cancel prompts user if you want to cancel installation ...

Страница 13: ...o adjust RGB Black Level White Point Display Gamma Color Calibration and SmartImage Please refer to SmartImage section You can follow the instruction and do the adjustment Refer to below table for sub menu item base on your input Example for Color Calibration ...

Страница 14: ...or calibration to happen dimes out start and quick view buttons 6 Must have patent info in calibration screen First Color Calibration Screen Previous button is disabled until the second color screen Next goes to the succeeding target 6 targets Final next goes File Presets pane Cancel closes the UI and returns to the plug in page SmartImage Allow users to change setting for better display setting b...

Страница 15: ...le context menu shows the task tray menu for SmartControl Premium A right click on the task tray icon displays the menu options for Help Technical Support Check for Upgrade About and Exit When Enable task tray menu is disabled the task tray icon will only display EXIT Run at Startup is checked On by default When disabled SmartControl Premium will not launch at start or be in the task tray The only...

Страница 16: ...ollowing screen User can enter PIN between 4 and 9 digits numbers only After entering PIN Accept button takes user to the pop up dialog box on the following page Minimum minutes set to 5 Slider set to 5 by default Does not require the display be attached to a different host to go into Theft Deterrence mode After creating PIN theTheft Deterrence pane will indicateTheft Deterrence Enabled and provid...

Страница 17: ... menu Tune Display Opens the SmartControl Premium control panel SmartImage Check current settings Office Photo Movie Game Economy Off Task Tray Menu Enabled The task tray menu can be displayed by rightclicking on the SmartControl Premium icon from the task tray Left Click will launch the application The task tray has five entries Help Access to User Manual file Open User Manual file using the defa...

Страница 18: ...e SmartControl Premium from the task tray disable Run at Startup in Options Preferences Note All the illustrations in this section are for reference only SmartControl software version might be changed without notification Please always check official Portrait website www portrait com dtune phl enu index to download the latest version of SmartControl software ...

Страница 19: ... UAC support 4 2 Using the device Philips monitor with webcam device transmits video and sound data through USB port It can be enabled by simply connecting your USB cable from your PC to the USB upstream of USB hub on the bottom IO of monitor 1 Connect your USB cable to upstream of USB hub on the bottom IO of monitor from PC side 2 Turn on your PC and make sure your internet connection is working ...

Страница 20: ...he monitor side You are now ready to view the images on your big screen display and operate all function on you the mobile device such as internet surfing game playing photo browsing etc if your monitor has speaker function then you will be able to hear accompanying sound too When the MHL cable is disconnected or the mobile device is turned off the MHL function will be automatically disabled MHL M...

Страница 21: ...ity you need to connect the display with the provided USB cable to your computer You do not need to install any other software You can softly touch the screen surface to interact with the applications with different gestures like swipe tap pinch etc You can use either single finger touch or multi finger touch upto maximum simultaneous 10 touch points Note Do not touch the screen with sharp objects...

Страница 22: ...pacitive Touch Screen Input method Finger or capacitive stylus Transmission rate 86 Glass screen Tempered Surface hardness 7H Touch Capabilities Multi touch Grab Rotate Double tap Zoom in out Single touch Flick Scroll Tap Drag Touch activation force No pressure required Connectivity Signal Input Output VGA DisplayPort In HDMI MHL HDMI USB USB 3 0 x2 Input Signal Separate Sync Sync on Green Audio I...

Страница 23: ...7 H x 4 6 D cm Weight Product with stand 4 37 kg Product without stand 4 00 kg Operating Condition Temperature Range Operation 0 C to 40 C Non operation 20 C to 60 C Relative Humidity 20 to 80 MTBF 30 000 hrs Environmental ROHS YES Packaging 100 recyclable Specific Substances 100 PVC BFR free housing Compliance and Standards Regulatory Approvals BSMI CE FCC Class B CU EAC SEMKO ETL ISO9241 307 CCC...

Страница 24: ...2 x 864 60 00 44 77 1280 x 720 59 86 47 78 1280 x 768 59 87 49 70 1280 x 800 59 81 60 00 1280 x 960 60 00 63 89 1280 x 1024 60 02 47 71 1360 x 768 60 02 55 47 1440 x 900 59 90 55 94 1440 x 900 59 89 75 00 1600 x 1200 60 00 64 67 1680 x 1050 59 88 65 29 1680 x 1050 59 95 66 59 1920 x 1080 59 93 74 04 1920 x 1200 59 95 67 50 1920 x 1080 60 00 Note Please notice that your display works best at native...

Страница 25: ...nsumption and signaling of this automatic power saving feature Power Management Definition VESA Mode Video H sync V sync Power Used LED Color Active ON Yes Yes 21 96 W typ 50 06 W max with audio and USB x2 White Sleep Standby OFF No No 0 5 W typ White blink Off OFF 0 3 W typ OFF The following setup is used to measure power consumption on this monitor Native resolution 1920 x 1080 Contrast 50 Brigh...

Страница 26: ...Equipment EN55022 2010 Radio Disturbance requirement of Information Technology Equipment EN55024 2010 Immunity requirement of Information Technology Equipment EN61000 3 2 2006 A1 2009 A2 2009 Limits for Harmonic Current Emission EN61000 3 3 2008 Limitation of Voltage Fluctuation and Flicker following provisions of directives applicable EN 50581 2012 Technical documentation for the assessment of el...

Страница 27: ...ed by the party responsible for compliance could void the user s authority to operate the equipment Use only RF shielded cable that was supplied with the monitor when connecting this monitor to a computer device To prevent damage which may result in fire or shock hazard do not expose this appliance to rain or excessive moisture THIS CLASS B DIGITAL APPARATUS MEETS ALL REQUIREMENTS OFTHE CANADIAN I...

Страница 28: ...t équipement N utiliser que des câbles RF armés pour les connections avec des ordinateurs ou périphériques CET APPAREIL NUMERIQUE DE LA CLASSE B RESPECTETOUTES LES EXIGENCES DU REGLEMENT SUR LE MATERIEL BROUILLEUR DU CANADA EN 55022 Compliance Czech Republic Only Polish Center for Testing and Certification Notice The equipment should draw power from a socket with an attached protection circuit a t...

Страница 29: ... festgelegten Vorschriften Auf der Rückwand des Gerätes befindet sich ein Aufkleber der auf die Unbedenklichkeit der Inbetriebnahme hinweist da dieVorschriften über die Bauart von Störstrahlern nach Anlage III 5 Abs 4 der Röntgenverordnung erfüllt sind Damit Ihr Monitor immer den in der Zulassung geforderten Werten entspricht ist darauf zu achten daß 1 Reparaturen nur durch Fachpersonal durchgefüh...

Страница 30: ...lution by Electronic Information Products or commonly referred to as China RoHS All products produced and sold for China market have to meet China RoHS request 中国电子信息产品污染控制标识要求 中 国 RoHS 法规标示要求 产品中有毒有害物 质或元素的名称及含量 部件名称 有毒有害物质或元素 铅 Pb 汞 Hg 镉 Cd 六价铬 Cr6 多溴联苯 PBB 多溴二苯醚 PBDE 外壳 O O O O O O 液晶显示屏 灯管 X O O O O O 电路板组件 X O O O O O 电源适配线 X O O O O O 电源线 连接线 X O O O O O 电路板组件包括印刷电路板及其构成的零部件 如电阻 电容 集成电路 连接器等...

Страница 31: ...ds for certain types or combinations of pixel defects that are more noticeable than others This policy is valid worldwide subpixel pixel Pixels and Sub pixels A pixel or picture element is composed of three sub pixels in the primary colors of red green and blue Many pixels together form an image When all sub pixels of a pixel are lit the three colored sub pixels together appear as a single white p...

Страница 32: ... pattern These are the types of black dot defects BRIGHT DOT DEFECTS ACCEPTABLE LEVEL 1 lit subpixel 3 2 adjacent lit subpixels 1 3 adjacent lit subpixels one white pixel 0 Distance between two bright dot defects 15mm Total bright dot defects of all types 3 BLACK DOT DEFECTS ACCEPTABLE LEVEL 1 dark subpixel 5 or fewer 2 adjacent dark subpixels 2 or fewer 3 adjacent dark subpixels 0 Distance betwee...

Страница 33: ...e Mainteq 33 082161 1658 0 09 Mon to Fri 9am 6pm Germany RTS 49 01803 386 853 0 09 Mon to Fri 9am 6pm Greece Alman 30 00800 3122 1223 Free of charge Mon to Fri 9am 6pm Ireland Celestica 353 01 601 1161 Local call tariff Mon to Fri 8am 5pm Italy Anovo Italy 39 840 320 041 0 08 Mon to Fri 9am 6pm Luxembourg Ecare 352 26 84 30 00 Local call tariff Mon to Fri 9am 6pm Netherlands Ecare 31 0900 0400 063...

Страница 34: ... 371 67460399 371 27260399 Lithuania N A UAB Servicenet 370 37 400160 general 370 7400088 for Philips Macedonia N A AMC 389 2 3125097 Moldova N A Comel 37322224035 Romania N A Skin 40 21 2101969 Russia N A CPS 7 495 645 6746 Serbia Montenegro N A KimTec d o o 381 11 20 70 684 Slovakia N A Datalan Service 421 2 49207155 Slovenia N A PC H and 386 1 530 08 24 The Republic of Belarus N A ServiceBy 375...

Страница 35: ...2 213 6030100 Sun Thu 10 00am 6 00pm Singapore Philips Singapore Pte Ltd Philips Consumer Care Center 65 6882 3966 Mon Fri 9 00am 6 00pm Sat 9 00am 1 00pm Taiwan FETEC CO 0800 231 099 Mon Fri 09 00 18 00 Thailand Axis Computer System Co Ltd 662 934 5498 Mon Fri 08 30am 05 30pm South Africa Computer RepairTechnologies 011 262 3586 Mon Fri 08 00am 05 00pm Israel Eastronics LTD 1 800 567000 Sun Thu 0...

Страница 36: ... is turned on AUTO button doesn t function The auto function is applicable only in VGA Analog mode If the result is not satisfactory you can do manual adjustments via the OSD menu Note The Auto Function is not applicable in DVI Digital mode as it is not necessary Visible signs of smoke or sparks Do not perform any troubleshooting steps Disconnect the monitor from mains power source immediately for...

Страница 37: ... technology Please refer the pixel policy for more detail The power on light is too strong and is disturbing You can adjust power on light using the power LED Setup in OSD main Controls For further assistance refer to the Consumer Information Centers list and contact Philips customer service representative 11 2 General FAQs Q1 When I install my monitor what should I do if the screen shows Cannot d...

Страница 38: ...es you can change your color setting through OSD control as the following procedures Press OK to show the OSD On Screen Display menu Press Down Arrow to select the option Color then press OK to enter color setting there are three settings as below 1 ColorTemperature With settings in the 6500K range the panel appears warm with a red white color tone while a 9300K temperature yields cool blue white ...

Страница 39: ...ecommended refresh rate in LCD monitors is 60 Hz In case of any disturbance on screen you can set it up to 75 Hz to see if that removes the disturbance 11 3 SmoothTouch Q1 Why is the touch function not available when I touch the display Ans Please ensure the supplied USB cable is connected between your computer and the display properly Q2 Does the touch function only exist on the Windows 8 OS Ans ...

Страница 40: ...l rights reserved Philips and the Philips Shield Emblem are registered trademarks of Koninklijke Philips N V and are used under license from Koninklijke Philips N V Specifications are subject to change without notice Version M5221C1T ...

Отзывы: