background image

5

2. Setting up the Display


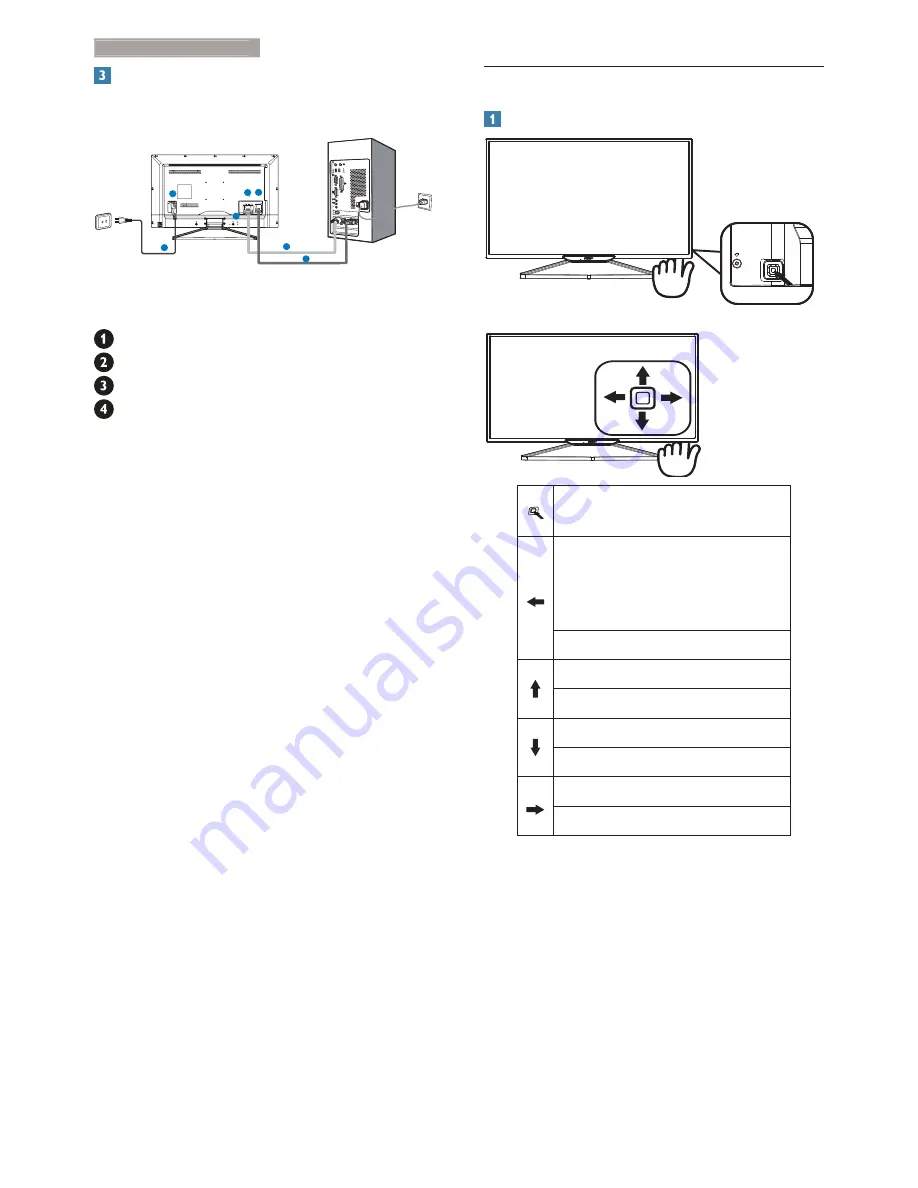
Connecting to your PC

1

1

2

2

4

3

3

   AC/DC power input
   DVI input
   VGA input 
    Kensington anti-theft lock

Connect to PC

1.  Connect the power cord to the back of 

the Display firmly.

2.  Turn off your computer and unplug its 

power cable.

3.  Connect the Display signal cable to the  

video connector on the back of your 
computer.

4.  Plug the power cord of your computer and 

your Display into a nearby outlet.

5.  Turn on your computer and Display. If the 

Display displays an image,  installation is 
complete.

2.2  Operating the Display

  Front view product description

Switch Display’s power ON and 
OFF

SmartImage. There  are 
six modes to be selected: 
Office, Photo,Movie, 
Game,Economy,Off.

Return to previous OSD level. 

Change the signal input source. 

Adjust the OSD menu. 

Change display format

Adjust the OSD menu. 

Access the OSD menu.

Confirm the OSD adjustment. 

Содержание BDM3201F

Страница 1: ...www philips com welcome BDM3201F EN User manual 1 Customer care and warranty 26 Troubleshooting FAQs 32 ...

Страница 2: ...mization 8 3 1 SmartImage 8 3 2 SmartContrast 9 3 3 Philips SmartControl Premium 9 3 4 SmartDesktop Guide 16 4 Technical Specifications 21 4 1 Resolution Preset Modes 23 5 Power Management 24 6 Regulatory Information 25 7 Customer care and warranty 26 7 1 Philips Flat Panel Displays Pixel Defect Policy 26 7 2 Customer Care Warranty 28 8 Troubleshooting FAQs 32 8 1 Troubleshooting 32 8 2 SmartContr...

Страница 3: ...cable or DC power cord for normal operation Please use approved power cord provided by Philips all the time If your power cord is missing please contact with your local service center Please refer to Customer Care Consumer Information Center Do not subject the Display to severe vibration or high impact conditions during operation Do not knock or drop the Display during operation or transportation ...

Страница 4: ...please contact with your local service center please refer to the chapter of Consumer Information Center For transportation information please refer to Technical Specifications Do not leave your Display in a car trunk under direct sun light Note Consult a service technician if the Display does not operate normally or you are not sure what procedure to take when the operating instructions given in ...

Страница 5: ...r utmost to make the packaging easily separable into mono materials Please find out about the local regulations on how to dispose of your old Display and packing from your sales representative Taking back Recycling Information for Customers Philips establishes technically and economically viable objectives to optimize the environmental performance of the organization s product service and activiti...

Страница 6: ...mblem are registered trademarks of Koninklijke Philips N V and are used under license from Koninklijke Philips N V Display drivers SmartControl software User s Manual 使用 前请阅读使用说明 保留备用 DVI Display x 4 x 4 BDM3201F Install base stand 1 Place the Display face down on soft and smooth surface taking care to avoid scratching or damaging the screen 2 After inserting the base column in the guide block tig...

Страница 7: ... your computer 4 Plug the power cord of your computer and your Display into a nearby outlet 5 Turn on your computer and Display If the Display displays an image installation is complete 2 2 Operating the Display Front view product description Switch Display s power ON and OFF SmartImage There are six modes to be selected Office Photo Movie Game Economy Off Return to previous OSD level Change the s...

Страница 8: ...option The OSD Menu Below is an overall view of the structure of the On Screen Display You can use this as a reference when you want to work your way around the different adjustments later on Main menu Sub menu Picture OSD Settings Setup Language Color Input Picture Format Brightness Contrast Horizontal Vertical Transparency OSD Time Out H Position Auto V Position Phase Clock Resolution Notificati...

Страница 9: ...imal performance at its native resolution 1920 1080 60Hz When the Display is powered on at a different resolution an alert is displayed on screen Use 1920 1080 60Hz for best results Display of the native resolution alert can be switched off from Setup in the OSD On Screen Display menu ...

Страница 10: ... time with the press of a single button How to enable SmartImage 1 Toggle to the left to launch the SmartImage on screen display 2 Toggle to the rear or front to select between Office Photo Movie Game Economy mode and Off 3 The SmartImage on screen display will remain on screen for 5 seconds or you can also press button to the left to make confirmation 3KRWR 0RYLH DPH FRQRP 2II 2IILFH 6PDUW PDJH O...

Страница 11: ...amically controls contrast and adjusts backlighting for clear crisp bright gaming and video images or displays clear readable text for office work By reducing your Display s power consumption you save on energy costs and extend the lifetime of your Display How does it work When you activate SmartContrast it will analyse the content you are displaying in real time to adjust colors and control backl...

Страница 12: ... the installation You can launch after installation is completed If you want to launch later you can either click the shortcut on desktop or toolbar First launch Wizard The first time after installation of SmartControl Premium it will automatically go to Wizard for first time launch The wizard will guide you through adjustment your monitor performance step by step You can go to Plug in menu to lau...

Страница 13: ...nu allows you to adjust RGB Black Level White Point Display Gamma Calibration SmartImage and SmartKolor You can follow the instruction and do the adjustment Refer to below table for sub menu item base on your input Example for Color Calibration ...

Страница 14: ...or calibration to happen dimes out start and quick view buttons 6 Must have patent info in calibration screen First Color Calibration Screen Previous button is disabled until the second color screen Next goes to the succeeding target 6 targets Final next goes File Presets pane Cancel closes the UI and returns to the plug in page SmartImage Allow users to change setting for better display setting b...

Страница 15: ... Enable context menu shows the task tray menu for SmartControl Premium A right click on the task tray icon displays the menu options for Help Technical Support Check for Update About and Exit When Enable task tray menu is disabled the task tray icon will only display Exit Run at Startup is checked On by default When disabled SmartControl Premium will not launch at start or be in the task tray The ...

Страница 16: ...owing screen User can enter PIN between 4 and 9 digits numbers only After entering PIN Accept button takes user to the pop up dialog box on the following page Minimum minutes set to 5 Slider set to 5 by default Does not require the display be attached to a different host to go into Theft Deterrence mode After creating PIN theTheft Deterrence pane will indicateTheft Deterrence Enabled and provide P...

Страница 17: ...lected the About screen is displayed Select Preset Provides a hierarchical menu of saved presets for immediate use A check mark shows the currently selected preset Factory Preset can also be called from the drop down menu Tune Display Opens the SmartControl Premium control panel SmartImage Check current settings Off Office Photo Movie Game Economy Task Tray Menu Enabled The task tray menu can be d...

Страница 18: ...are for reference only SmartControl software version might be changed without notification Please always check official Portrait website www portrait com dtune phl enu index to download the latest version of SmartControl software 3 4 SmartDesktop Guide SmartDesktop SmartDesktop is in SmartControl Premium Install SmartControl Premium and select SmartDesktop from Options Align to partition check box...

Страница 19: ... contents while dragging Title Bar Options Desktop Partition can be accessed from the title bar of the active window This provides a quick and easy way to manage the desktop as well as sending any window to any partition without having to drag and drop Move the cursor into the active window s title bar to access the drop down menu Right Click Menu Right click on the Desktop Partition icon to view ...

Страница 20: ...ains most of the features supported in the title bar with the exception of automatically sending a window to any partition Find Windows In some cases the user may have sent multiple windows to the same partition Find Window will show all open windows and move the selected window to the forefront Desktop Partition Desktop Partition shows the current selected partition and allows the user to quickly...

Страница 21: ...19 3 Image Optimization SmartDesktop Partition Definitions Name Description Image ...

Страница 22: ...20 3 Image Optimization Name Description Image 0 1 ...

Страница 23: ... 75Hz Horizontal Frequency 30kHz 83kHz sRGB YES Connectivity Signal Input VGA Analog DVI Digital Input Signal Separate Sync Sync on Green Convenience OSD Languages English German Spanish Greek French Italian Hungarian Dutch Portuguese Brazil Portuguese Polish Russian Swedish Finnish Turkish Czech Ukranian Simplified Chinese Traditional Chinese Japanese Korean Other Convenience 1 2 3 4 Kensington L...

Страница 24: ...ature range operation 0 C to 40 C Temperature range Non operation 20 C to 60 C Relative humidity 20 to 80 MTBF 30 000hrs Environmental 5 E1 1 1 2 4 Packaging 100 recyclable Specific Substances 100 PVC BFR free housing Compliance and standards Regulatory Approvals CCC CEL Cabinet Color Black White Finish Texture Note 1 1 F 2 This data is subject to change without notice Go to www philips com suppor...

Страница 25: ...4 35 00 640x480 66 67 37 86 640x480 72 81 37 50 640x480 75 00 37 88 800x600 60 32 46 88 800x600 75 00 48 36 1024x768 60 00 60 02 1024x768 75 03 63 89 1280x1024 60 02 79 98 1280x1024 75 03 55 94 1440x900 59 89 70 64 1440x900 74 98 65 29 1680x1050 59 95 67 50 1920x1080 60 00 Note Please notice that your display works best at native resolution of 1920x1080 60Hz For best display quality please follow ...

Страница 26: ...ly The following table shows the power consumption and signaling of this automatic power saving feature Power Management Definition VESA Mode Video H sync V sync Power Used LED Color Active ON Yes Yes 46 72W typ 47 56W max White Sleep OFF No No 0 5 W typ White blink The following setup is used to measure power consumption on this Display Native resolution 1920x1080 Contrast 50 Brightness 300 nits ...

Страница 27: ... have been adhered to in order to make Philips Displays safe to use throughout its life cycle China RoHS The People s Republic of China released a regulation called Management Methods for Controlling Pollution by Electronic Information Products or commonly referred to as China RoHS All products including CRT and Display which are produced and sold for China market have to meet China RoHS request ᵏ...

Страница 28: ...However pixel or sub pixel defects on theTFT Display panels used in flat panel Displays are sometimes unavoidable No manufacturer can guarantee that all panels will be free from pixel defects but Philips guarantees that any Display with an unacceptable number of defects will be repaired or replaced under warranty This notice explains the different types of pixel defects and defines acceptable defe...

Страница 29: ... Pixel Defect Tolerances In order to qualify for repair or replacement due to pixel defects during the warranty period aTFT Display panel in a Philips flat panel Display must have pixel or sub pixel defects exceeding the tolerances listed in the following tables BRIGHT DOT DEFECTS ACCEPTABLE LEVEL 1 lit subpixel 3 2 adjacent lit subpixels 1 3 adjacent lit subpixels one white pixel 0 Distance betwe...

Страница 30: ...0 3122 1223 Free of charge Mon to Fri 9am 6pm Ireland Celestica 353 01 601 1161 Local call tariff Mon to Fri 8am 5pm Italy Anovo Italy 39 840 320 041 0 08 Mon to Fri 9am 6pm Luxembourg Ecare 352 26 84 30 00 Local call tariff Mon to Fri 9am 6pm Netherlands Ecare 31 0900 0400 063 0 10 Mon to Fri 9am 6pm Norway Infocare 47 2270 8250 Local call tariff Mon to Fri 9am 6pm Poland MSI 48 0223491505 Local ...

Страница 31: ...ervice I I c 7 727 3097515 Latvia N A ServiceNet LV 371 67460399 371 27260399 Lithuania N A UAB Servicenet 370 37 400160 general 370 7400088 for Philips Macedonia N A AMC 389 2 3125097 Moldova N A Comel 37322224035 Romania N A Skin 40 21 2101969 Russia N A CPS 7 495 645 6746 Serbia Montenegro N A KimTec d o o 381 11 20 70 684 Slovakia N A Datalan Service 421 2 49207155 Slovenia N A PC H and 386 1 ...

Страница 32: ...SA 62 21 4080 9086 Customer Hotline 62 8888 01 9086 Customer Hotline Mon Thu 08 30 12 00 13 00 17 30 Fri 08 30 11 30 13 00 17 30 Israel Eastronics LTD 1 800 567000 Sun Thu 08 00 18 00 Korea Alphascan Displays Inc 1661 5003 Mon Fri 9 00am 5 30pm Sat 9 00am 1 00pm Malaysia R Logic Sdn Bhd 603 5102 3336 Mon Fri 8 15am 5 00pm Sat 8 30am 12 30am New Zealand Visual Group Ltd 0800 657447 Mon Fri 8 30am 5...

Страница 33: ...entre 99312 460733 460957 Mon Fri 09 00 18 00 Uzbekistan Soniko Plus Private Enterprise Ltd 99871 2784650 Mon Fri 09 00 18 00 Vietnam FPT Service Informatic Company Ltd Ho Chi Minh City Branch 84 8 38248007 Ho Chi Minh City 84 5113 562666 Danang City 84 5113 562666 Can tho Province Mon Fri 8 00 12 00 13 30 17 30 Sat 8 00 12 00 Japan フィリップスモ ニター サポー トセンター 0120 060 530 Mon Fri 10 00 17 00 ...

Страница 34: ...he Display cable has bent pins Make sure the computer is turned on AUTO button doesn t function The auto function is applicable only in VGA Analog mode If the result is not satisfactory you can do manual adjustments via the OSD menu Note The Auto Function is not applicable in DVI Digital mode as it is not necessary Visible signs of smoke or sparks Do not perform any troubleshooting steps Disconnec...

Страница 35: ...ows what happened Eliminate the vertical bars using the Phase Clock of Setup in OSD Main Controls It is valid only in VGA mode Image appears blurred indistinct or too dark Adjust the contrast and brightness on On Screen Display An after image burn in or ghost image remains after the power has been turned off Uninterrupted display of still or static images over an extended period may cause burn in ...

Страница 36: ...dated version which fully supporting DDC CI interface Please try to download the most updated graphic adaptor driver from corresponding companies web site Install the driver Remove SmartControl Premium and re install it once more Attention Theft Deterrence is Enabled Q5 I forgot my PIN for Theft Deterrence Function What can I do Ans Philips Service center has a right to ask for legitimate identifi...

Страница 37: ...nstall your Display Follow the instructions to insert the companion CD ROM included in this package Display drivers inf and icm files will be installed automatically Q4 How do I adjust the resolution Ans Your video card graphic driver and Display together determine the available resolutions You can select the desired resolution under Windows Control Panel with the Display properties Q5 What if I g...

Страница 38: ...age in LCD panels Ans Uninterrupted display of still or static images over an extended period may cause burn in also known as after imaging or ghost imaging on your screen Burn in after imaging or ghost imaging is a well known phenomenon in LCD panel technology In most cases the burned in or atter imaging or ghost imaging will disappear gradually over a period of time after the power has been swit...

Страница 39: ......

Страница 40: ... rights reserved Philips and the Philips Shield Emblem are registered trademarks of Koninklijke Philips N V and are used under license from Koninklijke Philips N V Specifications are subject to change without notice Version BDM3201E1T ...

Отзывы: