FX997A 1955 [ actually used phono
AG1006-88
] 11/20 [ file size 11.7MB] IN word.doc
11/20 [file size 3.14mb] IN .pdf
FX995A 1055 also had
Pl.Wechsler: AG1006-88, 3 KW Bereiche; Abweichung Bezeichnung - Jahreszahl !
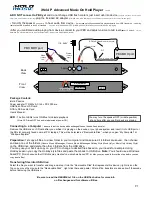
Record player was fitted with Magneto Dynamic Pickups AG 3020/3021, for which a special
pre amplyfing unit (with one EF 86 tube) was fitted in the chassis. Motorized band switch.
FX839A used
AG1000
record player and with 45 adap and a stacker and had a tape
AG 8101
...........................................................................................................................................
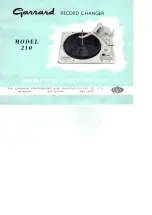
AG 1000 1952
rough/partially ,TRANSLATED from DUTCH via google docs and GOOGLE TRANSLATE
oct 2018
USING PHILIPS SERVICE DOCUMENTATIE VOOR DE PLATENWISSELAAR AG1000 1952
[referenced
FIGURES
start on page 21 of 36 of the 1952 PHILIPS SERVICE DOCUMENTATIE ] ..pg 59
here...
Last upload to google and also conv to pdf
JAN 27 2019 redo EACH again at final
70pgs
......................................................................................................
P12-19 ...operation
P21- ...repair and adjustment specs
P59- ...figures
Denis Burke
Runnells,IA usa
Then downloaded the FR folder from google docs [complete w translated pages
p17 .... 70 total !!! [31 translated images] all collated into this .doc
MOST RECENT verify APPROACH..OCT 17 2018
MAKE IMAGE OF FR PDF W/ PRINTKEY 2000 [
google would not convert the PDf French from RADMUES yesterday]...tho it still
uploads and coverts the DUTCH large BEST AG 1000 COMPLETE PDF FILE AND IS THEN EDITABLE..FR VS IS CLEANER THO LESS INFO @ END
PLACE THIS IMAGE ON DESKTOP.
IN CHROME UPPER LEFT
>APPS
..........>GOOGLE DRIVE....>IN MY DRIVE>UPLOAD FILES...>SELECT THE DESKTOP IMAGE IN JPG...>
>IN GOOGLE DOCS > FILE>OPEN...SHOWS UPPER PANE ORIGINAL AND LOWER PANE editable CONVERSION...>TOOLS>TRANSLATE...>
> SELECT OUTPUT LANGUAGE[GOOGLE WILL DETECT THE ORIGINAL LANGUAGE...>UPPER PANE IN THE ORIG IMAGE/LOWER PANE IS THE
EDITABLE TRANSLATED AND IS editable.
FRENCH OUTLINED BOXES COPIED FROM GOOGLE DOCS
First approach :
WAS
1
Содержание AG1000
Страница 29: ...See also DSC00130 jg and stitched 00125 00128 and zippy1 fig 6 jpg 29 ...
Страница 56: ...56 ...
Страница 61: ...Runnells IA usa c60h hotmail com 61 ...
Страница 62: ...62 ...
Страница 63: ...63 ...
Страница 64: ...64 ...
Страница 65: ...FIG 8 65 ...
Страница 66: ...FIG 8 FIG 9 66 ...
Страница 67: ...FIG 9 67 ...
Страница 68: ...68 ...
Страница 69: ...THERE IS NO 32 THRU 40 WAS NONE 69 ...
Страница 70: ...70 ...
Страница 71: ...71 ...