background image

iPronto

User Guide

28

Using the iPronto

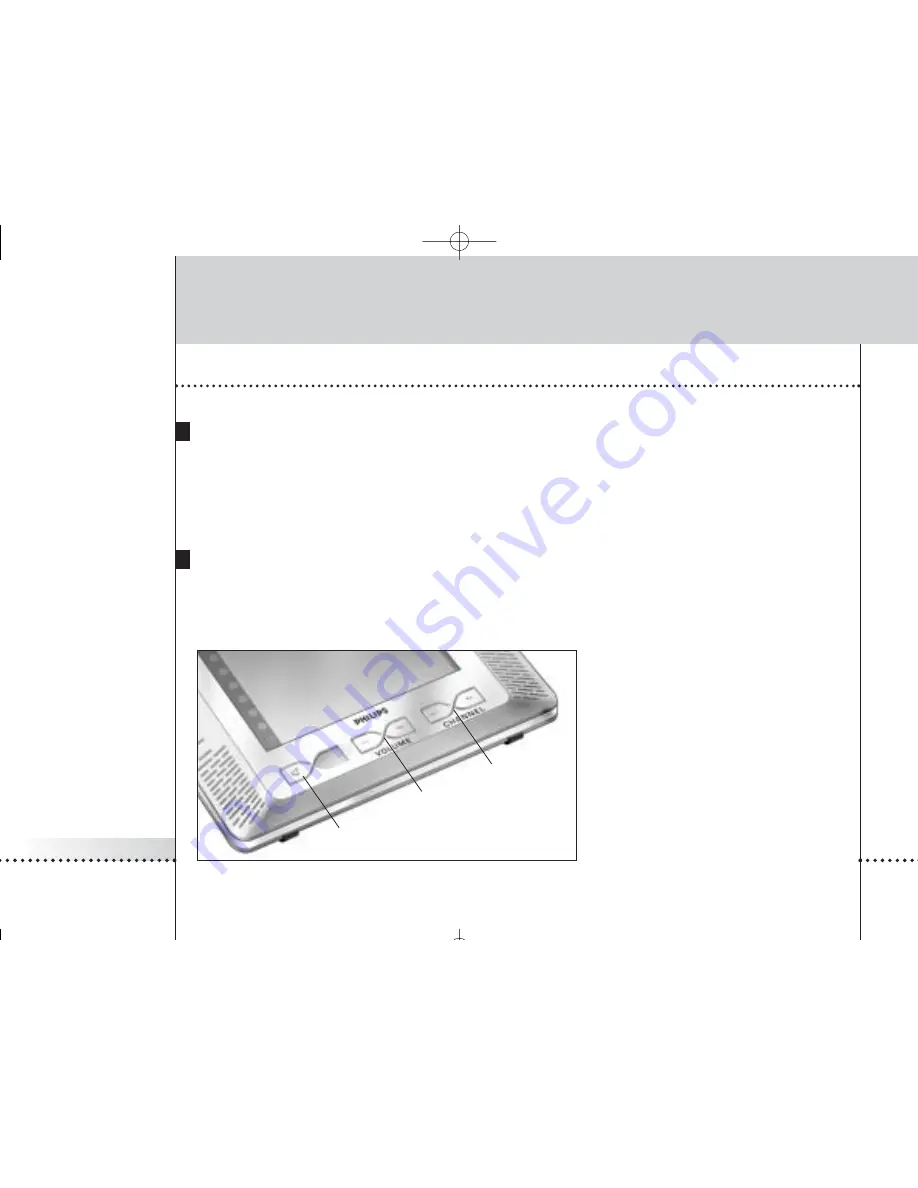
The iPronto’s External Controls

The Power Button

The iPronto’s Power button (located on the left side of the iPronto) is used to switch the iPronto 

on

when it is powered

off. In the System Settings you can decide on other options for powering on the iPronto. See 

Adjusting the Power On

Settings

on page 19.

You can also use the Power button to switch the iPronto 

off

at any time.

The Remote Control buttons

The iPronto has five buttons on the front panel. They always operate the iPronto’s 

Remote Control

(RC): When you are

working with the iPronto’s Electronic Program Guide or browser, these buttons will still have RC functions. By default,
the RC buttons have the following functions:

You can change these default functions with
the iPronto’s “learning” tool. This means that
the iPronto will learn an IR (infrared) code
from the existing RC of your device, for
instance your TV. See 

Learning IR Codes

on

page 38.

volume up
and volume
down

mute

channel up
and channel
down

iPronto 1.6 IFU En .qxd  22-04-2004  17:23  Pagina 28

Содержание 6400 series

Страница 1: ...TSi 6400 TSi 6400 ...

Страница 2: ... or television reception which can be determined by turning the equipment off and on the user is encouraged to try to correct the interference by one or more of the following measures Reorient or relocate the receiving antenna Increase the separation between the equipment and receiver Connect the equipment into an outlet on a different circuit from the receiver Consult the dealer or an experienced...

Страница 3: ...iPronto 1 6 IFU En qxd 22 04 2004 17 23 Pagina ii ...

Страница 4: ...Pronto 15 Setting up Your Network 20 Using the iPronto 27 The Touch Screen 27 The Status Display 27 The iPronto s External Controls 28 The External Connections 29 Navigating the iPronto 30 The Keyboard 33 The Remote Control 35 How Does the iPronto RC Work 36 Learning IR Codes 38 Using iProntoEdit 41 Using the iPronto Remote Control with the NetX 43 The Browser 44 Setting the Home Page 45 Entering ...

Страница 5: ...iPronto User Guide 2 Table of Contents The Electronic Program Guide 47 Subscription 50 Upgrading 55 Troubleshooting 56 Specifications 60 Index 62 iPronto 1 6 IFU En qxd 22 04 2004 17 23 Pagina 2 ...

Страница 6: ...iPronto Box Contain The iPronto box contains the following items Warranty Battery iPronto iPronto User Guide iPronto Getting Started Guide AC power adapter with cable Wireless LAN Adapter iPronto 1 6 IFU En qxd 22 04 2004 17 23 Pagina 3 ...

Страница 7: ...tion on how to use the iPronto Remote Control and its extra features You can find the iPronto Online Help on http www pronto philips com products ipronto help In addition to the iPronto documentation you can consult the iPronto Portal via the iPronto browser in layout 8 On this site you can find elaborate and useful information about the iPronto You can find more information about the iPronto Port...

Страница 8: ...Control it also has an Electronic Program Guide Without any effort you always have an up to date and customizable Program Guide for your favorite channels What makes this Electronic Program Guide so unique is its direct interaction with the iPronto s Remote Control No more wading through pages of program guides Get the information you want fast and start watching your programs immediately by tappi...

Страница 9: ...ronto The iPronto consists of several parts stylus power button speaker scroll wheel speaker Remote Control buttons status display color TFT touch screen touchstrip with 8 layout buttons iPronto 1 6 IFU En qxd 22 04 2004 17 23 Pagina 6 ...

Страница 10: ...ime You find information about Installing the Wireless LAN Adapter on page 8 Installing and Recharging the Battery on page 10 Getting the iPronto Up and Running on page 14 Using the iPronto on page 27 Using the iPronto s basic applications The Remote Control on page 35 The Browser on page 44 and The Electronic Program Guide on page 47 Troubleshooting on page 56 IR learning eye and sending eye cove...

Страница 11: ...alled PCMCIA card receives these RF signals and sends RF signals back to the WAP The first thing you do when you take your iPronto out of the box is installing this Wireless LAN Adapter In the following illustrations you see how the installation works 1 Open the Wireless LAN Adapter cover by pushing in the grips and sliding off the cover in the direction indicated below figure 1 2 Insert the Wirel...

Страница 12: ... until it clicks and close the cover Note Do not install any other adapter Do not remove the Wireless LAN Adapter when the iPronto is activated After the Wireless LAN Adapter is installed there is no need to remove it It can permanently be left inside the iPronto iPronto 1 6 IFU En qxd 22 04 2004 17 23 Pagina 9 ...

Страница 13: ...recharged but it is advisable to fully charge the battery when you start using the iPronto See Recharging on page 13 Insert the battery as follows 1 Lift the stand figure 1 2 Open the battery cover by pushing the grips and sliding off the cover in the direction indicated below figure 2 Figure 1 Figure 2 iPronto 1 6 IFU En qxd 22 04 2004 17 23 Pagina 10 ...

Страница 14: ...ing and Recharging the Battery 3 Attach the battery connector to the provided socket figure 3 4 Put the right side of the battery under the provided hook figure 4 Figure 3 Figure 4 iPronto 1 6 IFU En qxd 22 04 2004 17 23 Pagina 11 ...

Страница 15: ...iPronto User Guide 12 Installing and Recharging the Battery 5 Push the left side of the battery down into its place 6 Close the battery cover iPronto 1 6 IFU En qxd 22 04 2004 17 23 Pagina 12 ...

Страница 16: ...rmal use recharge every 2 days When you use the iPronto very frequently recharge every day You can use the iPronto while it is being recharged While the battery is being recharged the Status Display shows a full battery indication Plug in the power adapter as shown in the illustration The first time you put the battery in the iPronto the iPronto will start up automatically and guide you to the Sys...

Страница 17: ...creens and messages After these messages the System Settings will automatically appear on the screen These settings are divided into five tabs System Settings General On this tab you adjust general settings such as time power off time out and system sounds See Setting up Your iPronto below Wireless On this tab you set the wireless settings You need to define these settings so the iPronto can be co...

Страница 18: ...tylus See The Touch Screen on page 27 for more information Setting up Your iPronto After installing the Wireless LAN Adapter and the battery you need to calibrate your touch screen and define the settings on your iPronto such as time and date brightness time out and so on These settings are necessary to make your iPronto function properly The first time you activate your iPronto the System Setting...

Страница 19: ...ng the Timezone You need to set the timezone to enable your Electronic Program Guide to display the correct data at the right time 1 Select the General tab in the System Settings 2 Select the Timezone dropdown list A list of all timezones appears 3 Select your timezone from the Timezone dropdown list Adjusting the Time Format 1 Select the General tab in the System Settings 2 Select the Time Format...

Страница 20: ...ttons to change the minutes 6 When you have set the Time Format to 12 hour clock 1 In the Time section select the AM PM box The selection appears with a highlighted border 2 Use the and buttons to change AM or PM Adjusting the Date Format 1 Select the General tab in the System Settings 2 Select the Date Format dropdown list A list of date formats appears You have two possibilities month day year f...

Страница 21: ...he and buttons to set the brightness Adjusting the Power off Time Out Time Out when iPronto is running on the battery 1 Select the General tab in the System Settings 2 In the LCD power off when on batteries section use the and buttons to set the LCD time out You can choose a time out between 30 seconds and 15 minutes Time Out when iPronto is plugged into the power adapter 1 Select the General tab ...

Страница 22: ...e screen is tapped Power Button to power on the iPronto only when the Power Button is pressed Adjust the System Sound Settings You hear the system sounds when you tap a button on the touch screen go to the Applicaton Settings go to the System Settings and so on You can decide to switch the system sounds on or off When the system sounds are switched on you can adjust the volume by scrolling the scr...

Страница 23: ...rk settings in the Wireless and Network tabs These settings depend on the kind of home environment you have You can find more information about home networks in the iPronto Online Help at http www pronto philips com products ipronto help In the illustration below you see an example of a configuration Example of a Configuration iPronto 1 6 IFU En qxd 22 04 2004 17 23 Pagina 20 ...

Страница 24: ...oint WAP sends out RF radio frequency signals to the iPronto s Wireless LAN Adapter The iPronto must use the same wireless settings as the WAP How to define your WAP settings on the iPronto depends on the kind of home environment you have You can find more information about the WAP settings on your PC or in the WAP s manual or you can obtain information from the person who configures your home net...

Страница 25: ...e Set Identifier text box The SSID is a name that identifies your wireless network 4 If encryption is enabled in your wireless network select the correct encryption in the Wireless Network Encryption section 64 bit 128 bit 5 If encryption is enabled in your wireless network enter your Encryption pass phrase in the Encryption pass phrase text box The Encoding key text box is automatically filled in...

Страница 26: ...to the Internet Note You can find information about your network settings on your PC or you can obtain information from your Internet Service Provider You can set the network settings as follows 1 Press and hold the scroll wheel for 5 seconds to display the System Settings 2 Select the Network tab in the System Settings iPronto 1 6 IFU En qxd 22 04 2004 17 23 Pagina 23 ...

Страница 27: ...Pronto host name you determine the type of IP address you use An IP address is a number that identifies you on the Internet You have two options Use DHCP Dynamic Host Configuration Protocol Your iPronto s IP address will automatically be assigned by the DHCP server Use a fixed IP address You have only one IP address that you assign to your iPronto and that never changes If you use DHCP 1 In the Ne...

Страница 28: ...sh to use 3 In the Subnet mask text box enter your Subnet mask 4 In the Default gateway text box enter your Default gateway 5 In the Local domain name text box enter your Local domain name 6 In the DNS1 and DNS2 text boxes enter the DNS servers you wish to use Proxy When in addition you use a proxy server in your home network or at the Internet Service Provider you have to adjust the Proxy setting...

Страница 29: ...Press layout button 8 at the bottom in the touchstrip If all settings are correct the home page of the iPronto Portal appears 2 If the iPronto Portal does not appear recheck the settings in this chapter or go to Troubleshooting on page 56 3 After defining new settings tap the button to reload the iPronto Portal page in layout 8 If the new settings are correct the iPronto Portal appears After setti...

Страница 30: ...can damage the touch screen You can also operate the touch screen with your finger This is less precise than using the stylus However you may find it more comfortable to use your finger on the touch screen The Status Display Below the touch screen the iPronto has a small screen This second screen is always on even when the iPronto has been switched off It displays the time and battery status The s...

Страница 31: ...ote Control buttons The iPronto has five buttons on the front panel They always operate the iPronto s Remote Control RC When you are working with the iPronto s Electronic Program Guide or browser these buttons will still have RC functions By default the RC buttons have the following functions You can change these default functions with the iPronto s learning tool This means that the iPronto will l...

Страница 32: ... success beeps and so on in 20 intervals By pressing and holding the scroll wheel for 5 seconds you enter the System Settings to adjust settings such as time date network and so on The External Connections USB headphone power adapter connector MMC SD port The MMC SD slot the headphone connection and the USB port are currently not operational iPronto 1 6 IFU En qxd 22 04 2004 17 23 Pagina 29 ...

Страница 33: ...o Navigating the iPronto Layouts and Touchstrip The iPronto has 8 predefined ways of organizing the screen called layouts You can switch between these layouts with the touchstrip Touchstrip iPronto 1 6 IFU En qxd 22 04 2004 17 23 Pagina 30 ...

Страница 34: ...ind iPronto Online Help You can read the latest news You can find interesting links Flipside and Settings On the iPronto every application has a flipside On this flipside you can read application information and modify settings There are two kinds of settings on the iPronto The System Settings are general and applicable to every application Application Settings are specific for one application in ...

Страница 35: ...pears A greyed out text box indicates that you cannot enter text in it and that there is no on screen keyboard available The on screen keyboard has its own text box which displays the same text as the application s text box Depending on the text box that you tap the keyboard s text box consists of either 1 for example when you enter a URL or 3 lines for example when you fill in a form on the Inter...

Страница 36: ...pping Shift will appear in upper case 4 To enter multiple characters in upper case tap the Caps button All the characters you enter after tapping Caps will appear in upper case until you tap the Caps button again 5 To enter a symbol tap the Special button The symbols appear on the buttons and you can tap the symbol you need After tapping a symbol the normal characters reappear on the buttons iPron...

Страница 37: ...end of the line is reached 7 To position the cursor tap the place in the keyboard s text box where you want to position the cursor or Use the keyboard s arrow keys to move up down left or right 8 Tap Done The keyboard closes and the text appears in the text box or Tap Cancel The keyboard closes and the text does not appear in the text box iPronto 1 6 IFU En qxd 22 04 2004 17 23 Pagina 34 ...

Страница 38: ...mote Control RC is a universal RC This means that it can be used for virtually any audio and video device such as a TV VCR DVD CD and so on As long as your device understands IR codes the iPronto RC can control it This way the iPronto RC replaces the individual RCs that accompany your devices You access the iPronto RC via the touchstrip Layout 1 is a RC See Layouts and Touchstrip on page 30 for mo...

Страница 39: ...veral predefined devices These devices represent your existing remote controls Each device consists of one or more pages with buttons on them By tapping the iPronto icon you can go back to the Home page the Device Overview You can access the devices from the Device tab or from the Device Overview When you tap a device in the Device tab or in the Device Overview you immediately jump to the first pa...

Страница 40: ...ge tab When you tap the page in the Page tab you immediately jump to that page Page tab When the Device list or the Page list is very long Up and Down button appear at the top and the bottom for easy navigation through the Devices and Pages iPronto 1 6 IFU En qxd 22 04 2004 17 23 Pagina 37 ...

Страница 41: ...inds of devices The iPronto RC is set up by default to operate Philips and Philips compatible devices If you have other brands the iPronto has to learn the specific IR codes for your device from the existing RC that accompanies the device This means that you press the button on the existing RC and point it to the iPronto s learning eye The iPronto RC will learn the IR code from the existing remote...

Страница 42: ...on or for a hard button 1 Place the iPronto in line with the existing remote control Make sure you point the existing remote control to the iPronto s learning eye 2 On the iPronto select a layout with a Remote Control application 3 To learn a soft button open the page on your iPronto that contains the button you want to learn 4 Tap the Tools tab on the left side of the screen The Tools tab opens T...

Страница 43: ...d OK appears on the screen If learning does not succeed the iPronto beeps and Button Learn Failed appears on the screen Note When learning fails keep the following guidelines in mind Make sure you aim the IR sender of the existing remote control to the iPronto s learning eye Try increasing or decreasing the distance between the iPronto and the existing remote control Try learning in a different an...

Страница 44: ...ges Deleting and adding buttons or panels You can easily position elements on a page with simple tools such as Setting a Grid and Border Centering elements Setting the Z order of elements You can design pages with buttons and bitmaps for example Adding bitmaps to a button for its pressed and released state Importing an entire gallery with your own buttons or bitmaps Changing the color of elements ...

Страница 45: ...ding Note To upload and download an iCF the iPronto and your PC have to be connected to the same network To upload or download an iCF open iProntoEdit on your PC and click the Upload button to upload the iCF into iProntoEdit or click the Download button to download the iCF to the iPronto You can find more information on uploading and downloading in iPronto Online Help at http www pronto philips co...

Страница 46: ... your A V and Home Control devices from virtually any location in your home The NetX receives signals sent out by iPronto via your WiFi 802 11b wireless home network and converts them into infrared IR signals These IR signals are then sent out to your IR controlled A V and home control devices You can find more information about the NetX in the iPronto Online Help at http www pronto philips com pr...

Страница 47: ... iPronto Online Help at http www pronto philips com products ipronto help You use the iPronto browser to access the Internet The iPronto browser functions the same way as a regular PC browser it has Back Forward Home Reload and Stop buttons you can enter URLs see the downloading progress and scroll with the scroll bar iPronto Browser iPronto 1 6 IFU En qxd 22 04 2004 17 23 Pagina 44 ...

Страница 48: ...ontrol button for 5 seconds to display the Application Settings The flipside of the browser appears Browser flipside 3 In the Homepage URL text box enter the URL of the Home Page with the on screen keyboard See The Keyboard on page 33 for more information or To set the currently active web page as Home Page tap the Use Current button Note You cannot modify the home page of layout 8 With layout 8 y...

Страница 49: ... a URL with the iPronto s on screen keyboard 1 Tap the text box on the touch screen The on screen keyboard appears 2 Enter the URL with the on screen keyboard The URL appears in the keyboard s text box 3 Tap the Done button to close the keyboard See The Keyboard on page 33 for more information iPronto 1 6 IFU En qxd 22 04 2004 17 23 Pagina 46 ...

Страница 50: ...am Guide An Electronic Program Guide EPG is the electronic equivalent of a printed television program guide But the iPronto s EPG is not a regular EPG It is unique because of its direct interaction with the iPronto s Remote Control While browsing through the Electronic Program Guide you can immediately switch your TV to the channel Note Before you can use the iPronto EPG you have to subscribe onli...

Страница 51: ...laying at that time on Wednesday will appear in the program overview When you select one of the movies in the list a detailed description will appear in the left part of the EPG The EPG has two power features The Watch Feature When you select a program in the program overview you can immediately surf to this program with the button This Watch button only appears when you select a program that is c...

Страница 52: ...f to switch your device to channel 15 for example you need to press 0 0 1 5 4 You can check the Use Start command check box if you want the iPronto to send out a Start macro before it switches channels You can define your own Start macro with iProntoEdit You can find more information about iProntoEdit in the Help Menu of iProntoEdit 5 Check the Use Enter command check box if to go to a certain cha...

Страница 53: ...nce you have personalized and activated your subscription the iPronto EPG is ready for use Subscribing 1 Use an iPronto browser or your PC browser to navigate to the online EPG Subscription Pages at http www pronto philips com products ipronto epg The Login page appears 2 Enter the Username and Password that you use on the Pronto website at http www pronto philips com If you are not registered for...

Страница 54: ...ck the Next button The Create a Subscription Activation Key page appears Write down your activation key here After the registration you can personalize the information that will be sent to you The procedure for personalizing EPG data is not the same for US iPronto users and European iPronto users When you live in the US follow the procedure Personalizing for the United States below When you live i...

Страница 55: ...e Personalization Wizard Step 4 page appears 9 Enter a name for your subscription 10 Deselect the stations for which you do not want to receive EPG data The deselected stations will not be available on the iPronto EPG 11 Tap or click the Finish button The Personalization Wizard Home Page appears again Personalizing for European Countries 1 In the Create a Subscription Activation Key page tap or cl...

Страница 56: ...for which you want to receive EPG data 8 In the Channel column of the table enter the channel number of the every station for which you want to receive EPG data 9 Repeat steps 6 to 8 for all the channels in all the languages for which you want to receive EPG data 10 Tap or click the Next button The Personalization Wizard Step 3 page appears 11 Check the stations and channel numbers that you have d...

Страница 57: ...he EPG flipside 4 In the Activation key text box enter your activation key with the on screen keyboard 5 Tap the Activate button The first EPG download starts Note The first EPG data download may take about 30 minutes After the initial download the EPG will be fully functional and new data will be downloaded automatically every day You also have the possibility to download EPG data manually in the...

Страница 58: ... be ready for use Note iPronto will retain the homepages in the several layouts It is advised to upload your iPronto Configuration File to iProntoEdit as a backup before you download new upgrades When new upgrades are available you can read about them on the iPronto Portal via layout 8 in the touchstrip When you have registered your iPronto on the Pronto site you will also receive an email when up...

Страница 59: ...8 Devices do not respond to the commands I send Make sure to point the iPronto s sending eye towards the A V or home control device Make sure there is no obstruction between the iPronto and the A V or home control device Check the battery status in the status display Check if your device understands Philips IR codes You can find this information in your device s manual If your device does not unde...

Страница 60: ...he battery if necessary See Installing and Recharging the Battery on page 10 3 If steps 1 and 2 have no result use the Reset button The Reset button is located at the back of the iPronto as indicated in the illustration Press the Reset button with a pointed object such as an unfolded paperclip The iPronto will reboot Some settings may be lost such as date and time settings 4 If resetting does not ...

Страница 61: ...here are several ways to surf for example with a 10 button an Enter button and so on In the EPG settings you determine the way that your TV changes channels See The SmartSurfer on page 48 The Watch Feature and SmartSurf buttons will only function if the Watch Device selection mechanism on your iPronto RC functions properly Test whether the Watch Device selection mechanism functions correctly in th...

Страница 62: ...this led is not on something is wrong with your Wireless LAN Adapter See Installing the Wireless LAN Adapter on page 8 The iPronto browser does not display web pages the same way as the browser on my PC Most web pages are optimized for viewing with a Netscape or Internet Explorer browser That is why pages may look different on the iPronto browser The iPronto browser has some limitations compared t...

Страница 63: ...ant access to information Remote upgrades of software through web connection Infrared IR 8 power LEDs for sending IR codes 1 receiving eye for receiving IR codes Operating distance of approximately 33 ft 10 m Learning frequency up to 78 kHz and 455 kHz Memory 64 MB of non volatile flash memory and 64 MB of RAM Battery Rechargeable lithium ion battery 7 4 V Power Management Power on by tapping the ...

Страница 64: ...uded NetX Network Extender iProntoEdit PC Requirements Windows 98SE ME 2000 or XP 64 MB of RAM 70 MB of free hard disk space IEEE 802 11b compliant WiFi CD ROM player Broadband Internet access IR database information Redesigned by UEI Technology Licensed under U S Patent 5 689 353 Portions UIE 1999 iPronto 1 6 IFU En qxd 22 04 2004 17 23 Pagina 61 ...

Страница 65: ...ad 42 E Electronic Program Guide See EPG EPG 47 activation 54 detailed program information 48 filter settings 48 personalization 51 52 program overview 48 SmartSurf 48 58 subscription 50 Watch Feature 48 external connections 29 F flipside 32 G general settings brightness 18 calibration 16 date 18 date format 17 power on 19 system sounds 19 time 17 time format 16 time out 18 timezone 16 H hard butt...

Страница 66: ... keyboard 33 L layout 30 LCD 18 brightness 18 time out 18 learn 38 M MMC SD 29 N navigate 44 59 network settings IP 24 proxy 25 NetX 43 O on screen keyboard See keyboard P page 37 Page tab 37 PCMCIA 8 pen See stylus personalize 41 personalizing EPG Europe 52 United States 51 power adapter 13 power button 6 19 28 power off 18 power on 19 proxy 25 R RC See Remote Control recharge 13 Remote Control 3...

Страница 67: ...time format 16 time out 18 56 adapter 18 battery 18 timezone 16 Tools tab 38 touch screen 27 touchstrip 30 troubleshooting 56 U universal remote control 35 upload 42 URL 45 46 USB 29 V View Control button 32 WAP 8 21 watch device selection mechanism 49 58 Watch Feature 48 58 Wireless Access Point 8 21 Wireless LAN Adapter 8 59 wireless settings 21 Documentation concept and elaboration The Human In...

Отзывы: