background image

54

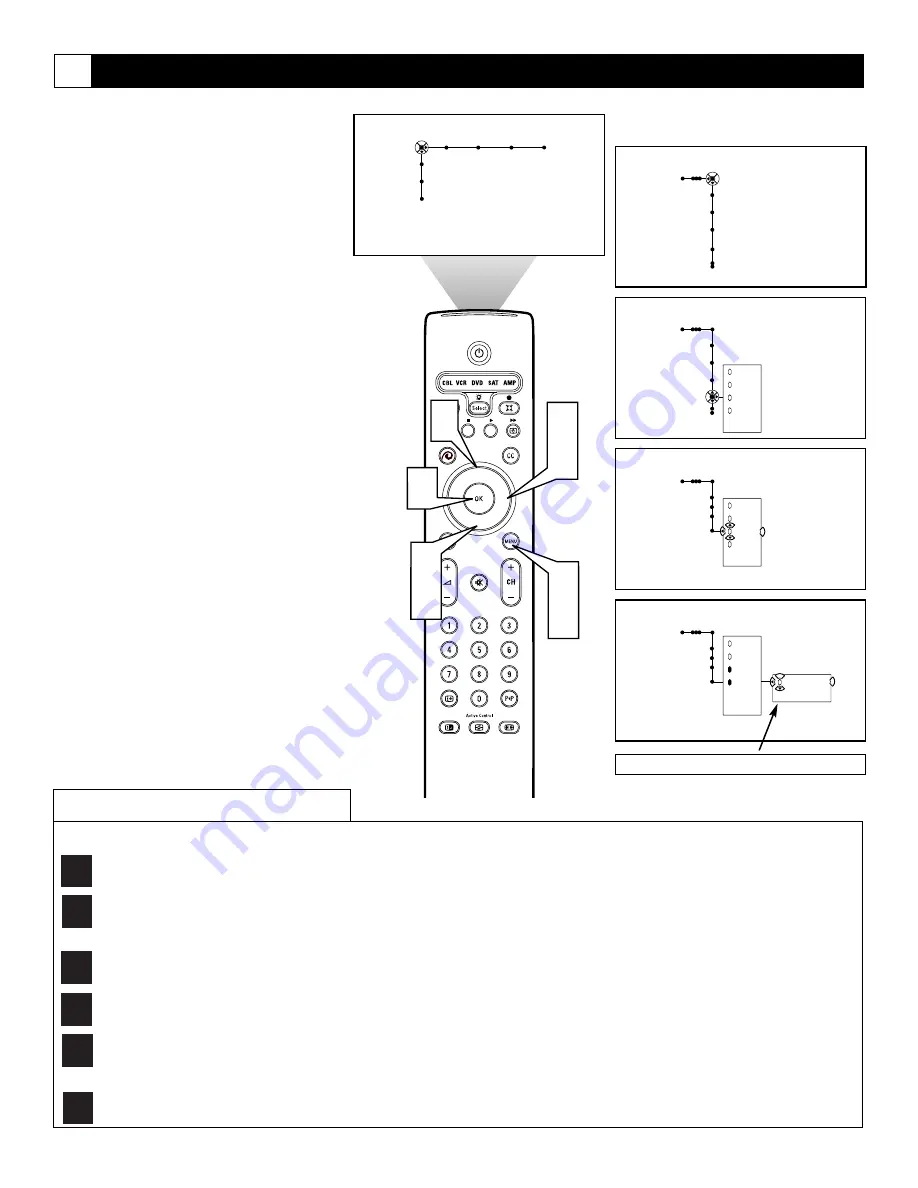
You can select specific TV Ratings to block
broadcast signals that have unsuitable content.

1

Press the Menu button on the remote
control to display the on-screen menu.

2

Press the Cursor Right button repeated-
ly to select “Channels.”

3

Press the Cursor Down button repeat-
edly to select the “TV ratings lock”
control.

4

Press the Cursor Right button to enter
the TV Ratings Lock list of options.

5

Press the Cursor Up or Down button to
select one of the ratings.

6

Press the OK button to activate your
choice.

NOTE:

Some of the TV Rating options con-

tain specific subratings. “TV-Y7” contains the
“(FV) Fantasy Violence” subrating; “TV-PG”
and “TV-14” contain “(D) Dialogue,” “(L)
Language,” “(S) Sex,” and “(V) Violence”
subratings; “TV-MA” contains “(L)
Language,” “(S) Sex,” and “(V) Violence”
subratings.

7

If the PIN message is displayed, enter
your PIN.

8

Press the Menu button to remove the
on-screen menu from the TV screen.

Blocking Programming Based on TV Ratings

Channels

TV

Channel list

Channel lock

Lock after

TV ratings lock

Channels

TV

Channel list

Channel lock

Lock after

TV ratings lock

All
None
TV-Y
TV-Y7
---

Channels

TV

TV ratings lock

All
None
TV-Y
TV-Y7
---

Channels

TV

TV ratings lock

All
None
TV-Y
TV-Y7
TV-G
---

(FV) Fantasy
Violence

®

®

®

®

x

5

6

1

7

2

4

Picture   Sound  Features  Channels

TV

Settings

Demo

Install

3

5

None—

programs that are either rated “None” or have no content advisory. Selecting this option will block all such programs.

TV-Y

(

All Children)

programs designed to be appropriate for all children, especially ones ages 2–6. These programs are not expected to frighten

younger children.

TV-Y7

(

Directed to Older Children)

—programs designed for children ages 7 and older. These programs may be more appropriate for children who

have acquired the development skills needed to distinguish between make-believe and reality. Such programs may include mild fantasy and comic vio-
lence (FV).

TV-G 

(

General Audience

)—most parents will consider programs that are rated TV-G to be suitable for children of all ages. Such programs have little

or no violence, no strong language, and little or no sexual dialogue or sexual situations.

TV-PG

(

Parental Guidance Suggested)

—programs contain material that parents may find unsuitable for younger children. This type of programming

has one or more of the following: moderate violence (V), some sexual situations (S), infrequent coarse language (L), or some suggestive dialogue (D).

TV-14

(

Parents Strongly Cautioned)

—programs contain material that many parents will find unsuitable for children under 14 years of age. These

programs have one or more of the following: intense violence (V); intense sexual situations (S); strong, coarse language (L); or intensely suggestive
dialogue (D).

TV-MA

(

Mature Audience Only)

—specifically designed to be viewed by adults and therefore may be unsuitable for children under 17. Such programs have

one or more of the following: graphic violence (V); explicit sexual situations (S); or crude, indecent language (L).

TV

Y

TV

Y7

TV

G

TV

PG

TV

14

TV

MA

Some TV Ratings have subrating options.

CH

TV Ratings

(from TV  Broadcasters)

Содержание 44PL9522/17B

Страница 1: ...anguage and Autoprogram Highlights Liquid crystal on silicon LCOS High definition Imaging High resolution Display 1280 x 720 pixels Pixel Plus Features Digital Natural Motion Active Control analyzes and adjusts incoming signal Two tuner Double window PIP Picture in Picture Dolby Virtual Surround 40 watt RMS 3D Y C Comb Filter HD Component and DVI Input Center Channel Audio Input Side AV Convenienc...

Страница 2: ...may cause an elec trical shock For the safety of everyone in your household please do not remove product cov ering sThe exclamation point calls attention to features for which you should read the enclosed literature closely to prevent operating and maintenance problems WARNING TO PREVENT FIRE OR SHOCK HAZARD DO NOT EXPOSETHIS EQUIPMENT TO RAIN OR MOISTURE CAUTION To prevent electric shock match wi...

Страница 3: ...ave fallen or liquid has been spilled into the appli ance or C The appliance has been exposed to rain or D The appliance does not appear to operate normally or exhibits a marked change in performance or E The appliance has been dropped or the enclosure damaged 17 Tilt Stability All televisions must comply with recommended international global safety standards for tilt and stability properties of i...

Страница 4: ... 37 Selecting a TV Equalizer Option 38 Adjusting TV Speaker Balance 39 Turning Loudness on or off 40 Selecting a Sound Mode Option 41 Using Alternate Audio SAP 42 Setting the TV for Stereo Programming 43 Turning the AVL Audio Volume Leveler on or off 44 Adjusting the Delta Volume 45 Selecting an AutoSound Option 46 FEATURES Using Closed Captioning 47 Setting the Sleeptimer 48 Setting the On Timer ...

Страница 5: ...ks or during program changes are reduced providing a more consistent comfortable sound V Chip with Channel Lock The V Chip feature with Channel Lock will allow you to block the viewing of channels or programs with certain ratings and thus prevent your children from watching inappropriate materials Your new television and its packing contain materials that can be recycled and reused Specialized com...

Страница 6: ...ION POWER OPEN CLOSE STANDBY ON STOP PREV NEXT PLAY PAUSE DVD619 DVD CD PLAYER Your High definition ready Set Over the Air Satellite Cable High definition television offers a picture with unprecedented crispness and clarity The TV broadcast industry is moving toward high definition as the signal standard Currently the number of programs being broadcast in high definition is limited but this is cha...

Страница 7: ...with RGB or VGA output Video called CVBS or composite Input Jacks Cable used Video with RCA type phono plugs Provide better picture performance than the antenna RF input Be sure to connect the audio cables because the video jacks receive only the picture signal Your TV also has a monitor output MON OUT video V jack Use a video cable with RCA type phone plugs to make connections Tuner RF Input Jack...

Страница 8: ...evel changing the TV volume does not affect them Adjust the volume at your external home cinema system 3 AV 2 Input Jacks Signals accepted NTSC 480i Inputs available S Video Y C and CVBS plus audio left and right Use only one of the video signal inputs at a time If you should forget and have both types of signal connected the set will automatically show the S Video since it is of better quality th...

Страница 9: ...efore you connect or disconnect any cables Ensure that all antennas and cables are prop erly grounded See page 3 Important Safety Instructions Protecting Accessory Devices from Overheating Arrange accessory devices so that air can cir culate freely around them Don t stack the accessory devices Arrange them to allow for good ventilation The optional Philips stand provides enough room for two access...

Страница 10: ...to the desired channel To store channels in the TV s memory you must use Autoprogram which you can access through Install in the TV s on screen menu See the Autoprogram section in the Quick Use and Setup Guide that came with the TV If you use Autoprogram you can select chan nels by pressing the CH or buttons on the TV remote control in TV mode Otherwise you must press the digit number buttons to t...

Страница 11: ...UDIO and VIDEO OUT jacks on the back of the cable box and to the corresponding AUDIO and VIDEO IN jacks on the back of the VCR 5 Using Audio Video cables connect to the AUDIO and VIDEO OUT jacks on the back of the VCR and to the corre sponding AV2 audio L and R and video V input jacks on the back of the TV 6 Press the Source button on the remote control to access the Source list 7 Press the Cursor...

Страница 12: ...tched to the AV2 input source for the viewing of programs from the S Video device Connecting an S Video Device DVI G S VIDEO G S VIDEO R L V R L R L R L V Pr Pb Y R L R L Pr Pb Y Pr Pb Y R L V STANDARD HD INPUTS STANDARD HD INPUTS TUNER RGB HV AV5 AV6 AV1 MON SUB OUT AV2 AV3 AV4 OUT SERVICE 1 2 C Source OK AUDIO OUT L R S VIDEO OUT ANT CABLE IN VIDEO OUT 2 1 5 3 4 4 TV AV1 Other AV2 Other AV3 Othe...

Страница 13: ... S VIDEO OUT Y C SUB WF OUT OPT OUT 1 2 1 2 Y PB CB PR CR VIDEO OUT 4 1 2 3 4 5 TV AV1 Other AV2 Other AV3 Other AV4 Other AV5 Other AV6 Other SIDE Other Back of TV Back of Standard DVD Player example only If you do not know whether your DVD player is standard or progressive scan you can connect it to either AV3 or AV4 and the TV will automatically determine the type of output To simplify making c...

Страница 14: ... HD INPUTS TUNER RGB HV AV5 AV6 AV1 MON SUB OUT AV2 AV3 AV4 OUT SERVICE 1 2 C OPTICAL COAXIAL DIGITAL BITSTREAM PCM AUDIO OUT 2CH L R AC IN VIDEO OUT SELECT I P Y PB PR VIDEO S OPEN CLOSE STANDBY ON STOP PREV NEXT PLAY PAUSE DVD619 DVD CD PLAYER Source OK 2 1 5 4 5 6 3 AV2 Other AV3 Other AV4 Other AV5 Other AV6 Other SIDE Other Back of TV Back of Progressive scan DVD Player example only To simpli...

Страница 15: ...NT SATELLITE IN OUT TO TV CH 3 CH 4 DIGITAL AUDIO OUT VCR CONTROL S VIDEO VIDEO VIDEO R R PB PR Y L L AUDIO AUDIO RF REMOTE PHONE JACK Source OK POWER SELECT GUIDE INFO HIGHDEFINITION POWER 1 2 4 5 5 6 3 User Manual for HD Satellite Receiver ___ AV3 Other AV4 Other AV5 Other AV6 Other SIDE Other Back of TV Back of HD Satellite Receiver example only To simplify making connections the con nectors on...

Страница 16: ...ITAL COAXIAL 1 2 L1 L2 R2 R1 AUDIO OUT Y PB PR AUDIO Lt Rt AIR IN SATELLITE IN ACCESS CARD CABLE IN DOLBY DIGITAL OUT OPTICAL DVI HDCP OUT RGB OUT TV OUT 1080i 720p 480p i RESOLUTION SELECT DVI DTV OUTPUT SELECT RGB Y PB PR CH 3 4 VCR CONTROL S VIDEO TEL LINE UL LISTED E207602 7H74 AUDIO VIDEOPRODUCT AV5 Other AV6 Other SIDE Other Source OK 1 5 5 2 3 User Manual for HD Satellite Receiver 4 6 Back ...

Страница 17: ...rs in a surround sound arrangement 3 Using Stereo Audio cables connect to the MON OUT L and R jacks on the back of the TV and to the corre sponding TV IN jacks on the back of the receiver 4 Using an Audio cable connect to the SUB OUT jack on the back of the TV and to the Audio Input jack on the back of a powered subwoofer 5 Using speaker wires connect to the R and L Front Speakers terminals and to...

Страница 18: ...uipment such as camcorders or cameras If the equip ment has an S Video output jack it is the suggested one to use for your connection to receive the best pic ture Otherwise you can make a regular Video connection You must also make an audio connection L and R for stereo or L for mono to receive sound Neither an S Video or Video cable carries a sound signal Camcorder You can label the Side Audio Vi...

Страница 19: ... input After labeling you can use the Source button to cycle through and select your desired source The labels will appear alongside the channel indicator when you select the AV input sources 1 Press the Menu button on the remote control to display the on screen menu 2 Press the Cursor Down button to select Settings 3 Press the Cursor Right button repeated ly to select the Source menu 4 Press the ...

Страница 20: ...the picture with Pixel Plus switched on See page 30 in the Directions for Use manual OK Press to activate or confirm menu choices Freeze Format Pressing will apply one of the Freeze modes you set using the on screen menu See page 60 in the Directions for Use manual Freeze mode stops action in the main screen Sound will continue to be heard Press again to resume normal viewing Replay mode displays ...

Страница 21: ...l enter all numbers Press a single digit button and hold a bit longer to directly access a single digit channel These buttons can also be used to enter values in certain on screen menu controls P P AutoSurf If you set the Surf control in the TV s on screen menu to two channels this button will allow you to toggle between the current channel and the last viewed channel If you choose the nine channe...

Страница 22: ...y until the mode you desire lights up When the light begins blinking point the remote toward the accessory device then press the Standby On button If the device responds you do not need to program the remote If not follow the steps below to program the remote 1 Look up the number for the device on the list below 1 Cable CBL 2 VCR 3 DVD 4 Satellite SAT 5 Amplifier AMP Look up the number for the man...

Страница 23: ... correctly pro grammed 4 Press the Select button on the remote to select the type of device When the mode you desire lights up stop press ing the button When the light begins blinking the remote is ready for use with the device 5 Press the Standby On button As long as the light keeps blinking you can use the remote with the selected device Once the light disappears the remote is back in TV mode If...

Страница 24: ...Nakamichi 0124 Onkyo 0162 Optimus 1050 0213 0558 0069 Panasonic 0066 1545 Penney 0222 Philips 1116 1216 1296 0418 Pioneer 0177 0558 1050 Proscan 1281 Quasar 0066 RCA 1281 0558 1050 Realistic 0222 Sansui 1116 Sharp 0213 Sherwood 0529 Sony 1185 1085 1285 Sunfire 1340 Teac 0490 Technics 0066 1335 1545 1336 Thorens 1216 Victor 0101 Yamaha 0203 0213 1203 Yorx 0222 Satellite Receiver AlphaStar 0799 Echo...

Страница 25: ...27 0094 0236 0298 Sanyo 0074 0131 0267 Scott 0211 0148 0070 0072 Sears 0064 0069 0027 0062 0074 0131 Semp 0072 Sharp 0075 Shintom 0099 Shogun 0267 Singer 0099 Sony 0059 0027 0062 0063 Sylvania 0062 0108 0027 0070 Symphonic 0027 TMK 0267 Tatung 0068 Teac 0027 0068 Technics 0062 0189 Teknika 0027 0062 0064 Thomas 0027 Tivo 0645 0663 Toshiba 0072 0070 Totevision 0064 0267 Unitech 0267 Vector 0072 Vec...

Страница 26: ...ter you replace the batteries in the remote is 60 seconds All modes will have the same time out setting c c CHECK IT OUT Once you have programmed your TV remote refer to page 27 to see how the remote func tions with accessory devices Before the remote will operate an accessory device you must select the correct mode CBL cable box VCR DVD SAT satellite or AMP amplifier 1 Press the Select button to ...

Страница 27: ...wer Off Play OK Closed Captioning Menu Up Pause Menu Right Fast Forward Menu Down Slow motion Disc Menu Channel Digits Numbers ActiveControl Plus Picture Format Point remote at TV when using this button Go To DVD Input Stop Pixel Plus Demo Menu Left Fast Reverse Pause Volume Mute System Menu Dual Screen PIP SAT Mode x Power Off Closed Captioning Menu Up Menu Right Menu Down Menu Channel Digits Num...

Страница 28: ...ol button on the remote control to display the Active Control menu 2 Press the Cursor Up or Down button to select one of the options Minimum Medium Maximum or Off 3 Press the Cursor Right button to dis play the Active Control information window You will notice how the val ues constantly change while Active Control is working NOTE The Active Control values shown in the information window will based...

Страница 29: ... the Menu button to remove the on screen menu from the TV screen Adjusting Setting the Picture Controls x Picture Sound Features Channels TV Settings Demo Install 3 2 4 Picture Sound Features Channels TV Contrast Brightness Color Sharpness Picture TV Contrast Brightness Color Sharpness 40 Picture TV Color Temperature Digital processing Dynamic contrast DNR Normal Warm Cool Picture TV Color enhance...

Страница 30: ...trol is selected 4 Press the Cursor Right button to enter the digital processing submenu 5 Press the Cursor Up or Down button to select Progressive Scan Movie Plus or PixelPlus 6 Press the Menu button to remove the on screen menu from the TV screen Selecting a Digital Processing Option x Picture Sound Features Channels TV Settings Demo Install Picture Sound Features Channels TV Contrast Brightness...

Страница 31: ...or Right button to enter the Dynamic Contrast submenu 5 Press the Cursor Up or Down button to select one of the Dynamic Contrast options Off Minimum Medium or Maximum 6 Press the Menu button to remove the on screen menu from the TV screen Selecting a Dynamic Contrast Option x Picture Sound Features Channels TV Settings Demo Install Picture Sound Features Channels TV Contrast Brightness Color Sharp...

Страница 32: ...ht button to enter the DNR submenu 5 Press the Cursor Up or Down button to select one of the DNR options Off Minimum Medium or Maximum 6 Press the Menu button to remove the on screen menu from the TV screen Selecting a DNR Dynamic Noise Reduction Option x 1 6 Picture Sound Features Channels TV Settings Demo Install Picture Sound Features Channels TV Contrast Brightness Color Sharpness Picture TV C...

Страница 33: ...at often appears in skin tones 1 Press the Menu button on the remote to display the on screen menu 2 Press the Cursor Right button to select Picture 3 Press the Cursor Down button repeat edly until the Color enhancement control is selected 4 Press the Cursor Right button to turn the color enhancement control on or off 5 Press the Menu button to remove the on screen menu from the TV screen Turning ...

Страница 34: ...nformation about PixelPlus Multimedia emphasizes soft colors This is a good choice for playing computer games for example ECO reduces brightness and contrast settings to low levels Whether you re watching a movie or playing a video game your TV has automatic video control settings to match your current pro gram source or content AutoPicture quick ly resets your TV s video controls for a num ber of...

Страница 35: ...Ds will still display black bars to preserve the true the atrical format HELPFUL HINT Conventional 4 3 Screen Size Your TV s 16 9 Screen Size Your TV s Picture Format Options Super zoom Removes the black or gray bars on the sides of a 4 3 format pic ture with minimal distortion Part of the top and bottom portions of the picture are excluded from the screen Panoramic Evenly stretches the edges of t...

Страница 36: ...nu 2 Press the Cursor Right button to select Picture 3 Press the Cursor Down button repeat edly until the Picture format control is selected 4 Press the Cursor Right button to enter the picture format submenu 5 Press the Cursor Down button to select one of the seven screen formats Automatic Super zoom Panoramic 4 3 Movie expand 14 9 Movie expand 16 9 16 9 subtitle or Wide screen The Automatic opti...

Страница 37: ...eft and Right buttons to adjust To control the Headphone volume 3 Press the Menu button on the remote control to display the on screen menu 4 Press the Cursor Right button to select Sound 5 Press the Cursor Down button repeat edly until the Headphone volume control is selected 6 Press the Cursor Right button to increase the headphone volume level 7 Press the Cursor Left button to decrease the head...

Страница 38: ...at the factory and cannot be changed 1 Press the Menu button on the remote to display the on screen menu 2 Press the Cursor Right button repeated ly to select Sound 3 Press the Cursor Down button repeat edly until the Equalizer control is selected 4 Press the Cursor Right button to enter the equalizer submenu Continue to press the Cursor Right button to select one of the options Speech Music Movie...

Страница 39: ...e Loudness Headphone volume 0 You can adjust the balance of the TV speaker sound 1 Press the Menu button on the remote to display the on screen menu 2 Press the Cursor Right button repeated ly to select Sound 3 Press the Cursor Down button repeat edly until the Balance control is selected 4 Press the Cursor Right or Left button to adjust speaker balance 5 Press the Menu button to remove the on scr...

Страница 40: ...ume Turning the Loudness control on provides a volume dependent bass boost effect to the speakers Follow the steps here to turn the Loudness control on 1 Press the Menu button on the remote to display the on screen menu 2 Press the Cursor Right button repeated ly to select Sound 3 Press the Cursor Down button repeat edly until the Loudness control is selected 4 Press the Cursor Right to toggle lou...

Страница 41: ...l the Sound mode control is selected 4 Press the Cursor Right button to enter the sound mode submenu 5 Press the Cursor Up or Down button to select one of modes either Incr Surround or Dolby Virtual Incr Surround enhances stereo pro grams by making the sound broader and fuller Dolby Virtual creates a virtualized surround sound experience from two speakers Dolby Virtual retains all the original mul...

Страница 42: ...tions are free to use SAP for any number of purposes If an SAP signal is not present with a selected program the Alt Audio option in the TV s on screen menu cannot be selected and will appear grayed out If SAP is available on the tuned channel 1 Press the Menu button on the remote to display the on screen menu 2 Press the Cursor Right button repeated ly to select Sound 3 Press the Cursor Down butt...

Страница 43: ...the on screen menu 2 Press the Cursor Right button repeated ly to select Sound 3 Press the Cursor Down button repeat edly until the Mono Stereo control is selected 4 Press the Cursor Right button to toggle and select either Mono or Stereo NOTE If the signal being received is in mono it cannot be set to Stereo If the signal is being received in Stereo the TV can be placed in the Mono mode If you se...

Страница 44: ...ay the on screen menu 2 Press the Cursor Right button repeated ly to select Sound 3 Press the Cursor Down button repeat edly until AVL is highlighted 4 Press the Cursor Right button to toggle the control on or off 5 Press the Menu button to remove the menu from the TV screen x 1 5 2 4 Picture Sound Features Channels TV Settings Demo Install Sound Features Channels TV Volume Equalizer Balance Loudn...

Страница 45: ...e remote control to tune to a specific channel 2 Press the Menu button on the remote control to show the on screen menu 3 Press the Cursor Right button repeated ly to select Sound 4 Press the Cursor Down button repeatedly until Delta volume is highlighted 5 Press the Cursor Left button to decrease the overall volume or press the Cursor Right button to increase the overall volume for the tuned chan...

Страница 46: ...ress the Menu button to remove the on screen menu from the TV screen x 2 4 1 6 Picture Sound Features Channels TV Settings Demo Install Sound Features Channels TV Volume Equalizer Balance Loudness Headphone volume Picture TV AVL Delta volume Auto sound Personal Speech Music Movies Multimedia Personal Speech Music Movies Multimedia Picture Auto sound TV 3 5 5 Selecting an AutoSound Option AutoSound...

Страница 47: ...n screen CC 1 is used most frequently CC 2 may be used for alternate languages if they are being transmitted T 1 T 2 T 3 or T 4 Often used for a channel guide schedules bulletin board information for captioned programs news weather information or stock market reports NOTES Text Modes T 1 through T 4 appear on screen as boxes and may block portions of the TV screen Not all caption services are nece...

Страница 48: ... after a period of time you choose 5 minutes up to 180 minutes in 5 minute increments 1 Press the Menu button on the remote control to display the on screen menu 2 Press the Cursor Right button repeated ly until Features is selected 3 Press the Cursor Down button repeat edly to select Sleeptimer 4 Press the Cursor Right button to set the sleeptimer in 5 minute increments from 5 minutes to 180 minu...

Страница 49: ... on 8 Press the Cursor Right button to shift the menu to the day daily submenu 9 Press the Cursor Up or Down button to select the day to turn on or select Daily 10Press the Cursor Right button to enter the AM PM submenu 11Press the Cursor Up or Down button to select AM or PM 12Press the Cursor Right button to enter the start time 13Press the Number buttons to enter the time Use 0 first if entering...

Страница 50: ...the Cursor Right button to enter the Channel List submenu 5 Press the Cursor Up or Down button to select a specific channel from the list 6 Press the OK button The television will tune to the selected channel 7 Press the Menu button to remove the on screen menu from the TV screen Using the Channel List x Channels TV Channel list Channel lock Lock after TV ratings lock Channels TV Channel list Chan...

Страница 51: ...e Channel remove control 4 Press the Cursor Right button to enter the list of channels in the television s memory 5 Press the Cursor Up or Down button to select a channel you want to remove 6 Press the OK button to activate your choice After you activate the Channel Remove control the channel s high lighted will no longer be tuned when you press the CH annel or but tons 7 Press the Menu button to ...

Страница 52: ...o video AV inputs Lock Channel provides this capability Before using the Lock Channel feature for the first time you will be asked to enter the PIN number Use the digit buttons on the remote control to enter the PIN you choose All num ber combinations from 0000 to 9999 are valid After you enter the number once you will be asked to confirm the number and then the number is stored To set or change y...

Страница 53: ... select AM or PM 8 Press the Cursor Right button to enter the Lock After time 9 Press the Number buttons to enter the time you want the television to lock all channels 10Press the Menu button to remove the on screen menu from the TV screen Using Lock After Channels TV Channel list Channel lock Lock after TV ratings lock Channels TV Channel list Channel lock Lock after TV ratings lock Off On Channe...

Страница 54: ...hildren programs designed to be appropriate for all children especially ones ages 2 6 These programs are not expected to frighten younger children TV Y7 Directed to Older Children programs designed for children ages 7 and older These programs may be more appropriate for children who have acquired the development skills needed to distinguish between make believe and reality Such programs may includ...

Страница 55: ... ages admitted Most parents will find programs that are rated G to be suitable for children of all ages Such programs have little or no violence no strong language and little or no sexual dialogue or sexual situations PG Parental Guidance Suggested contain material that parents may find unsuitable for younger children These programs have one or more of the following moderate violence some sexual s...

Страница 56: ...until you change the setting 1 Press the Menu button on the remote control to display the on screen menu 2 Press the Cursor Right button repeat edly to select Channels 3 Press the Cursor Down button repeat edly to select the Antenna attenuator control 4 Press the Cursor Right button to toggle the control On or Off 5 Press the Menu button to remove the on screen menu from the TV screen Turning the ...

Страница 57: ...to 2 channels or 9 channels 6 Press the Menu button to remove the on screen menu from the TV screen If you selected the 2 channels Surf option pressing the P P Surf button allows you to alternate between the currently viewed chan nel and the previously viewed channel If you selected the 9 channels Surf option pressing the P P Surf button displays a Surf list in which you can place up to 9 favorite...

Страница 58: ...t Settings 3 Press the Cursor Right button to select the General menu 4 Press the Cursor Down button repeat edly to select the Dual screen format control A submenu or list of options will appear 5 Press the Cursor Right button to enter the list of options 6 Press the Cursor Up or Down button to select the desire dual screen format Choose from Dual screen Large PIP or Small PIP 7 Press the Menu but...

Страница 59: ... the Cursor Up or Down button to select either the main or PIP screen A light colored border sur rounds the PIP screen when it is selected The PIP screen must be selected before its channel or input source can be changed 2 To change channels in the PIP screen press the CH Channel Selection or buttons Or 3 To select a different input source first press the Source button Then within 6 seconds press ...

Страница 60: ... remote control to display the on screen menu 2 Press the Cursor Down button to select Settings 3 Press the Cursor Right button to high light the General menu 4 Press the Cursor Down button repeat edly to highlight the Freeze format control A submenu will appear 5 Press the Cursor Right button to enter the submenu 6 Press the Cursor Up or Down button to select the desired freeze format Choose from...

Страница 61: ...g Lamp Replacement You can reset the TV s Sound and Picture set tings to the factory default values 1 Press the Menu button on the remote control to display the on screen menu 2 Press the Cursor Down button to select Settings 3 Press the Cursor Right button to select the General menu 4 Press the Cursor Down button repeat edly to select the Reset AV settings control 5 Press the OK button to reset t...

Страница 62: ...es and status screen informa tion 1 Press the Menu button on the remote control to display the on screen menu 2 Press the Cursor Down button to select Settings 3 Press the Cursor Right button to select the General menu 4 Press the Cursor Down button repeat edly to select the OSD control 5 Press the Cursor Right button to toggle between Minimum and Normal Normal mode the on screen display stays on ...

Страница 63: ...el feature 1 Press the Menu button on the remote control to display the on screen menu 2 Press the Cursor Down button to select Settings 3 Press the Cursor Right button to select the General menu 4 Press the Cursor Down button repeat edly to select either Set PIN or Change PIN NOTES If no PIN exists yet the menu will show Set PIN Simply follow the on screen instructions to set your PIN If a PIN ha...

Страница 64: ...e steps explain how 1 Press the Menu button on the remote control to display the on screen menu 2 Press the Cursor Down button to select Settings 3 Press the Cursor Right button to select the General menu 4 Press the Cursor Down button repeat edly to select the Subwoofer control 5 Press the Cursor Right button to toggle the Subwoofer control to Yes or No Select Yes if you have connected an externa...

Страница 65: ... the Cursor Down button to select Auto Clock Channel 6 Press the Cursor Right button to enter the channel list Select your local PBS channel by using the Cursor Up or Down buttons to scroll through the channel list or inputing the the channel using the number buttons 7 Press the Menu button on the remote control to remove the on screen menu from the TV screen 8 Next Set the Time Zone and Daylight ...

Страница 66: ...on repeatedly to back out to the Clock Menu 8 Press Cursor Down to select Day Then press Cursor Right to enter the list of days 9 Press the Cursor Up or Down but tons to select the current day 10Press the Menu button on the remote control to remove the on screen menu from the TV screen 11Next Set the Time Zone and Daylight Savings Time See page 69 for instructions Setting the Clock Manually Clock ...

Страница 67: ...e current time from the signal being received It needs to know your Time Zone however and whether or not you use Daylight Savings 1 Press the Menu button on the remote control to display the on screen menu 2 Press the Cursor Down button to high light Settings 3 Press the Cursor Right button repeated ly to select the Clock menu 4 Press the Cursor Down button repeat edly to select the Time Zone cont...

Страница 68: ...e of connection you have made either Antenna or Cable 10Press the Cursor Left button after making your Install mode selec tion 11Press the Cursor Down button to select Install 12Press the Cursor Right button to start the programming process 13Press the Menu button to remove the on screen menu from the TV screen when the Autoprogramming process has finished SOUND PICTURE ACITVE CONTROL ZOOM 1 2 1 6...

Страница 69: ...t cause permanent marring of the cabinet finish The television contains plastic parts DO NOT use benzine thinners or other chemi cals to clean DO NOT use insecticide or other volatile substances nearby DO NOT allow the TV to come into contact for extended periods of time with rubber or vinyl products Be sure the TV is unplugged before cleaning it Use a nonscratching duster Wipe with even easy ver ...

Страница 70: ...e In Standby mode the TV is off Be sure the TV is not placed on a surface such as a shag carpet that will prevent the free flow of air through the inlets and periodically clean or replace the filters as detailed in the following instructions WARNING Do not tip the TV when remov ing or installing the filters This may result in instability of the TV 1 Place your fingers under one of the fil ter slot...

Страница 71: ...To order a replacement lamp call the Philips Customer Care Center at 1 800 531 0039 A Philips associate will be happy to assist you The part number for the Philips TV replacement lamp is 3122 438 71310 Here are the steps for replacing the lamp 1 Power off the TV Unplug the TV 2 The lamp door is located on the back of the TV next to the power cord Gently slide the door completely to the right to op...

Страница 72: ...e with local state and federal regulations 6 CAUTION When installing the new lamp do not touch the glass envelope Oil from skin can reduce lamp life Align the groove on top of the new lamp s housing with the corresponding groove pocket inside the TV then slide the new lamp into place 7 Tighten the thumb screws clockwise until finger tight only Do not over tighten 8 Slide the lamp door closed IMPOR...

Страница 73: ...eed to enter the Lamp rating list in the on screen menu and select the alphabetical code that is provided with the lamp The recom mended Philips replacement Lamp is rated for 6000 hours an F rating The next step is to use the Lamp replaced control to tell the TV that you have installed a new lamp This control resets the Lifetime Counter to 0 for the new lamp and begins keeping track of the lifetim...

Страница 74: ...designed not to operate when the lamp door is ajar If a red light is blinking on the front of the TV the set has entered protection mode Unplug and plug the set back in a couple of times and try to switch it on If the problem persists contact the Customer Care Center at 1 800 531 0039 The Sleeptimer may have been set to turn the TV off Turn the TV back on if desired page 45 The TV switches on unex...

Страница 75: ...ou want page 33 Remote related Checks The remote control does not work Make sure nothing is blocking the path between the remote control and the TV or accessory device you want to operate Make sure you point the remote directly at the TV or accessory device you want to operate If you want to operate the TV make sure the remote is in TV mode If a green light is flashing the remote is in an accessor...

Страница 76: ...peech Music Personal Eight widescreen modes Automatic Super Zoom Panoramic 4 3 Movie Expand 14 9 Movie Expand 16 9 16 9 Subtitle and Wide Screen Subtitle and heading shift scroll the screen with the cursor buttons Auto Format Auto Screen Fit Smart Clock Miscellaneous Mains AC 110V 10 Power consumption Normal operation 233W Standby 1W Input and output jacks see page 7 Product dimensions d x w x h 4...

Страница 77: ...tting for the On screen Menu Q8 Lock After 53 Lock Channel 52 Loudness Control 40 O On screen Displays Options 62 On Timer 49 Overheating Preventing Q1 2 9 70 P Panel Jacks Compatibility Information 7 8 Panning the Screen with Cursor Buttons Q6 16 35 Picture Controls 29 Picture Format Options 35 36 Picture Freeze Options 60 PIN Setting up or Changing 63 PIP 58 Power Surges Protecting Against 9 Pre...

Страница 78: ...e sans frais Pour les produits non couverts par la garantie con tactez le centre le plus près de chez vous NOTA Si Ud reside en una de nuestras zonas para sucursales Philips de servicio al de fábrica ver directorio más abajo Ud puede comunicarse con la sucursal de servicio más cercana para obtener una reparación oportuna y eficaz de su producto Si su producto está todavía bajo garantía Ud debe pre...

Страница 79: ...S NECESITADOS DE REPARACIONES COMUNICARSE CON EL CENTRO DE SERVICIO DE FABRICA MAS CERCANO PARA ESTOS LUGARES DENTRO DE UN RADIO DE 80 A 120 KM 50 A 75 MILLAS DEL CENTRO DE SERVICIO LOCAL ATLANTA Philips Factory Service 550 Franklin Road Suite F Marietta GA 30067 800 273 1501 TAMPA Philips Factory Service 1911 US Highway 301 North Suite 100 Tampa FL 33619 800 442 2027 SAN FRANCISCO Philips Factory...

Страница 80: ...fi cially distributed by Philips Consumer Electronics Company In coun tries where Philips Consumer Electronics Company does not distribute the product the local Philips service organization will attempt to pro vide service although there may be a delay if the appropriate spare parts and technical manual s are not readily available MAKE SURE YOU KEEP Please keep your sales receipt or other document...

Отзывы: