background image

18

       Add a channel to a favourite list

 Tip

 View all channels before adding a channel to a 
favourite list.

    1

  When watching TV, switch to the channel 

you want to add to a favourite  list   (see 
‘Switch channels’ on page   7  ) .

    2

 Press 


OPTIONS

.

    The channel options menu appears.

      3

 Press 

      to select  

[Mark as favourite]

 .

    4

 Press 


OK

 .

    5

  Select a favourite list to add the channel to.

    6

 Press 


OK

 .

    The channel is added to the favourite 
list.

      7

 Press 


 BACK


 A/CH

  to exit the channel 

options menu. 

    The channel grid appears.

         Remove a channel from a favourite 
list

 Note

 Select the favourite list to edit, before 
removing a  channel .

    1

  When watching TV, press  

OK

 .

    The channel grid appears.

      2

 Press 


  to select a channel.

    3

 Press 


 OPTIONS

 .

    The channel options menu appears.

      4

 Press 

      to select  

[Unmark as favourite]

 .

    5

 Press 


OK

 .

    The channel is removed from the 
favourite list.

      6

 Press 


 BACK


 A/CH

  to exit the channel 

options menu. 

    The updated channel grid appears, 
displaying the current channels in the 
favourite list.

»

»

»

»

»

»

»


[Auto volume]

 Automatically 

reduces sudden volume changes, for 
example, when switching channels. 
When enabled, this produces a more 
consistent audio volume.
     

[Delta volume]

 Corrects volume 

differences between TV channels 
and connected devices (switch 
to your connected device when 
adjusting  

[Delta volume]

 ).

          Create and use lists of 
favourite channels

  You can create lists of your preferred TV 
channels and radio stations so that you can  nd 
those channels easily.

 Tip

 You can create and store up to four favourite 
lists on your TV.

     Select a favourite list


    1

  When watching TV, press  

OK

 .

    The channel grid appears.

      2

 Press 


    OPTIONS .

    The options menu appears.

      3

 Press 

      to select  

[Show favourite 

channels]

 .

    The favourite lists appear.

      4

 Press 

      to select a favourite list or  

[All]

 .

    5

 Press 


OK

 . 

    If you selected a favourite list, only 
channels in the list appear in the 
channel grid; if you selected  

[All]

 , 

all installed channels appear in the 
channel grid.

      6

 Press 

   to exit the options menu.

»

»

»

»

EN
Содержание 32PFL5609D/30

Страница 1: ...Register your product and get support at www philips com welcome N E User manual 42PFL7409D 30 47PFL7409D 30 32PFL5609D 30 42PFL5609D 30 47PFL5609D 30 non contractual image ...

Страница 2: ......

Страница 3: ...nformation banner 9 Install channels 9 Test digital reception 10 Change the order of stored channels 11 Set your preferences 11 Control access to digital channels 12 Set up your favourite channels 14 Use the Electronic Programme Guide 14 6 Use your product in analogue mode15 AccessTV menus 15 Change picture and sound settings 15 Create and use lists of favourite channels 18 Use timers 19 Use child...

Страница 4: ...ject www freetype org 1 Notice 2009 Koninklijke Philips Electronics N V All rights reserved Speci cations are subject to change without notice Trademarks are the property of Koninklijke Philips Electronics N V or their respective owners Philips reserves the right to change products at any time without being obliged to adjust earlier supplies accordingly The material in this manual is believed adeq...

Страница 5: ...rniture to reach the TV Risk of overheating Never install the TV in a con ned space Always leave a space of at least 4 inches or 10 cm around the TV for ventilation Ensure curtains or other objects never cover the ventilation slots on the TV Risk of damage to the TV Before you connect the TV to the power outlet ensure that the power voltage matches 2 Important Read and understand all instructions ...

Страница 6: ... the power cord always pull the plug never the cable Disconnect the TV from the power outlet and aerial before lightning storms During lightning storms never touch any part of the TV power cord or aerial cable Risk of hearing damage Avoid using earphones or headphones at high volumes or for prolonged periods of time If the TV is transported in temperatures below 5 C unpack the TV and wait until th...

Страница 7: ...chase and welcome to Philips To fully bene t from the support that Philips offers register your product at www philips com welcome Side controls and indicators a POWER Switches the product on or off The product is not powered off completely unless it is physically unplugged b P CH Switches to the next or previous channel c SOURCE Selects connected devices d VOLUME Increases or decreases volume 3 4...

Страница 8: ...de b DIGITAL MENU Accesses or exits the digital menu c SOURCE Selects connected devices d SUBTITLE Enables or disables subtitles e DUAL Switches Stereo and Nicam Stereo to Mono Selects rst language Dual I or second language Dual II in bilingual programmes f Home Toggles the home menu on or off g OPTIONS Accesses options relating to the current activity or selection h OK Con rms an entry or selecti...

Страница 9: ... you perform basic operations Switch your TV on off or to standby To switch on If the standby indicator is off press POWER at the side of the TV If the standby indicator is red press Standby On on the remote control To switch to standby Press Standby On on the remote control The standby indicator switches to red To switch off Press POWER at the side of the TV The standby indicator switches off Tip...

Страница 10: ...asy access add new devices to the home menu before selecting them Use the source button 1 Press SOURCE The source list appears 2 Press or to select the connected device 3 Press OK to watch the connected device Use the home menu Note You can add new devices to the home menu for easy access 1 Press Home The home menu appears 2 Press to select the device 3 Press OK to watch the connected device on yo...

Страница 11: ...ions that have been launched by the broadcaster after the initial installation Note If you are not in the digital mode press ANALOG DIGITAL 1 Press DIGITAL MENU 2 Select Installation Service Setup and press 5 Use your product in digital mode Understand the information banner When you select a digital channel an information banner is displayed at the top of the screen The banner disappears after a ...

Страница 12: ...me of the broadcast network is displayed 5 Press to select Signal Quality An indicator bar displays the quality level of theTV signal 3 Press to Add new services and press OK to activate the installation A search begins Any new channels are added to the channel list menu The percentage of the installation that has been completed and the number of channels found is displayed Note To cancel installa...

Страница 13: ...ar displays the strength level of theTV signal 7 Press to return to the previous menu or press DIGITAL MENU to exit Tip If the signal strength is poor consider adjusting or checking the connection of your antenna Contact a professional antenna installer for best results Change the order of stored channels You can change the order of the digital channels and radio stations that you have stored Note...

Страница 14: ...o output Note If you are not in the digital mode press ANALOG DIGITAL 1 Press DIGITAL MENU 2 Select Preferences Digital Audio Output and press 3 Press or to select AC3 or PCM output 4 Press to return to the previous menu or press DIGITAL MENU to exit Digital Audio Output AC3 A compressed digital audio format that supports 5 1 channel PCM Pulse Code Modulation PCM is a way of transmitting uncompres...

Страница 15: ...ou are not in the digital mode press ANALOG DIGITAL 1 Press DIGITAL MENU 2 Select Favorites list number List 1 to List 4 and press OK 3 Press to enter the Favorites setting options Change the name of a favourite list 1 Press DIGITAL MENU 2 Select Favorites list number List 1 to List 4 Name 3 Press or to move the cursor over the character of the name list and press or to scroll through the characte...

Страница 16: ... programmes Group programmes by genre Set reminders when programmes start Set up preferred EPG channels Switch on EPG 1 When watching TV press GUIDE The EPG planner screen appears displaying information about the scheduled programmes Tip Press GUIDE to switch between EPG and channel grid Use EPG 1 When watching TV press GUIDE The EPG planner screen appears 2 Press or to change channels or or to No...

Страница 17: ...Use the settings assistant to guide you through the best picture settings 1 Press Home The home menu appears 2 Press to select Setup Picture Settings assistant Start 3 Press OK The Settings assistant menu appears Follow the on screen instructions to choose your preferred picture settings 6 Use your product in analogue mode Access TV menus Menus help you to install channels change picture and sound...

Страница 18: ...A picture format bar appears 2 Press to select a picture format The selected picture format is previewed Use smart picture Use smart picture to apply pre de ned picture settings 1 Press PICTURE The Smart picture menu appears 2 Press to select from the following smart picture settings Personal Lists customised personal picture settings Vivid Maximises picture settings Standard Adjusts picture setti...

Страница 19: ...es menu to make the TV speakers menu available Surround Enables spatial sound Headphone volume Adjusts headphone volume Summary of picture formats The following picture settings can be con gured Note Depending on the format of the picture source some picture settings are not available Super zoom Not for HD and PC mode Removes the black bars on the side of 4 3 broadcasts There is minimal distortion...

Страница 20: ...nnel options menu The updated channel grid appears displaying the current channels in the favourite list Auto volume Automatically reduces sudden volume changes for example when switching channels When enabled this produces a more consistent audio volume Delta volume Corrects volume differences between TV channels and connected devices switch to your connected device when adjusting Delta volume Cr...

Страница 21: ... select Setup Features TV lock Use timers You can set timers to switch theTV on or switch to standby at a speci ed time Set the time 1 Press Home 2 Select Setup Features Clock 3 Press OK 4 Press to set the time 5 Select Done 6 Press OK Automatically switch the TV to standby sleeptimer Sleeptimer switches the TV to standby after a pre de ned period of time Tip You can always switch off your TV earl...

Страница 22: ...s displayed Note The clock is disabled automatically after ten minutes To disable the clock before that repeat this procedure A message appears prompting you to enter your PIN code 3 Enter your PIN code with the Numeric buttons The TV lock menu appears 4 Press to select Lock or Unlock 5 Press OK All channels and connected devices are locked or unlocked Lock or unlock one or more channels 1 When wa...

Страница 23: ...orted nor is it responsible for damage or loss of data from the device YourTV is tted with a USB connector that enables you to view photos listen to music or watch movies stored on a USB storage device Supported le formats Pictures JPEG non progressive only Music MP3 Video H 264 MPEG4 Note Only FAT or DOS formatted USB storage devices are supported File names must not exceed 128 characters Your TV...

Страница 24: ...er is off the wallpaper is displayed for a maximum of 120 minutes Change slide show settings 1 When viewing a slide show press OPTIONS The slide show options menu appears 2 Press to select from the following settings and adjust Start Stop slide Starts or stops a slide show Slideshow transitions Displays a list of transition styles Slideshow frequency Sets the amount of time that a picture is shown...

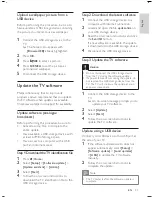
Страница 25: ...tware manually 2 Follow the on screen instructions to complete the update Note The TV restarts after the software update is complete Upload a wallpaper picture from a USB device Before performing this procedure be sure to have available a USB storage device containing the picture you intend to use as wallpaper 1 Connect the USB storage device to the TV The home menu appears with Browse USB already...

Страница 26: ... or shop Volume bar Displays the volume bar when adjusting the volume Channel info Displays information about the TV channel every time you switch channels EasyLink Enables one touch play and one touch standby between EasyLink compliant devices Pixel Plus Link Overrides the settings of connected devices and uses the settings of the TV E sticker For shop mode only Sets the location of the e sticker...

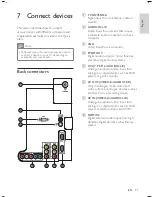
Страница 27: ...e Audio and video output to analogue devices such as another TV or a recording device g AV IN VIDEO and AUDIO L R Analogue audio and video input from analogue or digital devices such as DVD players satellite receivers and VCRs h HDMI 1 2 Digital audio and video input from high de nition digital devices such as Blu ray players 7 Connect devices This section describes how to connect various devices ...

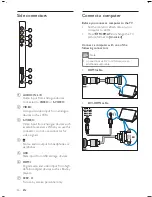
Страница 28: ...RIGHT HDMI 1 DVI HDMI 2 DVI HDMI 3 DVI VGA Side connectors a AUDIO IN L R Audio input from analogue devices connected to VIDEO or S VIDEO b VIDEO Composite video input from analogue devices such as VCRs c S VIDEO Video input from analogue devices such as satellite receivers When you use this connector do not use connector for video signals d Stereo audio output to headphones or earphones e USB Dat...

Страница 29: ...ign the device attached to each connector This allows you to easily identify devices connected to yourTV 1 Press Home 2 Select Add new device and press OK 3 Select Start and press OK 4 Press or to select a device and press 5 Press or to select the connector your device is connected to and press DVI AUDIO IN LEFT RIGHT HDMI 1 DVI HDMI 2 DVI HDMI 3 DVI VGA DVI AUDIO IN LEFT RIGHT HDMI 1 DVI HDMI 2 D...

Страница 30: ... CEC Consumer Electronics Control protocol EasyLink compliant devices that are connected through HDMI connectors can be controlled by a single remote control Note Philips does not guarantee 100 interoperability with all HDMI CEC devices Note The EasyLink compliant device must be switched on and selected as the source EasyLink features One touch play When you connect your TV to devices that support...

Страница 31: ...a device that is connected to an HDMI connector 3 Press OPTIONS 4 Select En Dis RC pass 5 Press OK 6 Press or to highlight an HDMI connector 7 Press OK to enable RC key forwarding for the selected HDMI connector Set TV speakers to EasyLink mode When enabled this feature automatically turns off TV speakers when content from an EasyLink compliant home theatre system is played Audio is played only fr...

Страница 32: ...nent video CVI in VGA in HDMI VGA Audio in SPDIF out USB Service connector 8 Product information Product information is subject to change without notice For detailed product information go to www philips com support Supported display resolutions Computer formats HDMI Resolution Refresh rate Hz 640 x 480 720 x 400 800 x 600 1024 x 768 1280 x 1024 1360 x 768 1600 x 1200 1920 x 1080 60 72 75 70 60 72...

Страница 33: ...nt damage to cables and connectors be sure to leave a clearance of at least 5 5 cm from the back of theTV Warning Follow all instructions provided with the TV mount Koninklijke Philips Electronics N V bears no responsibility for improper TV mounting that results in accident injury or damage TV screen size VESA compatible wall bracket type 32 37 200 x 200 mm M6 42 47 400 x 400 mm M6 42 M8 47 E n gl...

Страница 34: ... not save your picture settings Check that the TV location is set to the home setting This mode offers you the exibility to change and save settings 9 Troubleshooting This section describes commonly encountered issues and accompanying solutions General TV issues The TV does not switch on Disconnect the power cable from the power outlet Wait for one minute then reconnect it Check that the power cab...

Страница 35: ...e back of the TV and on the packaging The picture does not t the screen it is too big or too small Try using a different picture format The picture position is incorrect Picture signals from some devices may not t the screen correctly Check the signal output of the device Sound issues There is a picture but no sound from the TV Note If no audio signal is detected the TV automatically switches the ...

Страница 36: ...14 USB 22 P Picture format troubleshooting 32 10 Index B Batteries 4 C Channel list favourite 18 troubleshooting 32 update 18 Channels favourite list 18 install automatic 31 manual 31 rearrange 32 rename 31 test reception 10 Child lock TV lock 19 Clock 20 Computer format technical speci cations 30 Connections HDMI troubleshooting 33 mains cord 25 technical speci cations 30 troubleshooting 33 USB t...

Страница 37: ...istant 15 Sleep timer 19 Smart settings 16 17 Sound settings 17 Standby troubleshooting 32 Subtitles language 20 on analogue channel 20 on digital channel 20 T Technical speci cations 30 Timer on timer 19 sleeptimer 19 standby 19 Transmission troubleshooting 32 Troubleshooting 32 TV adjust volume 8 menu 15 software 23 standby 7 switch channels 7 switch off 7 switch on 7 troubleshooting 32 tuner te...

Страница 38: ... 2009 Koninklijke Philips Electronics N V All rights reserved Document order number 3139 125 41062 ...

Отзывы: