background image

8

Con

fi

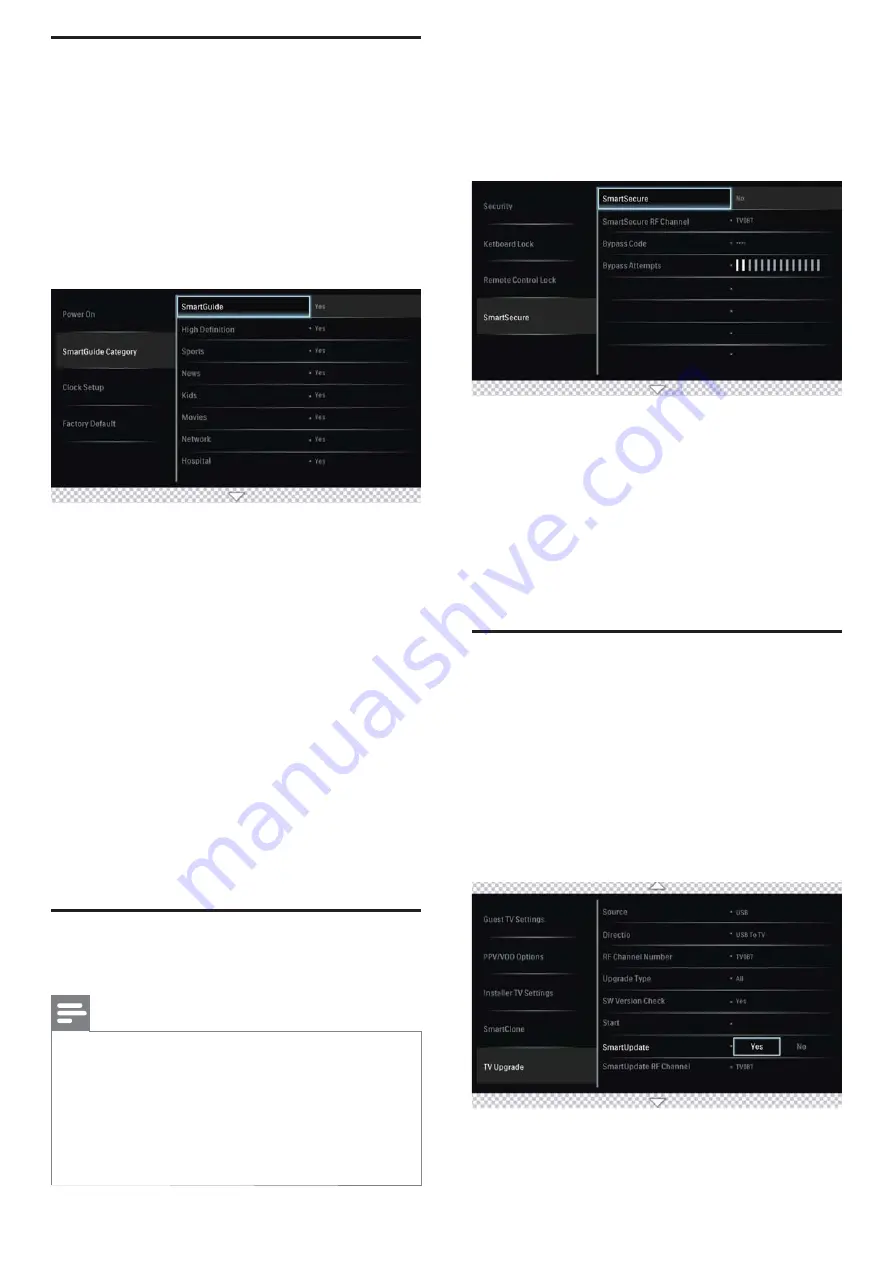
 gure the Smart Guide 

Categories

This section provides information to configure SmartGuide 
Categories icons.  Guests can access these icons by pressing 
the SMART GUIDE button on the guest remote control.

1. 

 Press 

M

 on the setup remote control to display the setup 

menu.

2. 

 Press 

oœp

π

 to select the Installer TV settings and 

press 

oœp

π

to go one level down to SmartGuide 

category.

3. 

 Press 

oœp

π

 and OK button on remote control to 

select one of the followings settings :

• 

High De

fi

 nition:

 Enables the High De

fi

 nition icon in 

the SmartGuide categories.

• 

Sports:

 Enables the Sports icon in the SmartGuide 

categories.

• 

News:

 Enables the News icon in the SmartGuide 

categories.

• 

Kids:

 Enables the Kids icon in the SmartGuide 

categories.

• 

Movies:

 Enables the Movies icon in the SmartGuide 

categories.

• 

Network:

 Enables the Network icon in the 

SmartGuide categories.

• 

Adult/Hospital:

 Enables the Adult/Hospital icon in the 

SmartGuide categories.

• 

Lifestyle:

 Enables the Lifestyle icon in the SmartGuide 

categories.

• 

Other/Education:

 Enables the Other/Education icon 

in the SmartGuide categories.

Con

fi

 gure the SmartSecure 

settings


Note

• SMARTSECURE feature prevents theft as TV only works 

when connected to the property distribution system.

• SMARTSECURE is available on selected models only.
• SMARTSECURE must be used with a Philips Smart 

Gateway (PSG) device. Do not enable SMARTSECURE 
unless the PSG has been con

fi

 gured at your location. 

For more information on the PSG, contact your Philips 
authorized agent or dealer.

This section allows the Installer to customize the Security 
settings of the TV.

1. 

 Press 

M

 on the setup remote control to display the setup 

menu.

2. 

 Press 

oœp

π

 to select the Installer TV settings and 

press 

oœp

π

 to go one level down to Security.

3. 

 Press 

œ 

and 

π

 to go to SmartSecure menu.

4. 

 Press 

œop

π

to disable or enable SmartSecure via RF 

or BLAN*.
* This is only available on certain models.

5. 

 Press 

œop

π

 to select SmartSecure RF channel if RF is 

selected.  

» 

The TV checks for the SmartSecure ID on speci

fi

 c 

TV channel (when enabled). If the ID is found, the TV will 
function. If the ID is not found, the TV will display an error 
message and not function.

Con

fi

 gure the SmartUpdate 

settings

This section allows the Installer to enables/disables 
the SmartUpdate feature of the TV. If set to Yes, then 
SmartUpdate will automatically check for new TV upgrades 
at regular intervals at specific RF channel and upgrade the TV 
software accordingly.

1. 

 Press 

M

 on the setup remote control to display the setup 

menu.

2. 

 Press 

œop

π

 to select the TV Upgrade.

3. 

 Press 

œop

π

 to select SmartUpdate.

Содержание 32HFL4462F

Страница 1: ...Quick Start Guide 32HFL4462F 37HFL4482F 42HFL4482F ...

Страница 2: ...mount is being fixed securely enough so that it meets safety standards 4 ThisTV is compatible with theVESA wall mounting standard Please contact your local electronics supplier for aVESA compliant bracket to wall mount thisTV Before you mount yourTV on a wall ensure the wall is suitable to carry the weight of theTV 5 Do not insert the power plug in the wall socket before all connections are made 6...

Страница 3: ... or top of the cabinet which could ultimately overturn the product Also do not endanger yourself or children by placing electronic equipment toys on the top of the cabinet Such items could unsuspectingly fall from the top of the set and cause product damage and or personal injury 18 Wall or Ceiling Mounting The appliance should be mounted to a wall or ceiling only as recommended by the manufacture...

Страница 4: ... date of purchase of this product Federal Communications Commission Notice This equipment has been tested and found to comply with the limits for a Class B digital device pursuant to part 15 of the FCC Rules These limits are designed to provide reasonable protection against harmful interference in a residential installation This equipment generates uses and can radiate radio frequency energy and i...

Страница 5: ...ith your normal household waste Correct disposal of your old product helps to prevent potential negative consequences for the environment and human health Like all LCD products this set contains a lamp with mercury please dispose of according to all local state and federal laws Philips pays a lot of attention to produce environment friendly products in green focal areas Your newTV contains materia...

Страница 6: ...gy consumption and the turn on time is increased The user should be aware that changing certain settings can cause the TV to consume more energy and put it in a condition that is no longer Energy Star compliant Some examples include but are not limited to changing Standby mode to speed up turn on time or raising the contrast level for a brighter picture Attention This TV is configured in Energy Sa...

Страница 7: ...do the TV installation setting 1 Please select your Language 2 SmartInstall Initial Wizard 3 SmartInstall PPV System selection If PPV System is selected asYes The Screen Menu will request for selection of CommunicationType which includes SmartPort select No SPI 5V SPI 3V3 and Serial Express 4 SmartInstall Standalone Proidiom selection 5 SmartInstall InstallTV Channels 6 SmartInstall InstallTV Sett...

Страница 8: ...irm the Smart Install Finished is OK Channel Setting Setup This section describes how to change the channel settings 1 Press M on the setup remote control to display the setup menu 2 Press oœpπ to select Channel Map Setup Current Channel Setup options Channel Input Channel Logo Digital RF Channel Number MPEG Program Number Rings SmartGuide Label Mute 3 Go to SmartGuide Menu by pressing Select the ...

Страница 9: ...lume at which the TV is turned on Channel Display Sets the display of channel number channel label and channel logo on the screen Configure Smart Feature settings Configure the Smart Power Settings Philips continuously focuses on lowering the environmental impact of its consumer products by adopting energy efficient ways of power management This section describes how to select a setting for maximu...

Страница 10: ...d to the property distribution system SMARTSECURE is available on selected models only SMARTSECURE must be used with a Philips Smart Gateway PSG device Do not enable SMARTSECURE unless the PSG has been configured at your location For more information on the PSG contact your Philips authorized agent or dealer This section allows the Installer to customize the Security settings of the TV 1 Press M o...

Страница 11: ...to USB device Note When selecting RF ensure that this is the channel that will be used to stream the data RF cloning must be used with a Philips Smart Gateway PSG device For more information on the PSG contact your Philips authorized agent or dealer Installation of Pay per View box This section describes how to install a external pay per view box Step 1 Set the communication mode You must setup th...

Страница 12: ... setup remote control is not included in the box Contact your Philips authorized agent or dealer to acquire the setup remote control Setup remote control might differ from the illustration A B C D E RECALL INFO F G RESET UPGRADE GUIDE BACK PP ALARM CLOCK OPTIONS HOME MENU SMART TELETEXT ABC DEF JKL MNO GHI TUV WXYZ PQRS SLEEP AV MUTE CC TV VOL P RC5 GUEST RC5 SETUP RC6 GUEST RC6 SETUP HOSPITALITY ...

Страница 13: ... DATA 1 g h k i j VGA IN PC AUDIO IN USB SIDE HDMI VIDEO IN L AUDIO IN R a b c d e f l a VIDEO IN b AUDIO IN L R c VGA IN d PC AUDIO IN e USB f SIDE HDMI g CVI YPbPr and AUDIO L R h Data 1 i SPDIF OUT j HDMI 1 k RS232 Service Port l TV 75Ω ...

Страница 14: ...Z 4 1 G 7 8 3 0 8 1 3 2 2 A 2010 Koninklijke Philips Electronics N V All rights reserved Document order number Z41G783081322A ...

Отзывы: