background image

3

English


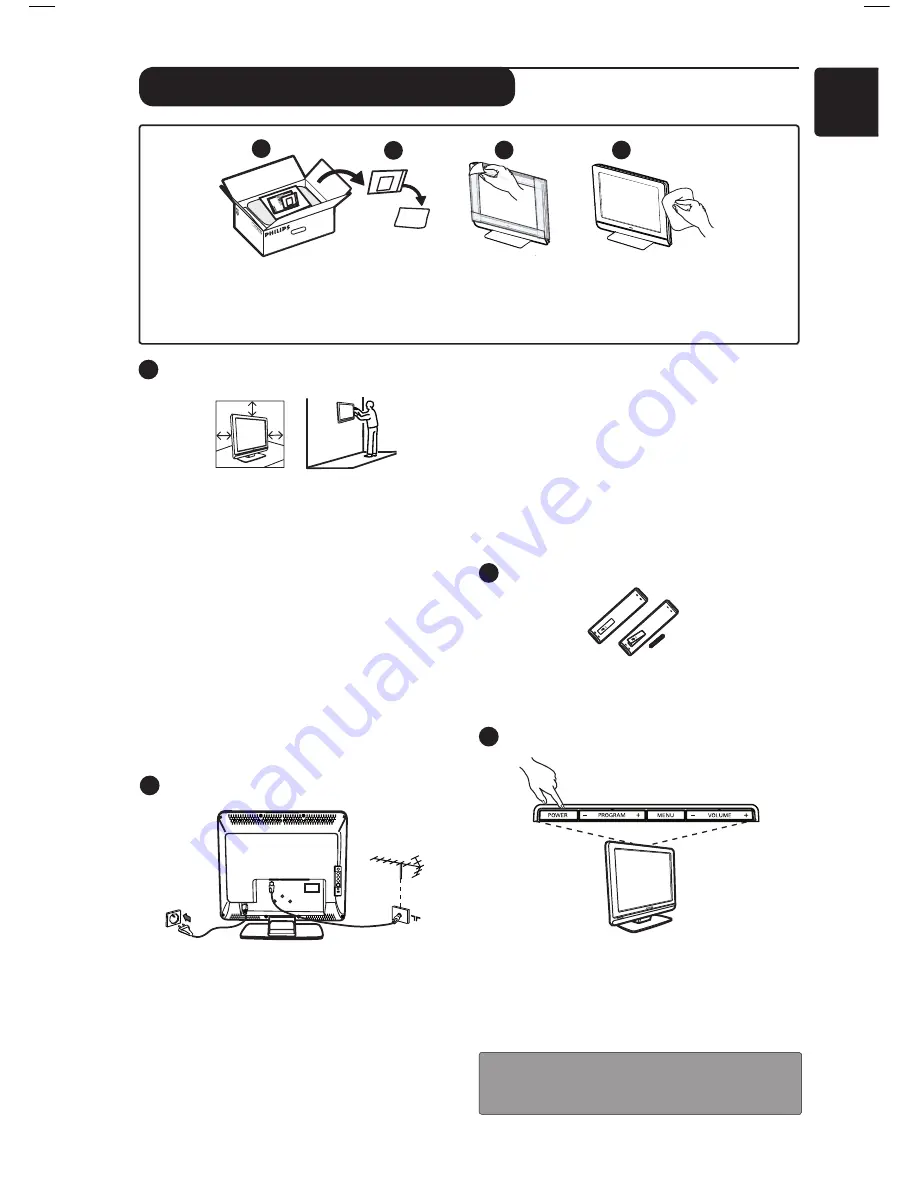
  Using the Remote Control

  •  Insert the 2 batteries supplied. Ensure that    
     the (+) and (-) ends of the batteries line up    
     correctly (inside of case is marked.)

      Switching on the TV set

  •  To switch on the TV set, press the POWER  

     button. A green indicator comes on and the  

     screen lights up.

  •   If the TV set remains in standby mode (red   

     indicator), press the P – / + button on the    

    remote control.

 NOTE: 

 Do not leave the TV in standby mode

  for an extended period of time. Instead,

  disconnect the TV from the mains.


Positioning the TV set


 •  If you place the TV set on a surface, ensure 

the surface is level and that it can withstand 

the weight of the TV.

•  Before you hang your TV on a wall, ensure 

the wall is suitable to carry the weight of 
the TV. Installation of the TV set on the wall 
should be carried out by qualified person. 
Improper installation can cause the TV to be 
unsafe.
The connections do not have to be made 
before hanging the TV, but the cables must 
be inserted into connectors of the TV.

•  Wherever you place or hang the TV, ensure 

that air can circulate freely through the 

ventilation slots. Do not position the TV in a 

confined space.


Connections

If you do not have a cable box or satellite box, 

follow these instructions:
  •  Insert the aerial plug into the 

socket at    

     the bottom of the set.

  •  Insert the mains plug into a wall socket  


   (220-240V 50/60Hz).
If you are using a cable box or satellite box see 

“Connecting peripheral equipment” on page 16 

to 19.

2

3

1

Preparation / Getting started

4

15

PF

51

21


20

PF

51

21


23

PF

53

21


Do not remove the protective sheet until you have completed the stand/wallmounting and 
connections.
Please handle with care. Use a soft cloth provided to clean the glossy black front of the TV.

The power consumption of the set is given 

on the type plate at the rear of the TV.

Warning: 

Verify that the mains supply voltage 

in your home corresponds to the voltage printed 

on the sticker at the rear of the TV.
If the TV is mounted on a swivel base or swivel 

arm, ensure no strain is placed on the power 

cord when the TV is swivelled. Strain on the 

power cord can loosen connections. This may 

cause arcing and result in fire.

Содержание 20PFL5122

Страница 1: ...English ...

Страница 2: ......

Страница 3: ... free Ireland 01 601 1777 local Italy 840320086 0 08 min Luxemburg 40 6661 5644 local Netherlands 0900 8407 0 10 min Norway 2270 8111 local Poland 0223491504 local Portugal 2 1359 1442 local Slovakia 0800004537 free Spain 902 888 784 0 10 min Sweden 08 5792 9100 local Switzerland 0844 800 544 local UK 0845 601 0354 local This information is correct at the time of press For updated information see ...

Страница 4: ... if provided Use only the stand provided with the set making sure that the fixings are properly tightened A diagram showing how to assemble the stand is packed with the stand Never use a make shift stand or legs fixed with woodscrews Positioning the TV For the best results choose a position where light does not fall directly on the screen and at some distance away from radiators or other sources o...

Страница 5: ......

Страница 6: ... Apply to the local authorities for correct disposal Disposal of your old product Your product is designed and manufactured with highly quality material and components which can be recycled and reused When this crossed out wheeled bin symbol is attached to a product it means the product is covered by the European Directive 2002 96 EC Please inform yourself about the local separate collection syste...

Страница 7: ...ure and sound settings 8 Using the Contrast and Sleeptimer features 9 Using the smart picture and sound features 9 Screen formats 10 Teletext 11 Using the TV as a PC monitor 12 Using the TV in High Definition HD mode 13 Using the TV as an FM Radio 14 Using the FM radio sound features 15 Connecting peripheral equipment Connecting a DVD recorder or VCR recorder 16 Connecting a computer 17 Connecting...

Страница 8: ...s cord on the TV is used as the disconnect device Philips Royal Electronics manufactures and sells many products targeted at consumers which like any electronic apparatus in general have the ability to emit and receive electro magnetic signals One of Philips leading Business Principles is to take all necessary health and safety measures for our products to comply with all applicable legal requirem...

Страница 9: ...s of the TV Wherever you place or hang the TV ensure that air can circulate freely through the ventilation slots Do not position the TV in a confined space Connections If you do not have a cable box or satellite box follow these instructions Insert the aerial plug into the socket at the bottom of the set Insert the mains plug into a wall socket 220 240V 50 60Hz If you are using a cable box or sate...

Страница 10: ...aerial plug into the TV Antenna socket 1 2 3 4 5 6 8 FM Aerial socket Insert the radio aerial lead into the FM Antenna socket For Service use only EXT1 socket for connecting to devices like DVD VCR recorder decoder or games console DVI I HD PC for connecting a High Definition HD equipment or computer with DVI VGA output Side connections AV SVHS for connecting to devices like camera or camcorder Al...

Страница 11: ... for bilingual programmes to choose between Dual å or Dual The Mono indication is red when in forced position Programme List To display exit the list of programmes Use the Î ï keys to select a programme and the Æ key to display it Teletext key see page 11 Surround mode To activate deactivate the surround sound effect In stereo this gives the impression that the speakers are further apart Mute Mute...

Страница 12: ...nu is displayed on the screen Use the ï key select the Install menu and the Æ key to enter the Install menu Use the ï key to select Sort and the Æ key to enter sort mode Select the programme number you want to move by using the Î ï keys and the Æ key to enter sorting mode The arrow cursor now points to the left Use the Î ï keys to select the new programme number and confirm with the Í key The arro...

Страница 13: ...TV Menu Picture Sound Features Install TV Menu Picture Sound Features Install Manual Store System Search Program No Fine Tune Store Europe Æ Æ Æ Æ To exit the menu press the Ë key NOTE If you interrupt search during auto store not all channels are stored For all channels to be stored you must do a complete auto store search again Selecting the language If you have selected the wrong language to op...

Страница 14: ... Picture or Sound menu Use the Î ï keys to select a Picture or Sound setting Use the Í Æ keys to adjust the settings To quit the menu press the Ë key 1 2 3 4 TV Menu Picture Sound Features Install Picture Brightness Colour Contrast Sharpness Colour Temp Store 39 TV Menu Picture Sound Features Install Sound 100 Hz 300 Hz 1000 Hz 3000 Hz 8000 Hz Equalizer Æ Balance Æ Delta Volume Æ AVL Æ Incr Surrou...

Страница 15: ...button repeatedly to select your desired mode The Smart Sound feature offers you the following sound settings Theatre Music Voice and Personal Press the button repeatedly to cycle through the settings to select your desired mode Rich or Personal Multimedia Natural Soft Theatre or Music Voice Personal Definition of Picture Settings Rich Brilliant and sharp picture settings suitable for bright envir...

Страница 16: ... Î ï to select the different modes If your television is a wide screen Press the ë key or Í Æ to select the different modes This TV set is also equipped with automatic switching which will select the correct screen format provided that the specific signals are transmitted with the programmes 4 3 The picture is reproduced in 4 3 format and a black band is displayed on either side of the picture Zoo...

Страница 17: ...be used to stop or resume sub page display in teletext mode The indication appears on the top left side To activate or deactivate the double page teletext display mode The active page is displayed on the left and the following page is displayed on the right Press ë to hold a page i e the contents page The active page is then displayed on the right To return to normal mode press the ê key NOTE Appl...

Страница 18: ...le when connected to a computer with VGA output NOTE When using the TV as a PC monitor slight diagonal interference lines may be observed when it is operated under electromagnetic interference environment This does not affect the performance of the TV For better performance use a good quality DVI cable IMPORTANT For the TV to function as PC monitor the following step must be taken The DVI I input ...

Страница 19: ...n to TV mode press the key select TV and confirm with the Æ key Using the HD menus Press the H key to display the HD menu Use the Î ï keys to access the settings Use the Í Æ keys the to select or adjust setting HD Install menu NOTE You cannot access Install in the HD menu There is NO Install function in HD mode HD Picture and Sound settings HD Picture and Sound settings are the same as the TV Pict...

Страница 20: ...is NO Picture function in FM Radio menu FM Radio menu settings Install Language Select your preferred on screen menu language Selecting the language If you have selected the wrong language and do not understand the language to operate the set take the following steps to bring you back to your preferred language Auto Store Install the FM Radio stations automatically complete search NOTE If you inte...

Страница 21: ... Select the On option to activate the screen saver function Select the Off to deactivate function Sleep Refer to Using the Sleeptimer feature on page 9 The FM Radio Smart Sound feature offers the following sound modes Classical Jazz Pop and Personal The Classical Jazz and Pop are pre determined in the factory The way you select the desired frequencies in the Sound menu is the Personal mode After s...

Страница 22: ...d assign it programme number 0 or store the test signal under a programme between 90 and 99 see Manual Store on page 6 See also the handbook of your recorder Press the key to display Source List and use the Î ï keys to select EXT1 Use the Æ key to switch to the selected source Decoder with Recorder Connect a eurocable 4 to your decoder to the second euroconnector socket of your recorder See also t...

Страница 23: ...o the DVI AUDIO IN of the TV Press the key to display Source List and the Î ï keys to select PC Use the Æ key to switch to the selected source VIDEO IN S VIDEO DVI AUDIO IN AUDIO IN R L VIDEO IN S VIDEO DVI AUDIO IN AUDIO IN R L DVI I HD PC FM ANT TV 75Ω EXT1 DVI I HD PC FM ANT TV 75Ω EXT1 Æ Source TV EXT1 AV SVHS PC HD FM Radio PC with DVI connector VGA to DVI adaptor PC with VGA connector DVI PC...

Страница 24: ...o the DVI Audio In of the TV Press the key to display Source List and the Î ï keys to select HD Use the Æ key to switch to the selected source DVI to DVI In connection HDMI to DVI In connection VIDEO VIDEO IN IN S VIDEO S VIDEO DVI DVI AUDIO AUDIO IN IN AUDIO AUDIO IN IN R R L L VIDEO VIDEO IN IN S VIDEO S VIDEO DVI DVI AUDIO AUDIO IN IN AUDIO AUDIO IN IN R R L L DVI I HD PC FM ANT TV 75Ω EXT1 DVI...

Страница 25: ...into the headphone socket as shown é To achieve optimum performance headphone impedance should be between 32 and 600 Ohms Note The sound from the TV will be muted You can only hear the sound from the headphone Connect the aerial cables 1 2 and 3 as shown only if your peripheral has TV aerial in output Connect either equipment with a eurocable 4 to EXT1 to obtain a better picture quality Look for t...

Страница 26: ...iances for interference example hairdryer vacuum cleaner that are in use Unable to understand Wrong language selected Press the Ë key to exit menu from screen Press the language on accidentally the H key to enter main menu Use the ï key to screen to operate set select the fourth item on the main menu Use Æ key to enter into the next menu level and the Í Æ keys to select correct language TV not res...

Страница 27: ...here are different standards BG DK I and LL The System setting p 6 is used to select these different standards This is not to be confused with PAL or SECAM colour coding PAL is used in most countries in Europe SECAM in France Russia and most African countries The United States and Japan use a different system called NTSC HDCP High bandwidth Digital Content Protection HDCP encrypts the transmission...

Страница 28: ......

Страница 29: ......

Страница 30: ... 2007 Koninklijke Philips N V All rights reserved Document order number 3139 125 39011 ...

Отзывы: