background image


Quick guide PA L 1


04/2020 

4/12 

086050010 

en 

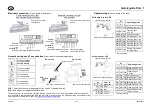
Electrical connection: 

(Circuit  board in lower  part) 

Optical settings 

(Circuit  board in the lens)


Common connection of  light  

and sounder (f actory setting)


Separate  connection of  light  

and sounder


With  single color LED


Connector from light 
circuit board


Connector from light circuit 
board


Light intensity control


Selection of operating mode


S1 

Operating mode


OFF OFF OFF  Flashing light 1 Hz 

*


OFF OFF  ON 

Flashing light  
0.75 Hz 

OFF ON  OFF  Continuous light 

OFF ON  ON  Blinking light   1 Hz 

ON  OFF OFF  Flashing light  2 Hz 

ON  OFF  ON  Blinking light   2 Hz 

ON  ON  OFF  Flashing light 0.1 Hz 

ON  ON  ON  Flashing light 0.5 Hz 

OFF OFF  ON 

Double Flash mode 
(DFM) (Option) 

Factory setting


External  

tone selec-

tion  

(see 

S1B

 for 

polarity)


Operating voltage connection


External  

tone selec-

tion  

(see 

S1B

 for 

polarity)


Operating voltage connection 

for sounder 

Operating voltage 
connection for light 

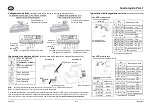
Acoustic settings and Tone selection


(Circuit  board in sounder upper part)


With multicolor-LED   


Diode not bridged 
Polarity negative 

Factory setting


Diode not bridged 
Polarity positive 


Diode bridged 
Polarity negative 


Diode bridged 
Polarity positive 


DC version 

AC version


Light intensity control 


Selection of operating mode 
 

S1 

Color as-
signment 

OFF 

OFF OFF  Red 

*


OFF  ON  Blue 

ON  OFF  Green 

ON  ON  Yellow 


S1 

Operating mode


OFF  OFF  OFF Flashing light 1 Hz 

*


OFF  OFF  ON 

Flashing light  
0.75 Hz 

OFF  ON  OFF Continuous light 

OFF  ON  ON  Blinking light   1 Hz 

ON  OFF  OFF Flashing light  2 Hz 

ON  OFF  ON  Blinking light   2 Hz 

ON  ON  OFF Flashing light 0.1 Hz 

ON  ON  ON  Flashing light 0.5 Hz 

OFF  OFF  ON 

Double Flash mode 
(DFM) (Option) 

Factory setting


Volume control 


S3

 Tone selector switch   

S3

 Tone selector switch


S1B:  

Selection of control voltage polarity for C1 and C2 (external control) 

S1A:  

Bridging of the integrated rectifier diode 

The desired tone can be selected using the 

S3

 tone selector switch. The tone is generated after the supply volt-

age is applied. A complete tone type table can be found in the Annex. See the  digital operating instructions for the 
external control of other tones, source

www.pfannenberg.com/manuals


S1B 

S1A 

S3 

Содержание PA L 1

Страница 1: ...ch geschulte und autorisierte Fachkräfte durchführen Vor der Montage alle Zuleitungen spannungsfrei schalten und gegen Wiedereinschalten sichern Span nungsfreiheit immer sicherstellen Entladungsphase von 5 Minuten für die elektrischen Komponenten abwarten Erst danach Gerät öffnen Das Anlegen der Betriebsspannung darf nur bei fest verschlossenem Gehäuse erfolgen Bestimmungsgemäße Verwendung missach...

Страница 2: ...wahl Platine im Schallgeber Oberteil mit Multicolor LED Diode nichtüberbrückt Polaritätnegativ Werkseinstellung Diode nichtüberbrückt Polaritätpositiv Diode überbrückt Polaritätnegativ Diode überbrückt Polaritätpositiv DC Version AC Version Steuerung der Lichtintensität Wahl der Betriebsart S1 Farbzuord nung 4 5 6 OFF OFF OFF Rot OFF ON Blau ON OFF Grün ON ON Gelb S1 Betriebsart 1 2 3 OFF OFF OFF ...

Страница 3: ...uthorized electricians may work on electrical connections Disconnect all supply lines from the mains before installation and secure them against reconnection Al ways ensure absence of voltage Wait 5 minutes for the electrical components to discharge after switching off the operating voltage The device should only be opened afterwards The operating voltage must only be applied when the housing is f...

Страница 4: ...ounder upper part With multicolor LED Diode not bridged Polarity negative Factory setting Diode not bridged Polarity positive Diode bridged Polarity negative Diode bridged Polarity positive DC version AC version Lightintensity control Selection of operating mode S1 Color as signment 4 5 6 OFF OFF OFF Red OFF ON Blue ON OFF Green ON ON Yellow S1 Operating mode 1 2 3 OFF OFF OFF Flashing light 1 Hz ...

Страница 5: ...és formés en électrotechnique Avant le montage débrancher tous les câbles d alimentation électrique et veiller à ce que le courant ne soit pas rétabli S assurer toujours de l absence de tension Attendre la fin de la phase de décharge de 5 minutes pour les composants électriques L appareil peut en suite être ouvert La tension de service ne doit être appliquée que lorsque le boîtier est solidement f...

Страница 6: ...eure de la sirène Avec DEL multicolore Diode non pontée Polarité négative Réglage d usine Diode non pontée Polarité positive Diode pontée Polarité négative Diode pontée Polarité positive Version CA Version CC Commande de l intensité lumineuse Choix du mode opératoire S1 Affectation des couleurs 4 5 6 OFF OFF OFF Rouge OFF ON Bleu ON OFF Vert ON ON Jaune S1 Mode opératoire 1 2 3 OFF OFF OFF Flash 1...

Страница 7: ...i Prima del montaggio togliere tensione a tutte le linee in ingresso e metterle in sicurezza in modo che non possano riattivarsi Accertarsi sempre che non ci sia tensione Attendere 5 minuti affinché i componenti elettrici siano privi di tensione A quel punto sarà possibile aprire l apparecchio È possibile riattivare la tensione operativa solo con l alloggiamento perfettamente chiuso Uso non confor...

Страница 8: ...superiore del segnalatore acustico con LED multicolore Diodo non bypassato Polarità negativa Impostazione di fabbri ca Diodo non bypassato Polarità positiva Diodo bypassato Polarità negativa Diodo bypassato Polarità positiva Versione cc Versione ca Controllo dell intensità della luce Selezione della modalità operativa S1 Assegnazio ne colori 4 5 6 OFF OFF OFF Rosso OFF ON Blu ON OFF Verde ON ON Gi...

Страница 9: ...над подключениями к электросети разрешается выполнять только обученным и авторизо ванным специалистам электрикам Перед монтажом все подводящие линии необходимо обесточить и заблокировать от повторного включения Необходимо всегда удостоверяться в отсутствии напряжения Выждать фазу разряда электрических компонентов длительностью в 5 минут Лишь затем откры вать устройство Включение рабочего напряжени...

Страница 10: ...многоцветным СИД Диод не перемкнут Полярностьотрица тельная Заводская установка Диод не перемкнут Полярностьположи тельная Диод перемкнут Полярностьотрица тельная Диод перемкнут Полярностьположи тельная Версия пост тока Версия перем Тока Регулирование интенсив ности освещения Выбор режима работы S1 Назначе ние цветов 4 5 6 ВЫКЛ ВЫКЛ ВЫКЛ Красный ВЫКЛ ВКЛ Синий ВКЛ ВЫКЛ Зеленый ВКЛ ВКЛ Желтый S1 Ре...

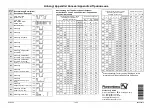
Страница 11: ...tinuous 56 Continuous PFEER Gasalarm 57 Continuous UK BS5839 1 59 Continuous 60 Continuous 61 Continuous 63 Continuous 65 Continuous Sweden SS031711 All Clear 66 Continuous 67 Continuous Germany KTA3901 All Clear 68 Continuous 69 Continuous 71 Continuous 77 Intermittent 82 Intermittent PFEER General Alarm UK BS5839 1 Back up Alarm 83 Intermittent PFEER General Alarm 88 Intermittent Beschreibung De...

Страница 12: ...N ON 33 30 52 35 ON ON 34 35 52 93 ON ON ON 35 27 52 110 ON ON 36 146 67 57 ON ON ON 43 131 52 91 ON ON ON 45 2 57 93 ON ON ON ON 52 15 65 82 ON ON 54 46 54 131 ON ON ON 55 131 52 128 ON ON ON 56 82 35 33 ON ON ON ON 59 143 59 101 ON ON ON 60 131 52 125 ON ON ON ON 65 131 52 93 ON ON ON ON 66 110 52 107 ON ON ON ON ON 69 131 52 110 ON 71 131 52 93 ON ON 77 61 52 122 ON ON 82 131 52 83 ON ON ON 83 ...

Отзывы: