12 - 7
Adjustment
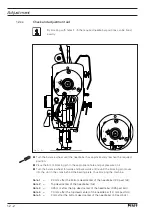
Fig. 12 - 06
2
1
7
7
6
5
3
4
●
Set the needle position adjustment lever
4
to
"
middle
"
and loosen screws
5
and
6
.
●
Run the machine slowly and turn the zigzag stitch adjustment lever
3
to the right until
the needle bar no longer moves laterally.
●
Turn the machine off. Move screw
5
to the right until it touches and then tighten it.
●
Loosen screws
7
and move scale
1
in accordance with
requirement
2
.
●
Tighten screws
7
.
Screw
6
remains loose for the following adjustment.
12
.05.05
Zero stitch and zigzag stitch scale
Requirement
With the zigzag stitch set at
"0"
:
1. the needle bar must not move laterally when the balancewheel is turned and
2. the marking
"0"
on scale
1
must be at marking
2
.
Содержание 3704-2/02
Страница 28: ...8 4 Installation and commissioning 8 04 Table top cutout for the PFAFF 939 U ...
Страница 112: ...13 2 Wearing parts 99 137 151 45 91 171 049 05 91 171 042 05 91 168 499 05 11 180 094 15 91 168 498 15 91 700 249 15 ...
Страница 115: ...14 3 91 191 477 95 Part 1 Version 05 11 03 Circuit diagrams PFAFF 939 U ...
Страница 116: ...14 4 Circuit diagrams Version 05 11 03 91 191 477 95 Part 2 PFAFF 939 U ...
Страница 117: ...14 5 91 191 477 95 Part 3 Version 05 11 03 Circuit diagrams PFAFF 939 U ...
Страница 118: ...14 6 Circuit diagrams Version 03 09 04 91 191 487 95 Part 1 PFAFF 3704 ...
Страница 119: ...14 7 91 191 487 95 Part 2 Version 03 09 04 Circuit diagrams PFAFF 3704 Fadenwischer ...
Страница 120: ...14 8 Circuit diagrams Version 03 09 04 91 191 487 95 Part 3 PFAFF 3704 ...
Страница 121: ...Notes ...


