Input
47
O
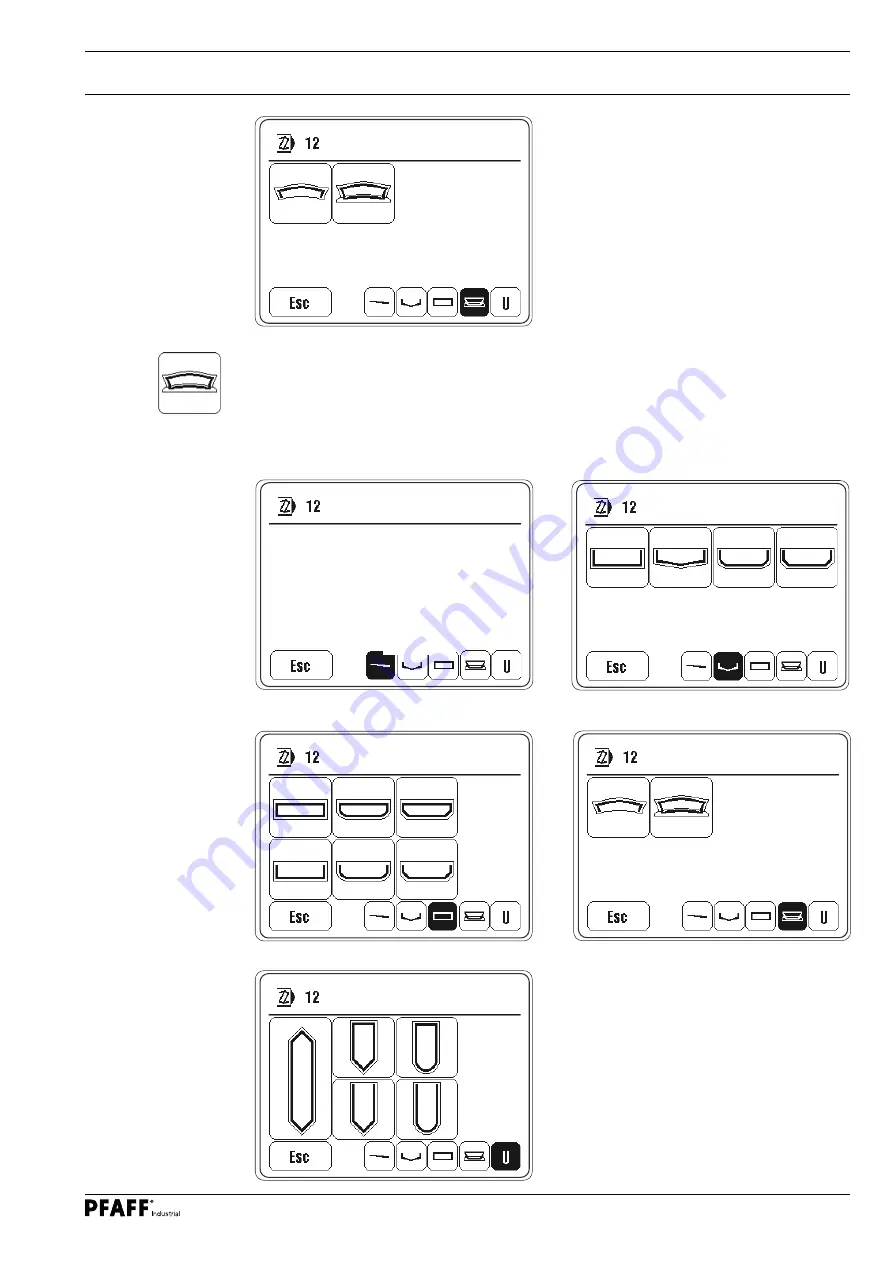
Select the desired seam type. When a seam type has been selected, the machine switches to the seam program input function.
Overview of the seam groups with their corresponding seam types:
Free
seam
Flap
Cuffs
Collars
Shoulder flaps
Страница 1: ...2481 296 12 19 272 002 Instruction Manual engl 05 16 This instruction manual applies to machines from the serial number 2 809 573 and software version 0307 010 onwards INSTRUCTION MANUAL 3 01 980 30...
Страница 2: ...Geiger Str 12 IG Nord D 67661 Kaiserslautern This instruction manual applies for all models and subclasses listed in chapter 3 Technical Data The adjustment manual for the machine can be downloaded at...
Страница 3: ...s premises 13 5 02 Transport within the customer s premises 13 5 03 Disposal of the packaging materials 13 5 04 Storage 13 6 Work Symbols 14 7 Operating Controls 15 7 01 Main switch 15 7 02 Keys on th...
Страница 4: ...ntering the number of compensation stitches 32 9 10 Setting the number of remaining stitches for the bobbin thread monitor 33 9 11 Selecting the seam program 35 9 12 Setting the control panel 36 9 13...
Страница 5: ...nance and Care 64 12 01 Maintenance intervals 64 12 02 Cleaning the machine 64 12 03 Topping up the oil tank 65 12 04 Cleaning the blower air filter 65 13 Table Top 66 13 01 Table top cutout 66 13 02...
Страница 6: ...g to all the relevant safety requirements O O The machine must always be disconnected from the power supply by pressing the main switch or pulling out the mains plug when sewing tools are replaced suc...
Страница 7: ...manual is a part of the machine and must be made available to the operating personnel at all times The instruction manual must have been read before the initial start up O O The operating personnel a...
Страница 8: ...orised persons are located in the machine s hazard zone O O Any changes occurring on the machine which impair its safety must be reported to the owner operator immediately 1 05 02 Technical staff Tech...
Страница 9: ...come jammed or be slung away Risk of injury from parts flying around Do not operate the machine without the take up lever guard 1 Risk of injury due to the motion of the take up lever Do not operate t...
Страница 10: ...dge guide and edge sensor The machines are used for sewing lockstitch seams in the clothing industry Any usage not approved by the manufacturer is deemed misuse The manufacturer shall assume no liabil...
Страница 11: ...ox 180 mm Height above table approx 300 mm Ambient temperature 85 rel humidity condensation not permitted 5 40 C Connection data Operating voltage 230 V 10 50 60 Hz Max input power 400 VA Fuse protect...
Страница 12: ...various plastics The electrical equipment consists of plastics and copper O O The machine must be disposed of in accordance with the locally valid environmental pro tection regulations with a speciali...
Страница 13: ...ensure that the machines are only transported in a vertical position 5 03 Disposal of the packaging materials The packaging materials of these machines consists of paper cardboard and VCI fleece It i...
Страница 14: ...med or important information in this instruction manual are emphasised by symbols The symbols used have the following meaning Note information Cleaning care Lubrication Maintenance repairs adjustment...
Страница 15: ...keys Key 1 Reverse sewing Key 2 Raise the needle without thread trimming Key 3 Carry out a single stitch Fig 7 02 7 Operating Controls 7 01 Main switch Before switching on the machine raise the take...
Страница 16: ...turned on 0 Neutral position 1 Sewing 1 Raise sewing foot 2 Trim thread reset bobbin thread monitor or bobbin rest thread count function 0 2 1 Fig 7 03 1 Fig 7 04 7 04 Hand lever to raise the sewing f...
Страница 17: ...nnector is inserted into the bushing X47 the edge guide can be moved back using the knee switch Fig 7 05 1 Fig 7 06 2 GB max 7 06 Control panel The current operating statuses are indicated on the cont...
Страница 18: ...e g for entering a value Activated functions are indicated by pictograms shown inversely Apart from the bobbin change function the pictograms and texts without border are only for display purposes an...
Страница 19: ...st be provided at the erection site see chapter 3 Technical Data The erection site must also have a firm and level subsurface and adequate lighting The table top is lowered for packaging purposes The...
Страница 20: ...inge 1 is screwed to the sewing head base plate O O Insert the sewing machine into the table top O O Insert the sewing head support 2 into the table top hole 1 Do not operate the machine without the s...
Страница 21: ...chapter 8 01 02 Inserting the sewing machine into the stand O O After loosening the screws 2 adjust the switch 1 in such a way that the switch 1 is actuated when the sewing head is mounted O O Tighten...
Страница 22: ...O Securely attach the ground cable from the sewing head 1 to ground point A O O Securely attach the ground cable from the control point B to ground point B O O Securely attach the ground cable from t...
Страница 23: ...ommissioning 23 8 03 Assembling the reel stand O O Assemble the reel stand as shown in the adjacent illustration O O Then insert the stand into the O O hole in the table top and secure it with the enc...
Страница 24: ...f the oil reservoir 2 before the initial commissioning Danger of machine damage The plug 1 serves solely for transit support and may not be used during the sewing opera tions O O Inspect the machine p...
Страница 25: ...tricity mains for all set up work by operat ing the main switch or by removing the mains plug Switch off the machine Risk of injury due to accidental machine start up Only use needles of the system in...
Страница 26: ...obbin case must be fitted in the hook Otherwise a jammed thread may damage the hook O O The tension of the thread on the bobbin 1 can be adjusted with the knurled thumb screw 4 O O The bobbin winder s...
Страница 27: ...position using both hands Danger of injury by crushing between the machine and the table top Fig 9 05 Fig 9 03 9 03 Removing inserting the bobbin case 1 9 04 Inserting the bobbin case adjusting the bo...
Страница 28: ...d tension Switch off the machine Risk of injury due to accidental machine start up O O Thread the needle thread as shown in Fig 9 06 Please ensure that the needle is threaded from the left O O Adjust...
Страница 29: ...ectly in manual sewing mode O O Switch the machine on O O Call up the stitch length input menu O O Enter the stitch length with the number keys O O or O O Alter the stitch length step by step O O Conc...
Страница 30: ...the manual sewing mode O O Switch the machine on O O Call up the edge guide position input menu O O Enter the edge guide position with the number keys O O or O O Alter the edge guide position step by...
Страница 31: ...cktack the corresponding symbol is shown as an inverse symbol O O Select the desired value for the number of forward stitches A of the start backtack O O Select the desired value for the number of rev...
Страница 32: ...wn after the recognition of the material edge till the machine stops O O Switch the machine on O O Switch on the edge sensor and call up the compensation stitches input menu O O Enter the number of co...
Страница 33: ...the bobbin thread monitor signals that the bobbin thread has been used up O O Switch the machine on O O Call up Entry mode O O Call up parameter 660 O O Switch on the bobbin thread monitor value 1 Exp...
Страница 34: ...arameter 760 O O Set the number of remaining stitches which can still be sewn after the signal from the bobbin thread monitor depends on the thread size O O End input entry The number of remaining sti...
Страница 35: ...l up the seam program selection menu O O Enter the seam program number with the number keys O O or O O Scroll through the seam program numbers O O Conclude the input and change to the programmed sewin...
Страница 36: ...ol panel O O Switch the machine on O O Call up Entry mode O O Select user level C see chapter 14 11 02 Selecting the user level in the adjustment manual O O Call up the service menu O O Call up the co...
Страница 37: ...Set up 37 O O Change the display contrast O O Switch the key tone off or on O O End input entry Never reduce the display contrast to such an extent that the display can no longer be read...
Страница 38: ...ently on the corner of the SD card 2 the SD card will be ejected O O Slide the cover 1 upwards to close it 9 13 Inserting and removing the SD memory card Fig 9 07 2 1 2 GB max 3 Adjusting the slide 3...
Страница 39: ...number selection function see chapter 9 11 Selecting the seam program The selection of the manual sew ing mode is shown by the symbol of a hand on the display instead of the program number O O Switch...
Страница 40: ...ntering the number of compensation stitches When this function is switched on the seam end is initialised automatically with the edge sensor Sewing foot raised after thread trimming When this function...
Страница 41: ...ions and displays Seam program selection Opens the menu for entering the seam program number or for selecting the manual sewing mode see chapter 9 11 Selecting the seam program Edge guide position Dis...
Страница 42: ...activated the current speed is shown see chapter 11 04 03 List of parameters O O Sewing is carried out using the pedal functions see chapter 7 03 Pedal 10 03 Error messages If an error occurs the text...
Страница 43: ...he input mode and call up the sewing mode Parameter selection Select the hundred and unit figures of the desired parameters see chapter11 04 02 Example of a parameter input Altering the parameter valu...
Страница 44: ...Description of the functions Seam program selection Opens the menu for entering the seam program number or for selecting the manual sewing mode see chapter 9 11 Selecting the seam program Edge guide...
Страница 45: ...verse sewing direction When this function is activated the corresponding seam zone is sewn in reverse Sewing stop When this function is activated sewing stops automatically at the end of the seam zone...
Страница 46: ...nd values in the individual seam zones can be altered The seam types are divided into groups for flaps cuffs collars and shoulder flaps In addi tion one free description space is available if it is no...
Страница 47: ...e desired seam type When a seam type has been selected the machine switches to the seam program input function O O Overview of the seam groups with their corresponding seam types Free seam Flap Cuffs...
Страница 48: ...e edge have to be sewn a correction value must be entered O O Switch the machine on O O Select the program number see chapter 9 11 Selecting the seam program O O Call up seam program input 3 12 2 0 0...
Страница 49: ...input menu and enter the correction value O O or O O Place the workpiece on the angle outline on the display and adjust the angle The correction value is calculated automatically from the adjusted ang...
Страница 50: ...ogram number input menu and select program number 16 see chapter 9 11 Selecting the seam program O O Call up seam program input O O Call up the menu for selecting the seam types see chapter 11 02 01 S...
Страница 51: ...zone 0 All values entered in this seam zone are valid for all other seam zones in the seam program unless they are altered in the individual seam zones O O Call up the stitch length input menu and en...
Страница 52: ...ace the workpiece on the angle outline on the display and adjust the angle The correction value is calculated automatically from the adjusted angle O O Conclude the input and take over the correction...
Страница 53: ...am zone six O O Call up the stitch length input menu and enter the stitch length 0 see chapter 9 06 En tering the stitch length The fifth seam zone is then recognised as the last seam zone O O Conclud...
Страница 54: ...parameters can be called up directly is called up by pressing the corresponding function All parameter groups or also individual ones can be protected by a code against unauthorised access Select para...
Страница 55: ...the bobbin thread monitor value 1 O O Conclude the parameter input 11 04 02 Example of a parameter entry O O Switch the machine on O O Call up Entry mode O O e g Select parameter 660 bobbin thread mo...
Страница 56: ...ith parameter 105 OFF limited with parameter 607 108 End backtack stitches in reverse C 0 9 3 109 End backtack stitches forwards C 0 9 3 110 End backtack speed B 100 1500 1000 111 No of stitches from...
Страница 57: ...0 100 10 activate in 10 ms 350 Bobbin changer hold bobbin B 0 100 10 deactivate in 10 ms 4 419 Bartacks C OFF ON ON ON inverted OFF suppressed 478 Corner stitch C OFF ON ON ON accurate OFF quick fast...
Страница 58: ...ON on OFF off 660 Bobbin thread monitor A 0 2 1 0 off 1 on 2 bobbin thread reverse counter on 668 Thread wiper 1 B 0 2 2 Thread clamp 2 0 off 7 700 Logical zero mark increments B 0 127 0 702 Needle po...
Страница 59: ...after simple end backtack ms 733 Holdoff time from C 0 200 30 switch on feed reverse to speed start ms 739 Holdoff time for speed C 0 2550 200 after start backtack or stitch condensation ms 740 Stitc...
Страница 60: ...85 80 1 10mm 844 Distance sensor 1 to needle 2 10mm B 80 300 200 845 Speed controlled B 0 3 1 stitch length adjustment per 1000 min 1 846 Feed regulator characteristic line adj A 80 110 for forward s...
Страница 61: ...1 50 25 higher ranking speed controller for standstill brake rest brake 891 Proportional amplification of C 1 50 20 lower ranking speed controller for standstill brake rest brake 9 901 Cutting release...
Страница 62: ...BDF P1 ERROR 27 SD card ERROR 40 Transmitted light sensors ERROR 45 Bobbin thread monitor ERROR 46 Bobbin changer if timeout ERROR 47 Bobbin changer empty if magazine is empty ERROR 48 Bobbin changer...
Страница 63: ...66 Short circuit ERROR 67 Mains off ERROR 68 Excess current during operation ERROR 69 No increments ERROR 70 Motor blocked ERROR 71 No incremental encoder connector ERROR 73 Faulty motor operation ER...
Страница 64: ...ting off the main switch or removing the mains plug Risk of injury due to acci dental machine start up The following tasks are recommended during single shift operation to avoid operational errors O...
Страница 65: ...e see arrow Return the machine to its upright position using both hands Danger of injury by crushing between the machine and the table top Only use oil with a centre viscosity of 22 0 mm2 s at 40 C an...
Страница 66: ...66 13 Table Top 13 01 Table top cutout Table top assembly...
Страница 67: ...sembly 186 35 120 102 5 102 5 2 5 5 6x 175 200 70 150 14 H11 17 28 28 1060 600 0 5 0 5 0 5 0 5 40 R 2 u m l a u f e n d R 2 u m l a u f e n d c c 2 100 35 Lage EMT Gestell 906 3550 005 895 Ausschnitt...
Страница 68: ...s technical As an alternative to the Internet download the parts list can also be requested as a hard copy under order no 296 12 19 272 95 774 361 05 91 701 179 15 2x 91 100 296 25 2x 11 108 174 25 11...
Страница 69: ...Wearing Parts 69 91 171 049 05 99 137 151 45 91 700 996 15 95 774 464 25 91 171 042 05 11 108 087 15 91 264 235 15 91 264 338 91 11 108 222 15 91 264 240 05 11 108 084 15 2x...
Страница 70: ...is an authorized licensee of the PFAFF trademark PFAFF Industriesysteme und Maschinen GmbH Hans Geiger Str 12 IG Nord D 67661 Kaiserslautern Tel 49 6301 3205 0 Fax 49 6301 3205 1386 E mail info pfaff...