background image

 www.petsafe.net

 7 

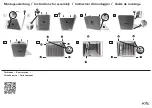
Prepare the Receiver Collar

Charge the Receiver Collar

1.

 Lift the rubber cover protecting the Receiver Collar 

Charging Jack. 

2.

 Connect one of the charger connectors to the 

Receiver Collar Charging Jack (

2A

).

3.

 Plug the charger into a standard wall outlet. The 

red light will appear.

4.

 Charge the Receiver Collar for 24 hours for the 

fi rst charge. Recharges take only 12 hours. 

Note: The Receiver Indicator Light is solid green after 
12 hours of charging. For the fi rst charge, continue to 
charge the Receiver Collar for an additional 12 hours.

5.

 When charging is completed, replace the rubber 

cover.

Charger connector

placed in Receiver

Collar Charging

Jack

2A

To Turn the Receiver Collar On:

1.

 Press and hold the On/Off Button (

2B

) until the 

Receiver Indicator Light comes on solid green 
and you hear the Receiver Collar beep from low 
to high. 

2.

 Release the On/Off Button.

The Receiver Indicator Light fl ashes green once 
every 5 seconds to indicate the battery is good. 
This fl ashing green light also indicates the Receiver 
Collar is on and ready to receive a radio signal 
from the Remote Transmitter. 

Note: If the Receiver Indicator Light fl ashes red 3 
times every 5 seconds (instead of green), this indicates 
that the battery charge is low and the unit should be 
recharged before use.

On/Off Button

2B

To Turn the Receiver Collar Off: 

1.

 Press and hold the On/Off Button until the Receiver Indicator Light comes on solid 

red and the Receiver Collar beeps high to low. 

2.

 Release the On/Off Button.

To extend the life between charging cycles, turn the Receiver Collar off when it is not in 
use. Approximate battery life between charges is 15-20 hours, depending on frequency of 
use. 

Step

2

400-1158-19.indd   7

400-1158-19.indd   7

9/25/09   10:41:04 AM

9/25/09   10:41:04 AM

Содержание PDT20-12471

Страница 1: ...ze gids volledig door te lezey voordat u begint Por favor este manual lea completo antes de empazar Si prega di leggere attentamente la guida al uso prima di utilizzare il collare Bitte lesen Sie die gesamte Betriebsanleitung vor dem Trainingsbeginn 1 2 3 4 5 6 7 8 Operating Guide Manuel d utilisation Gebruiksaanwijzing Manual de funcionamiento Guida all uso Gebrauchsanweisung 400 1158 19 indd 1 4...

Страница 2: ...ay cause skin damage This is called bed sores it is also called decubitus ulcers or pressure necrosis Avoid leaving the collar on the dog for more than 12 hours per day When possible reposition the collar on the pet s neck every 1 to 2 hours Check the fit to prevent excessive pressure follow the instructions in this manual Never connect a lead to the electronic collar it will cause excessive press...

Страница 3: ...ranty information is available online at www petsafe net ____________________________________________________________________ Table of Contents Components 4 How the System Works 4 Key Definitions 5 Operating Guide Prepare the Remote Transmitter 6 Prepare the Receiver Collar 7 Fit the Receiver Collar 9 Find the Best Stimulation Level forYour Pet 10 Program the Remote Transmitter 11 Reset the Receiv...

Страница 4: ... nu ng sa nle itu ng How the SystemWorks The PetSafe 250 m RemoteTrainer has been proven safe comfortable and effective for all pets greater than 3 6 kg and at least 6 months old This system assists you in controlling your pet without a lead in a range up to 250 metres At the push of a button the RemoteTransmitter sends a signal activating the Receiver Collar Using the RemoteTrainer consistently a...

Страница 5: ...dicates when the Receiver Collar has been turned on or off and also serves as a low battery indicator Green LED Indicates when tone is being delivered and serves as a good battery indicator Red LED Indicates when stimulation is being delivered and serves as a low battery indicator Charging Jacks For connecting the charger Although the RemoteTransmitter and Receiver Collar are waterproof without th...

Страница 6: ...ditional 12 hours 5 When charging is completed replace the rubber cover Charger connector placed in the Remote Transmitter Charging Jack Note Approximate battery life between charges is 40 to 60 hours depending on frequency of use Transmitter Indicator Light Function and Response Condition Dual Colour LED RED LED GREEN LED Normal Operation OFF OFF Normal Operation Low Battery Flashes 3 times every...

Страница 7: ...on solid green and you hear the Receiver Collar beep from low to high 2 Release the On Off Button The Receiver Indicator Light flashes green once every 5 seconds to indicate the battery is good This flashing green light also indicates the Receiver Collar is on and ready to receive a radio signal from the Remote Transmitter Note If the Receiver Indicator Light flashes red 3 times every 5 seconds in...

Страница 8: ...ON OFF OFF Charging Complete OFF ON OFF Rechargeable Batteries The rechargeable Nickel Metal Hydride NiMH batteries are not memory sensitive and do not require depletion before charging The batteries come partially charged from the factory but will require a full charge 24 hours before the first use When storing the unit for long periods remember to regularly give batteries a full charge 12 hours ...

Страница 9: ...ess of the Receiver Collar by inserting one finger between the collar and your dog s neck 3C The fit should be snug but not constricting CAUTION Risk of skin damage You should not make the collar any more tight than is required for good contact A collar that is too tight will increase the risk of pressure necrosis in the contact area 5 Allow your dog to wear the Receiver Collar for several minutes...

Страница 10: ...sity scratching at his collar or flicking his ears indicates the Recognition Level that is best for him Follow the steps below to find your pet s Recognition Level 1 Starting at Level 1 on the Intensity Dial press the Upper Button continuously for 1 to 2 seconds 2 If your pet shows no reaction repeat the Stimulation level several times before moving up to the next level 3 YOUR PET SHOULD NOT VOCAL...

Страница 11: ...utton is released theTransmitter Indicator Light will flash two times Note Continuous Stimulation will transmit for no more than eight continuous seconds no matter how long the button is pressed To reactivate release and repress the button Mode UPPER BUTTON FUNCTION LOWER BUTTON FUNCTION SIDE BUTTON FUNCTION OF DOGS 1 Tone 1 Second then Continuous Stimulation set by Dial Tone 1 Second then Continu...

Страница 12: ...fe Receiver Collars can be set to respond to the upper lower or side Remote Transmitter buttons Add A Dog receiver s must be purchased to train additional dogs 1 Program the Remote Transmitter to Mode 3 or 4 2 Program the first Receiver Collar A Turn the Receiver Collar off B Press and hold the On Off Button The Receiver Indicator Light will come on then turn off in 4 5 seconds If the On Off Butto...

Страница 13: ...the Intensity Dial Note This function only applies if the Remote Transmitter is programmed in Mode 1 The objective is to train your pet to respond to your spoken command and the Audible Tone from the receiver in normal circumstances After proper training the use of Stimulation should only be necessary if your pet repeats unwanted behaviour ____________________________________________ Accessories T...

Страница 14: ... Can I use the 250 m Remote Trainer with more than one pet Yes Add A Dog Receiver Collars must be purchased and the Remote Transmitter must be changed to Mode 3 or 4 Will I get exactly 250 m of range with the 250 m Remote Trainer The range you get with your 250 m Remote Trainer will vary according to terrain weather vegetation as well as transmission from other radio devices To get the maximum amo...

Страница 15: ...ver Collar Please refer to the Test Light Instructions section for details Increase the Intensity Dial Refer to Find the Best Stimulation Level ForYour Pet for more information Make sure the Receiver Collar s Contact Points are placed snugly against your pet s skin Refer to Fit the Receiver Collar for more information If you notice your operating time dropping to about half the original time your ...

Страница 16: ... area before discarding spent batteries The Remote Transmitter operates on one battery of the type Nickel Metal Hydride NiMH with a 7 2 Volt 160 mAH capacity The Receiver Collar operates on one battery of the type NiMH with a 4 8 Volt 120 mAH capacity At end of product life use these battery removal instructions for final disposal of the battery pack Using a number 1 Phillips screwdriver remove th...

Страница 17: ...ubject to the following two conditions 1 this device may not cause interference and 2 this device must accept any interference including interference that may cause undesired operation of the device This unit is in compliance with the limits found in RSS 310 This Class B digital apparatus complies with Canadian ICES 003 Australia This device complies with the applicable EMC requirements specified ...

Страница 18: ...r i any indirect punitive incidental special or consequential damage and or ii any loss or damages whatsoever arising out of or connected with the misuse of this Product The Purchaser assumes all risks and liability from the use of this Product to the fullest extent permissible by law For the avoidance of doubt nothing in this clause 4 shall limit Radio Systems Corporation s liability for human de...

Страница 19: ...ms Corporation 10427 Electric Avenue Knoxville TN 37932 USA 865 777 5404 www petsafe net 400 1158 19 2010 Radio Systems Corporation 400 1158 19 indd 104 400 1158 19 indd 104 9 25 09 10 41 19 AM 9 25 09 10 41 19 AM ...

Отзывы: