


- 20 -
perma-tec GmbH & Co. KG
The World of Automatic Lubrication
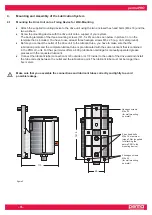
7.2
How to Replace the PRO LC-Unit
Drive system and circuit board must be protected from moisture. Exchanges should only be done in a dry place
and it must be ensured that no moisture enters the drive unit.
a) Turn the protection cover on the drive unit counter-clockwise and remove it.
b) Remove the empty PRO LC-unit. The display indicates “
LC
” and the red LED is blinking.
c) Remove the used battery set from the drive unit.
d) Insert the new battery set into the drive unit. Follow the directions of the arrows.
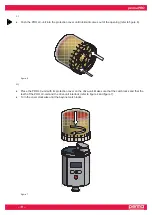
e) Remove the plug of the PRO LC-unit (refer to figure 5, chapter 4.2).
f) Push the PRO LC-unit into the protection cover until lubricant comes out of the opening
(refer to figure 6, chapter 4).
g) Place the new PRO LC-unit on the drive unit, turn it until the catch locks and the teeth of the PRO LC-unit
and the drive unit interlock. The control system automatically recognizes the new PRO LC-unit.
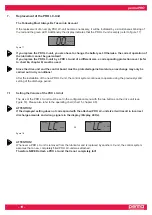
The display indicates “
_ _
” if the perma PRO was switched off prior to the replacement of the PRO LC-unit.
Or it indicates “
99
% Vol.” if the perma PRO was switched on before the replacement.
You should only use completely full perma-tec PRO LC-units, in order to guarantee a trouble-free operation.
h) The lubrication system continues to operate with the previous setting of the discharge period.
i)
If required, change lubricator settings (see chapter 6.8).
If the lubricator was ON before changing the LC-unit, it will automatically resume operation with existing
settings. If the lubricator was OFF, it must be turned ON (refer to figure 13, chapter 6.5).


