Maintenance
169
2.
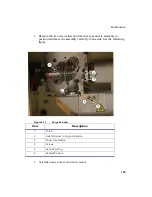
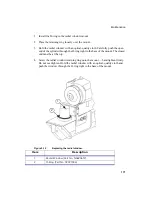
Remove the two screws that hold the shear gas nozzle assembly in
position and move the assembly carefully to one side
.
See the following
figure.
Figure 5-11
Purge Window
3. Carefully unscrew the axial window mount.
Item
Description
1
Torch
2
Axial Window to Purge Extension
3
Shear Gas Nozzle
4
Screws
5
Retaining Ring
6
Radial Window
4
2
3
5
6
1
Содержание OPTIMA 8000
Страница 1: ...OPTIMA 8000 Customer Hardware and Service Guide ICP OPTICAL EMISSION Return to Document Menu...
Страница 2: ......
Страница 3: ...Optima 8000 Customer Hardware and Service Manual...
Страница 12: ...Contents 10...
Страница 18: ...16 Indicates the ON position of the main power switch Indicates alternating current...
Страница 24: ...22 Figure C Location of warning labels in the sample compartment 1 2...
Страница 28: ...26...
Страница 29: ...Safety Practices 1...
Страница 49: ...Preparing Your Laboratory 2...
Страница 61: ...Preparing Your Laboratory 60...
Страница 62: ...System Description 3...
Страница 78: ...System Description 78 Figure 3 8 GemCone nebulizer and end cap N0680343 also shown in cross sec tional view...
Страница 89: ...Installation 4...
Страница 136: ...Maintenance 5...
Страница 241: ...Troubleshooting 6...
Страница 264: ...Error Messages 7...
Страница 284: ......


