background image

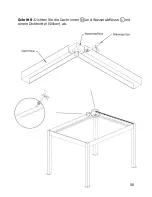
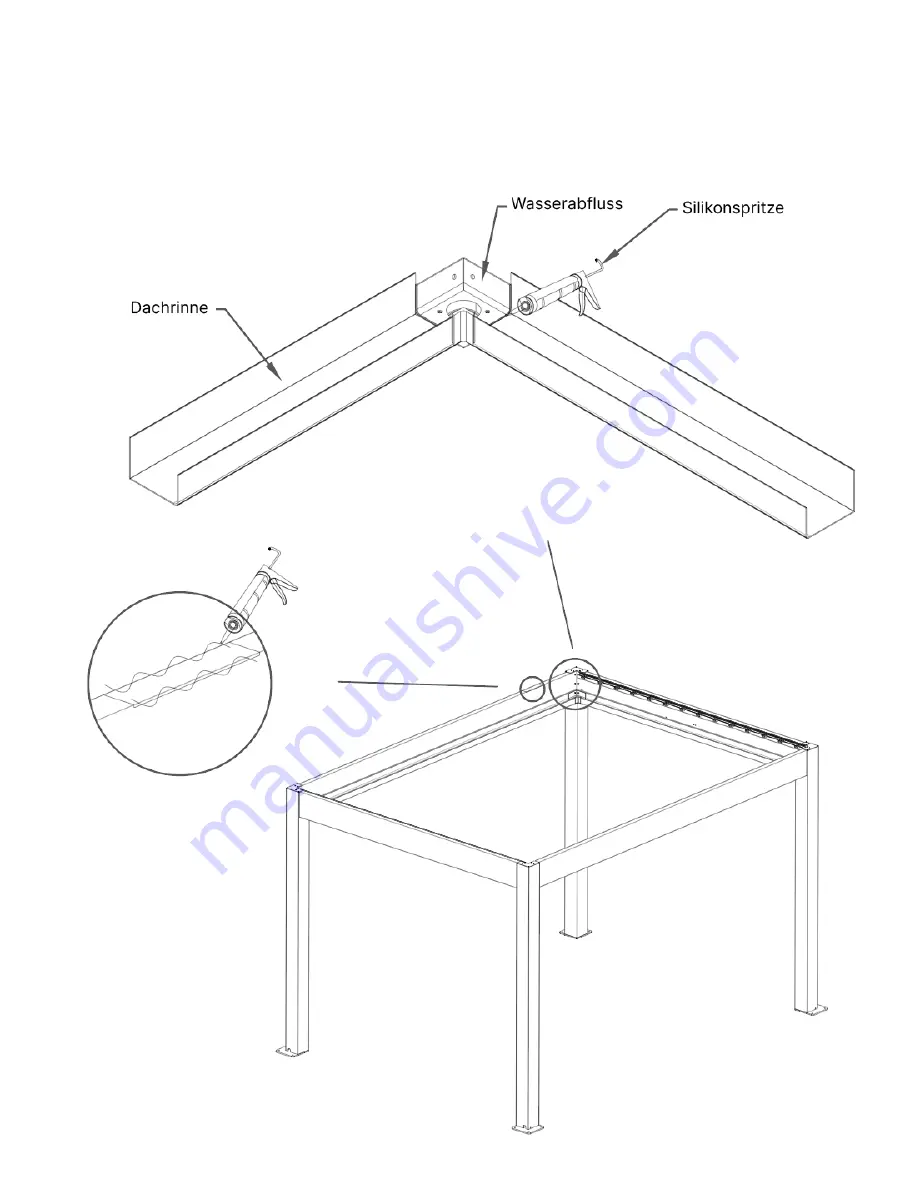
Schritt 9

Dichten Sie die Dachrinnen Ⓝ und Wasserabflüsse Ⓛ mit

einem Dichtmittel  Silikon) ab.

56

Содержание Skydance

Страница 1: ...Et kvalitetsmerke fra Norge Eine Qualit tsmarke aus Norwegen A quality brand from Norway...

Страница 2: ...etsinstruksjoner 5 Monteringsveiledning 6 Viktig informasjon 22 Avsluttende ord 23 English List of items 24 Security instructions 26 Installation steps 27 Important information 43 Closing remarks 44 D...

Страница 3: ...Innholdsliste 3...

Страница 4: ...4...

Страница 5: ...n egen og andres sikkerhet vennligst f lg monteringsinstruksjonene F r du starter monteringsprosessen og tar i bruk pergolaen anbefaler vi at du f rst er godt kjent med dette produktet Forsikre deg om...

Страница 6: ...Monteringsveiledning Trinn 1 Monter bunnplatene til s ylene med skruer og 6...

Страница 7: ...Trinn 2 Fest bjelken til s ylene Stram skruene 7...

Страница 8: ...Trinn 3 Fest bjelke til s ylene som i trinn 2 Stram skruene 8...

Страница 9: ...Trinn 4 Fest bjelke og bjelke til s ylene med skruer Fest topplokket til s ylene med skruer 9...

Страница 10: ...Trinn 5 Juster s ylene slik at avstanden mellom s ylene stemmer overens med lengde bredde og diagonal F lg tabellen under 10...

Страница 11: ...Trinn 6 Monter hj rnedelen med hj rneplatene p alle s ylene Fest med skruer 11...

Страница 12: ...Trinn 7 Monter takrennene p alle bjelkene 12...

Страница 13: ...Trinn 8 Monter takrenne klemme i alle hj rnene 13...

Страница 14: ...Trinn 9 Silikoner takrennene og vannutl pet 14...

Страница 15: ...Trinn 10 Skill mellom f lgende typer lameller 2x aa lamell for feste til motor 8x bb lameller uten LED 4x cc lameller med LED 15...

Страница 16: ...Trinn 11 Fest lamellene aa slik tabellen nedenfor viser Avvent med feste de andre lammelene til motoren trinn 12 er montert 16...

Страница 17: ...Trinn 12 Fest aliminums vinkelen med skruer Monter deretter festebraketten til motoren med skruer Fest motoren til festebraketten Monter lamellene aa til motoren med styringsplaten Fest med skruer 17...

Страница 18: ...Trinn 13 Monter de resterende lamellene i rekkef lgen slik tabellen under viser 18...

Страница 19: ...Trinn 14 Koble ledningen til LED lysene dd og motoren til den integrerte str mstyringen 19...

Страница 20: ...Trinn 15 Koble LED lamellene cc med LED ledningen dd Fest lamellklemmene og put LED ledningen i rommet under aluminiumslisten Fest med selvborrende skruer 20...

Страница 21: ...Trinn 16 Fest lamellene til styringsskinnen med festeskuer 21...

Страница 22: ...lamellene er lukket dreneres vannet ut til rennene i sidene og ned gjennom s ylene Det m p regnes at vann kan komme inn under visse forhold H st og vinter skal lamellene settes til 90 graders vinkel f...

Страница 23: ...lorier og fortjener slappe skikkelig av under din nye Pergola Vi h per dere var forn yd med bestillingsprosessen leveringen og monteringen Til slutt nsker vi dere mange fine stunder i tiden fremover u...

Страница 24: ...List of items 24...

Страница 25: ...25...

Страница 26: ...afety please follow the installation instructions Before you start assembling and using the pergola we recommend that you first make yourself familiar with the product Ensure that all the parts listed...

Страница 27: ...Installation steps Step 1 Install the base plates on the pillars Fasten with screws and 27...

Страница 28: ...Step 2 Install the beam to the pillars Fasten with screws 28...

Страница 29: ...Step 3 Install the beam to the pillars as was done in step 2 Fasten with screws 29...

Страница 30: ...Step 4 Install the beams and to the pillars with screws Install the pillar covers with screws 30...

Страница 31: ...Step 5 Adjust the pillars so that the distance between the pillars matches in length width and in diagonal Follow the table below 31...

Страница 32: ...Step 6 Install the water outlet and the aluminum sheet with screws in the corner of the pillars 32...

Страница 33: ...Step 7 Install the gutters into the beams 33...

Страница 34: ...Step 8 Install the gutter clamps in all corners 34...

Страница 35: ...Step 9 Seal the gutters and water outlets with silicone 35...

Страница 36: ...Step 10 Differentiate between the following louvers 2x louvers for connecting to the motor aa 8x louvers without LED bb 4x louvers with LED cc 36...

Страница 37: ...Step 11 Install the louvers aa as shown in the table below Do not attach the other louvers until the motor step 12 is installed 37...

Страница 38: ...num angle with screws Install the mounting bracket for the motor with screws Install the electric motor to the mounting bracket Connect the aa louvers to the motor with the small connection rod Fasten...

Страница 39: ...Step 13 Install the louvers in order according to the table shown below 39...

Страница 40: ...Step 14 Connect the LED light wire dd and the motor to the integrated electricity control 40...

Страница 41: ...Step 15 Connect the LED slats cc with the LED wire dd Attach the louver clamps and put the LED wire into the aluminum cover Fasten with screws 41...

Страница 42: ...Step 16 Attach the slats to the steering rail with connection rod screws 42...

Страница 43: ...lats are closed the water is drained out to the gutters down through the pillars Water may enter the pergola under certain conditions In autumn and winter the slats should be set at a 90 degree angle...

Страница 44: ...ome calories and deserve to relax properly under your new Pergola We hope you were satisfied with the ordering process delivery and assembly Finally we wish you many happy moments in the future under...

Страница 45: ...Artikelliste 45...

Страница 46: ...46...

Страница 47: ...tte die Installationshinweise genau Bevor Sie mit der Montage und Nutzung der Pergola beginnen empfehlen wir Ihnen sich zun chst mit dem Produkt vertraut zu machen Stellen Sie sicher dass alle im Hand...

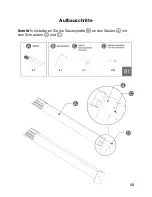
Страница 48: ...Aufbauschritte Schritt 1 Installieren Sie die S ulenplatte an den S ulen mit den Schrauben und 48...

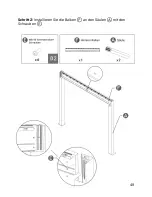
Страница 49: ...Schritt 2 Installieren Sie die Balken an den S ulen mit den Schrauben 49...

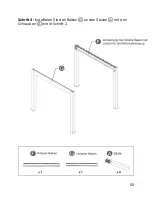
Страница 50: ...Schritt 3 Installieren Sie den Balken an den S ulen mit den Schrauben wie in Schritt 2 50...

Страница 51: ...Schritt 4 Befestigen Sie die Balken und an den S ulen mit den Schrauben Installieren Sie die S ulenabdeckungen mit den Schrauben 51...

Страница 52: ...Schritt 5 Richten Sie die Konstruktion so aus dass die diagonale Abstand zwischen den S ulen korrekt ist Folgen Sie der Tabelle unten Angaben in mm 52...

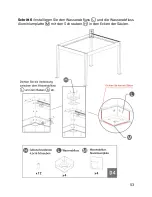
Страница 53: ...Schritt 6 Installieren Sie den Wasserabfluss und die Wasserabfluss Aluminiumplatte mit den Schrauben in den Ecken der S ulen 53...

Страница 54: ...Schritt 7 Installieren Sie die Regenrinne an den Balken 54...

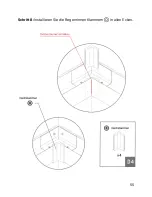
Страница 55: ...Schritt 8 Installieren Sie die Regenrinnen Klammern in allen Ecken 55...

Страница 56: ...Schritt 9 Dichten Sie die Dachrinnen und Wasserabfl sse mit einem Dichtmittel Silikon ab 56...

Страница 57: ...Schritt 10 Unterscheiden Sie zwischen den folgenden Lamellen 2x Lamellen zur Motorverbindung aa 8x Lamellen ohne LED bb 4x Lamellen mit LED cc 57...

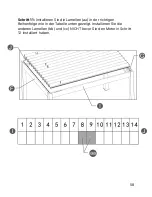
Страница 58: ...11 Installieren Sie die Lamellen aa in der richtigen Reihenfolge wie in der Tabelle unten gezeigt Installieren Sie die anderen Lamellen bb und cc NICHT bevor Sie den Motor in Schritt 12 installiert h...

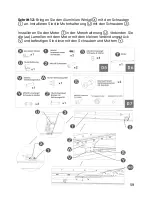
Страница 59: ...Schrauben an Installieren Sie die Motorhalterung mit den Schrauben Installieren Sie den Motor in der Motorhalterung Verbinden Sie die aa Lamellen mit dem Motor mit dem kleinen Verbindungsst ck und be...

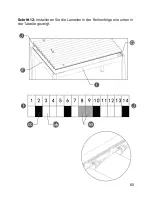
Страница 60: ...Schritt 12 Installieren Sie die Lamellen in der Reihenfolge wie unten in der Tabelle gezeigt 60...

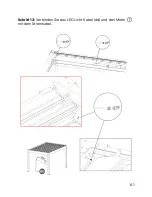
Страница 61: ...Schritt 13 Verbinden Sie das LED Licht Kabel dd und den Motor mit dem Stromkabel 61...

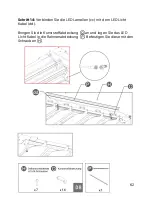
Страница 62: ...tt 14 Verbinden Sie die LED Lamellen cc mit dem LED Licht Kabel dd Bringen Sie die Kunststoffabdeckung an und legen Sie das LED Licht Kabel in die Rahmenabdeckung Befestigen Sie diese mit den Schraube...

Страница 63: ...Schritt 15 Verbinden Sie die Lamellen mit der Steuerschiene mit den Innensechskant Verbindungsbolzen 63...

Страница 64: ...chlossen sind wird das Wasser zu den Rinnen nach unten durch die S ulen abgeleitet Unter bestimmten Bedingungen kann Wasser in die Pergola eindringen Im Herbst und Winter sollten die Lamellen im 90 Gr...

Страница 65: ...s verdient sich unter Ihrer neuen Pergola richtig zu entspannen Wir hoffen dass Sie mit dem Bestellvorgang der Lieferung und der Montage zufrieden waren Abschlie end w nschen wir Ihnen f r die Zukunft...

Отзывы: