Abschließende Worte
Herzlichen Glückwunsch zur fertigen Pergola! Sie haben einige
Kalorien verbrannt und es verdient, sich unter Ihrer neuen Pergola
richtig zu entspannen. Wir hoffen, dass Sie mit dem Bestellvorgang,
der Lieferung und der Montage zufrieden waren. Abschließend
wünschen wir Ihnen für die Zukunft viele glückliche Momente unter
Ihrer neuen PERGOLUX Pergola.
Warme und sonnige Grüße
Ihr PERGOLUX Team
65
Содержание Skydance
Страница 1: ...Et kvalitetsmerke fra Norge Eine Qualit tsmarke aus Norwegen A quality brand from Norway...
Страница 3: ...Innholdsliste 3...
Страница 4: ...4...
Страница 6: ...Monteringsveiledning Trinn 1 Monter bunnplatene til s ylene med skruer og 6...
Страница 7: ...Trinn 2 Fest bjelken til s ylene Stram skruene 7...
Страница 8: ...Trinn 3 Fest bjelke til s ylene som i trinn 2 Stram skruene 8...
Страница 9: ...Trinn 4 Fest bjelke og bjelke til s ylene med skruer Fest topplokket til s ylene med skruer 9...
Страница 11: ...Trinn 6 Monter hj rnedelen med hj rneplatene p alle s ylene Fest med skruer 11...
Страница 12: ...Trinn 7 Monter takrennene p alle bjelkene 12...
Страница 13: ...Trinn 8 Monter takrenne klemme i alle hj rnene 13...
Страница 14: ...Trinn 9 Silikoner takrennene og vannutl pet 14...
Страница 18: ...Trinn 13 Monter de resterende lamellene i rekkef lgen slik tabellen under viser 18...
Страница 19: ...Trinn 14 Koble ledningen til LED lysene dd og motoren til den integrerte str mstyringen 19...
Страница 21: ...Trinn 16 Fest lamellene til styringsskinnen med festeskuer 21...
Страница 24: ...List of items 24...
Страница 25: ...25...
Страница 27: ...Installation steps Step 1 Install the base plates on the pillars Fasten with screws and 27...
Страница 28: ...Step 2 Install the beam to the pillars Fasten with screws 28...
Страница 29: ...Step 3 Install the beam to the pillars as was done in step 2 Fasten with screws 29...
Страница 30: ...Step 4 Install the beams and to the pillars with screws Install the pillar covers with screws 30...
Страница 32: ...Step 6 Install the water outlet and the aluminum sheet with screws in the corner of the pillars 32...
Страница 33: ...Step 7 Install the gutters into the beams 33...
Страница 34: ...Step 8 Install the gutter clamps in all corners 34...
Страница 35: ...Step 9 Seal the gutters and water outlets with silicone 35...
Страница 39: ...Step 13 Install the louvers in order according to the table shown below 39...
Страница 40: ...Step 14 Connect the LED light wire dd and the motor to the integrated electricity control 40...
Страница 42: ...Step 16 Attach the slats to the steering rail with connection rod screws 42...
Страница 45: ...Artikelliste 45...
Страница 46: ...46...
Страница 48: ...Aufbauschritte Schritt 1 Installieren Sie die S ulenplatte an den S ulen mit den Schrauben und 48...
Страница 49: ...Schritt 2 Installieren Sie die Balken an den S ulen mit den Schrauben 49...
Страница 50: ...Schritt 3 Installieren Sie den Balken an den S ulen mit den Schrauben wie in Schritt 2 50...
Страница 54: ...Schritt 7 Installieren Sie die Regenrinne an den Balken 54...
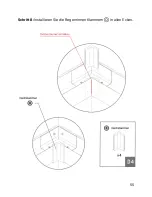
Страница 55: ...Schritt 8 Installieren Sie die Regenrinnen Klammern in allen Ecken 55...
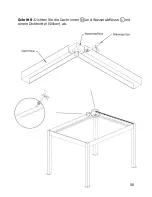
Страница 56: ...Schritt 9 Dichten Sie die Dachrinnen und Wasserabfl sse mit einem Dichtmittel Silikon ab 56...
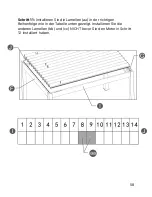
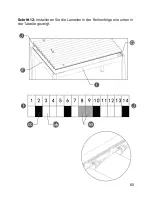
Страница 60: ...Schritt 12 Installieren Sie die Lamellen in der Reihenfolge wie unten in der Tabelle gezeigt 60...
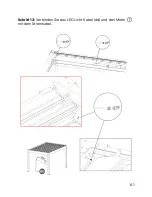
Страница 61: ...Schritt 13 Verbinden Sie das LED Licht Kabel dd und den Motor mit dem Stromkabel 61...
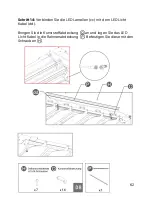
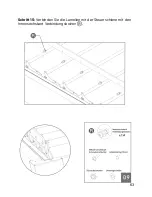
Страница 63: ...Schritt 15 Verbinden Sie die Lamellen mit der Steuerschiene mit den Innensechskant Verbindungsbolzen 63...


