background image

2

VisuNet Control Center Manual

VisuNet Control Center Manual

Introduction

The VisuNet RM Shell 4.1.1 (or newer) embeds a software client that allows connection to Raritan

®

 KVM-over-IP 

switches. The KVM-over-IP client allows a point-to-point connection between a VisuNet Remote Monitor and a 

Host PC to be set up in the safe area. The local host PC can be shared and remotely operated by a second user 

on the remote monitor in the hazardous location.
In this quick installation guide, the configuration of the RM Shell 4.1.1 (or newer) and the Raritan Dominion

®

 KX 

II-101 KVM-over-IP switch is described; it is available as an accessory (DKX2-101-V2, #547998).

Raritan

®

 Dominion

®

 KX II-101 KVM-over-IP Switch

Device Interfaces

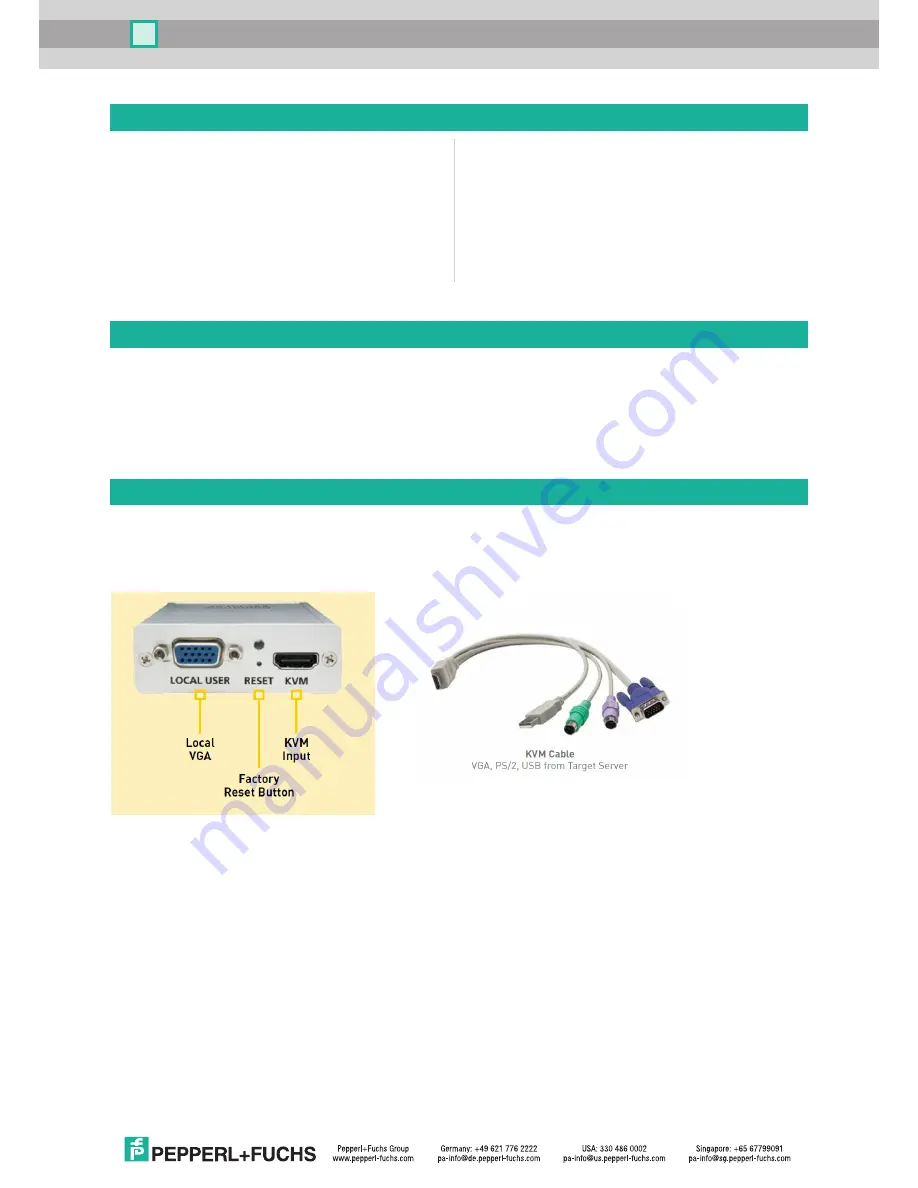
The Raritan Dominion KX II-101 KVM-over-IP switch (KVM switch) has multiple interfaces that are used to 

connect a VisuNet Remote Monitor / Box Thin Client (RM) to a local Host PC:

Table of Contents

I. Introduction 

2

II. Raritan Dominion KX II-101  


KVM-over-IP Switch


2

Device Interfaces 

2

Application Setup 

4

III. Preparing VisuNet RMs  

5


Set IP Address of RM 

5

Add KVM Switch to Trusted Sites 

5

Create KVM Profile and Connect to KVM Switch 

7

IV. Congifuring the KVM Switch 

8

Change Username/Password 

8

Enable Direct Port Access 

8

Set up Date and Time 

9

Create a Self-Signed Certificate 

10

Import a Self-Signed Certificate 

11


„

Local VGA: This is a VGA port that can be used to connect an optional, local monitor to the KVM switch 

and share the transmitted video signal from a host PC. 


„

Factory Reset Button: This button allows the configuration of the KVM switch to be reset.


„

KVM Input: This is the interface for the KVM cable that provides all interfaces that must be connected to 

the host PC.


„

VGA: Connect the VGA interface to the VGA port of the host PC to transmit the video signal to the KVM 

switch. (If the Host PC only has digital interfaces like display port, HDMI, DVI, please use a digital-to-

analog signal converter.)


„

USB: Connect the USB interface to a USB port of the host PC to forward the keyboard/mouse to the 

host PC.


„

(

PS/2: You can also use the PS/2 ports to forward the keyboard/mouse to the host PC.)

Содержание Raritan Dominion KX II-101

Страница 1: ...Raritan Dominion KX II 101 KVM over IP PROCESS AUTOMATION QUICK INSTALLATION GUIDE ...

Страница 2: ... KVM over IP Switch 2 Device Interfaces 2 Application Setup 4 III Preparing VisuNet RMs 5 Set IP Address of RM 5 Add KVM Switch to Trusted Sites 5 Create KVM Profile and Connect to KVM Switch 7 IV Congifuring the KVM Switch 8 Change Username Password 8 Enable Direct Port Access 8 Set up Date and Time 9 Create a Self Signed Certificate 10 Import a Self Signed Certificate 11 Local VGA This is a VGA ...

Страница 3: ...Ethernet port that must be connected with the RM There are multiple setup options for the KVM switch Connection with Local Monitor connected to host PC Use this setup if you want to operate the host PC locally and via an RM that is connected via LAN recommended setup Connection without Local Monitor Use this setup if you do not want to locally operate the host PC but only want to operate the host ...

Страница 4: ...n to the local setup of the KVM switch and the host PC there are also multiple options for connecting the KVM switch to an RM and integrating the KVM switch into a network Figure 1 RM and KVM switch point to point Figure 2 RMs and KVM switches Ethernet switched ...

Страница 5: ... KVM switch 192 168 0 xxx Sytem Settings app Network IP Address Add KVM Switch to Trusted Sites Especially when you use a point to point connection to the KVM switch the certificate based communication can pose a problem since the certificate cannot be properly validated To overcome this problem we recommend that the KVM switch be added to the trusted intranet zone and that the the security settin...

Страница 6: ...ficate settings in the Advanced tab Disable the following two settings Check for publisher s certificate revocation Warn about certificate address mismatch 4 Apply changes by pressing OK and reboot RM Click on the Advanced button and add the IP address of the KVM switch to the list default IP 192 168 0 192 Deselect the option Require server verification https for all sites in this zone if set ...

Страница 7: ...92 c Username Enter username stored on KVM switch factory default admin d Password Enter password of KVM switch user factory default raritan e Port number Select port of KVM switch you want to use factory default 1 1 Open the connection initially by pressing Open Remote Console A connection to the KVM switch will be established and you will be prompted to choose whether you want to run the client ...

Страница 8: ...ion the configuration steps are described that are required to establish a connection from an RM to a KVM switch Change Username Password When you log in for the first time to the KVM switch you will be prompted to change the default username and password admin raritan Use a strong password to increase system security Note If you change the username or password please also update the username and ...

Страница 9: ...9 VisuNet Control Center Manual Set up Date and Time Check the KVM switch time Navigate to Device Settings Date Time and update the date and time IMPORTANT The times on the RM and KVM switch must match ...

Страница 10: ...t or Internet 1 Navigate to Security Certificate and create a new certificate with your organization information If you have a certificate available you can upload it via Certificate upload 2 Click Create to create the certificate You will be prompted to choose whether you want to create a self signed certificate Click OK 3 After the Certificate has been created successfully on the KVM switch rebo...

Страница 11: ...eed to import the created certificate into the RM Shell 1 Open the KVM profile settings on the RM 2 Connect to the KVM switch by pressing Open Remote Console 3 When the connection is established you are prompted with a security alert that the integrity of the connection cannot be verified Open the certificate by clicking View Certificate ...

Страница 12: ...he certificate into the Trusted Root Certificate Authorities Store a Click on Install Certificate A new window opens b Select Place all certificates in the following store and press Browse c Select the folder Trusted Root Certification Authorities and press OK ...

Страница 13: ...nd asks if you really want to install the certificate Accept by pressing Yes The certificate has now been successfully imported 5 After you have imported the certificate close the Remote Console window 6 The KVM switch and KVM profile are now configured and operators can start them by clicking the profile on the home screen of the RM Shell ...

Страница 14: ...www pepperl fuchs com Subject to modifications Pepperl Fuchs Printed in Germany TDOCT 5540_ENG 01 17 00 ...

Отзывы: