Pentax 205571 - PocketJet 3 Plus B/W Direct Thermal Printer Скачать руководство пользователя страница 50

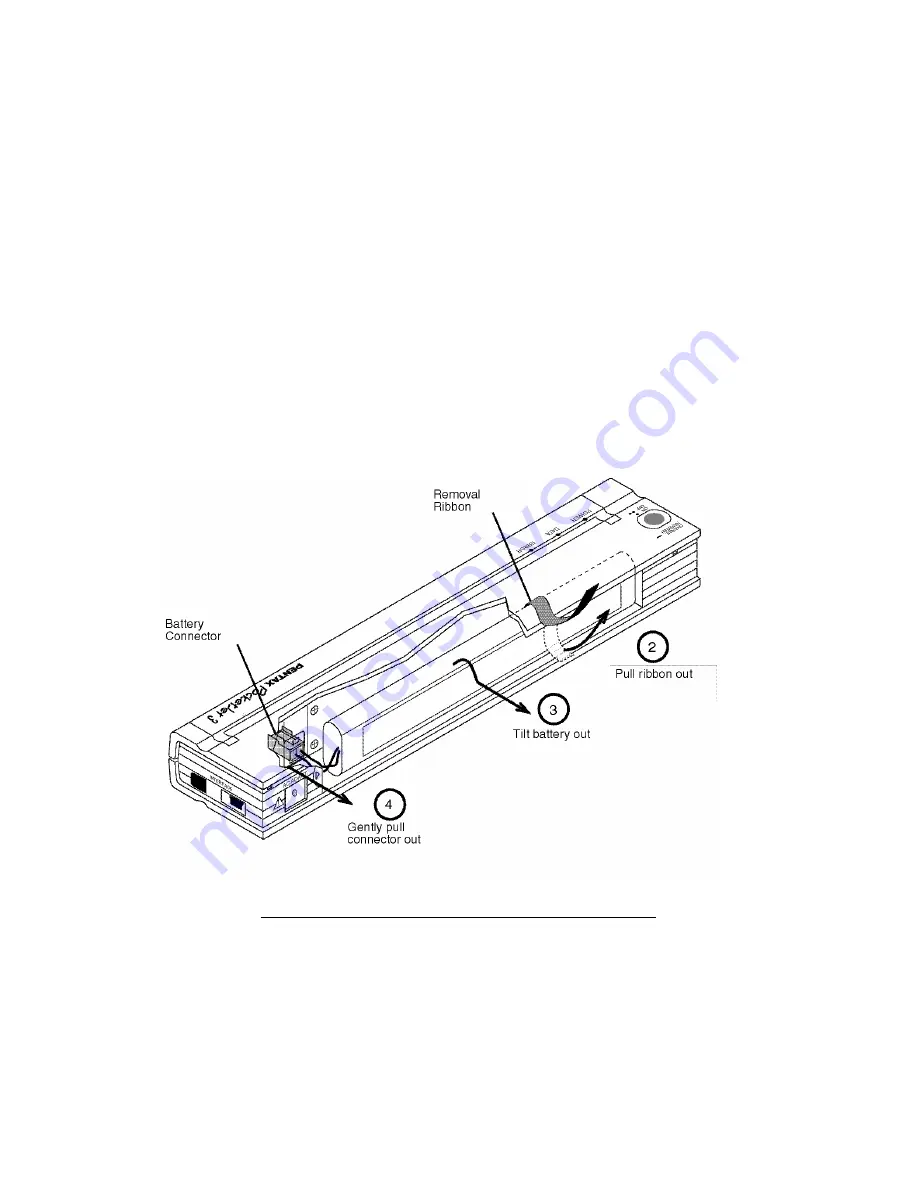
Removing the Battery


1. Open the printer’s battery cover by pressing the cover latch.  Swing 

the cover open and remove it. 


2. Pull out on the battery removal ribbon as shown in Figure 13 

until the battery starts to tilt out of its compartment. 


NOTE:


If the battery removal ribbon is caught behind the battery, 

insert a thin metal object such as a flat-blade screwdriver 
between the battery and the case at the end away from the 
AC adapter receptacle and tilt it out of its compartment. 

 
3. Remove the battery from the compartment. 
 
4. Gently pull the battery connector from the terminal inside the 

printer. 


FIGURE 13.  Instructions for removing the battery 


Page 40 

Содержание 205571 - PocketJet 3 Plus B/W Direct Thermal Printer

Страница 1: ...Printer User s Guide The Future of Portable Printing Today...

Страница 2: ...tered trademarks of Pentax Corporation PSION is a trademark of Psion PLC RBRC is a trademark of the Rechargeable Battery Recycling Corporation WINDOWS is a trademark of the Microsoft Corporation EPSON...

Страница 3: ...Sheet Paper 10 Non Perforated Roll Paper 10 Perforated Roll Paper 12 Windows Advanced Features 12 Windows Specific Operating System Features 13 Connecting to Your Computer 14 Via USB Cable 14 Via Infr...

Страница 4: ...f Test Feature 56 Chapter 6 Troubleshooting 57 Overview 57 Paper Problems 58 Printed Image Problems 58 Pages Don t Print 61 Pages Are Partially Printed 61 Windows CE related Problems 62 Bluetooth rela...

Страница 5: ...use AC power with or without the battery installed you must use the AC adapter supplied with the printer The AC adapter allows you to connect to worldwide 100 240 volt power outlets The power cord sup...

Страница 6: ...t the end of their useful life when taken out of service within the United States The RBRC program provides a convenient alternative to putting spent NiMH battery packs into the trash or municipal was...

Страница 7: ...l retailer may also take back your old product free of charge if you purchase a similar new one Please contact your local authority for further details By disposing of this product correctly you will...

Страница 8: ...B cable or IRDA For all PocketJet 3 and 3 Plus kit models a 3 foot 1 meter USB cable is supplied The printers may also be used with IrDA capable hosts Integrated Bluetooth and integrated serial connec...

Страница 9: ...ttery pack or the Pentax Quality Paper fails due to defects in material or workmanship within the first 90 days of ownership it will be replaced Contact Pentax or your local reseller for further infor...

Страница 10: ...Notes Page x...

Страница 11: ...ter Unpacking the Printer Read and follow any instructions on any Read Me First sheet that may be included in your kit A typical printer kit may contain the items shown in Figure 1 FIGURE 1 The conten...

Страница 12: ...240 VAC 50 60 Hz FIGURE 2 Connecting the printer to an AC power outlet The PocketJet works from DC sources from 10 to 17V and can require as much as 2 6A Operation below 14 volts may slow printing NOT...

Страница 13: ...w 1 Connect an appropriate power adapter cord either with a cigarette plug or direct wired to the vehicle 12VDC supply as shown in Figure 3 These items are available as options See Ordering Informatio...

Страница 14: ...for five seconds after the printer has received any data The button must then be held down for 1 1 2 seconds to start the form feed Charge the Battery With the printer off push the main switch and hol...

Страница 15: ...s steady green Power is on external power POWER light is red or orange The printer is operating on battery power Color and blink solid indicates approximate charge remaining POWER light is alternately...

Страница 16: ...Notes Page 6...

Страница 17: ...are supplied on the CD and on the Pentax website Contact the applet provider to purchase the one you want after the trial period PocketPC 2000 and higher systems may use the WinCE driver if using app...

Страница 18: ...driver installation described below For most printer applications your printer requires software drivers to communicate with your computer A CD with drivers and installation information is provided wi...

Страница 19: ...and Linux View the Readme txt file on the CD for more information Note that every driver can be installed manually if necessary Browse the CD to locate the Setup or Install program for your operating...

Страница 20: ...d at the end of a job This is typically used with non perforated roll paper to save paper No Feed Mode Extra Feed this option is used in conjunction with the No Feed Mode to eject paper by setting the...

Страница 21: ...1 Select No Feed Mode 2 Select Infinite Paper Size 3 Set the value of the No Feed Mode Extra Feed to the desired length 4 Check to be sure that the Top Bottom margins within your application software...

Страница 22: ...forated paper compared to cut sheet paper WinCE Note Check the Perforated Paper box Windows 2000 XP Note Set Paper Type to Perforated Roll This modifies the printable area for any paper size including...

Страница 23: ...pecifications will be displayed as paper size options Windows CE Notes 1 Serial Handshake Used with Serial models only Choose Hardware or Software handshake based on the way the serial port is configu...

Страница 24: ...the cable and hold it so the notched metal surface is facing up 3 Insert the printer end of the cable into the interface connector on the side of the printer See example Figure 7 FIGURE 7 Connecting t...

Страница 25: ...essary using a PIN password use the Configuration Program that accompanies your PocketJet3 Bluetooth printer to set the printer s PIN password See information on PIN setting in Bluetooth Menu page 20...

Страница 26: ...kly The POWER indicator lights up See Figure 8 FIGURE 8 Turning the printer ON 3 Insert a sheet of Pentax Quality Paper into the paper input slot Place the print side of the paper away from you so tha...

Страница 27: ...to Off Timer feature is enabled the printer will turn itself off automatically after the selected period of inactivity Making Prints Lighter or Darker You can make prints lighter or darker by using th...

Страница 28: ...on the Pentax CD Auto On Auto Off Pre Feed For Bluetooth Printers PIN Code Setting For Serial Printers Baud Rate Setting Parity Setting Flow Control Setting For Text Mode Printers All Features Text m...

Страница 29: ...on will load and the active window will appear as follows FIGURE 5 Configuration Utility If you prefer a language other than English you may select this first Then you may choose the appropriate Pocke...

Страница 30: ...t queue available This will also modify the Printer selected on the main dialog Bluetooth Menu If your printer is enabled with Bluetooth you may use this menu entry to create your own PIN password for...

Страница 31: ...r is shipped from the factory with NO PIN code required However if your OS or application requires a PIN code the PASSWORD for access as shipped from the factory is default case sensitive Please refer...

Страница 32: ...ou may use this menu entry to set the parameters for your printer s serial port The printer is configured for 8 data bits and one stop bit Baud rate parity and flow control may be configured here Baud...

Страница 33: ...tions click on the Save Config button to transmit your preferences to the printer Note The new serial parameters will take effect immediately If you are sending this configuration data to your printer...

Страница 34: ...ch are common to all operating systems include Auto On Auto Off and Pre feed Printer This selection lists print queues that exist for the printer In most cases only one queue will be displayed If the...

Страница 35: ...printable height of 11 36 288 5mm top and bottom margins of about 0 27 6 9mm and 0 06 1 5mm respectively Printable width is set to 8 0 203 2mm with 0 13 3 3mm margins on either side Custom size allows...

Страница 36: ...any source Different modes are appropriate depending upon the type of paper being used Fixed Page mode is typically appropriate It assumes a known page length based upon the Form Length and or Paper...

Страница 37: ...r printing If Auto On is set to Enabled the printer will power up as soon as an external power source is connected to the printer This can be useful in certain mobile installations where access to the...

Страница 38: ...mines what the ESC P emulation does with ASCII characters 10 and 13 These are the line feed LF and carriage return CR characters The LF causes the printer to move down to the next print line and the C...

Страница 39: ...rm length The maximum setting is 127 lines For 6 lines per inch that will provide a page of a little more than 21 inches in length If using the Inches method for setting form length the physical heigh...

Страница 40: ...Margin is set to 4 lines 2 3 of blank space will be created at the bottom of each page The minimum and default space between pages will depend upon the setting of the Text Line Spacing but is a minimu...

Страница 41: ...columns of unprinted left margin The actual empty width created will depend upon the current character pitch as set by Default Pitch For example if the default pitch is set to 12 characters per inch a...

Страница 42: ...current Default Pitch is set to Proportional 10 characters per inch pitch is used for this calculation Values that cause the printable page width the space left on the page by the difference between...

Страница 43: ...in 10 12 or 15 per inch mode will use the same amount of horizontal space If Proportional is selected each character uses an amount of horizontal space appropriate to the characters intrinsic width F...

Страница 44: ...Character Set Map This menu allows you to select the use of special characters appropriate for one of the languages selected See Appendix I for a chart of the special characters available Page 34...

Страница 45: ...You can print a test page using the Configuration Utility or you can print test pages using the Main Switch see Self Test Feature page 56 Clicking on Test Page will print a page showing the current p...

Страница 46: ...CHAR SET USA AUTO LINE FEED Disabled DENSITY LEVEL 5 PAPER EJECT MODE Fixed Page Mode BATERY POWER TIME OUT 10 Minutes BATTERY REFRESH INTERVAL Discharges Before Every charge SERIAL PARAMS 9600 8 N 1...

Страница 47: ...l be loaded and displayed Since that file is expected to match the internal factory configuration of your printer this file s properties are set to Read Only and it should not be modified Save Config...

Страница 48: ...wing the cover open and remove it 3 Gently push the battery connector into the terminal on the inside of the printer s battery compartment See Figure 11 FIGURE 11 Pushing the battery connector into th...

Страница 49: ...lt the battery and place it inside the battery compartment Once the battery clears the outer edges of the compartment press it securely into position Make sure the side of the battery with the warning...

Страница 50: ...s compartment NOTE If the battery removal ribbon is caught behind the battery insert a thin metal object such as a flat blade screwdriver between the battery and the case at the end away from the AC a...

Страница 51: ...uts the printer in Charge Mode and starts the charging of the battery The POWER indicator light blinks until charging is complete The maximum time to charge to 100 capacity is approximately 120 minute...

Страница 52: ...ts discharge the battery faster than lighter prints do Use the density adjustment from the driver dialog on your computer or use the Set Up Utility to adjust lightness and darkness See Accessing Advan...

Страница 53: ...skewed after the printer pulls it into the starting position you can correct the situation as follows If the printer does not start to print immediately open the release cover as far back as it will...

Страница 54: ...and Handling Instructions When loading paper make sure the smooth coated side faces the back of the printer To avoid wrinkling and tearing keep paper in its box or bag until ready to use Do not fold...

Страница 55: ...itch down This can be repeated as many times as necessary If this does not move the jammed paper out of the printer use Method 2 below NOTE This method can also be used to finely position a sheet of p...

Страница 56: ...in either direction is acceptable See Figure 16 CHARGE REFRESH ON OFF E R R O R D A T A P O W E R FIGURE 16 Pulling jammed paper out of the printer 3 Close the release cover 4 Reinsert a new sheet of...

Страница 57: ...e a Form Feed will be executed instead 2 Press the main switch for about two seconds The Data LED will illuminate 3 Press the main switch again for less than 2 seconds The feed motor will begin to tur...

Страница 58: ...he cleaning cloth The cleaning cloth is for head and roller cleaning only Do not use it to clean any other part of the printer NOTE Don t throw the cleaning cloth away after you clean the print head I...

Страница 59: ...minate 3 Press the main switch again for less than 2 seconds The feed motor will begin to turn 4 Insert the black cleaning cloth that came with the printer into the printer s paper input slot with the...

Страница 60: ...s for head cleaning and platen roller cleaning only Do not use it to clean any other part of the printer NOTE Don t throw the cleaning cloth away after you clean the platen roller It should last for t...

Страница 61: ...ater If necessary add a very small amount of a mild soap such as a liquid dishwashing detergent CAUTION Avoid saturating the cloth Do not allow water to get inside the printer Avoid the use of benzene...

Страница 62: ...Notes Page 52...

Страница 63: ...ternal power in use Battery in use 14 0 Volts Battery in use 13 1 Volts Battery in use 10 0 Volts Battery in use 6 6 Volts Battery is discharging Battery is charging Printer is receiving data Unprinte...

Страница 64: ...at the fuse is good No Battery Found When Charging If this indication occurs immediately when attempting to charge the battery the printer did not detect a battery when you tried to initiate a battery...

Страница 65: ...ts with a great deal of black content To avoid or delay the onset of this condition you can print using a lighter density setting reduce the amount of black space being printed by removing background...

Страница 66: ...page 36 contains firmware level image quality and configuration information 1 To print a test page the printer must be turned on and idle and paper must not be loaded in the printer 2 Press the main...

Страница 67: ...o your computer Make sure you have installed and selected the proper printer driver as explained in Chapter 2 Using the Printer Look through the troubleshooting tips in this chapter for help correctin...

Страница 68: ...only Heavy paper may not feed through the printer If the release cover is closed and you are using Pentax Quality paper the printer may have a damaged drive system Call technical support Printed Imag...

Страница 69: ...nt head may need maintenance Call technical support All pages have a white vertical line The print head may need maintenance Call technical support All pages have a black vertical line The print head...

Страница 70: ...page has completed printing Certain colors of text do not print Choose a different color of text The Windows 3 1 Universal Print Driver is limited to 8 colors specific colors not total colors The side...

Страница 71: ...ng another page or manually form feeding using the main switch may finish the page correctly The application should be sending data to the printer but the green DATA indicator is not lit Make sure the...

Страница 72: ...the WinCE HPC is not connected to a PC Try resetting the WinCE HPC according to the manufacturer s directions There seems to be no way to print from my application Your application may not support pri...

Страница 73: ...erage Emulation Epson ESC P for 24 wire matrix similar to that of an LQ 500 printer PocketJet 3 emulates a PocketJet 200 PocketJet 3 Plus emulates a PocketJet II Fonts Native fonts are Serif and Sans...

Страница 74: ...extension to IrLMP IrCOMM COM port emulation using 3 wire cooked serial mode IrLPT and IrOBEX vCard vCal and vMSG text portions only Bluetooth 2402 2480MHz ISM band 79 x 1MHz Class 1 Bluetooth Level...

Страница 75: ...uous 37 watts 3 5A peak 50 watts Standby 0 02A 1 1 watts externally powered printer powered off Battery Type and Rating NiMH 14 4 VDC 360mAH Battery Yield Over 100 pages per full 100 charge tested at...

Страница 76: ...For PocketJet 3 units sold in the U S A the following declaration of conformity applies Page 66...

Страница 77: ...For PocketJet 3 units sold in the Europe the following declaration of conformity applies Page 67...

Страница 78: ...For PocketJet 3 Plus units sold in the U S A the following declaration of conformity applies Page 68...

Страница 79: ...For PocketJet 3 Plus units sold in the Europe the following declaration of conformity applies Page 69...

Страница 80: ...For PocketJet 3 Bluetooth units sold in the U S A the following declaration of conformity applies Page 70...

Страница 81: ...For PocketJet 3 Plus Bluetooth units sold in the U S A the following declaration of conformity applies Page 71...

Страница 82: ...For PocketJet 3 Bluetooth units sold in Europe the following declaration of conformity applies Page 72...

Страница 83: ...For PocketJet 3 Plus Bluetooth units sold in the Europe the following declaration of conformity applies Page 73...

Страница 84: ...ision reception which can be determined by turning the equipment off and on the user is encouraged to try to correct the interference by one or more of the following measures Reorient or relocate the...

Страница 85: ...des Herstellers Importeurs Hiermit wird bescheinigt dab der die das PENTAX Thermodrucker PT A4211 PocketJet 3 PENTAX Thermodrucker PT A4312 PocketJet 3Plus In bereinstimmung mit Bestimmungen der BMPT...

Страница 86: ...Notes Page 76...

Страница 87: ...aper 1000 sheets per box Note Fanfold papers are perforated and indexed every 11 Accessories Replacement Parts Note Depending on the kit purchased these items may be included not optional USB cable Ni...

Страница 88: ...ormation about ordering supplies accessories and replacement parts Uploadable Fonts Custom fonts may be developed for this printer to meet unique customer applications For further information in N Ame...

Страница 89: ...R b r 3 3 C S c s 4 4 D T d t 5 5 E U e u 6 6 F V f v a 7 7 G W g w o 8 8 H X h x 9 9 I Y i y A J Z j z B K k C L l D M m E N n F O _ o International Character Set Table 23 24 40 5B 5C 5D 5E 60 7B 7C...

Страница 90: ...Notes Page 80...

Страница 91: ...attery Charge Mode 41 Charging 4 41 Compartment 38 39 Connector 38 40 Cover 38 39 40 Discharging 53 Installation 38 54 NiMH vi ix 3 65 77 Overheat 54 Overheating 39 Recycling ii vi Removal 40 Removal...

Страница 92: ...DC adapter 16 54 DC supply 3 declaration of conformity 66 67 68 69 70 71 72 73 density mode 10 Direct thermal technology viii driver CD ix 7 8 driver installation 8 Driver Installation 9 18 Driver Ins...

Страница 93: ...54 M Mac OSX viii 7 15 Main Switch 5 27 35 Main Switch Functions 4 Maintaining the Printer 47 make prints lighter or darker 17 Making Prints Lighter or Darker 17 58 59 Manual Form Feed 4 Menu Bar 20 M...

Страница 94: ...11 PDA 7 8 platen roller 49 50 58 59 Pocket PC 7 PocketPC viii 7 8 Power Sources viii 65 Power button 17 POWER light 5 Power OFF 4 Power ON 4 power plug v print density 10 Print Density 17 26 58 Print...

Страница 95: ...Serial 13 15 22 64 serial adapter cable 15 serial specifications 15 Service Mode 4 56 slow printing speed 55 Specifications 63 Electrical 65 Environmental 64 Interfaces 64 Physical 63 Printing 63 Regu...

Страница 96: ...supply 3 17 Vehicle Mount 77 vehicle power viii W Warranty Extended ix Standard ix Warranty Information ix Warranty Registration ix Windows 2000 7 9 10 11 12 13 Windows 3 1 11 60 Windows Advanced Fea...

Страница 97: ...Notes Page 87...

Страница 98: ...3 5 1930 Zaventem Belgium Tel 32 2 306 1190 Fax 32 2 306 1199 E mail info europe pentaxtech be Technical Support In US 1 800 543 6144 ext 1820 8 a m to 5 p m Mountain Time M F Outside US Contact your...

Отзывы: