manualshive.com logo in svg
background image

7


AQUALUMIN

®

 III Nicheless Pool Light Installation Guide
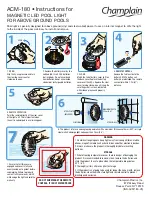
10.

Connect all three wires to the corresponding circuit wires in the junction box and secure
the junction box cover in place.

11.

For lights with 2-conductor cords only (no ground wire) connect two wires to the
corresponding circuit wires in the Junction Box, black wire to power, white wire to common
and secure the Junction Box cover in place.

12.

Before operating the light for more than 10 seconds, fill pool until the AquaLumin III pool
light fixture is completely submerged in water. To check for proper operation, turn on main
switch or circuit breaker, as well as the switch which operates the AquaLumin III pool
light.

Section 1: Installing a mounting bracket and light fixture during new vinyl

              pool construction 

(Continued)

       WARNING: 

Never operate the AquaLumin

®

 III Nicheless Pool Light for more than

10 seconds unless it is totally submerged in water. Without total submersion, the light
assembly will get extremely hot, which may result in serious burns or in breakage of
the lamp or lens. This may result in serious injury to pool users, installer, or bystand-
ers, or in damage to property.


      WARNING: 

Use only the special stainless steel captive screw (see 

Light

Assembly Parts

, item 4, on page 14) provided with this AquaLumin III pool light.

This screw mounts and electrically grounds the housing securely to the AquaLumin
III pool light fixture. Failure to use the screw provided could create an electrical
hazard which could result in death or serious injury to pool users, installers or others
due to electrical shock.

C. Winterizing: 

Light should be left in place for winterization.

Содержание AQUALUMIN III

Страница 1: ...ng light fixture in existing pools 7 3 Replacing a lamp only 10 Parts List Replacement Part Kits 13 15 Minimum Qualifications Licensed or Certified Electrician Electrician or qualified pool person Qua...

Страница 2: ...ause a an electrical hazard resulting in death or serious injury to pool users installer or others due to electrical shock or b breakage of the lamp or lens which likewise could result in serious inju...

Страница 3: ...y a licensed or certified electrician or a qualified pool service person in accordance with the current National Electrical Code and all applicable local codes and ordinances Improper installation wil...

Страница 4: ...ding wire must be installed through the conduit from the Junction Box to the bonding grounding lug on the mounting bracket see Figure 3 Seal the wire lug connection with a listed sealant such as 3M Sc...

Страница 5: ...over hole with the word TOP at the top and secure with mounting flange and two 2 hex nuts and lock washers Tighten hex nuts evenly with equal torque When non metallic conduit PVC is used a No 8 AWG bo...

Страница 6: ...the remaining cord through the conduit hole in the mounting hub Place hook mounting bracket over the pin on the bottom of the mounting bracket and press down lightly to secure in place Secure at the...

Страница 7: ...t and light fixture during new vinyl pool construction Continued WARNING Never operate the AquaLumin III Nicheless Pool Light for more than 10 seconds unless it is totally submerged in water Without t...

Страница 8: ...III Vinyl Mounting Bracket Assembly 1 78887800 AquaLumin III Vinyl Mounting Bracket Assembly 3 4 78887700 A The following are preparatory steps which must be completed by the electrician or qualified...

Страница 9: ...lectrical system meets allapplicablerequirements 3 Install this light fixture only in a Pentair Aquatic Systems mounting bracket Mounting brackets made by other manufacturers may not provide proper bo...

Страница 10: ...pin on the bottom of the mounting bracket and press down lightly to secure into place Secure at top of the light with the captive screw 7 Cut the cord at the junction box leaving at least six 6 inches...

Страница 11: ...the deck on a flat soft clean surface Take care not to scratch the lens 4 Using a Phillips head screwdriver loosen do not remove all ten 10 screws on the back of the light 5 Using a Phillips head scr...

Страница 12: ...12 Reinstall the lens gasket lens and plastic face ring While replacing the lens be sure the tabs around the perimeter of the lens gasket are not under the flange of the lens Orientate the lens so th...

Страница 13: ...the pool for servicing NOTE Leave 2 to 3 of slack cord at the top so that the light may be tipped back for removal 17 Feed the remaining cord through the conduit hole in the mounting hub Place the hoo...

Страница 14: ...t assembly 2 619548 Metal bracket cup assembly 3 619549 Mounting hub 3 4 in assembly 4 619550 Mounting hub 1 in assembly 5 78872600 Mountingspacer 6 619617 Housingspacer 7 86001800 Nipple 1 in 8 78887...

Страница 15: ...ption AquaLumin III Replacement Parts Note Sold in Bulb Replacement Kits 600139 and 600138 Lens Replacement Kit 600141 600138 Bulb replacement kit 120V 250W 619484 Bulb 120V 250W Qty 1 619599 Lens gas...

Страница 16: ...re trademarks of 3M Company Corporation Unless expressly noted names and brands of third parties that may be used in this document are not used to indicate an affiliation or endorsement between the ow...

Отзывы: