background image

Air cleaner maintenance is important to ensure proper 
airflow into the generator

s carburetor.  Follow the 

maintenance schedule for checking and cleaning your 

air cleaner as shown on page 14.
When checking the air cleaner, visually inspect the 

cleaner to be sure that it is free from dirt and particles.

1. First, unclasp the springs on the bottom and top of 

the cleaner

s cover (see Figure J).

2. Remove the meshy components inside the air 

cleaner case

3. Wash with soapy warm water and let dry. Then coat 

and soak in engine oil and squeeze out any excess 

before returning to the air cleaner case.

4. Replace the cover and spring clasps.

.


MAINTAINING THE AIR CLEANER

Copyright 2010 DTX International

Figure K

DRAINING THE FUEL TANK

Figure J

To inspect the spark plug, first:

1. Remove the spark plug cap and unscrew the spark 

plug using the spark plug wrench (See Figure K).

2. Look at the spark plug and check for defects such 

as cracks or chips. If any of these defects are 

visible, replace with a new spark plug

3. Next, measure the spark plug gap, which

4. If you are not replacing the spark plug, clean around 

the base of the one to be reused and then reset the 

gap. Screw the plug back in, using the spark plug 
wrench and replace the plug cap.


. Use a 


F6RTC 

spark plug such as NGKBPR5ES.

should be 

0.7-0.8 nun (0.028-0.031 in). See Figure K.

MAINTAINING THE SPARK PLUG

CLEANING THE FUEL FILTER CUP

The fuel filter cup helps to strain out dirt and impurities 
that are attempting to get into the engine. To clean this 

cup:

1. First, move the fuel valve to 

2. Use a wrench to remove the cup from the fuel 

valve (see Figure L, below).

3. Clean the cup of debris using a clean cloth, q-tip 

or brush and then replace.

OFF.

Figure L

If you are storing your generator for long periods of 
time you should drain the gas tank to avoid starting 

trouble the next time you attempt to use it. To do this:

1. First, move the fuel valve to 

and remove the 

fuel filter cup (see above and Figure L). Empty the 
cup of any fuel present.

2. Place a drain pan or container underneath the 

generator to contain the gas to be drained, then 
turn the fuel valve to 

3. Once all gas has drained, turn the fuel valve back 

to the 

position. Wipe any excess gas from the 

body of your generator and replace the fuel filter 

cup.

OFF 

ON.

OFF 


16

0.7-0.8mm
(0.026-0.031  in)

PLUG CAP

PLUG WRENCH

COVER
SPRING

COVER
SPRING

AIR CLEANER
COVER

ELEMENT

FUEL VALVE

FUEL FILTER CUP

Содержание GALE FORCE PT8500E

Страница 1: ...l power in case of public utility outage and in areas where electrical power is not available IMPORTANT All persons that will operate this equipment must read and become thoroughly competent with all operating procedures and safety precautions ELECTRIC GENERATOR IMPORTANT Read Unpacking Instructions First Separate Sheet GALE FORCE PT8500E Copyright 2010 DTX International TORNADO PT6500E TM TM TM T...

Страница 2: ...ning the bill of lading If an item is opened and deemed to be defective within 30 days from the date of delivery please contact us at www pentagontool com for return instructions A Pentagon Tool RMA is required when returning defective merchandise Pentagon Our return policy allows 30 days from the date of delivery to return products provided it is new unused and in the original packaging as receiv...

Страница 3: ...ury 8 Do not refuel near open flames pilot lights welders grinders or sparking electric tools Allow engine to cool before refueling Avoid spills clean up if NEVER ONLY Do not operate generator in wet conditions Do not use a generator while tired or under the influence of drugs alcohol or medication Never refuel while generator is running SAFETY PRECAUTIONS necessary 9 Do not attempt to force a sma...

Страница 4: ...cated on your generator Failure to heed these warnings may result in serious injury or death NEVER operate your generator indoors operate only in well ventilated outdoor LEVEL locations ALWAYS ensure generator is properly grounded before use DO NOT run generator in rainy or wet conditions Keep out of reach of children or unqualified individuals touch bare wires receptacles or outlets DO NOT WARNIN...

Страница 5: ...9dB 37 fl oz 1 1 liters 37 fl oz 1 1 liters 389 cc 419 cc non contact transistor non contact transistor PT6500E PT8500E Electric Electric 6 6 gal 25 liters 6 6 gal 25 liters Based on 50 load Model Rated Wattage Surge Wattage Voltage Frequency Phase DC Voltage DC Amps 12V 8 3 8 3 Single 60Hz 120V 240V PT6500E PT8500E 5500W Dimensions Height 21 3 Width 20 Length 28 12V 7000W 6500W 8500W 120V 240V 60...

Страница 6: ...e with all relevant electrical codes 2 6 8 MUST BE LEVEL IMPORTANT All persons that will operate this equipment must read and become thoroughly competent with all operating procedures and safety precautions Misuse of this equipment may result in death personal injury or property damage OPERATING PRECAUTIONS and standards before operation If an extension cord is used to provide power to a tool make...

Страница 7: ...l 11 Idle Control Switch 12 12V DC batteries 13 l2V DC receptacle Reads current voltage output Use to connect electrical devices that run 120 Volt 60 Hz single phase AC current 2 Áduplex GFCI Receptacle to connect electrical devices running 120 240 Volt 60Hz single phase AC current NEMA L14 30 Reset switch protecting generator from overload Grounding wires connection point to ensure proper groundi...

Страница 8: ...s provided See Figure bb 4 Place See Figure cc Figure dd Figure ee Make sure the wheel s air valve is accessible Install the wheel with the valve facing out 5 Attach the handles to the cage using the cap screws and lock nuts provided See Figure ff Figure gg 6 Double check that all screws lock nuts and pins are secure Note a wheel over the axle then slide a flat washer over the axle Tighten down th...

Страница 9: ...capacity is 6 6 U S gallons 2 Use clean fresh lead free regular gasoline with a minimum of 87 octane 3 Purchase fuel in quantity that can be used within 30 days Do not use old gas 4 Avoid getting water oil or dirt mixed with the gasoline 5 Do not fill to top of tank Leave room for gasoline to expand Check fuel gauge on top of tank for current fuel level 6 Do not store gasoline in the tank for exte...

Страница 10: ...1 T 2 Do not fill to top of tank Leave room for gasoline to expand Check fuel gauge on top of tank for current fuel level 3 Check the oil Check the gas Ground the generator ALWAYS ighten the grounding wing nut onto a grounding wire Attach the other end of the grounding wire to a grounding rod brass or copper that is driven into the earth IMPORTANT STEPS BEFORE USE Copyright 2010 DTX International ...

Страница 11: ...e OPEN position 1 Check and double check your electrical devices to ensure that they are OFF 2 Refer to the chart Figure E for average wattage reported from devices you may encounter Most electrical devices will have the wattage requirements imprinted somewhere on the appliance If the requirements are reported in volts and amps you may calculate the watts by this formula Be sure that the total run...

Страница 12: ...r of the generator into an 120V only mode or a 120V 240V mode In order to use a 240V appliance you must have the selector set to 120V 240V mode 120V appliances may be operated in either mode You may use both 240V and 120V devices simultaneously while in the 120V 240V mode but do not use a 240V device in the 120V mode VOLTAGE SELECTOR SWITCH INFORMATION MINIMUM EXTENSION CORD GAUGE 120 VOLT EXTENSI...

Страница 13: ... output terminal red positive DC output terminal black negative SHUTTING DOWN THE GENERATOR To turn off the generator 1 Turn off then disconnect all devices and extension cords connected to the generator 2 Turn the circuit breaker to but run the generator for a few more minutes with no devices connected so that the generator s temperature will cool slowly and evenly 3 Turn the engine switch to the...

Страница 14: ...l noise or vibration occurs you should diagnose and resolve the problem before further use Refer to the engine manufacturer s Operation Maintenance and Parts Manual for specific information The amount of preventative upkeep and maintenance for any generator will depend upon the amount of use NOTE BEFORE EACH USE Task MAINTENANCE RECORD Hours Date Initials Task Hours Date Initials Task Hours Date I...

Страница 15: ... an even level surface Use a 10mm hex head wrench Copyright 2010 DTX International Figure G You should check the oil in your generator before every use Follow the maintenance schedule for changing your oil as shown on page 14 The generator is equipped with a low oil automatic shutoff which will not allow the generator to run on insufficient oil levels If your oil level is too low but it is still n...

Страница 16: ... the base of the one to be reused and then reset the gap Screw the plug back in using the spark plug wrench and replace the plug cap Use a F6RTC spark plug such as NGKBPR5ES should be 0 7 0 8 nun 0 028 0 031 in See Figure K MAINTAINING THE SPARK PLUG CLEANING THE FUEL FILTER CUP The fuel filter cup helps to strain out dirt and impurities that are attempting to get into the engine To clean this cup...
Страница 17: ...tric machine back cover Take down the installed bolts M5 x 16 of carbon brush Take down the carbon brush from DC wire of excitation Install the electric machine back cover with 2 bolts M5 x 12 Insert and connect the DC wire of excitation according to anode cathode Install the new carbon brush with bolts M5 x 16 ...

Страница 18: ...ine back cover Take down the 2 installed bolts M5 x 16 of AVR Disconnect the sample wire hindered Connect the sample wire hindered Install the new AVR with 2 bolts M5 x 16 Take down the AVR from carbon brush Insert and connect the DC wire of excitation according to anode cathode Install the electric machine back cover with 2 bolts M5 x 12 ...

Страница 19: ...TORNADO PT6500E GALE FORCE PT8500E WIRING DIAGRAM Copyright 2010 DTX International 19 ...

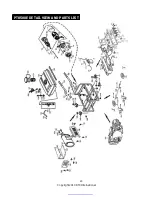
Страница 20: ...PT6500E PT8500E DETAIL VIEW AND PARTS LIST Copyright 2010 DTX International 20 ...

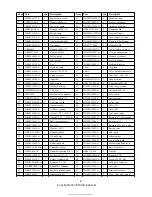
Страница 21: ...r 20 DF2500H 34118 A 1 Clip wire 62 DJ188F 14002 A 2 Bolt head M8 48 21 34218 001 1 Idle Control Component 63 DJ168F 18500 A 1 Plug spark 22 GBT5789 B6 25 2 Flange bolt M6 25 64 DJ190F 13100 C 1 Camshaft assy 23 DJ188FB 18106 A 1 Cord stop switch 65 DJ190F 13009 A 2 Lifter valve 24 DJ188F 11017 A 1 Grommet cord 66 DJ188F 13001 A 1 Valve IN 25 DJ188F 18100 C 1 Coil assy ignition 67 DJ188F 13002 A 1...

Страница 22: ...200 A 1 Control assy 89 DF3800H 11032 A 1 Fan cover 100 DJ188F 15007 A 1 Spring governor 90 DJ188F 11007 A 1 Cap assy oil filler 101 DJ188F 15008 A 1 Spring throttle return 91 DJ188F 15100 A 1 Governor kit 102 DJ188F 15004 B 1 Arm governor 92 DJ188F 11003 B 1 Packing case cover 103 DJ188F 15006 A 1 Rod governor 93 DJ168F 11002 B 1 Pin dowel 7 12 104 DJ188F 15005 A 1 Bolt governor arm 94 DJ190F 123...

Страница 23: ...Copyright 2010 DTX International 23 PT8500E DETAIL VIEW AND PARTS LIST ...

Страница 24: ...4300 B 1 Fuel tank 1 6 6 GBT5789 B6 16 4 Bolt M6 16 12 4 14307 1 Fuel Filler 1 6 7 34204 003 1 Receptacle 30A 12 5 14310 1 Packing ring 1 6 8 34204 005 2 Receptacle 20A 12 6 14306 1 Fuel filler cap comp 1 6 9 34206 049 1 Circuit protector 12 7 14303 1 Fuel sensor 1 7 0 GBT801 B3 8 Bolt M3x 8 12 8 GB 819 95 2 Screw M5 x 10 1 7 1 34208 004 1 8A Circuit Protector 12 9 14313 1 Gasket Fuel Sensor 1 7 2...

Страница 25: ...nnected devices do not exceeding the rated running wattage of your generator 2 Make sure that one of the t o 3 Make sure that the air cleaner does not need to be cleaned or replaced 4 Make sure that the length of your extension cords is not affecting the reduced draw engine switch is ON fuel valve is set to OPEN enough gas to start the generator make sure the gas is not old Check your oil level cl...

Отзывы: