10
10
1.
Connect the ends of the connecting hoses (hot and cold water supply) to the respective
ports on the tub. Ensure that there are sealing gaskets within the swivel fittings on the
hoses.
2.
Connect the drain (waste) of the tub to the facility’s drain system.
3.
The system needs to be checked for any leaks in the entire system. However, the
electrical connections must be made prior to doing this. Once the electrical connections
have been made, continue with step 4.
4.
Open the facility’s supply valves to the tub and check for leaks. If no leaks are found,
check the entire plumbing system for any leaks. Look for leaks while each of the
following systems are running: “Tub fill”, “Shower”, and “Disinfecting”.
Electrical Connections:
Warning:
This unit is to be connected only by a licensed electrician. A minimum of 15 amp 120 volt
service is required with ground fault circuit interrupter.
1.
Remove the covers from the electrical box of the tub (and reservoir).
2.
For tubs with reservoirs, connect the reservoir electrical supply lead to the tub’s electrical
kit.
a.
Remove the hole-plug from the left side of the tub electrical box.
b.
Run the cable lead through that hole and secure using the cord restraint
and nut provided.
c.
Connect the line wire to the line distribution bar located in the upper
right corner of the tub’s electrical box. It will have only black wires
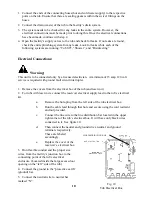
connected to it. See figure 10.
d.
Then connect the neutral and ground wires, neutral, and ground
terminals respectively.
These are labeled
accordingly.
e.
Replace the cover of the
reservoir’s electrical box.
3.
Run flexible conduit and the proper size
wires, from the facility’s junction box to the
connecting point of the tub’s electrical
enclosure. (Located inside the large access door
opening on the “left” side of the tub.)
4.
Connect the ground to the “protective earth”
(ground) bar.
5.
Connect the neutral wire to neutral bar
marked “N”.
Fig. 10
Tub Electrical Box
LINE DISTRIBUTION BAR


