background image

A.  

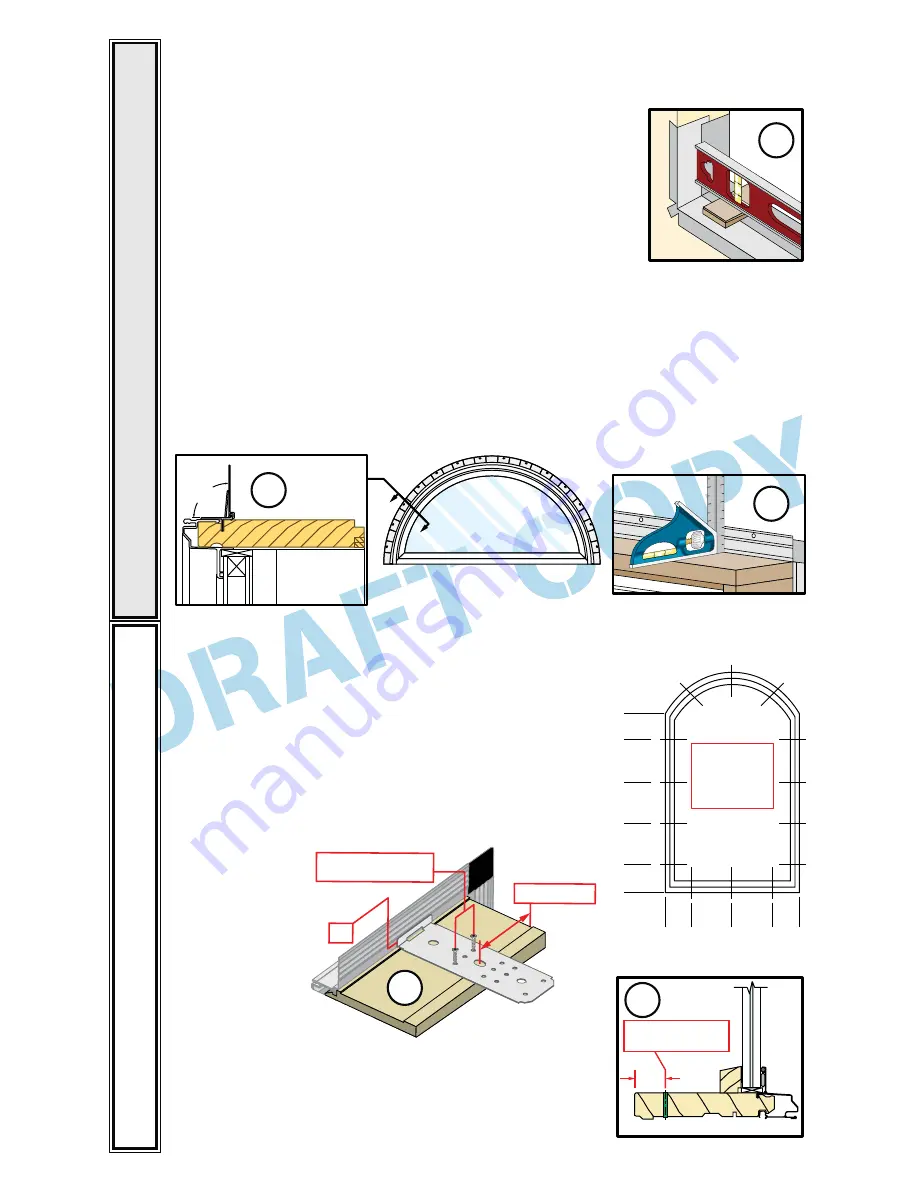
Install and level shims.

 Place 1" wide by 1/4" thick shims 

on the bottom of the opening, 2-1/2" from each side, 
beneath transition bars and mullion joints. Keep shims 
back 1/2" from interior face of window. Adjust shims as 
necessary to ensure the sill is level. Once level, attach 
shims to prevent movement.

Note: Improper placement of shims may result in 
bowing the bottom of the window.

B. 

Remove plastic wrap and cardboard packaging from window.

Note: If grilles are removed from the window at this time, label them and store 
them in a protected area.

2

SETTING AND FASTENING THE WINDOW

C. 

Units with fold-out installation fins:

 Fold out fin to 90°. On units with pre-applied 

fin corners, be careful not to remove or tear the fin corners.

Note: If the fin is not at 90°, the window will not line up correctly on the interior.

Ř

WINDOW


Ř

 ALL

 WINDOWS 

Ř

 ALL

 WINDOWS 

Ř

D. 

Windows using Installation Clips: 

Install installation 

clips. If installation fins are used; place the clip so that 
the lip is facing up and against the installation fin, at the 
locations shown in the placement diagram. If installation 
fins are not used, the clip lip faces down and is inserted 
into a groove in the frame. Secure the clip by driving  
#6 x 5/8" corrosion resistant screws through the outer 
two holes of the three holes shown.

6" MAX 

6" MAX 

10" 

MAX 

10" 

MAX 

10" 

MAX 

6" 

MAX 

10" 

MAX 

10" 

MAX 

6" 

MAX 

FOR PLACEMENT 

OF FRAME 

SCREWS AND 

INSTALLATION 

CLIPS

$MBE'SBNF4JMM

%SJMM

DMFBSBODFIPMF

#

E. 

Windows using frame screws:


Pre-drill installation 

screw holes.

 On the room side of the window, drill 

13/64" diameter clearance holes through the frame 
as shown on the placement diagram. Space the holes 
a maximum of 6" from each end and a maximum of 
10" on center on the head, jambs and sill.

2A 

2A

Ó

#

¡

$*3$-&)&"%8*5)

'-&9*#-&'*/

2C

2C

6“ from end

Lip

#6 x 5/8” corrosion

2D

resistant screws

2D

2E

PERFORMANCE UPGRADE & HURRIC

ANESHIELD

Note: Performance Upgrade and HurricaneShield® require 
use of installation clips or screws through the frame. 
Use of fins in addition to clips or screws is optional.

Содержание 801U0103

Страница 1: ...aintenance instructions may void your Pella product warranty See Limited Warranty for complete details at http warranty pella com INSTALLATION INSTRUCTION STANDARD PERFORMANCE UPGRADE AND HURRICANESHI...

Страница 2: ...framing members REMEMBER TO USE APPROPRIATE PERSONAL PROTECTIVE EQUIPMENT A Make sure the bottom of the opening is level Note It is critical the bottom is level for the window to be installed correctl...

Страница 3: ...s If installation ns are used place the clip so that the lip is facing up and against the installation n at the locations shown in the placement diagram If installation ns are not used the clip lip fa...

Страница 4: ...or sealant details Center window between the sides of the opening to allow clearance for shimming and insert one 6 x 1 1 2 or longer screw into one hole in each of the top corner clips This will hold...

Страница 5: ...window Press the tape down rmly while folding down the excess tape at the top and bottom of the window Note DO NOT tape or seal the bottom nailing n C Apply top ashing tape Cut a piece of ashing tape...

Страница 6: ...to circle top windows Several pieces of ashing tape will be needed to cover the top n Start taping from the sides of the window working toward the peak To determine the length of cuts hold the tape a...

Страница 7: ...ctly follow the foam manufacturer s recommendations for application Use of high pressure foams or improper application of the foam may cause the window frame to bow and hinder operation 6 INTERIOR SEA...

Страница 8: ...nstructions for these and any other applications 7 45 4 MFBSBODF BDLFS 3PE BOE 4FBMBOU UZQJDBM OTVMBUJOH PBN 1FSJNFUFS 4FBMBOU NVTU FYUFOE UP SPPNTJEF PG DDFTTPSZ SPPWF DDFTTPSZ SPPWF 800 4 8 5 53 OTV...

Страница 9: ...eel wool BE CAREFUL NOT TO SCRATCH THE GLASS Remove sanding dust Note To maintain proper product performance do not paint nish or remove the weather stripping mohair dust pads gaskets or vinyl parts A...

Страница 10: ...per management of moisture within the wall systems The determination of the suitability of all building components including the use of Pella products as well as the design and installation of allow f...

Отзывы: