background image

Instructions for use, installation and connection

50

Hotplates

Important warnings!

• 

Never switch on empty hotplates, without dishes, and never
use hotplates for heating the ambience!

• 

Keep the hotplates and the cookware clean, because dirt
may affect your cooking results.

• 

Hot oil or grease is highly inflammable, so the
preparation of food with large quantities of oil (chips)
should be under constant surveillance at all times.

Special warning for glass ceramic hob

• 

Glass ceramic hob is tough, but not unbreakable. Should
any sharp or heavy objects fall upon the surface, they may
cause damage.

• 

If you discover any visible cracks upon the glass ceramic
surface, you may not use the hob anymore, because there is
an electric shock hazard. In such cases switch all the
hotplates off and unscrew the fuse or switch off the main
switch to disconnect the appliance completely from the
mains. Call the nearest service center.

• 

Sand particles or rough wrought iron pot bottoms may also
produce scratches upon the glass ceramic surface.

• 

In case the glass ceramic hob is used as a worktop it may
be damaged or scratched. Never heat up the food in
aluminum foil or plastic dishes, otherwise you may damage
the hob or cause melting of material and fire.

• 

Bottom of the dish must correspond to the diameter of the
hotplate.

• 

Red hotplate may sometimes glow over the marked rim,
depending upon the observing angle.

Operation of hotplates

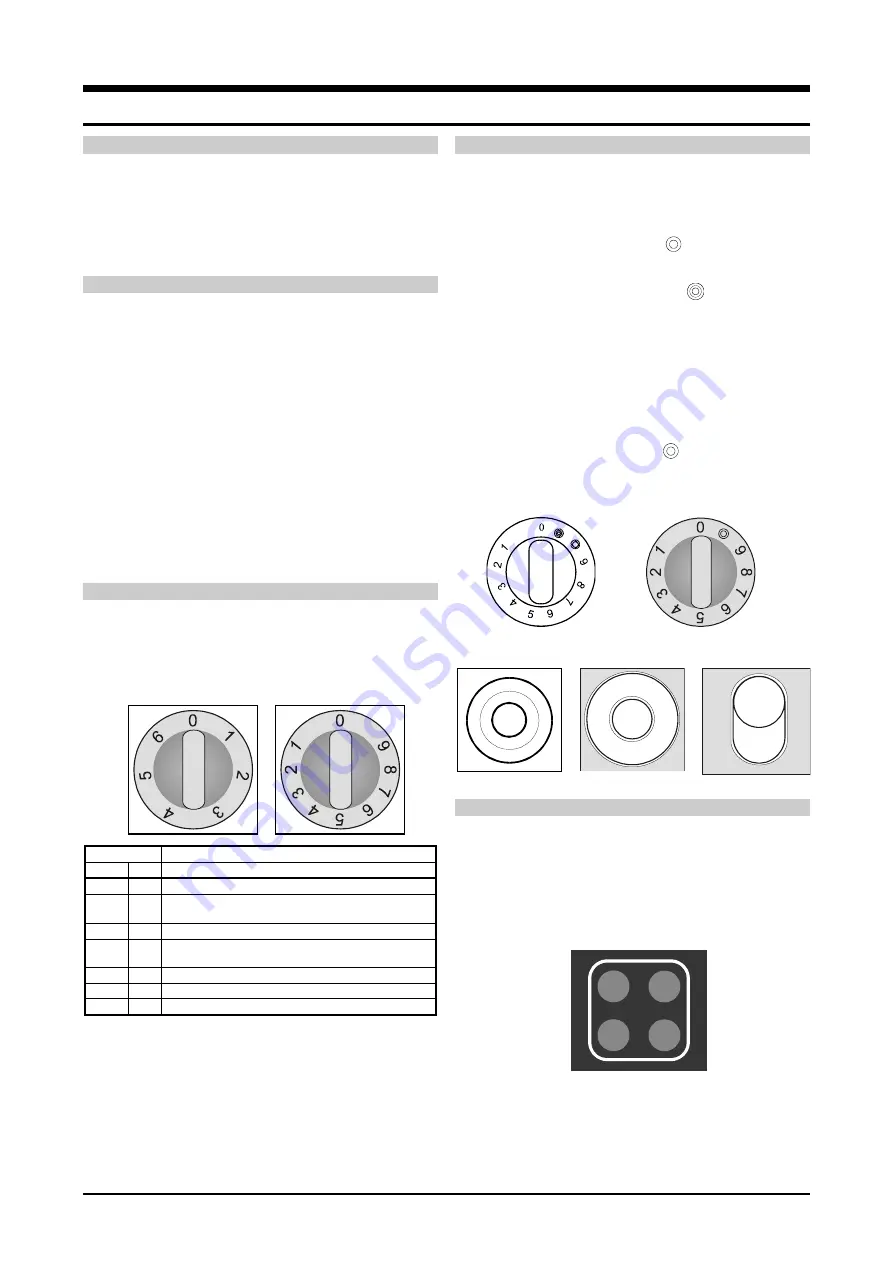
Hotplates are controlled by knobs, located at the control panel.
Symbols adjacent to the knobs indicate their location.
Heating power is regulated in steps. It is recommended to
switch the hotplate off 3-5 minutes before the completion of
cooking, and use the remaining accumulated heat.
Following are the recommended power regulations.


Step

Suitable for

E

S

0

0

hotplate off, use of remaining heat

1-2

1

maintaining temperature, slow cooking, small
quantities of food (

min. power

)

3

2

slow cooking

4-5

3

slow cooking of large quantities, slow fryanig of
large big chunks

6

4

frying, preparing soup basis

7-8

5

frying

9

6

boiling, browning, frying 

(maximum power)

E

=

sliding increase of power with power regulators

S

=

gradual increase

Hotplates

Controlling the operation of a three ring hotplate

Three ring hotplate offers the possibility to adapt the heating
surface to the size and the shape of the cooking dish.
The hotplate is switched on/off by the relevant control knob.

• 

Central ring is switched on by turning the knob to the
position of the double ring symbol 

. Then select the

desired heating power.

• 

The largest, third ring is switched on by turning the relevant
hotplate knob all the way (see symbol 

; a click is heard).

Then select the desired heating power.

• 

All hotplate rings are switched off by turning the knob into
the "0" position (OFF).

Controlling double circle hotplate and roasting pan
hotplate

The surface size of both hotplates is designed to suit different
types and sizes of dishes. The hotplate is switched on and off
with the relevant knob on the control panel.

• 

Larger hotplate is activated by turning the button to the
extreme position (see the symbol 

; a click is heard), and

then setting the desired power stage.

• 

All hotplates are switched off by turning the button to the
position "0" (OFF).

Hotplate with extended
rings button

Hotplate with extended ring
button

Three ring hotplate

Two ring hotplate

Roast pan hotplate

Hi-Light hotplates

These hotplates differ from the regular ones by their extremely
fast heating, so that the cooking process is accelerated.

Remaining heat indicators

Each hotplate is equipped with the signal lamp  which is lit up
when the hotplate reaches certain temperature and becomes
hot. Once it is cooled down again, the signal lamp goes off.
The indicator will lit up also if a hot dish is placed upon any of
the hotplates.

Содержание PF6064RVSUU/P1

Страница 1: ...lungs und Anschlu anweisung Notice d utilisation et d installation Instructions for use installation and connection Vrijstaand elektrisch fornuis Elektrostandherd Cuisini re lectrique Freestanding ele...

Страница 2: ...Aanwijzingen voor gebruik opstelling en aansluiting 3 Gebrauchs Aufstellungs und Anschlu anweisung 18 Notice d utilisation et d installation 33 Instructions for use installation and connection 47...

Страница 3: ...het gevaar van een elektrische schok te vermijden mag het fornuis uitsluitend door de servicedienst of een erkend vakman worden aangesloten Bij onvakkundige ingrepen en reparaties van het apparaat be...

Страница 4: ...he en elektronische apparatuur wordt gerecycled Als u ervoor zorgt dat dit product op de correcte manier wordt verwijderd voorkomt u mogelijk voor mens en milieu negatieve gevolgen die zich zouden kun...

Страница 5: ...tijd is noodzakelijk voor het gebruik van het apparaat omdat de oven pas na het instellen van de tijd kan werken Aanbevelingen voor energiebesparing De bodem van de pan is te dun en gaat bol staan bi...

Страница 6: ...eramische kookplaat is zeer bestendig maar niet onbreekbaar Hij kan beschadigen door scherpe en harde voorwerpen die op de oppervlakte vallen Wanneer de oppervlakte van de keramische kookplaat barsten...

Страница 7: ...n de oven omdat door de warmteophoping het email van de oven kan beschadigen Vruchtensappen die uit het bakblik druipen kunnen vlekken op het email veroorzaken die niet meer verwijderd kunnen worden B...

Страница 8: ...e Gebruik de 1e richel van onder af en niet te hoge bakvormen zodat de warme lucht ook over de bovenkant van het gerecht kan circuleren Onderste verwarmingselement Aqua clean Alleen het verwarmingsele...

Страница 9: ...iken De temperatuur is gewoonlijk lager dan bij het bakken met boven onderverwarming zie ook de Tabel voor het bakken van gebak Bij het bakken van vochtig gebak in een bakvorm vruchtentaart kunt u van...

Страница 10: ...vetgedrukt in de tabel voor het braden van vlees aangegeven Verwijder het vetfilter altijd uit de oven bij het bakken Raadgevingen in verband met het serviesgoed U kunt een serviesgoed van email vuurv...

Страница 11: ...ijn het rooster en de rest van het toebehoren van de oven zeer heet Gebruik daarom ovenwanten en een speciale vleestang Uit het vlees waarin u prikt kan heet vet spuiten bijvoorbeeld uit worstjes Gebr...

Страница 12: ...iet ongeveer 1 liter water in het diepe bakblik zodat in de oven de nodige vochtigheidsgraad ontstaat Plaats de glazen potten zo in de oven dat ze niet met de wanden in aanraking komen zie tekening Ee...

Страница 13: ...n bij het verschuiven van pannen Zorg ervoor dat zandkorrels niet op de keramische kookplaat achterblijven Kleurveranderingen van de kookplaat hebben geen invloed op de werking en de stabiliteit van d...

Страница 14: ...r met wat afwasmiddel schoon te maken U kunt het vetfilter ook in de afwasmachine doen Ovenlade De ovenlade is tegen ongewenst openen beveiligd Wanneer u hem wilt openen moet u hem een beetje optillen...

Страница 15: ...gleuf steekt en in de richting van het pijltje trekt zie afbeelding Het lampje is verbruiksmateriaal en valt niet onder de garantie Aanwijzingen voor het opstellen en aansluiten Veiligheidswaarschuwi...

Страница 16: ...luitdoos met een schroevendraaier Hierbij maakt u met de schroevendraaier de vergrendeling los zoals op de afbeelding van het afdekplaatje van de aansluitdoos te zien is De aansluitkabel moet via de o...

Страница 17: ...verwarmingselementen 230 V Totale aansluitwaarde kW 9 8 Oven totaal kW 3 4 Kookzones totaal kW 6 4 Servicedienst Reparaties Indien u technische problemen met het fornuis heeft en reparaties nodig heef...

Страница 18: ...chlossen werden Bei unsachgem en Eingriffen und Reparaturen des Ger ts besteht die Gefahr eines elektrischen Schlags und Kurzschlusses deswegen f hren Sie diese wegen der Gefahr der K rperverletzung u...

Страница 19: ...auchsanleitung oder der Verpackung weist darauf hin Die Werkstoffe sind gem ihrer Kennzeichnung wiederverwertbar Mit der Wiederverwendung der stofflichen Verwertung oder anderen Formen der Verwertung...

Страница 20: ...der Backofenbetrieb erst nach Einstellung der Zeitschaltuhr m glich ist Energiespartips Der Boden des Kochtopfes oder der Pfanne ist zu d nn und w lbt sich bei Erhitzung aus Die Folge ist ein gr erer...

Страница 21: ...amikkochfeld Das Glaskeramikkochfeld ist sehr best ndig jedoch nicht unzerbrechlich Scharfe und harte Gegenst nde die auf die Oberfl che fallen k nnen sie besch digen Wenn auf der Oberfl che des Glask...

Страница 22: ...Wichtige HInweise Kleiden Sie den Backofen nicht mit Alu Folie aus und stellen Sie keine Bratpfannen und anderes Geschirr auf den Boden des Backofens weil der Email des Backofens wegen Hitzeanstauung...

Страница 23: ...se Sie ist vor allem zum Backen niedriger Kuchen und zum Einkochen von Obst und Gem se geeignet Verwenden Sie bitte die erste Einschubebene von unten und nicht allzu hohe Backbleche damit die erhitzte...

Страница 24: ...mehreren Ebenen geeignet f r feuchtes Backgut und Obsttorten Sie k nnen auch helle Backbleche verwenden Die Temperatur ist gew hnlich niedriger als beim Backen mit Ober Unterhitze siehe Backtabelle B...

Страница 25: ...n setzten Sie bitte immer den Fettfilter ein Tips zum Geschirr Sie k nnen Geschirr aus Email feuerfestem Glas Ton oder Gu eisen verwenden Backbleche aus rostfreiem Stahl sind nicht geeignet weil sie d...

Страница 26: ...e bitte W rmeisolierhandschuhe und spezielle Fleischzangen Aus durchstochenem Fleisch kann hei es Fett spritzen z B aus Klobassen Um Verbrennungen der Haut oder der Augen zu vermeiden verwenden Sie zu...

Страница 27: ...ngef hr 1 Liter Wasser damit die notwendige Feuchtigkeit im Backofen entstehen kann Stellen Sie die Einmachgl ser so in den Backofen da sie die Backofenw nde nicht ber hren siehe Skizze Eine Schicht f...

Страница 28: ...r w hrend die Kochzone noch hei ist Danach reinigen Sie die Oberfl che wie in Punkt 2 beschrieben Sandk rner die Ihnen beim Kartoffelsch len oder Salatreinigung zuf llig auf das Glaskeramikkochfeld fa...

Страница 29: ...Achtung Achten Sie darauf da die Klemmen der T rscharniere nicht springen weil es wegen der starken Federkraft zu Verletzungen kommen kann Zubeh r Zubeh r wie z B Backbleche Rost u reinigen Sie bitte...

Страница 30: ...en Dazu geben sie bitte Code und Typ bzw das Modell des Ger ts an Die Bedienungskn pfe k nnen einfach abgezogen und ausgewechselt werden Backofenlampe Zum Auswechseln ben tigen Sie eine Backofenlampe...

Страница 31: ...e des Schutzleiters des Anschlu kabels mu so bemessen sein da bei eventueller Zugbelastung des Kabels der Schutzleiter sp ter belastet wird als di unter Spannung stehenden Leiter Anleitung ffnen Sie m...

Страница 32: ...kW 6 4 Kundendienst Reparatur Wenn Sie mit dem Herd technische Probleme haben sollten und eine Reparatur ben tigen verst ndigen Sie bitte den n chstliegenden technischen Kundendienst und geben Sie bit...

Страница 33: ...ner la d t rioration de l appareil Ces interventions doivent tre effectu es par notre service apr s vente ou par un professionnel agr Pendant la cuisson sur les plaques ou au four les graisses peuvent...

Страница 34: ...dessus du bouton correspondant Apr s chaque utilisation remettez le bouton z ro pour pouvoir l enfoncer ATTENTION Il n est possible de mettre les boutons en position enfonc e ou saillante que lorsqu...

Страница 35: ...ontenues dans les aliments se conservent mieux Foyers vitroc ramiques quand vous pr parez vos plats dans des r cipients fond pais ou en m tal clair le temps d bullition peut tre plus long de quelques...

Страница 36: ...sation pour chaque degr de puissance Degr Adapt E S 0 0 ARRET utilisation de la chaleur r siduelle 1 2 1 Maintien au chaud poursuit la cuisson de petites quantit s puissance minimale 3 2 Poursuit la c...

Страница 37: ...r est r partie par le gril infrarouge situ en haut du four Cette fonction est surtout adapt e la cuisson de petits morceaux de viande comme par exemple steaks r tis escalopes c telettes etc Gril venti...

Страница 38: ...g teaux ont t sp cialement adapt es ce four Si dans le tableau de cuisson vous ne trouvez pas le g teau que vous avez l intention de faire choisissez les indications pour un g teau quivalent Cuisson d...

Страница 39: ...a 2 200 220 3 170 180 20 30 Frites 2 200 220 3 170 180 20 35 Croquettes 2 200 220 3 170 180 20 35 Cuisson de la viande Pour la cuisson de la viande on peut utiliser la r sistance de vo te et de sole o...

Страница 40: ...et les autres accessoires sont particuli rement chauds utilisez des gants adapt s ou des pinces sp ciales pour la viande Il arrive que la graisse chaude jaillisse lorsqu on pique la viande Pour viter...

Страница 41: ...ments frais Versez environ 1 litre d eau dans le r cipient creux pour cr er dans le four la vapeur n cessaire Installez les bocaux de mani re ce qu ils ne se touchent pas voir illustration Une couche...

Страница 42: ...ers chauffants n ont pas d effet sur le bon fonctionnement ou la solidit de la table de cuisson vitroc ramique Ce changement n est pas le r sultat d une d gradation du foyer mais provient d claboussur...

Страница 43: ...ini re Le tiroir de la cuisini re est prot g contre une ouverture trop facile Si vous souhaitez l ouvrir vous devez le soulevez un peu Si vous souhaitez le retirer de la cuisini re tirez le d abord ju...

Страница 44: ...te et tirez en direction de la fl che voir le dessin L ampoule est un produit de consommation courante elle n est donc pas incluse dans la garantie Instructions pour le raccordement au r seau lectriqu...

Страница 45: ...sement arrach du bo tier Proc dure l aide d un tournevis ouvrez le couvercle du bo tier de raccordement situ l arri re de l appareil Pour cela il faut soulever les 2 clips comme le montre le dessin su...

Страница 46: ...le des r sistances 230 V Total de la puissance absorb e kW 9 8 Four au total kW 3 4 Total des foyers lectriques kW 6 4 Service apr s vente R parations Si vous avez des probl mes avec votre cuisini re...

Страница 47: ...so pay extra attention when preparing food with grease or oil Frying may be carried out only under constant surveillance Warning Never let small children in the vicinity of the cooker they are not yet...

Страница 48: ...may not be treated as household waste Instead it shall be handed over to the applicable collection point for the recycling of electrical and electronic equipment By ensuring this product is disposed o...

Страница 49: ...itionally saves energy since food is prepared in a closed dish and under pressure Furthermore shorter cooking time preserves the vitamin contents When using high radiation bright metal surface crocker...

Страница 50: ...off use of remaining heat 1 2 1 maintaining temperature slow cooking small quantities of food min power 3 2 slow cooking 4 5 3 slow cooking of large quantities slow fryanig of large big chunks 6 4 fr...

Страница 51: ...heater Heaters from the upper and the lower side uniformly heat the exposed food Baking and roasting is possible only at single level Grill Heat comes directly from the infrared heater located at the...

Страница 52: ...tion available for the next most similar type of cake Baking with upper and lower heater Use only a single guide level This baking position is especially suitable for baking dry pastry bread and teaca...

Страница 53: ...nd lower or with hot air Best heating mode for each type of roasting pan is indicated by bold print in the Roasting Tables Note When roasting always insert the grease filter Tips regarding roasting pa...

Страница 54: ...170 50 70 Grilling and browning barbecue Take extra precautions when grilling Intensive heat from infrared heater makes the oven and the accessories extremely hot Use protective gloves and barbecue a...

Страница 55: ...may place up to six one liter jars Use only fresh groceries Pour around one liter of water into the deep roasting pan to produce the required humidity Place the jars into the oven without touching the...

Страница 56: ...e hob is damaged but merely represents burned out remains of food and dirt Shining silvery spots are the consequence of moving the dishes along the hob especially in case of aluminum dishes or in case...

Страница 57: ...epair the appliance is extremely dangerous as it might cause electric shock and short circuit To avoid such injuries any repairs may be performed only by qualified personnel or after sales service How...

Страница 58: ...at least the distance indicated in the instructions for use of the kitchen extraction hood Panels glue and furniture lining from artificial materials adjacent to the appliance must be temperature res...

Страница 59: ...oxes have the connection screws already in open position so they need not be unscrewed During the tightening procedure you will hear a faint click meaning that the tightening screw should be fastened...

Страница 60: ...r check if you can repair the malfunction using the instructions from the Troubleshooting guide section If the malfunction of the appliance was caused by the improper use the service visit during the...

Страница 61: ...N vod k pou it 1...

Страница 62: ...N vod k pou it 1...

Страница 63: ......

Страница 64: ...E44U3 E34 PELGRIM 129384 49 05 07...

Отзывы: