Peg-Perego IGCD0552 Скачать руководство пользователя страница 9

• Regularly check the conditions of the vehicle. In

case of fault, do not try to use the vehicle. For
repair use only original PEG PEREGO’s spare parts.

• PEG PEREGO assumes no liability if the product as

been tampered with.

• Do not leave vehicle near sources of heat such as

radiators, stoves, fireplaces, etc.

• Protect vehicle from water, rain, snow, etc. 
• Periodically lubricate (with a light weight oil)

moving parts, such as wheel bearings, steering
linkages, and chains at points of rotation or where
they come in contact.

• The vehicle’s surface can be cleaned with a

dampcloth. Do not use abrasive cleaners. The
cleaning must be carried out by adults only.

• Never disassemble the vehicles mechanisms unless

authorized by PEG PEREGO.

MAINTENANCE AND VEHICLE  CARE

For the safety of the child, before starting up the
vehicle read and carefully follow the following
instructions.
• Teach the child how to use the vehicle properly for

safe and enjoyable driving.

• The toy must be used with caution, as it requires

substantial dexterity in order to avoid falls or
collisions which could cause injuries to the user or
third parties.

• Before starting, check that there are no people or

objects obstructing the vehicle’s path.

• Drive with hands on the handlebars/steering wheel

and always watch the road ahead.

• Brake in good time to avoid collisions.

WARNING!

• Check that all the wheel fixing studs/nuts are

fastened properly.

RULES FOR SAFE DRIVING

Our toys are compliant with European Safety
Standards for toys (safety requirements stipulated by
the EEC Council) and with the “U.S. Consumer Toy
Safety Specification”. They are also certified by
notified toy safety bodies in accordance with
Directive 2009/48/EC. They are not compliant with
the requirements of road transport standards and
consequently cannot travel on public roads.

Peg Perego S.p.A. is ISO 9001
certified.

This certification provides customers
and consumers with a guarantee of
transparency and assurance about the
company’s working procedures.

• A child must be 2 year of age or older for the

necessary coordination and maturation to operate
this motorized vehicle safely.

WARNING! 

Using the vehicle on public roads, in

narrow spaces or near watercourses and
swimming pools may cause injury to the users
and/or third parties. Adult supervision is always
necessary.

• Children must always wear shoes when using the

vehicle.

• When the vehicle is in operation make sure that

children do not put their hands, feet, other body
parts, clothing, or other objects close to the
moving parts.

• Never wet sensitive vehicle components like the

motors, electrical systems, buttons, etc.

• Do not use petrol or other flammable substances

close to the vehicle.

• The vehicle must be only be used by a single child

unless it is classed as a two-seater vehicle.

WEEE DIRECTIVE (EU only)

• At the end of its useful life, this product is classed

as Waste Electrical and Electronic Equipment
(WEEE) and must therefore not be disposed of as
urban waste but instead taken to a designated
separated waste collection facility.

• Take it to an appropriate collection centre.
• The presence of dangerous substances contained in

the electrical components of this product
represents a potential source of danger to human
health and for the environment if the products are
not disposed of correctly.

• The barred dustbin symbol indicates that the

product must undergo sorted waste collection.

DISPOSAL OF THE BATTERY
• Help protect the environment.
• Used batteries must not be disposed of with

domestic waste.

• They can be left at a used battery or special waste

collection centre. Contact your local authorities
for more information.

LR44 BATTERY WARNINGS

The insertion of the batteries must be carried out
and supervised by adults only. Do not allow children
to play with the batteries.
• The batteries must be replaced by an adult.
• Only use the battery type specified by the

manufacturer.

• Respect the +/- polarity.
• Do not short circuit the power supply terminals:

risk of fire or explosion.

• Always remove the batteries when the toy is not

used for a long time.

• Do not throw the batteries into a fire.
• Never try to recharge batteries if they are not

rechargeable.

• Do not mix old and new batteries.
• Remove flat batteries.
• Dispose of flat batteries in the appropriate

recycling containers.  

SAFETY STANDARDS

PEG PEREGO offers an after-sales assistance
service, directly or through a network of
authorized assistance centres, for any repairs or
replacements and the sale of original spare parts.
To contact a service center, visit our website:

http://global.pegperego.com/toys-site/support/

The item’s serial number must always be quoted.
See the page on spare parts to find out how to
identify the serial number.

Peg Perego always strive to best satisfy their
customers' needs. Knowing the opinions of our
customers is therefore very important and
valuable to us. We would be very grateful if, once
you have used the product, you would fill out the
CONSUMER SATISFACTION QUESTIONNAIRE
which you can find on the internet at:

www.pegperego.com

, making any observations

or suggestions you might have.

ASSISTANCE SERVICE

WARNING

ASSEMBLY MUST ONLY BE CARRIED OUT BY
ADULTS. TAKE  CARE WHEN  REMOVING THE
VEHICLE FROM ITS PACKAGING. ALL THE
SCREWS AND SMALL PARTS ARE CONTAINED IN
A BAG INSIDE THE PACKAGING. 
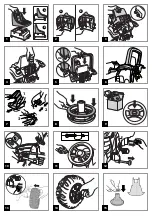
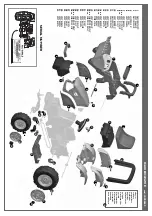
ASSEMBLY

1 • Position the seat in one of the two possible

positions on the seat support that will best suit
the child's height.
Seat position A - low and forward; 
Seat position B - high and to the rear.

2 • Secure the seat in the desired position using the

two screws provided.

3 • Slide the two front studs of the seat support

into the relating holes on the frame.

4 • Secure the rear of the seat support to the

excavator frame using the two screws provided.

5 • Position the roll-bar to the excavator by sliding

both ends of the bar into the slots on the rear
mudguards.
Note: the roll-bar should lean slightly towards
the rear of the excavator.

6 • Secure the roll-bar in position with the two

screws supplied (one on each side).

7 • Turn the red coupling pin so that the cab can be

opened (1). Release the cab. Fully insert the hinge
at the front of the chassis (2). Close the cab (3)
and secure it by turning the red pin 180°.

8 • Combine the upper and lower parts of the

steering wheel together.

9 • Fit the horn into the hole in the middle of the

steering wheel following the instructions on the
packaging.

10 • Push the steering wheel shaft (1) upwards and

line up the holes on both components (2).

11 • Position the nut in the hexagonal hole and the

bolt in the round one. Secure the steering wheel
in position by tightening up the bolt.

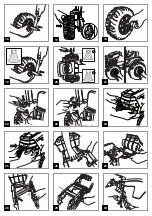
12 • Remove the protective caps from the front and

rear axles.

13 • Fit a washer to the front left axle. Fit the small

wheel with the letters SX stamped on the inside
Note: before fitting the wheel, make sure that
the wheel has a hub cap with a bushing on the
inner side.

14 • Fit a washer to the end of the axle that is

protruding from the wheel.

15 • Position a self-locking washer on the conical

retaining cap as shown in the photo. Warning, the
tabs on the self-locking washer must be
positioned face down. Note: the bag contains
more self-locking washers than required, keep
the extras as spares for use in the event of a
breakage.

16 • Fasten the wheel to the axle with a hammer.

Carry out the same procedure on the right front
(DX).

17 • Starting on the left side of the excavator, first fit

the big wheel with the letters SX stamped on
the inside, to the rear axle making sure that the
splined section of the axle is fully inserted inside
the wheel.
Note: before fitting the wheel, make sure that
the wheel has a hub cap on the outside and a
bushing on the inner side.

18 • Fit a washer to the end of the axle that is

protruding from the wheel.

19 • Position a self-locking washer on the conical

retaining cap as shown in the photo. Fasten the
wheel to the axle with a hammer.

20 • Place the excavator on its left side. Position a

conical retaining cap under the left wheel (1). Fit
the right rear wheel (DX) to the axle. Slide a flat
washer on to the part of the axle that is
extruding. Position a self-locking washer on the
conical retaining cap and fasten the wheel to the
axle with a hammer (2).

21 • Press the hub caps into position on the wheels

(large to the rear and small to the front).

22 • Fit the two silver stickers to the rear mudguards.
23 • Click the rear light clusters into the lower (1)and

upper (2) position

24 • Fit the silver stikers to the front head light.
25 • Click the cover of the front light into place,

ensuring you insert the side tongues into the
mask slots.

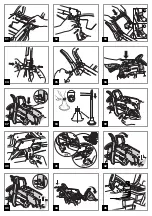
26 • Fit one of the two cross members between the

excavator bucket arms using slots nearest the
shovel.

27 • Secure it in position with the two screws

supplied (one on each side).

28 • Fit the other cross member between the

excavator bucket arms.

29 • Secure it in position with the two screws

ASSEMBLY INSTRUCTIONS

Содержание IGCD0552

Страница 1: ... USE AND CARE UTILISATION ET ENTRETIEN EN FR DE ES PT TR RU EL GEBRAUCH UND WARTUNG BRUGSANVISNING KÄYTTÖOHJE BRUKSANVISNING DA FI NO SV BRUKSANVISNING EMPLEOY MANUTENCION USO E MANUTENÇÃO KULLANIM VE BAKIM ЭКСПЛУАТАЦИЯ И УХОД MSGQG G SL UPORABA IN VZDRŽEVANJE H B s j O H L H g w h k m AR ...

Страница 2: ...15 OK 7 8 9 10 A 1 2 3 4 5 6 8 9 11 10 14 13 12 A A B B 1 2 7 3 ...

Страница 3: ...16 18 17 19 23 22 25 24 21 26 27 28 29 20 2 1 30 ...

Страница 4: ...40 41 38 39 44 45 42 43 37 31 32 33 A B 35 34 36 ...

Страница 5: ...47 48 49 A B OR OR 46 50 51 ...

Страница 6: ...JY 10 SPST8500RC 11 ASGI0217NY 12 SAGI9192NY 13 SPST9342N 14 SPST8343JGP 15 SPST8297N 16 DX SPST8295DY 16 SX SPST8295SY 17 SPST8294Y 18 MMEV1016 19 SPST8550GP 20 DX SARP9130KDNY 20 SX SARP9130KSNY 21 SPST9132Y 22 SPST8517JGP 23 SPST9339N 24 SPST9133GP 25 SPST9131Y 26 DX SARP9129DNY 26 SX SARP9129SNY 27 SPST3813N 28 SPST3814Y 29 SPST9343GP 30 SPST8308N 31 SPST8509N 32 SPST8307A SERIAL NUMBER DX SX ...

Страница 7: ...nto Non bagnare mai componenti del veicolo come motori impianti pulsanti etc Vicino al veicolo non usare benzine o altre sostanze infiammabili Il veicolo deve essere usato assolutamente da un solo bambino qualora non rientrasse nella categoria dei veicoli a due posti DIRETTIVA RAEE solo UE Questo prodotto costituisce alla fine della sua vita un rifiuto classificato RAEE e pertanto non deve essere ...

Страница 8: ...DUCT IDENTIFICATION CODE IGCD0552 REFERENCE STANDARD origin General Toy Safety Directive 2009 48 EEC Standard EN 71 1 2 3 9 European Directive WEEE 2003 108 EC European Directive RoHS 2002 95 EC Phthalates Directive 2005 84 EC The vehicle is not compliant with the requirements of road transport standards and consequently cannot travel on public roads DECLARATION of CONFORMITY Peg Perego S p A decl...

Страница 9: ...sistance service directly or through a network of authorized assistance centres for any repairs or replacements and the sale of original spare parts To contact a service center visit our website http global pegperego com toys site support The item s serial number must always be quoted See the page on spare parts to find out how to identify the serial number Peg Perego always strive to best satisfy...

Страница 10: ... on both sides of the excavator 48 Turn the right DX and left SX side disks until the holes where the pedals come out and the white ring on the bottom part of the sticker line up Tighten up the six screws on the disks when they match the symbols on the sticker To raise the pedals again repeat the same procedure lining up where the pedals come out with the grey ring on the upper part of the sticker...

Страница 11: ...brication à l exception de la batterie et du chargeur se reporter aux instructions d utilisation détaillées dans cette notice La garantie s applique dans le cadre d une utilisation normale du véhicule le fabricant se réservant le droit d expertiser les pièces Le fabricant ne saurait en aucune manière être tenu responsable en cas de non respect des recommandations de ce manuel d utilisation de mauv...

Страница 12: ...chrott klassifiziert und muss demnach gemäß der vorgesehenen Mülltrennungsbestimmungen entsorgt werden Das zu entsorgende Produkt bei den dafür vorgesehenen Sammelstellen abliefern Die in den elektrischen Komponenten dieses Produktes enthaltenen gefährlichen Substanzen stellen eine potenzielle Gefahr für die Gesundheit des Menschen und die Umwelt dar sofern diese Produkte nicht vorschriftsmäßig en...

Страница 13: ...es in einer der beiden möglichen Positionen positionieren Position A Sitz niedrig und nach vorn Position B Sitz hoch und nach hinten 2 Den Sitz mit den beiden im Lieferumfang enthaltenen Schrauben in der gewünschten Position befestigen 3 Die beiden vorderen Befestigungen der Sitzhalterung an den entsprechenden Stellen des Rahmens befestigen 4 Diesen im hinteren Teil mit den beiden im Lieferumfang ...

Страница 14: ...9001 La certificación ofrece tanto a los clientes como a los consumidores la garantía de una transparencia y confianza en lo que respecta al modo de trabajar de la empresa No apto para niños menores de 24 meses por sus características funcionales y dimenciones ATENCIÓN El uso del vehículo en vías públicas o en proximidades de cursos de agua o de piscinas o en espacios reducidos podría ocasionar el...

Страница 15: ...TRUCCIONES DE MONTAJE 25 Enganchar a presión el vidrio del faro delantero introduciendo las lengüetas laterales en los cortes de la máscara 26 Introducir uno de los dos travesaños entre los brazos de la cuchara en los alojamientos más cercanos a la pala 27 Fijarlo enroscando los dos tornillos en dotación uno por lado 28 Introducir el otro travesaño entre los brazos de la cuchara 29 Fijarlo enrosca...

Страница 16: ...idores a garantia de transparência e confiança no que se refere ao modo com que a empresa trabalha Não é indicado para crianças menores de 24 meses por suas características funcionais ATENÇÃO A utilização do veículo em estradas públicas perto de cursos de água ou piscinas ou em espaços reduzidos pode causar perigo de ferimentos aos utilizadores e ou a terceiros A vigilância de um adulto é sempre n...

Страница 17: ...adiador 26 Inserir uma das duas travessas entre os braços do cesto nos encaixes mais próximos da lâmina 27 Fixá la apertando os dois parafusos incluídos uma de cada lado 28 Inserir a travessa restante entre os braços da cesta 29 Fixá la apertando os dois parafusos incluídos um INSTRUÇÕES DE MONTAGEM de cada lado 30 Inserir um ilhó pequeno no encaixe oposto do lado direito da pá correspondente ao f...

Страница 18: ...zdelka ne zavržete na pravilen način Prekrižan smetnjak je oznaka ki sporoča da je treba izdelek zavreči kot predmet ločenega zbiranja odpadkov VARNO ODLAGANJE AKUMULATORJA Prizadevajte si za varovanje okolja Iztrošenega akumulatorja ne zavrzite z gospodinjskimi odpadki Zavržete ga lahko v centru za zbiranje izrabljenih baterij in akumulatorjev ali za zbiranje posebnih odpadkov pozanimajte se v sv...

Страница 19: ...i 27 Pritrdite ga s priloženima vijakoma s po enim na vsaki strani 28 Namestite drugi nosilec med nosilni roki bagra 29 Pritrdite ga s priloženima vijakoma s po enim na vsaki strani 30 Majhen ploščati vijak vstavite v luknjo na desni strani zadnje kopalne žlice da bi luknjo na nosilni roki poravnali z luknjo na kopalni žlici 31 Odstranite elastični trak ki drži ročico na mestu in kovinsko palico p...

Страница 20: ...på offentlig vej Peg Perego S p A er ISO 9001 certificeret Certificeringen yder kunder og forbrugere garanti for gennemskuelighed og tillid til måden firmaet arbejder på Bilen er ikke egnet til børn under 24 måneder p g a dens funktionskarakteristika ADVARSEL Hvis køretøjet anvendes på offentlig vej på trange steder eller i nærheden af vandløb og swimmingpools kan det føre til tilskadekomst for br...

Страница 21: ...erst og gem brugsanvisningen sammen med købsbon til brug ved reklamation Procedure ved reklamation Ved evt fejl og mangler bør du altid henvende dig hvor køretøjet er købt Af hensyn til vores løbende kvalitetssikring er det vigtigt at du ved henvendelse har nedenstående oplysninger om køretøjet klar Såfremt reklamationen ikke kan klares pr telefon skal køretøjet sendes til Maki A S Haarupvej 22D 8...

Страница 22: ...viranomaisten hyväksynnän direktiivin 2009 48 EY mukaisesti Ne eivät vastaa tieliikennesääntöjä eikä niillä siis voi ajaa yleisillä teillä Peg Perego S p A on ISO 9001 sertifioitu Sertifiointi takaa asiakkaille ja kuluttajille yhtiön työtapojen läpinäkyvyyden ja sen että niihin voi luottaa Ei sovellu alle 24 kuukauden ikäisten lasten käyttöön sen toiminnallisten ominaisuuksien takia HUOMIO Ajoneuv...

Страница 23: ... kattaa ajoneuvon kaikki osat normaalin ja oikean käytön yhteydessä Lue sen vuoksi käyttöohje huolellisesti ennen ajoneuvon käyttöönottoa Täytä alla oleva lomake ja säästä käyttöohje sekä ostokuitti mahdollista reklamaatiotapausta varten Menettelyohje reklamaatiotapauksessa Mikäli ajoneuvossa on virheitä tai puutteita ota yhteyttä ostopaikkaan Jatkuvan laadunvarmistuksen kannalta on tärkeää että o...

Страница 24: ...r ISO 9001 sertifisering Sertifiseringen gir kunder og forbrukere en garanti om åpenhet og trygghet omkring måten bedriften arbeider på Ikke egnet til barn under 24 måneder på grunn av funksjonelle særpreg OBS Bruk av kjøretøyet på offentlig vei eller i nærheten av elver eller basseng eller på trange områder kan påføre skader for brukeren og på andre personer i området Det er alltid nødvendig at v...

Страница 25: ...etøyet Reklamasjonsretten dekker alle kjøretøyets deler ved normal og korrekt bruk Les derfor nøye gjennom bruksanvisningen før du tar kjøretøyet i bruk Fyll ut skjemaet nederst og ta vare på bruksanvisningen sammen med kvitteringen til bruk ved en eventuell reklamasjon Fremgangsmåte ved reklamasjon Ved ev feil og mangler bør du alltid henvende deg til forhandleren hvor kjøretøyet er kjøpt Av hens...

Страница 26: ... är inte i överensstämmelse med föreskrifterna för trafiknormer på vägar och får alltså inte köras på allmänna vägar Peg Perego S p A är certifierat enligt ISO 9001 Certifieringen erbjuder kunder och användare garanti för insyn och förtroende för företagets arbetsmetod Leken är inte lämplig för barn under 24 månader på grund av de funktionella egenskaperna VARNING Användning av fordonet på allmänn...

Страница 27: ...på dess vänstra sida Sätt en konformad fästkåpa under det vänstra hjulet 1 Sätt på det högra bakhjulet DX på axeln Skjut in en platt mutterbricka på delen av axeln som sticker ut Placera en självblockerande mutterbricka på den konformade fästkåpan och fäst hjulet vid axeln med en hammare 2 21 Tryck fast navkapslarna på hjulen stora bak och små fram 22 Fäst de två silverdekalerna på de bakre stänks...

Страница 28: ... Sertifikalıdır Bu sertifika ile müşterilere ve tüketicilere kurumun şeffaf işleyişinin ve tam bir güven ortamının garantisi verilmektedir Fonksiyonel özelliklerinden dolayı 24 aydan küçük olan çocuklara uygun değildir DİKKAT Aracın trafikte su veya havuz yakınında veya dar alanlarda kullanılması kullanıcıda ve veya üçüncü şahıslarda ciddi yaralanmalara yol açabilir Her zaman için bir yetişkinin g...

Страница 29: ...KKAT EDİNİZ BÜTÜN VİDALAR VE UFAK PARÇALAR AMBALAJIN İÇİNDEKİ BİR TORBANIN İÇİNDE BULUNMAKTADIR MONTAJ 1 Koltuğu koltuk desteği üzerinde mevcut olan iki olası konumdan çocuğun boyuna en uygun olan konuma yerleştirin Koltuk konumu A alçak ve önde Koltuk konumu B yüksek ve arkada 2 Koltuğu verilen iki vida aracılığıyla belirlenen konumda sabitleyin 3 Koltuk desteğinin ön tarafında bulunan iki bağlan...

Страница 30: ...вилам дорожного движения поэтому они не могут передвигаться по общественным дорогам Peg Perego S p A сертифицирована по норме ISO 9001 Сертификация гарантирует заказчикам и потребителям что компания работает соблюдая принципы гласности и доверия Игрушка не предназначена для детей меньше 24 месяцев из за ее функциональных характеристик ВНИМАНИЕ Использование транспортного средства на дорогах общего...

Страница 31: ...оклеющиеся этикетки на передние фары 25 Защелкните крышку передних фар убедившись что боковые язычки вошли в пазы на радиаторной решетке 26 Вставьте одну из поперечин между рукоятями стрелы ковша экскаватора в пазы расположенные ближе всего к ковшу 27 Зафиксируйте ее в нужном положении с помощью двух винтов входящих в комплект поставки по одному с каждой стороны 28 Вставьте другую поперечину между...

Страница 32: ...ecc grg liay diau meiay jai elpirsor mgy rsom sq po le som opo o dotke ei g esaiq a Uoqs rse sg lpasaq a ajokoth msay siy odgc ey pot epirtm psomsai le so uoqsirs lpasaqi m jai re j he peq psxrg lgm tpeqba mese siy 24 qey 1 1 1 1 1 1 1 1 0 1 1 1 1 1 1 1 1 1 1 1 Sa paidi pq pei p msa ma uoqo m papo sria jas sg di qjeia sgy vq rgy sot ov lasoy 3sam so vgla keisotqce pqor nse ma lgm b fotm sa paidi v...

Страница 33: ...OCGRGR 1 1 1 DX 0 1 1 1 1 1 0 1 2 21 1 1 22 1 1 23 1 1 1 1 2 24 1 1 25 1 1 1 1 1 26 0 1 1 1 1 1 27 1 1 1 1 28 0 1 29 1 1 1 1 30 1 1 1 1 31 5 1 1 1 1 32 1 1 1 1 1 33 1 5 1 1 34 1 1 1 1 35 1 1 1 36 0 1 1 37 1 1 38 1 1 0 1 1 1 1 1 39 1 1 1 1 1 40 1 1 1 1 1 1 41 1 1 1 1 1 1 1 0 0 5 0 0 42 z 5 1 1 1 1 1 43 1 1 1 1 1 1 1 1 1 1 44 60z5V7 1 1 3 1 45 T 5K5 z 07 WK 1 46 VzT 7 0WK K05 0 1 1 1 1 PEG PEREGO Sp...

Страница 34: ...H g O g m t d H g x H g s g d 1 e L H g x H g u g D 2 4 2 H g w R l g w R H g l w f h H l h l d 5 2 U a R h œ H g l w f h H l h l d l v H g P V W U g n î O h G H g H z H g h k f m t d t j P h J H g y h x 6 2 O G î P N H g u h V q j K f K ƒ V c H g Œ h S H g g t d H l h K H e V r V f h l K H g l V t m 7 2 r L f j e f j h U K V R V f œ H g f V H Y d H g l V t R f V Y d f G h k F 8 2 O G H g u h V q ...

Страница 35: ... U j L H U j l h L q h l K r f G z h J l a V M l O j w m f l h G l h K H g u h F t Œ h g j i H B j P h H V f d C E 8 4 9 0 0 2 ƒ I H g u h F Y V l h f Œ m g g H z p H g l V V t d H g V R g ƒ g t b l k h H g s V t d H g V R H g u h l m A p S o g e r e P g e P d a V m P h w g m U g n a h M 1 0 0 9 O S I j Œ L H g a h M î g n H g u l b x H g l s j g K q l h K H g a h t m H g e Œ m t d H x U l G H g a...

Страница 36: ...40 call us toll free 1 800 728 2108 llame USA gratis 1 800 225 1558 PEG PEREGO CANADA Inc 585 GRANITE COURT PICKERING ONT CANADA L1W3K1 phone 905 8393371 fax 905 8399542 call us toll free 1 800 661 5050 Tutti i diritti di proprietà intellettuale relativi ai contenuti di questo manuale d istruzione appartengono a PEG PEREGO S p A e sono tutelati dalle leggi vigenti All of the intellectual property ...

Отзывы: