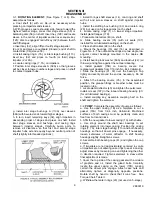
Peerless Pump TUT 4-Stage Скачать руководство пользователя страница 7


BEARING MOUNTING 


FIGURE 2, BEARING REMOVAL AND MOUNTING 

BEARING REMOVAL 

-

COURTESY OF NEW DEPARTURE-  


USING AN ARBOR PRESS


1. 

PLACE THE BEARING ON 
TWO FLAT BLOCKS SO 
THAT THEY CONTACT THE 
INNER RING OR BOTH 
RINGS OF THE BEARING. 

2. 

HOLD SHAFT STRAIGHT – 
FORCE THE SHAFT BY A 
STEADY PRESSURE, UNTIL 
THE BEARING IS SEATED  
AGAINST THE SHAFT 
SHOULDER.


    USING TUBING 


1. 

PLACE THE BEARING ON  
SHAFT. 

2. 

PLACE TUBING OVER SHAFT 
IN CONTACT WITH THE  
INNER RING OF THE  
BEARING. 

3. APPLY 

HAMMER 

ALTERNATELY 

AT OPPOSITE POINTS –  
AVOID COCKING.

USING A BEARING PULLER 


1. 

PLACE BEARING PULLER 
BEHIND BEARING INNER  
RING. SET PULLER JAWS 
SO THAT THEY WILL NOT 
SLIP OVER THE INNER RING 
AND DAMAGE SPARATOR 
OR SHIELD WHEN PRESSURE 
IS APPLIED. 

2. 

FORCE BEARING OFF SHAFT 
BY A STRAIGHT PULL.  
DO NOT COCK BEARINGS.


  USING AN ARBOR PRESS


1. 

REST THE BEARING INNER 
RING OR BOTH RINGS 
(NEVER THE OUTER RING 
ONLY) AGAINST A PAIR OF  
FLAT BLOCKS. 

2. 

FORCE THE SHAFT OUT BY  
A STEADY PRESSURE – KEEP 
SHAFT STRAIGHT – DO NOT 
ALLOW SHAFT TO COCK OR 
DROP. 


 7 


2883819 

Содержание TUT 4-Stage

Страница 1: ...replace or adjust Equipment or parts without Seller s prior written approval Seller is relieved of any further obligation to Purchaser under this section with respect to such Equipment or parts unless such repair replacement or adjustment was made after Seller failed to satisfy within a reasonable time Seller s obligations under this Paragraph of the manufacturer and may also result in bodily inju...

Страница 2: ...und housings 31 33 to remove Do not cock or force housings off as to do so may damage the 2883819 without the consent of Peerless Pump Company or its authorized representatives Disregard of this warning can result in pump failure and serious personal injury or death SECTION 1 DISASSEMBLY bearings 16 18 or the oil seal 107 e Loosen and remove bearing locknut 22 and lock washer 69A f Remove bearings...

Страница 3: ...Casing Ring 58 Inter stage Sleeve 7A Left Hand Casing Ring 58A Inter stage Sleeve A 13 Packing 63 Stuffing Box Bushing 14 Shaft Sleeve 68 Shaft Collar 16 Outboard Bearing 69A Bearing Lock washer 17 Packing Gland 73A Casing Gasket Not Shown 17B Gland Bolt 73B Bearing Cover Gasket 18 Outboard Bearing 113 Inter stage Bushing 22 Bearing Locknut 113A Inter stage Bushing A 29 Lantern Ring 127 Seal Pipin...

Страница 4: ... Shaft Collar 14 Shaft Sleeve 69A Bearing Lock washer 16 Outboard Bearing 73A Casing Gasket Not Shown 17 Packing Gland 73B Bearing Cover Gasket 17B Gland Bolt 107A Oil Retaining Shield 18 Outboard Bearing 113 Inter stage Bushing 22 Bearing Locknut 113A Inter stage Bushing A 29 Lantern Ring 125 Constant Level Oiler Not Shown 31 Inboard Bearing Housing 127 Seal Piping 32 Impeller Key 128 Inter stage...

Страница 5: ...ing Ring 53 Base 7A Left Hand Casing Ring 56 Balancing Disc 13 Packing 58 Inter stage Sleeve 14 Shaft Sleeve 63 Stuffing Box Bushing 16 Outboard Bearing 68 Shaft Collar 17 Packing Gland 69A Bearing Lock washer 17B Gland Bolt 73A Casing Gasket Not Shown 17D Gland Flange 73B Bearing Cover Gasket 18 Outboard Bearing 76 Balance Disc Key 22 Bearing Locknut 113 Inter stage Bushing 29 Lantern Ring 115 Ba...

Страница 6: ...8 Inter stage Sleeve 14 Shaft Sleeve 63 Stuffing Box Bushing 16 Outboard Bearing 68 Shaft Collar 17 Packing Gland 69A Bearing Lock washer 17B Gland Bolt 73A Casing Gasket Not Shown 17D Gland Flange 73B Bearing Cover Gasket 18 Outboard Bearing 76 Balance Disc Key 22 Bearing Locknut 113 Inter stage Bushing 29 Lantern Ring 115 Balance Disc Ring 31 Inboard Bearing Housing 125 Constant Level Oiler Not ...

Страница 7: ...R SHAFT IN CONTACT WITH THE INNER RING OF THE BEARING 3 APPLY HAMMER ALTERNATELY AT OPPOSITE POINTS AVOID COCKING USING A BEARING PULLER 1 PLACE BEARING PULLER BEHIND BEARING INNER RING SET PULLER JAWS SO THAT THEY WILL NOT SLIP OVER THE INNER RING AND DAMAGE SPARATOR OR SHIELD WHEN PRESSURE IS APPLIED 2 FORCE BEARING OFF SHAFT BY A STRAIGHT PULL DO NOT COCK BEARINGS USING AN ARBOR PRESS 1 REST TH...

Страница 8: ...le I FIGURE 5 2883819 d Place bearing on a screened surface e Using a spray gun with air filter and clean Stoddard solvent flush each bearing until all grease and sludge is removed f Blow solvent out of bearings with dry filtered air g Lubricate bearings immediately after cleaning with light spindle oil and place them in a covered container h Do not spin bearings any time during cleaning 2 2 REPAI...

Страница 9: ...No 4 The outboard bearings are two single row angular contact bearings mounted in the duplex DB mounting p Install bearing lock washer 69A and locknut 22 oil thrower and tighten against the outboard bearing q Install gaskets 73B on bearing covers Cut replacement gaskets from 1 16 inch No 444 Vellumoid r Slide the housings 31 33 over the bearings Tap lightly and evenly around the end as necessary D...

Страница 10: ...tions and location environment Table II should be used as a guide for grease re lubrication Oil bottles should have a visible supply at all times b Oil Pumps are shipped without oil in the bearing housings Be sure to fill and adjust constant level oilers before initial start of pump See Figure 9 1 Adjust dust cap to lowest possible position on base fittings 2 The pipe nipple and base fitting must ...

Страница 11: ...mpeller Foot valve too small or restricted by dirt Re prime Check for low motor voltage or motor over load Other drives increase driver speed when possible Check to see that all discharge valves are opened and the discharge line is free from obstructions In some cases the installation has to be altered or a pump of suitable rating must be provided Check NPSH requirements of pump and increase syste...

Страница 12: ...e foundation Replace bearings Check lubricants for proper Grade Check pump alignment Check for Condensation on water cooled bearings Always obtain new trim diameter from Peerless Pump Company representative 3 6 SPARE PARTS To keep delays to a minimum when pump repairs are required we suggest that the following spare parts be stocked The number of each part required depends upon the application For...

Отзывы: