


9
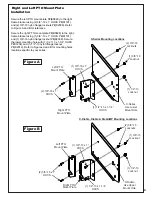
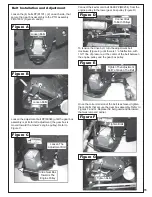
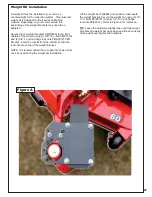
Right and Left PTO Mount Plate
Installation
Secure the left PTO mount plate P#(B0829) to the right
frame bracket using (2) 3/8”-16 x 1” HHCS P#(K1191)
and (2) 3/8”-16 nylon flange locknuts P#(K2038). Refer
to Figure A and B for reference.
Secure the right PTO mount plate P#(B0828) to the right
frame bracket using (1) 3/8”-16 x 1” HHCS P#(K1191)
and (1) 3/8”-16 nylon flange locknut P#(K2038). Secure
the lower mounting hole with (1) 1/2”-13 x 1-1/4” HHCS
P#K1232) and (1) 1/2”-13 nylon flange locknut
P#(K2012). Refer to Figures A and B for mounting holes
locations specific to your series.
X-Series Mounting Locations
X-Diablo, Diablo & DiabloMP Mounting Locations
Left PTO
Mount Plate
Right PTO
Mount Plate
(2) 3/8”-16 x 1”
HHCS
(1) 3/8”-16 x 1”
HHCS
(1) 1/2”-13 x 1-1/4”
HHCS
Left PTO
Mount Plate
Right PTO
Mount Plate
(2) 3/8”-16 x 1”
HHCS
(2) 3/8”-16
Locknuts
(1) 3/8”-16
Locknut
(1) 1/2”-13
Locknut
(1) 1/2”-13
Locknut
(1) 3/8”-16
Locknut
(2) 3/8”-16
Locknuts
(1) 1/2”-13 x 1-1/4”
HHCS
(1) 3/8”-16 x 1”
HHCS
X-Series
Use Lower
Mount Hole
X-Diablo
Use Upper
Mount Hole
Figure A
Figure B
Содержание Pro 12 DFS 52621201
Страница 16: ...16 ALUMINUM GRASS CONTAINER EXPLODED VIEW A0614 K1442 V1 131 6...
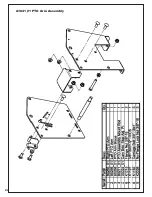
Страница 22: ...22 A1841_01 PTO Arm Assembly...
Страница 23: ...23 A1941_01 PTO Base Assembly Exploded Parts View...
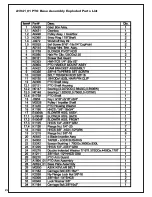
Страница 24: ...24 A1941_01 PTO Base Assembly Exploded Parts List...
Страница 25: ...25 A0623 PTO Assembly w Small Pulley Guard Exploded Parts View...
Страница 26: ...26...
Страница 30: ...30...
Страница 31: ...31 NOTES...


