


2
PECO GRASS COLLECTION SYSTEM
TABLE OF CONTENTS
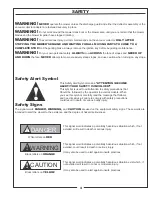
Safety
1.
Read the operator’s manual carefully and familiarize yourself with the proper use of your attachment. Do not allow
anyone who is not acquainted with the Safety Instructions to use your attachment.
2.
Know the controls and how to stop quickly. READ THE OPERATOR’S MANUAL!
3.
Do not allow children to operate the vehicle. Do not allow adults to operate it without proper instruction.
4.
Be especially watchful of children and pets darting into the area while operating.
5.
Keep your eyes and mind on your unit while mowing or operating your attachment. Don’t let others distract you.
6.
Do not attempt to operate your unit or mower when not in the driver’s seat.
7.
Always stop unit when emptying the container.
8.
Stop unit, shut off deck attachment, set parking brake, shut off mower engine and remove spark plug wire before
removing clogs, removing or replacing hose, boot, blower cone, or performing any maintenance.
9.
Mow across the face of slopes (not steeper than 10 degrees); never up and down the face of the slope.
10.
It is recommended that the container be kept only half full when negotiating any slopes. Start mowing on slopes
when the container is empty.
11.
Inspect your lawn and remove any foreign objects before mowing. Never deliberately run the mower across any
foreign object.
12.
Wear ear protection if the noise level is offensive.
13.
Wear eye protection to prevent debris from damaging your eyes.
SECTION PAGE
Safety - - - - - - - - - - - - - - - - - - - - - - - - - - - - - - 2
Safety Alert Symbols - - - - - - - - - - - - - - - - - - - - - - 3
Warranty - - - - - - - - - - - - - - - - - - - - - - - - - - - - - 4
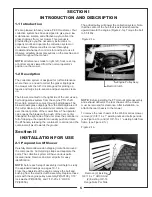
I INTRODUCTION AND DESCRIPTION - - - - - - - - - - - - - - 5
1-1 Introduction - - - - - - - - - - - - - - - - - - - - - - - - - 5
1-2 Description - - - - - - - - - - - - - - - - - - - - - - - - - 5
II INSTALLATION FOR USE - - - - - - - - - - - - - - - - - - - - - - 5
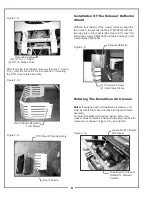
2-1 Preparation Of Mower - - - - - - - - - - - - - - - - - 5-6
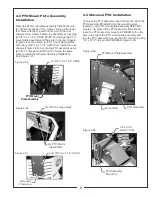
2-2 PTO Assembly Installation - - - - - - - - - - - - - - - 7
2-3 Universal PTO Installation- - - - - - - - - - - - - - - 7
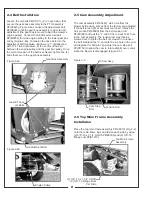
2-4 Belt Installation - - - - - - - - - - - - - - - - - - - - - - - 8
2-5 Cam Assembly Adjustment - - - - - - - - - - - - - - - 8
2-6 Top Main Frame Assembly Installation - - - - - - - - 8
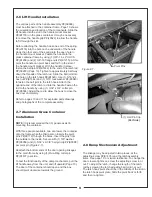
2-7 Lift Handle Installation - - - - - - - - - - - - - - - - - - 9
2-8 Aluminum Grass Container Installation - - - - - - - 9
2-9 Dump Mechanism Adjustment - - - - - - - - - - - - - -9
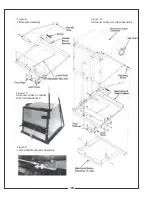
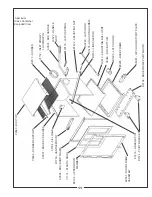
Exploded Part Views And Assemblies - - - - - - - - -10-14
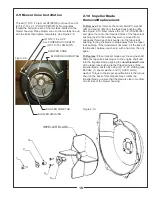
2-10 Blower Cone Installation - - - - - - - - - - - - - - - - 15
2-11 Impeller Blade Removal/Replacement - - - - - - --15
SECTION PAGE
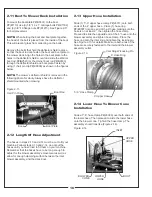
2-12 Length of Hose Adjustment - - - - - - - - - - - - - - 16
2-13 Upper Hose Installation - - - - - - - - - - - - - - - - 16
2-14 Lower Hose to Blower Cone Installation - - - - - - 16
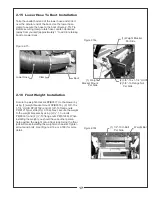
2-15 Lower Hose to Boot Installation - - - - - - - - - - - 17
2-16 Front Weight Installation - - - - - - - - - - - - - - - - 17
III OPERATING INSTRUCTIONS - - - - - - - - - - - - - - - - - - 18
3-1 General Safety - - - - - - - - - - - - - - - - - - - - - - - 18
3-2 Operation & Tips On Mowing - - - - - - - - - - - - - - 18
3-3 Disengagement Of The Blower - - - - - - - - - - - 18
3-4 Unloading The Collection System - - - - - - - - - - - 18
IV MAINTENANCE- - - - - - - - - - - - - - - - - - - - - - - - - - - - 18
4-1 Maintenance Checklist - - - - - - - - - - - - - - - - - - 18
4-2 Lubrication- - - - - - - - - - - - - - - - - - - - - - - - - - 19
V PARTS AND SERVICE - - - - - - - - - - - - - - - - - - - - - - - 19
5-1 Parts And Service Information - - - - - - - - - - - - - 19
Safety Decals - - - - - - - - - - - - - - - - - - - - - - - - - - 20
Torque Specifications - - - - - - - - - - - - - - - - - - - - - 21
Содержание 50721201
Страница 14: ...PTO Parts List 14...
Страница 21: ...21...


